Use Netperf and sockperf to test packet forwarding rate (PPS), network bandwidth, and network latency of ECS instances.
To prevent data loss, test network performance on new ECS instances that do not contain data.
Instance type metrics are verified in a test environment. Actual performance may vary based on factors such as instance load and networking model.
Prerequisites
Preparations
Create ECS instances for testing. See Custom launch ECS instances.
ImportantUse instances of the same instance type to ensure accurate and comparable test results.
Ensure all test instances are in the same Virtual Private Cloud (VPC), connected to the same vSwitch, and in the same security group.
Example environments
The following tables list the recommended instance types and quantities for test machines and auxiliary test machines. Select machines as servers or clients based on your test scenario.
Test the packet forwarding rate (Linux instances only)
NoteNo tools are available to test the packet forwarding rate of Windows instances.
Packet forwarding rate lower than 6,000,000 pps
Test item
Test machine
Auxiliary test machine
Instance type
ecs.g7.large
ecs.g7.large
Image
Alibaba Cloud Linux 3
Alibaba Cloud Linux 3
Number of instances
1
1
Network
Public IP addresses are assigned.
Packet forwarding rate higher than 6,000,000 pps and lower than 20,000,000 pps
Test item
Test machine
Auxiliary test machine
Instance type
ecs.g7.16xlarge
ecs.g7.16xlarge
Image
Alibaba Cloud Linux 3
Alibaba Cloud Linux 3
Number of instances
1
3
Network
Public IP addresses are assigned.
Packet forwarding rate higher than 20,000,000 pps
Test item
Test machine
Auxiliary test machine
Instance type
ecs.g7.32xlarge
ecs.g7.32xlarge
Image
Alibaba Cloud Linux 3
Alibaba Cloud Linux 3
Number of instances
1
3
Network
Public IP addresses are assigned.
Test network bandwidth and latency
Linux instance
Test item
Test machine
Auxiliary test machine
Instance type
ecs.g7.large
ecs.g7.large
Image
Alibaba Cloud Linux 3
Alibaba Cloud Linux 3
Number of instances
1
1
Network
Public IP addresses are assigned.
Windows instance
Test item
Test machine
Auxiliary test machine
Instance type
ecs.g7.large
ecs.g7.large
Image
Windows Server 2022
Windows Server 2022
Number of instances
1
1
Network
Public IP addresses are assigned.
Procedure
Test packet forwarding rate (Linux only)
No tools are available to test the packet forwarding rate of Windows instances.
Packet forwarding rate lower than 6,000,000 pps
Connect to the test machine and auxiliary test machines. See Log on to a Linux instance using Workbench.
On both machines, download the Netperf installation package:
wget https://benchmark-packages.oss-cn-qingdao.aliyuncs.com/netperf-2.7.0.tar.gzOn both machines, install Netperf and sar.
Decompress the Netperf installation package:
sudo yum install -y gcc autoconf automake libtool sysstat
tar -zxvf netperf-2.7.0.tar.gz
Query the version number of GNU Compiler Collection (
GCC).gcc -v 2>&1If
GCCis later than V10 on either machine, perform the following operations to ensure thatGCCcompiles correctly. Otherwise, skip this step.Open the
nettest_omni.cfile.cd netperf vim src/nettest_omni.cPress i to enter Insert mode and delete the following declared variables from
nettest_omni.c:/* different options for the sockets */ int loc_nodelay, /* don't/do use NODELAY locally */ rem_nodelay, /* don't/do use NODELAY remotely */ loc_sndavoid, /* avoid send copies locally */ loc_rcvavoid, /* avoid recv copies locally */ rem_sndavoid, /* avoid send copies remotely */ rem_rcvavoid; /* avoid recv_copies remotely */Press Esc, enter
:wq, and press Enter to save and close the file.
Install Netperf and sar.
cd netperf
sudo ./configure
sudo make && sudo make install
On the test machine, start 64 netserver services:
#!/bin/bash
for j in `seq 64`; do
    netserver -p $[16000+j] > server_$[16000+j].netperf > /dev/null 2>&1  &
done
Query the private IP address of the test machine:
ifconfig || ip addr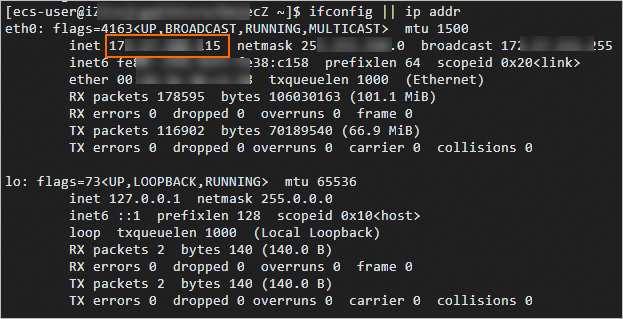
On the auxiliary test machine, send traffic to the test machine:
#!/bin/bash
server_ip=<Private IP address of the test machine>
for j in `seq 64`; do
    port=$[16000+j]
    netperf -H ${server_ip} -l ${run_time:-300} -t UDP_STREAM  -p $port  -- -m 1 -D > /dev/null 2>&1 &
done
Replace
<Private IP address of the test machine>with the actual private IP address obtained in the previous step.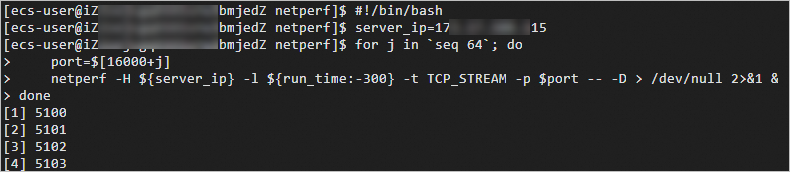
On the test machine, test the packet forwarding rate:
sar -n DEV 1Check the
rxpck/scolumn. Therxpck/svalue shows packets received per second. In this example, the value is approximately 940,000.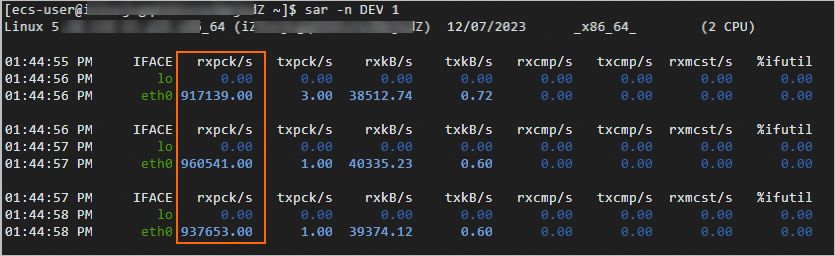
Packet forwarding rate higher than 6,000,000 pps and lower than 20,000,000 pps
Connect to the test machine and auxiliary test machines. See Log on to a Linux instance using Workbench.
On all four machines (three auxiliary + one test), install sockperf:
sudo yum install -y autoconf automake libtool gcc-c++
cd /opt
sudo wget https://github.com/Mellanox/sockperf/archive/refs/tags/3.8.tar.gz
sudo tar -zxf 3.8.tar.gz
cd sockperf-3.8/
sudo ./autogen.sh
sudo ./configure
sudo make -j `cat /proc/cpuinfo| grep process | wc -l`
sudo make install
Query the private IP address of the test machine:
ifconfig || ip addrOn each auxiliary test machine, send traffic to the test machine:
server_ip="<Private IP address of the test machine>"
threads=64
msg_size=14
run_time=60

basePort=6666
for((i=0;i<$threads;++i));do
    nohup sockperf tp -i $server_ip --pps max -m ${msg_size} -t ${run_time} --port $[${basePort}+${i}] 2>&1 &
done
Replace
<Private IP address of the test machine>with the actual value.run_timespecifies the traffic duration.On all four machines, test the packet forwarding rate:
sar -n DEV 1Check the
rxpck/scolumn on the test machine. Therxpck/svalue shows packets received per second. In this example, the value is approximately 12,000,000 pps.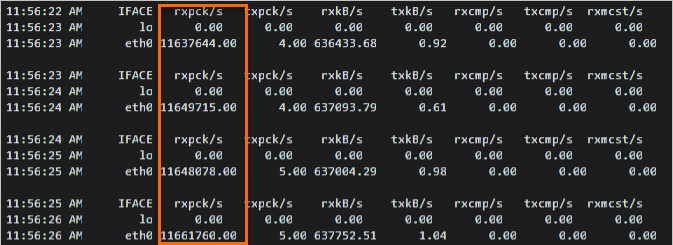
Packet forwarding rate higher than 20,000,000 pps
Connect to the test machine and auxiliary test machines. See Log on to a Linux instance using Workbench.
On all four machines (three auxiliary + one test), install sockperf:
sudo yum install -y autoconf automake libtool gcc-c++
cd /opt
sudo wget https://github.com/Mellanox/sockperf/archive/refs/tags/3.8.tar.gz
sudo tar -zxf 3.8.tar.gz
cd sockperf-3.8/
sudo ./autogen.sh
sudo ./configure
sudo make -j `cat /proc/cpuinfo| grep process | wc -l`
sudo make install
On the test machine, bind interrupt requests (IRQs) to CPU cores.
Binding IRQs to specific CPU cores reduces context switching and improves packet processing efficiency at high PPS.
a=$(cat /proc/interrupts | grep virtio2-input | awk -F ':' '{print $1}')
cpu=0
for irq in $a; do
    echo $cpu >/proc/irq/$irq/smp_affinity_list
    let cpu+=2
done
Query the private IP address of the test machine:
ifconfig || ip addrOn each auxiliary test machine, send traffic to the test machine:
server_ip="<Private IP address of the test machine>"
threads=64
msg_size=14
run_time=60

basePort=6666
for((i=0;i<$threads;++i));do
    nohup sockperf tp -i $server_ip --pps max -m ${msg_size} -t ${run_time} --port $[${basePort}+${i}] 2>&1 &
done
Replace
<Private IP address of the test machine>with the actual value.run_timespecifies the traffic duration.On all four machines, test the packet forwarding rate:
sar -n DEV 1Check the
rxpck/scolumn on the test machine. Therxpck/svalue shows packets received per second. In this example, the value is approximately 20,000,000 pps.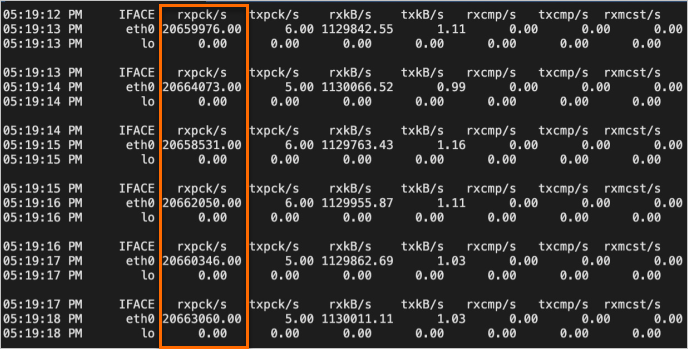
Test network bandwidth
Linux instance
Connect to the test machine and the auxiliary test machine. See Log on to a Linux instance using Workbench.
On both machines, download the Netperf installation package:
wget https://benchmark-packages.oss-cn-qingdao.aliyuncs.com/netperf-2.7.0.tar.gzOn both machines, install Netperf and sar.
Decompress the Netperf installation package.
sudo yum install -y gcc autoconf automake libtool sysstat
tar -zxvf netperf-2.7.0.tar.gz
Query the version number of
GCC.gcc -v 2>&1If
GCCis later than V10 on either machine, perform the following operations to ensure thatGCCcompiles correctly. Otherwise, skip this step.Open the
nettest_omni.cfile.cd netperf vim src/nettest_omni.cPress i to enter Insert mode and delete the following declared variables from
nettest_omni.c:/* different options for the sockets */ int loc_nodelay, /* don't/do use NODELAY locally */ rem_nodelay, /* don't/do use NODELAY remotely */ loc_sndavoid, /* avoid send copies locally */ loc_rcvavoid, /* avoid recv copies locally */ rem_sndavoid, /* avoid send copies remotely */ rem_rcvavoid; /* avoid recv_copies remotely */Press Esc, enter
:wq, and press Enter to save and close the file.
Install Netperf and sar.
cd netperf
sudo ./configure
sudo make && sudo make install
On the test machine, start 64 netserver services:
#!/bin/bash
for j in `seq 64`; do
    netserver -p $[16000+j] > server_$[16000+j].netperf 2>&1 &
done
Query the private IP address of the test machine:
ifconfig || ip addr[ecs-user@izxxx ecZ ~]$ ifconfig || ip addr eth0: flags=4163<UP,BROADCAST,RUNNING,MULTICAST> mtu 1500 inet 17.xxx.xxx.15 netmask 25xxx.0 broadcast 17.xxx.55 inet6 fexxx38:c158 prefixlen 64 scopeid 0x20<link> ether 00:xxx:xxx txqueuelen 1000 (Ethernet) RX packets 178595 bytes 106030163 (101.1 MiB) RX errors 0 dropped 0 overruns 0 frame 0 TX packets 116902 bytes 70189540 (66.9 MiB) TX errors 0 dropped 0 overruns 0 carrier 0 collisions 0 lo: flags=73<UP,LOOPBACK,RUNNING> mtu 65536 inet 127.0.0.1 netmask 255.0.0.0 inet6 ::1 prefixlen 128 scopeid 0x10<host> loop txqueuelen 1000 (Local Loopback) RX packets 2 bytes 140 (140.0 B) RX errors 0 dropped 0 overruns 0 frame 0 TX packets 2 bytes 140 (140.0 B) TX errors 0 dropped 0 overruns 0 carrier 0 collisions 0On the auxiliary test machine, send traffic to the test machine:
#!/bin/bash server_ip=<Private IP address of the test machine> for j in `seq 64`; do port=$[16000+j] netperf -H ${server_ip} -l ${run_time:-300} -t TCP_STREAM -p $port -- -D > /dev/null 2>&1 & doneReplace
<Private IP address of the test machine>with the actual private IP address obtained in the previous step.#!/bin/bash server_ip=<Private IP address of the test machine> for j in `seq 64`; do port=$[16000+j] netperf -H ${server_ip} -l ${run_time:-300} -t TCP_STREAM -p $port -- -D > /dev/null 2>&1 & done [1] 5100 [2] 5101 [3] 5102 [4] 5103On the test machine, test the network bandwidth:
sar -n DEV 1Check the
rxkB/scolumn. TherxkB/svalue shows received packet size in KB/s. Multiply by 8 to convert to Kbit/s for the network bandwidth value.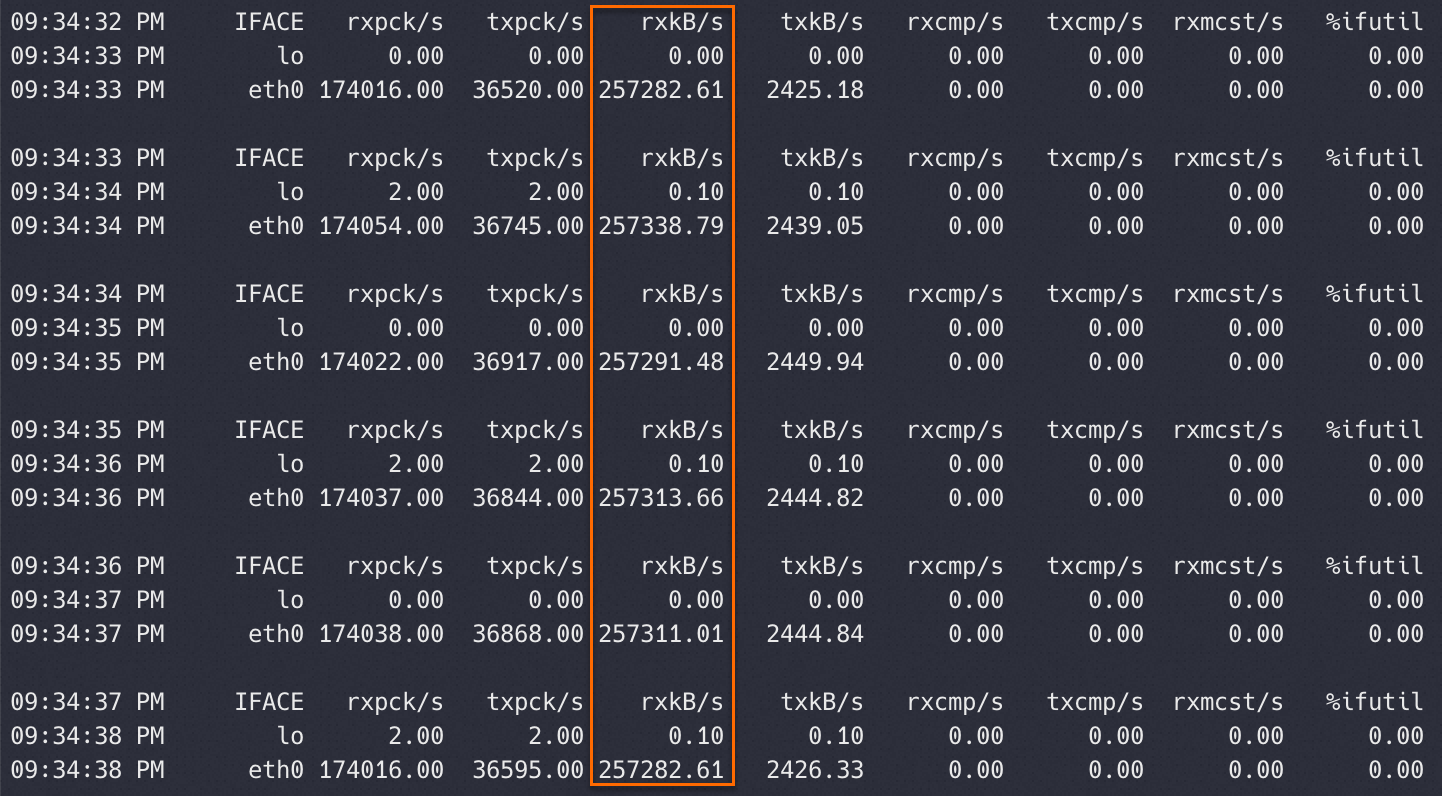
Windows instance
Connect to the test machine and the auxiliary test machine. See Connect to a Windows instance by using a password or a key.
Install test tools and disable the firewall on both machines.
Download the ntttcp.exe tool and obtain the path in which the tool is stored.
Open the Run dialog box. Enter powershell and click OK to start PowerShell.
Disable the firewall on both machines to prevent blocked connections:
Set-NetFirewallProfile -Profile * -Enabled:falseAlternatively, create an inbound firewall rule that allows NTTTCP (ntttcp.exe) on both machines:
$ntttcpPath = "<Path of ntttcp.exe>" New-NetFirewallRule -DisplayName ntttcp -Protocol Any -Direction Inbound -Action Allow -Enabled True -Profile Any -Program $ntttcpPathNoteReplace
<Path of ntttcp.exe>with the actual value.
On the test machine, configure receive side scaling (RSS) for the network adapter.
RSS distributes received packets across multiple CPU cores to improve network performance. Set RSS queues based on CPU count:
If the machine has up to 16 CPU cores, set the number of RSS receive queues to the CPU core count.
If the machine has more than 16 CPU cores, disable RSS. Most network adapters support up to 16 RSS queues, so exceeding this limit may cause uneven resource allocation.
$cpuNum = (Get-CimInstance -ClassName Win32_Processor).NumberOfLogicalProcessors if ($cpuNum -le 16) { Set-NetAdapterRss -Name <Name of the network adapter on the test machine> -NumberOfReceiveQueues $cpuNum } else { Disable-NetAdapterRss -Name <Name of the network adapter on the test machine> }NoteReplace
<Name of the network adapter on the test machine>with the actual value. RunGet-NetAdapter | Select-Object Nameto get adapter names.Modifying RSS configuration restarts the network adapter service, which may interrupt connections. Wait for reconnection before proceeding.
On the test machine, prepare to receive data:
$serverIp = (Get-NetIPConfiguration -InterfaceAlias <Name of the network adapter on the test machine>).IPv4Address.IPAddress $cpuNum = (Get-CimInstance -ClassName Win32_Processor).NumberOfLogicalProcessors $threadNum = $cpuNum & <Path of ntttcp.exe on the test machine> -r -m $threadNum,0,$serverIp -t 300NoteReplace
<Name of the network adapter on the test machine>and<Path of ntttcp.exe on the test machine>with actual values.On the auxiliary test machine, send data:
$serverIp = "<Private IP address of the test machine>" $threadNum = "<Thread number of the test machine>" <Path of ntttcp.exe on the auxiliary test machine> -s -m $threadNum,*,$serverIp -t 100NoteReplace
<Private IP address of the test machine>,<Thread number of the test machine>, and<Path of ntttcp.exe on the auxiliary test machine>with actual values. Runipconfigto get the private IP address and$cpuNumto get the thread number.View the network bandwidth on the test machine.
The
Throughput(MB/s)value indicates the network bandwidth.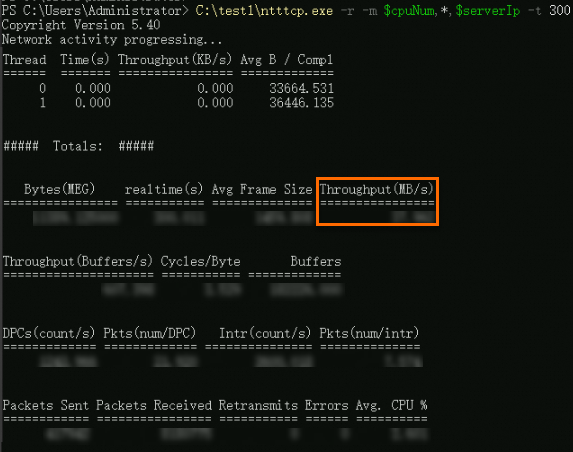
Test network latency
Linux instance
Connect to the test machine and the auxiliary test machine. See Log on to a Linux instance using Workbench.
On both machines, install
sockperf:sudo yum install -y autoconf automake libtool gcc-c++ cd /opt sudo wget https://github.com/Mellanox/sockperf/archive/refs/tags/3.8.tar.gz sudo tar -zxf 3.8.tar.gz cd sockperf-3.8/ sudo ./autogen.sh sudo ./configure sudo make -j `cat /proc/cpuinfo| grep process | wc -l` sudo make installQuery the private IP address of the test machine:
ifconfig || ip addrIn the command output, the inet address of the eth0 interface is the private IP address of the instance.
[ecs-user@izxxx ecZ ~]$ ifconfig || ip addr
eth0: flags=4163<UP,BROADCAST,RUNNING,MULTICAST>  mtu 1500
        inet 17.xxx.xxx.15  netmask 25xxx.0  broadcast 17.xxx.55
        inet6 fexxx38:c158  prefixlen 64  scopeid 0x20<link>
        ether 00:xxx:xxx  txqueuelen 1000  (Ethernet)
        RX packets 178595  bytes 106030163 (101.1 MiB)
        RX errors 0  dropped 0  overruns 0  frame 0
        TX packets 116902  bytes 70189540 (66.9 MiB)
        TX errors 0  dropped 0  overruns 0  carrier 0  collisions 0

lo: flags=73<UP,LOOPBACK,RUNNING>  mtu 65536
        inet 127.0.0.1  netmask 255.0.0.0
        inet6 ::1  prefixlen 128  scopeid 0x10<host>
        loop  txqueuelen 1000  (Local Loopback)
        RX packets 2  bytes 140 (140.0 B)
        RX errors 0  dropped 0  overruns 0  frame 0
        TX packets 2  bytes 140 (140.0 B)
        TX errors 0  dropped 0  overruns 0  carrier 0  collisions 0
On the test machine, start sockperf:
sockperf sr --tcp --daemonizeOn the auxiliary test machine, send traffic to the test machine:
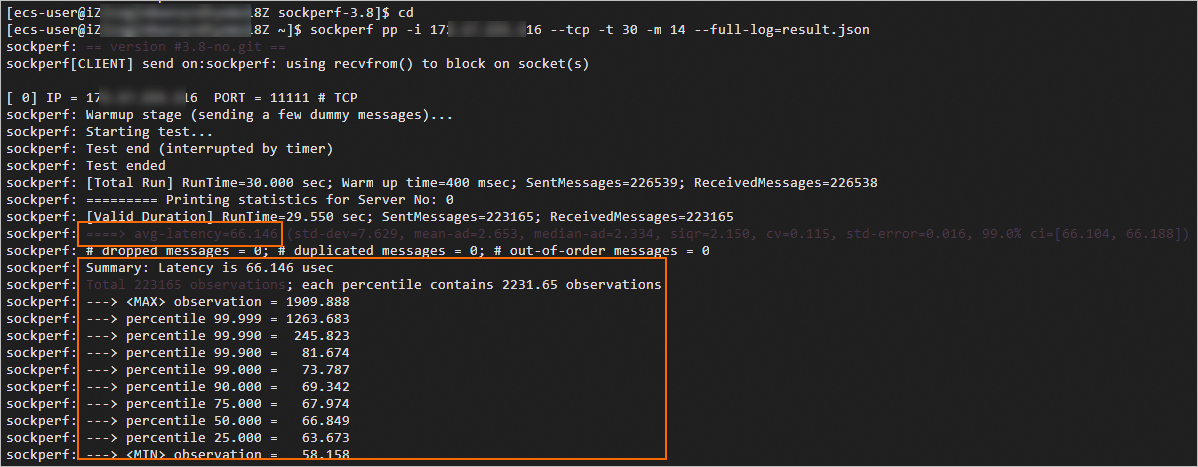
sockperf pp -i <Private IP address of the test machine> --tcp -t 30 -m 14 --full-log=result.jsonReplace
<Private IP address of the test machine>with the actual value from the previous step.View the network latency results.
In the returned data:
avg-latency: average latency in microseconds.percentile 99.000: 99th-percentile latency in microseconds.
Windows instance
Connect to the test machine and the auxiliary test machine. See Connect to a Windows instance by using a password or a key.
Install test tools and disable the firewall on both machines.
Download the latte.exe tool and obtain the path in which the tool is stored.
Open the Run dialog box. Enter powershell and click OK to start PowerShell.
Disable the firewall on both machines to prevent blocked connections:
Set-NetFirewallProfile -Profile * -Enabled:falseAlternatively, create an inbound firewall rule that allows Latte (latte.exe) on both machines:
$lattePath = "<Path of latte.exe>" New-NetFirewallRule -DisplayName Latte -Protocol Any -Direction Inbound -Action Allow -Enabled True -Profile Any -Program $lattePathNoteReplace
<Path of latte.exe>with the actual value.
On the test machine, prepare to receive data:
$serverIp = (Get-NetIPConfiguration | Where-Object {$_.InterfaceAlias -eq '<Name of the network adapter on the test machine>'} | Select-Object -ExpandProperty IPv4Address).IPAddress $port = <Communication port> & "<Path of latte.exe on the test machine>" -a "$serverIp`:$port" -i 65535NoteReplace
<Name of the network adapter on the test machine>and<Path of latte.exe on the test machine>with actual values. RunGet-NetAdapter | Select-Object Nameto get adapter names.Specify a port number for
<Communication port>. Use the same port on both machines.
On the auxiliary test machine, send data:
$serverIp = "<Private IP address of the test machine>" $port = <Communication port> & "<Path of latte.exe on the auxiliary test machine>" -c -a "${serverIp}:$port" -i 65535NoteReplace
<Private IP address of the test machine>and<Path of latte.exe on the auxiliary test machine>with actual values. Runipconfigto get the private IP address.Specify a port number for
<Communication port>. Use the same port on both machines.
View the network latency results.
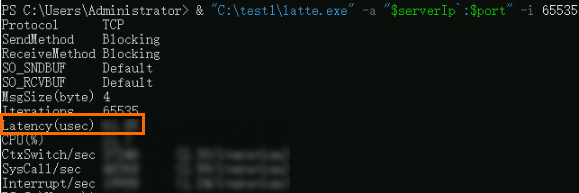
The
Latency(usec)value indicates the average network latency in microseconds.