To create an application-consistent snapshot, the system suspends write requests to ensure the integrity and consistency of data captured in the snapshot. Using an application-consistent snapshot to restore data helps mitigate the risk of data corruption and loss. This ensures that applications, such as MySQL, can start as expected, and data remains in the same state as when the snapshot was created. This topic describes how to create application-consistent snapshots for a CentOS 7.9 Elastic Compute Service (ECS) instance with MySQL 8.0, and check whether the snapshots can be used to restore data as expected.
Prerequisites
The disks that are attached to the ECS instance are Enterprise SSDs (ESSDs) for which multi-attach is disabled.
The ECS instance is in the Running state. Cloud Assistant is in the Normal state on the instance. For information about how to view the status of Cloud Assistant, see Check Cloud Assistant status and handle anomalies.
MySQL is installed on the ECS instance. The username and password of MySQL are obtained. For more information, see Install MySQL on a Linux instance.
A Resource Access Management (RAM) role is attached to the ECS instance and a custom policy that contains the permissions on application-consistent snapshots is attached to the RAM role. For more information, see Create a RAM role and attach it to an ECS instance.
NoteWhen you create application-consistent snapshots, you must invoke Cloud Assistant to access the ECS instance and run commands. Before you invoke Cloud Assistant, grant Cloud Assistant the required permissions by using the RAM role.
Configure a custom RAM role, such as AppSnapshotRoleName.
Attach a custom policy to the RAM role. The following sample code shows a custom policy, which indicates that the RAM role has the permissions to query snapshots, create snapshots, add tags, and query disk information.
{
    "Version": "1",
    "Statement": [
        {
            "Effect": "Allow",
            "Action": [
                "ecs:DescribeSnapshot*",
                "ecs:CreateSnapshot*",
                "ecs:TagResources",
                "ecs:DescribeDisks"
            ],
            "Resource": [
                "*"
            ],
            "Condition": {}
        }
    ]
}
Workflow
The following figure shows the operations that you must perform to create application-consistent snapshots to ensure that the database status is the same as the status when the application-consistent snapshots were created, to ensure application consistency.

Step 1: Create the prescript.sh and postscript.sh script files
Create prescript.sh and postscript.sh script files for application-consistent snapshot creation. The prescript.sh script suspends database write operations before snapshot creation. The postscript.sh script resumes database write operations after snapshot creation.
Step 2: Prepare the database verification environment
Create database tables and stored procedure to simulate data write operations for later verification of application-consistent snapshots. To create application-consistent snapshots for MySQL databases, the system suspends the databases. This section describes how to call the TestPIT stored procedure to insert data into a MySQL database before you create application-consistent snapshots for the database. This way, you can subsequently check whether the MySQL database is suspended and the created snapshots can be used as expected to restore data.
Step 3: Create application-consistent snapshots in the ECS console
Create application-consistent snapshots for a Linux ECS instance on which the MySQL database resides and run the scripts to suspend and resume database write operations. When you create application-consistent snapshots, write operations on the database are temporarily stopped to ensure data consistency.
Step 4: Check whether the application-consistent snapshots are created
Check whether the snapshots are created as expected by viewing Cloud Assistant command execution results and view the points in time at which the database write operations are suspended and resumed.
Step 5: Check whether the application-consistent snapshots can be used to restore data as expected
Use application-consistent snapshots to restore data on the disks attached to the Linux ECS instance. Then, compare the last time when the data was written into the MySQL database with the time when the prescript.sh script was run to determine whether the data is properly backed up in the application-consistent snapshots and is restored from the snapshots as expected.
If the last time when data was written to the MySQL database is earlier than the time when the prescript.sh script was run, no write operations were performed on the MySQL database during the suspension. MySQL data is restored to the state when the application-consistent snapshots were created, which achieves the status consistency.
If the last time when data was written to the MySQL database is later than or equal to the time when the prescript.sh script was run, write operations were still performed on the MySQL database during the suspension. MySQL data is inconsistent with the application-consistent snapshots.
Procedure
Step 1: Create the prescript.sh and postscript.sh script files
The prescript.sh and postscript.sh script files used in this topic are only for reference. When you create application-consistent snapshots for applications, you can compile the prescript.sh and postscript.sh script files based on your business scenarios. For more information, see Create application-consistent snapshot.
Connect to the ECS instance as the root user.
For more information, see Connect to Linux.
Create the /tmp/prescript.sh script file and write data to the script file.
Use the root account to create the /tmp/prescript.sh script file.
vim /tmp/prescript.shPress the
Ikey to enter Insert mode.Write the prescript.sh file based on your applications.
Press the
Esckey, enter:wq, and then press the Enter key to save and close the script file.Grant read, write, and execute permissions on the script file only to the root account.
ImportantFor security purposes, make sure that only the root account is granted read, write, and execute permissions on the script file (chmod 700). Otherwise, the permission settings are invalid and the script cannot run.
chmod 700 /tmp/prescript.sh
Create the /tmp/postscript.sh script file and write data to the script file.
Use the root account to create the /tmp/postscript.sh script file.
vim /tmp/postscript.shPress the
Ikey to enter Insert mode.Write the script file based on your applications.
Press the
Esckey, enter:wq, and then press the Enter key to save and close the script file.Grant read, write, and execute permissions on the script file to only the root account.
ImportantFor security purposes, make sure that only the root account is granted read, write, and execute permissions on the script file (chmod 700). Otherwise, the permission settings are invalid and the script cannot run.
chmod 700 /tmp/postscript.sh
Go to the /tmp directory and check the permissions on the script files.
cd /tmp
ls -l
The following command output indicates that the permissions on the script files are correctly configured.

Step 2: Prepare the database verification environment
Create the /root/test.sql script.
Create and open the /root/test.sql script file.
vim /root/test.sqlPress the
Ikey to enter Insert mode.Compile the script file.
This script includes the SQL statement used to create a database table named PointInTime and the SQL statement used to create a stored procedure named TestPIT. Sample script:
USE AdventureWorks;
CREATE TABLE PointInTime(id int, t datetime);
DELIMITER $$
CREATE PROCEDURE `TestPIT`()
BEGIN
DECLARE i int;
SET i=1;
WHILE i < 180
DO
INSERT INTO PointInTime VALUES(i, now());
SELECT SLEEP(1);
SET i=i+1;
END WHILE;
END $$
DELIMITER ;
Press the
Esckey, enter:wq, and then press the Enter key to save and close the script file.
Log on to MySQL.
Enter the following command, press the Enter key, and then enter your MySQL password as prompted:
mysql -u <mysqlUserName> -pReplace
<mysqlUserName>with an actual MySQL username.Create a database named AdventureWorks.
CREATE DATABASE AdventureWorks;Run the script.
source /root/test.sqlCall the TestPIT stored procedure.
CALL TestPIT;ImportantYou must create application-consistent snapshots within the 3-minute window that is required to run the TestPIT stored procedure.
Step 3: Create application-consistent snapshots in the ECS console
In the top navigation bar, select the region and resource group of the resource that you want to manage.

On the Snapshot-consistent Groups tab, click Create Snapshot-consistent Group.
In the Create Snapshot dialog box, configure the parameters described in the following table.
By default, the Resource Type parameter is set to Instance.
Select an instance from the Select Instances drop-down list. Then, in the Select Cloud Disks section, select the ESSDs for which you want to create snapshots from the instance.
Expand Advanced Settings and configure application-consistent snapshot settings.
Select Enable Application-consistent Snapshot.
Set the path of the prescript.sh script and the path of the postscript.sh script to be the same as the paths of the scripts created in Step 1.
Select Enable to enable the File System I/O Suspension and Resume feature and specify a timeout period.
Click OK.
After the snapshot-consistent group is created, a message that contains the Cloud Assistant command ID and the task ID is displayed. You can check whether application-consistent snapshots are created based on the task ID.
Go to ECS console - Snapshot-consistent Groups.
Step 4: Check whether the application-consistent snapshots are created
On the ECS Cloud Assistant page, click the task ID and view the command execution results.

If application-consistent snapshots are created in the task, the return value of ExitCode is
0and the IDs of the created application-consistent snapshots and the snapshot-consistent group are displayed in the command output, as shown in the preceding figure.NoteIf the return value of ExitCode is not
0, an error occurred. Troubleshoot the error based on the returned error code in the ExitCode column. For more information, see Error codes.In the return data of Cloud Assistant, view the points in time at which the database was suspended and resumed.
In the return data, find the time when the prescript.sh script started to run and the time when the postscript.sh script stopped running.
The prescript.sh script started to run at
2024-08-27 15:27:55, indicating that the database suspended write operations at this point in time.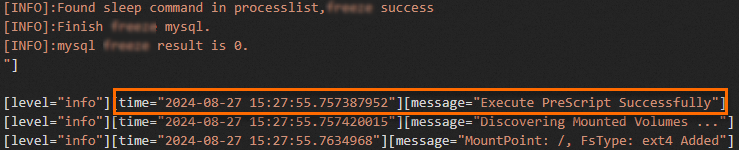
The postscript.sh script stopped running at
2024-08-27 15:27:57, indicating that the database resumed write operations at this point in time.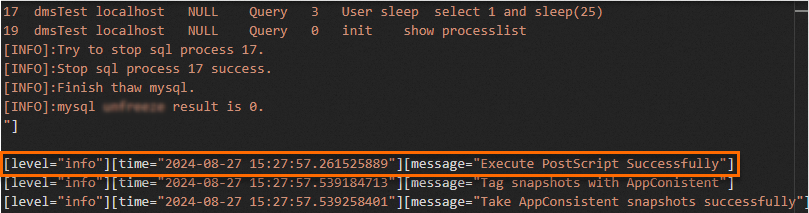
View the created snapshot-consistent group and disk snapshots.
On the Snapshot-consistent Groups tab, find the snapshot-consistent group that you created and click the ID of the snapshot-consistent group to view snapshot details.
In the Snapshot Information section, check whether the snapshots created in the snapshot-consistent group are application-consistent snapshots based on the tags added to the snapshots.
If a created snapshot is an application-consistent snapshot, the
APPConsistent:Truetag is displayed in the Tag column corresponding to the snapshot, as shown in the following figure.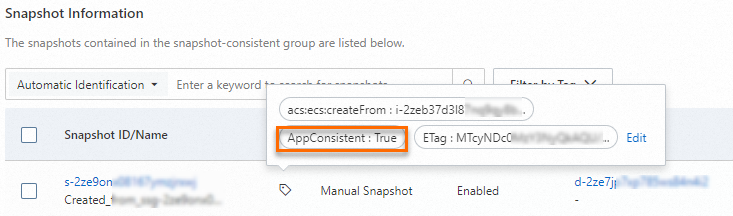
Go to ECS console - Snapshot-consistent Groups.
Connect to the MySQL database to view the time when insert operations were suspended.
Connect to the Linux ECS instance.
For more information, see Connect to Linux.
Log on to MySQL.
Enter the following command, press the Enter key, and then enter your MySQL password as prompted:
mysql -u <mysqlUserName> -pReplace
<mysqlUserName>with an actual MySQL username.Query the content of the PointInTime table.
USE AdventureWorks;
SELECT * FROM PointInTime;
In the query results, view the point in time at which the database was suspended.
The command output shows that no data was inserted during the period from
2024-08-27 15:27:55to2024-08-27 15:27:58.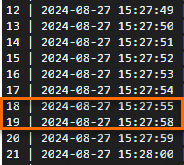
Step 5: Check whether the application-consistent snapshot can be used to restore data as expected
Roll back disks by using the created snapshot-consistent group.
For more information, see Roll back disks by using a snapshot-consistent group.
Log on to MySQL and query the content of the PointInTime table.
Connect to the Linux ECS instance.
For more information, see Connect to Linux.
Log on to MySQL.
Enter the following command, press the Enter key, and then enter your MySQL password as prompted:
mysql -u <mysqlUserName> -pReplace
<mysqlUserName>with an actual MySQL username.Query the content of the PointInTime table.
USE AdventureWorks;
SELECT * FROM PointInTime;
In the query results, view the time when data was last written to the MySQL database after data was restored.
The command output shows that the last data record inserted to the database is at the point of time of
2024-08-27 15:27:54, which is earlier than2024-08-27 15:27:55that is queried in Step 4. Therefore, the application-consistent snapshots correctly backed up data for MySQL.