When SQL Server crashes or a disk fails, restoring from a crash-consistent snapshot can leave the database in a corrupted or inconsistent state — requiring manual recovery steps or resulting in data loss. Application-consistent snapshots solve this by briefly pausing database write operations before the snapshot is taken, so the restored database starts cleanly with no partial transactions. This guide walks through the full verification workflow: setting up a test database, creating an application-consistent snapshot, confirming the snapshot succeeded, and validating that a disk rollback restores data exactly to the snapshot point in time.
The following example uses Windows Server 2019 and Microsoft SQL Server 2019 (64-bit).
How it works
When you trigger an application-consistent snapshot, the ECS snapshot service coordinates with the Windows Volume Shadow Copy Service (VSS) to:
Notify registered VSS Writers (including the SQL Server Writer) to freeze write operations.
Flush all pending I/O buffers so no in-flight writes are left incomplete.
Create snapshots of the selected ESSDs while write operations are suspended.
Signal VSS to resume write operations after the snapshots are created.
Tag each successfully created snapshot with
APPConsistent:True.
Check the ExitCode in the Cloud Assistant output to confirm success.
Prerequisites
Before you begin, ensure that you have:
An ECS instance that uses Enterprise SSDs (ESSDs) with the multi-attach feature disabled
The ECS instance in the Running state with Cloud Assistant in the Normal state — see Check Cloud Assistant status and handle anomalies
Microsoft SQL Server installed on the instance
A Resource Access Management (RAM) role attached to the instance, with a custom policy granting the following permissions:
{
    "Version": "1",
    "Statement": [
        {
            "Effect": "Allow",
            "Action": [
                "ecs:DescribeSnapshot*",
                "ecs:CreateSnapshot*",
                "ecs:TagResources",
                "ecs:DescribeDisks"
            ],
            "Resource": [
                "*"
            ],
            "Condition": {}
        }
    ]
}
For instructions on creating the RAM role and attaching it to the instance, see Create a RAM role and attach it to an ECS instance.
Cloud Assistant invokes commands on the instance to coordinate the VSS freeze. The RAM role grants Cloud Assistant the permissions it needs to query and create snapshots during this process.
Workflow

Prepare a database verification environment — Create a test database and table, then start a continuous write loop to simulate ongoing write operations.
Create an application-consistent snapshot — Create a snapshot-consistent group for the Windows instance in the ECS console with application consistency enabled.
Confirm the snapshot succeeded — Check the Cloud Assistant output for a zero exit code and verify the
APPConsistent:Truetag on the snapshot.Validate data restoration — Roll back the disk using the snapshot-consistent group, then query the database to confirm the last write timestamp is earlier than the freeze point.
Procedure
Step 1: Prepare a database verification environment
Connect to the Windows instance. For instructions, see Connect to Windows.
Open SQL Server Management Studio: click the Search icon in the lower-left corner, type
ssms, and press Enter. Click Microsoft SQL Server Management Studio 18.In the Connect to Server dialog box, enter the server connection details and click Connect.
Create a test database named
AdventureWorks:Right-click the query window and select Execute.
CREATE DATABASE AdventureWorks;Create a test table named
PointInTimeand start a continuous write loop:Right-click the query window and select Execute.
USE AdventureWorks
GO
IF NOT EXISTS (SELECT name FROM sysobjects WHERE name = 'PointInTime' AND TYPE ='U')
CREATE TABLE PointInTime (PIT datetime)
WHILE ( 1 = 1 )
BEGIN
    INSERT PointInTime SELECT GETDATE()
    WAITFOR DELAY '00:00:001'
END
The query runs a continuous loop, inserting the current timestamp every millisecond. Leave this query running — it simulates ongoing write operations for the snapshot verification.
In the left directory tree, confirm the
AdventureWorksdatabase andPointInTimetable are visible.
Step 2: Create an application-consistent snapshot
In the top navigation bar, select the region and resource group of the instance.

On the Snapshot-consistent Groups tab, click Create Snapshot-consistent Group.
In the Create Snapshot dialog box:
Leave Resource Type set to Instance (the default).
Select the Windows instance from the drop-down list. In the Select Cloud Disks section, select the ESSDs to include in the snapshot.
Expand Advanced Settings, select Enable Application-consistent Snapshot, and then select Contain Writers by Default.
VSS Writers coordinate with applications like SQL Server to freeze write operations during the snapshot. For background on the VSS architecture, see the Volume Shadow Copy Service?redirectedfrom=MSDN) documentation.
Click OK.
After the snapshot-consistent group is created, a message appears with the Cloud Assistant command ID and task ID. Use the task ID in the next step to verify the snapshot.
Step 3: Confirm the snapshot succeeded
Click the task ID link on the Cloud Assistant command execution results page to view the output. A successful application-consistent snapshot shows ExitCode =
0. The output includes the snapshot-consistent group ID.A non-zero ExitCode indicates an error. Check the error code in the ExitCode column and refer to the Error codes section for resolution steps.

Review the command output to confirm each stage of the snapshot process:
VSS components (COM+ and VSS) are installed and available.

All logical volumes to be backed up are correctly identified and loaded.

The SQL Server database is automatically included by the SQL Server VSS Writer.

The snapshot creation timestamp and the database freeze point are recorded. In the following example, the snapshot was created at
2025-03-03 13:53:30— this is the point in time at which write operations were suspended.
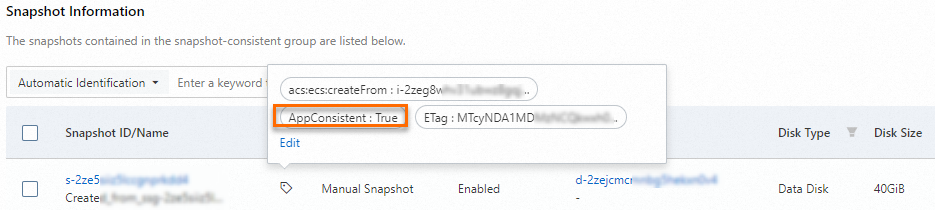
Verify the
APPConsistent:Truetag on the snapshot:On the Snapshot-consistent Groups tab, click the ID of the snapshot-consistent group you created.
In the Snapshot Information section, confirm that the
APPConsistent:Truetag appears in the Tag column for each snapshot.
Query the database to view the exact freeze window:
Right-click the query window and select Execute.
In the query results, look for a gap in the timestamps. In the following example, no records were inserted between
2025-03-03 13:53:30and2025-03-03 13:53:33, which confirms that write operations were suspended at13:53:30and resumed at13:53:33.
USE AdventureWorks
select * from PointInTime
GO
Step 4: Validate data restoration
Roll back the disk using the snapshot-consistent group. For instructions, see Roll back disks by using a snapshot-consistent group.
After the rollback completes, connect to the Windows instance and open Microsoft SQL Server Management Studio 18.
Click New Query and enter:
USE AdventureWorks
select * from PointInTime
GO
Right-click the query window and select Execute.
In the query results, find the latest timestamp in the
PointInTimetable. In the example, the latest record shows2025-03-03 13:53:29— which is earlier than the freeze time of13:53:30recorded in Step 3. This confirms that the application-consistent snapshot captured the database exactly at the moment write operations were suspended, with no partial writes included.
Verification logic:
| Query result | Meaning |
|---|---|
| Last write time earlier than the freeze time | Application-consistent snapshot is working correctly. The restored database reflects the exact state at snapshot creation. |
| Last write time equal to or later than the freeze time | Write operations continued during the freeze window. The snapshot did not achieve application consistency as expected. |