Diagnose and fix the "no bootable device" error caused by missing drivers, inactive partitions, or corrupted boot files on a Windows ECS instance.
Symptom
A Windows ECS instance fails to start and displays the "no bootable device" error.
If the OS fails to start, you can only connect to the instance by using VNC.

Causes
Use instance health diagnostics to identify the cause. The following table lists possible causes and solutions.
|
Cause |
Solution |
|
The disk adapter driver is not installed in the image file. |
|
|
An upper-layer disk filter driver (UpperFilter) exception prevents disk identification. |
|
|
The system partition is marked as Inactive. |
|
|
Essential system partition files are corrupted, and the boot mode configuration is invalid. |
|
|
The system partition is too small (less than 100 MB). |
The instance was created from a faulty custom image. Re-create the image and use it to Replace an OS (system disk). To create images, see Create Windows image files. |
|
The system partition does not exist on the system disk. |
|
|
The file system type of the system partition is incorrect. |
Solutions
Install a disk adapter driver
Install a disk adapter driver on the instance with an attached repair disk.
-
Connect to the faulty instance.
On the Diagnostic Result page, click VNC Connection. Enter the Administrator username and password from the diagnostic report to log on to the ECS instance with the repair disk attached. See Connect to an instance by using VNC.
-
Install the disk adapter driver.
For example, if the mounted drive letter is D and the driver file is in
C:\Drivers, run one of the following commands:-
Dism:
dism.exe /image:D:\ /Add-Driver /Driver:C:\Drivers /recurse. -
PowerShell:
Add-WindowsDriver -Path D:\ -Driver C:\Drivers -Recurse.
-
-
On the Instance page, move the pointer over the Fixing state that corresponds to the instance and click Detach Repair Disk.
-
Restart the instance for the changes to take effect.
See Restart an instance.
-
Connect to the ECS instance. If the connection succeeds, the issue is resolved.
Remove residual entries for the Windows disk filter driver
Solution 1: Reinstall the filter driver
Contact the filter driver vendor for installation instructions.
Solution 2: Delete the residual entries from the registry
Delete residual entries from the registry of the instance with an attached repair disk.
Registry modifications may affect OS stability and security. Back up your current registry settings before making changes.
-
Connect to the faulty instance.
On the Diagnostic Result page, click VNC Connection. Enter the Administrator username and password from the diagnostic report to log on to the ECS instance with the repair disk attached. See Connect to an instance by using VNC.
-
Open the Run dialog box. Enter
regeditand click OK to open Registry Editor. -
In Registry Editor, select
HKEY_LOCAL_MACHINE. Choose . Navigate toD:\Windows\System32\config\SYSTEMand click Open. When prompted for a key name, enterOfflineSYSTEM.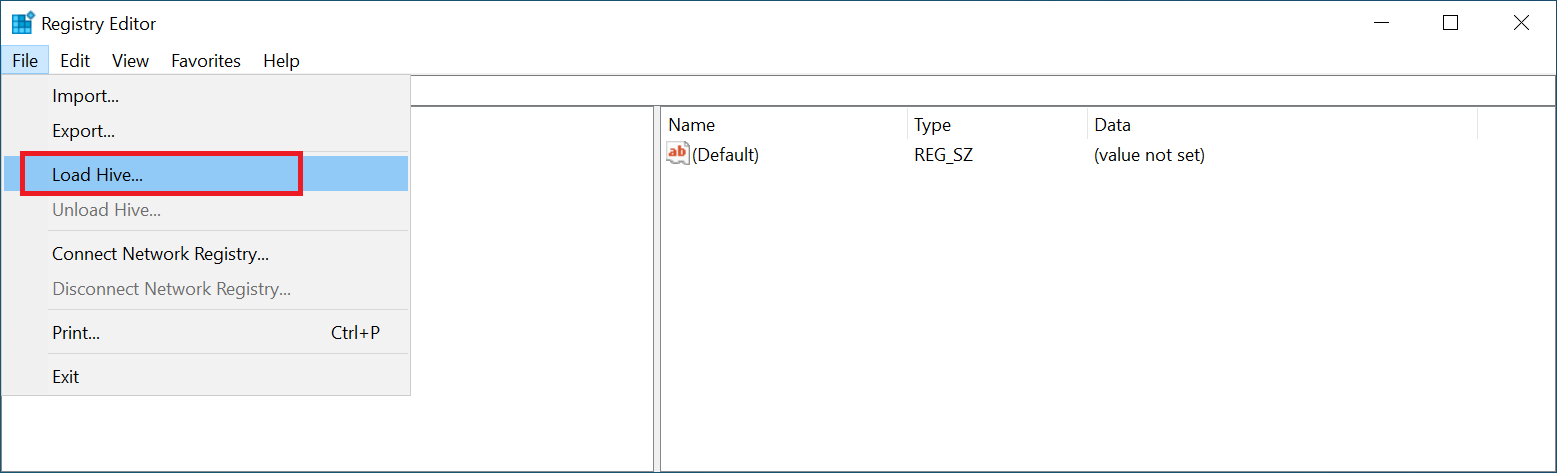
-
Delete the residual
UpperFiltervalue data fromHKEY_LOCAL_MACHINE\OfflineSYSTEM\ControlSet001\Control\Class\{4d36e967-e325-11ce-bfc1-08002be10318}. In this example, the value data istest_filter.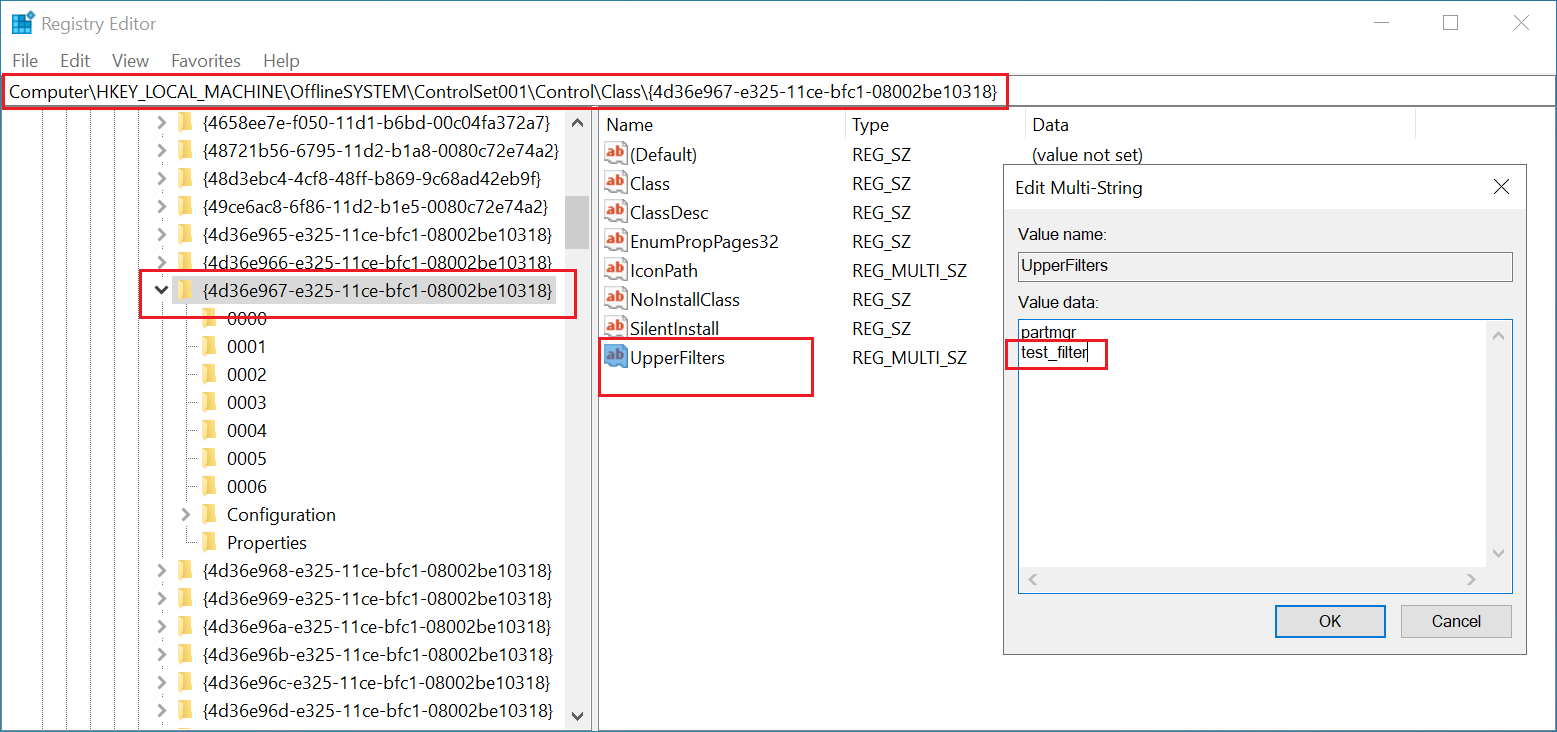
-
On the Instance page, move the pointer over the Fixing state that corresponds to the instance and click Detach Repair Disk.
-
Start the ECS instance.
See Start an instance.
-
Connect to the ECS instance. If the connection succeeds, the issue is resolved.
Set the system partition state to Active
Set the system partition state to Active on the instance with an attached repair disk.
-
Connect to the faulty instance.
On the Diagnostic Result page, click VNC Connection. Enter the Administrator username and password from the diagnostic report to log on to the ECS instance with the repair disk attached. See Connect to an instance by using VNC.
-
Set the system partition state to Active.
Select one of the following methods. In this example, the faulty OS disk number is 1 and the system partition number is 1.
Use DiskPart to resolve the issue
-
Open the
DiskPartwindow.Enter
diskpartin the search box on the desktop and press Enter, or openWindows PowerShelland run thediskpartcommand. -
Select the target disk.
select disk 1 -
Clear the read-only attribute of the disk.
attribute disk clear readonly -
Select the system partition.
select partition 1 -
Set the system partition state to Active.
active
Use a PowerShell command to resolve the issue
Set-Partition -DiskNumber 1 -PartitionNumber 1 -IsActive $true -
-
On the Instance page, move the pointer over the Fixing state that corresponds to the instance and click Detach Repair Disk.
-
Restart the instance for the changes to take effect.
See Restart an instance.
-
Connect to the ECS instance. If the connection succeeds, the issue is resolved.
Reconfigure the boot mode of the Windows operating system
Reconfigure the boot mode on the faulty instance with an attached repair disk. In this example, the system partition drive letter is S, and the Windows partition drive letter is C.
-
Connect to the faulty instance.
On the Diagnostic Result page, click VNC Connection. Enter the Administrator username and password from the diagnostic report to log on to the ECS instance with the repair disk attached. See Connect to an instance by using VNC.
-
Enable Windows Preinstallation Environment (
WinPE) mode and run one of the following BCDboot commands to reconfigure the boot mode:-
Unified Extensible Firmware Interface (UEFI) boot mode
bcdboot C:\Windows /s S: /f UEFI -
Basic input/output system (BIOS) boot mode
bcdboot C:\Windows /s S:
-
-
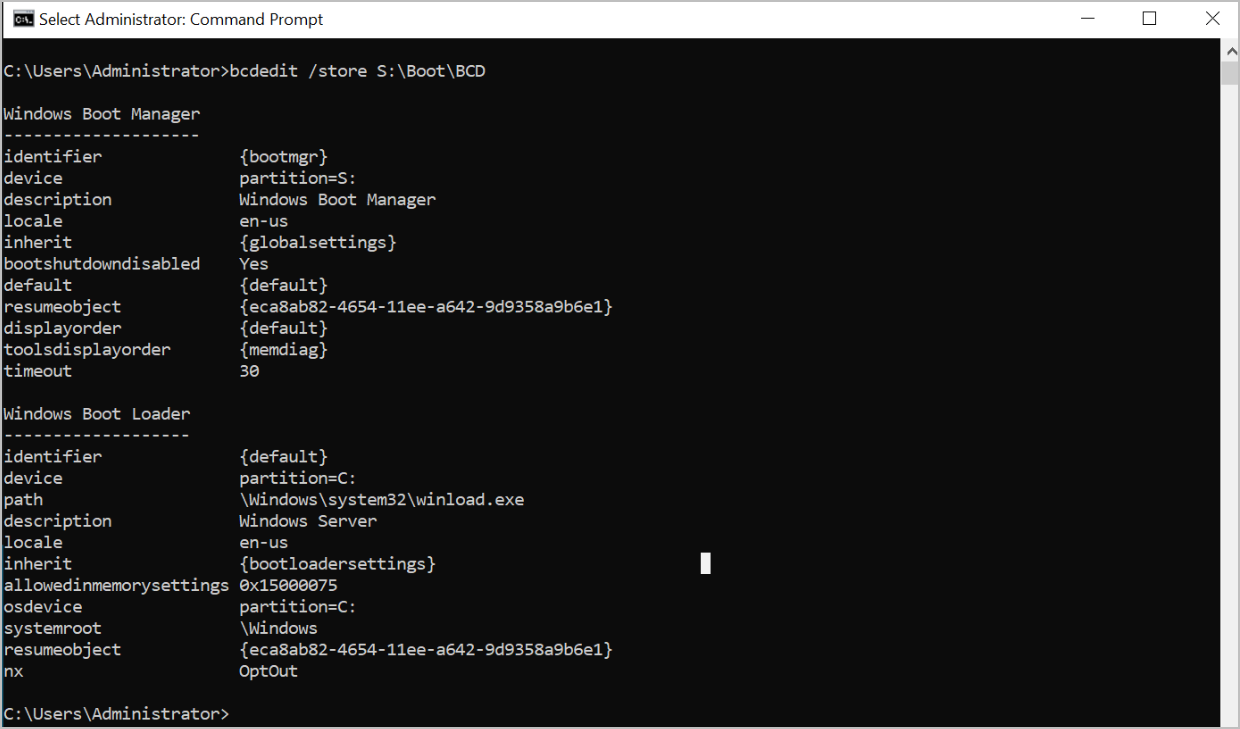
Run the following command to view the boot settings:
-
UEFI boot mode
bcdedit /store S:\EFI\Boot\BCD -
BIOS boot mode
bcdedit /store S:\Boot\BCD
Sample output:
-
-
(Optional) If the D disk also runs a Windows OS, specify a boot mode for it.
-
UEFI boot mode
bcdboot D:\Windows /s S: /d /p /addlast /f UEFI -
BIOS boot mode
bcdboot D:\Windows /s S: /d /p /addlast
-