Elastic Container Instance (ECI) offers a one-click tcpdump feature for capturing and analyzing network packets to monitor network traffic. This topic shows you how to use tcpdump to capture packets and troubleshoot container network issues.
Background
When a container has a network issue, you may need to capture packets to diagnose the problem. However, you might encounter the following challenges:
-
Packet capture typically requires entering the container with an exec command. If a network issue occurs, the container may not be in a running state, which prevents you from using exec.
-
Packet capture requires the tcpdump tool, which might not be installed in the container's rootfs.
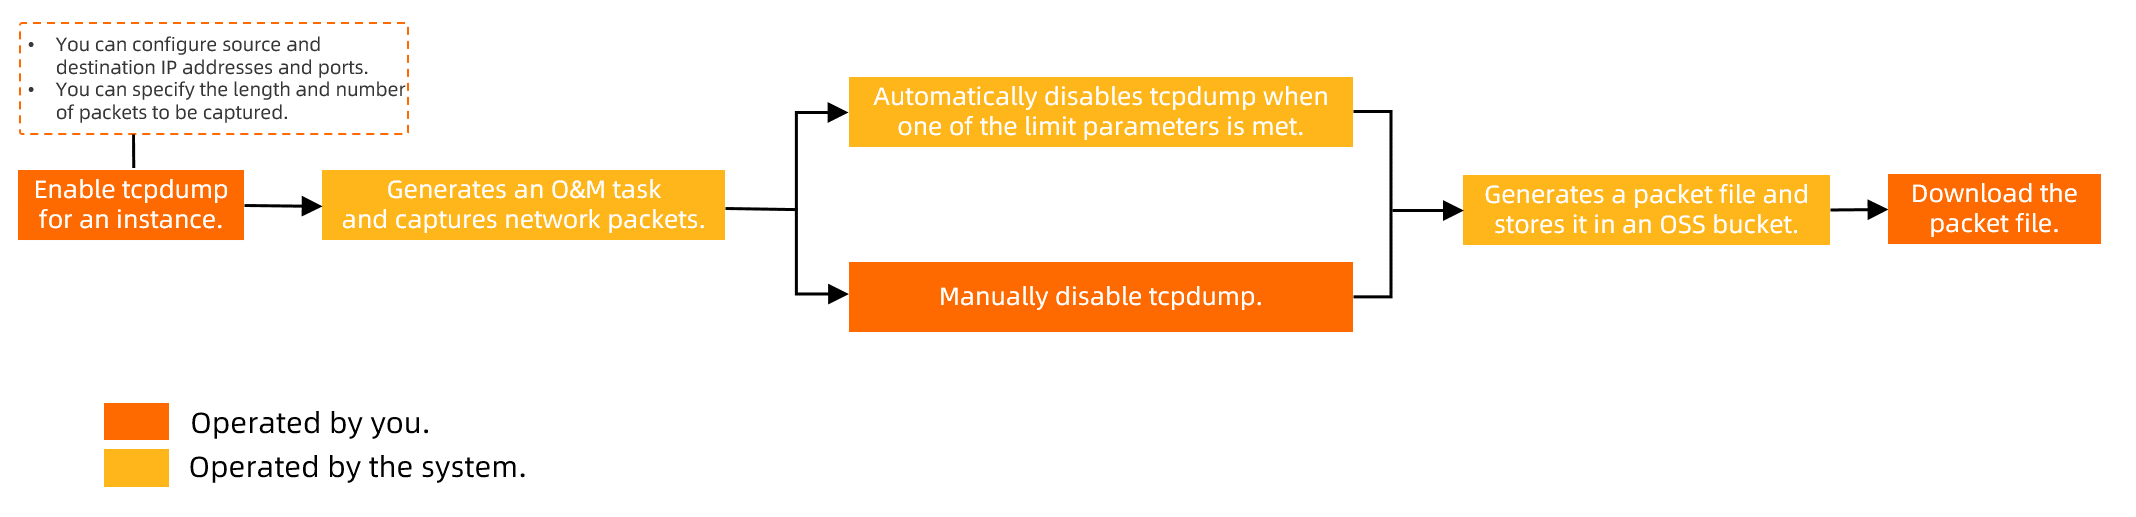
To address these issues, ECI provides a one-click tcpdump feature. It works as follows:
Limitations
The tcpdump feature is not supported in the following regions: China (Ulanqab), China (Heyuan), China (Guangzhou), China (Nanjing - Local Region - Decommissioning), Philippines (Manila), South Korea (Seoul), Thailand (Bangkok), and Malaysia (Kuala Lumpur).
Procedure
You can use the tcpdump feature from the Elastic Container Instance console or by calling an OpenAPI operation.
Console
-
Log on to the Elastic Container Instance console.
-
Enable tcpdump for the ECI instance.
-
Click the target instance ID to open the instance details page.
-
Click the O&M tab, and then click the Tcpdump tab.
-
Click Enable.
-
Configure the parameters and click OK.
The following table describes the parameters.
|
Parameter
|
Description
|
|
Source
|
The source IP address or CIDR block and the port from which to capture packets.
|
|
Destination
|
The destination IP address or CIDR block and the port to which packets are sent.
|
|
ENI
|
The elastic network interface (ENI) on which to capture packets.
|
|
Packet
|
-
Length: The maximum length of each captured packet, in bytes. Default: 65535.
-
Quantity: The total number of packets to capture.
-
Duration: The capture duration in seconds.
|
|
Network protocol
|
Select a network protocol. TCP, UDP, and ICMPv4 are supported.
|
After you enable tcpdump, the system starts the packet capture and creates a corresponding O&M task. The task status is Running.
-
Reproduce the issue on the target ECI instance, and then disable tcpdump.
After tcpdump is disabled, the system stops the packet capture, generates a PCAP file, and stores the file in Object Storage Service (OSS). You can disable tcpdump in one of the following ways:
|
Method
|
Description
|
|
Manual
|
On the Tcpdump tab of the target instance, click Disable.
|
|
Automatic
|
If you set a packet size, count, or duration limit when enabling tcpdump, the system automatically disables it when any limit is reached.
|
-
In the O&M task's Result column, click Download to download the PCAP file to your computer.
Note
If the download does not start, check your browser's site settings. For more information, see FAQ.
OpenAPI
-
Call the CreateInstanceOpsTask operation to enable tcpdump for an ECI instance.
When you enable tcpdump, set the following parameters:
-
Reproduce the issue on the target ECI instance, and then disable tcpdump.
After tcpdump is disabled, the system stops the packet capture, generates a PCAP file, and stores the file in OSS. You can disable tcpdump in one of the following ways:
|
Method
|
Description
|
|
Manual
|
Call the CreateInstanceOpsTask operation to disable tcpdump. Set the following parameters:
|
|
Automatic
|
If you set limits such as Snaplen, Duration, PacketNum, or FileSize in OpsValue when enabling tcpdump, the system automatically disables it when any limit is reached.
|
-
Download the PCAP file.
-
Call the DescribeInstanceOpsRecords operation to obtain the URL of the PCAP file from the ResultContent parameter in the response.
The PCAP file is saved in OSS. The following is an example URL: http://eci-ops-files-cn-beijing.oss-cn-beijing.aliyuncs.com/pcaps/1609****/eci-2ze6n7kqdici********-eth0-****.pcap?Expires=****&OSSAccessKeyId=****&Signature=****&security-token=****.
-
Open the URL to download the PCAP file.
FAQ
The download does not start when I click Download in the console. What should I do?
If the download does not start, check your browser's site settings. For example, you can follow these steps to grant the necessary permission in Google Chrome:
-
Open the Elastic Container Instance console. Click the  icon to the left of the address bar and select Site settings.
-
Set Insecure content to Allow.