This topic describes how to use a DataCache to accelerate the deployment of a Stable Diffusion application. If you want to deploy a Stable Diffusion application, you can pull Stable Diffusion model data from a DataCache in advance. When you create the pod that corresponds to the Stable Diffusion application, you can mount the model data to the pod. This eliminates the need to pull data and accelerates the deployment of the Stable Diffusion application.
Background information
Stable Diffusion is a model that can be used to generate and modify images based on text descriptions. Stable Diffusion consists of a text understanding component and an image generating component. Stable Diffusion encodes prompts by using the Contrastive Language-Image Pre-Training (CLIP) model and generates images by using a diffusion model.
Alibaba Cloud does not guarantee the legality, security, or accuracy of third-party models. Alibaba Cloud is not liable for any damages caused thereby.
You must abide by the user agreements, usage specifications, and relevant laws and regulations of the third-party models. You agree that your use of the third-party models is at your sole risk.
Prerequisites
A DataCache custom resource definition (CRD) is deployed in the cluster. For more information, see Deploy a DataCache CRD.
The virtual private cloud (VPC) in which the cluster resides is associated with an Internet NAT gateway. An SNAT entry is configured for the Internet NAT gateway to allow resources in the VPC or resources connected to vSwitches in the VPC to access the Internet.
NoteIf the VPC is not associated with an Internet NAT gateway, you must associate an elastic IP address (EIP) with the VPC when you create the DataCache and deploy the application. This way, you can pull data from the Internet.
Prepare a runtime environment
To deploy a Stable Diffusion application, you must prepare a container image that contains the environment required for running the Stable Diffusion application. The environment must include the Compute Unified Device Architecture (CUDA), the Diffusers library, and other basic dependencies. Elastic Container Instance provides container images that can run stable environments for most models. If your application does not require special dependencies, you can use the images that are provided by Elastic Container Instance.
Images that start the HTTP service
The GPU-accelerated image: registry.cn-hangzhou.aliyuncs.com/eci_open/ubuntu:cuda11.7.1-cudnn8-ubuntu20.04
The CPU-accelerated image: registry.cn-hangzhou.aliyuncs.com/eci_open/ubuntu:hf-ubuntu20.04
The following part provides information about the images.
The image that supports WebUI
Image address: registry.cn-hangzhou.aliyuncs.com/eci_open/stable-diffusion:1.0.0
NoteThis image applies to all Stable Diffusion models. To use a model, you only need to mount an existing model data cache to the
/stable-diffusion-webui/models/Stable-diffusion/directory.
Procedure
Select a procedure based on the image that you use.
Use an image that starts the HTTP service
Create a DataCache
Visit Hugging Face and obtain the ID of the model.
In this example, the stabilityai/stable-diffusion-2-1 model is used. Find the model in Hugging Face and copy the ID of the model in the upper part of the model details page.
Write a YAML configuration file for the DataCache. Then, use the YAML file to create the DataCache and pull the stable-diffusion-2-1 model data from the DataCache.
kubectl create -f datacache-test.yamlExample: datacache-test.yaml document
apiVersion: eci.aliyun.com/v1alpha1
kind: DataCache
metadata:
  name: stable-diffusion
spec:
  path: /model/stable-diffusion/                 # Specify the storage path of the model data.
  dataSource:
    type: URL
    options:
      repoSource: HuggingFace/Model              # Specify the model whose data source is Hugging Face.
      repoId: stabilityai/stable-diffusion-2-1   # Specify the ID of the model.
  retentionDays: 1
  netConfig:
    securityGroupId: sg-2ze63v3jtm8e6s******
    vSwitchId: vsw-2ze94pjtfuj9vay******         # Specify a vSwitch for which an SNAT gateway is configured.
View the status of the DataCache.
kubectl get edc stable-diffusionAfter the data is downloaded and the status of the DataCache becomes Available, the DataCache is ready for use. Example:

Deploy the Stable Diffusion application
Write a YAML configuration file for the application, and then use the YAML file to deploy the Stable Diffusion application.
kubectl create -f stable-diffusion.yamlThe following example shows the content of stable-diffusion.yaml. You can use the configuration file to create a Deployment that contains a pod replica. Select the GPU-accelerated image for the pod and mount the Stable Diffusion v2-1 model data to the pod. Select the GPU-accelerated image for the container in the pod. After the container starts, it runs the
python3 http-server.pycommand to start the HTTP service.NoteIn the following example, a GPU-accelerated image is used. When you create the Elastic Container Instance pod, you must specify a GPU-accelerated ECS instance type and the number of GPUs required by the container. You can also use the CPU-accelerated image. An application that uses the CPU-accelerated image starts faster than an application that uses the GPU-accelerated image, but infers slower.
apiVersion: apps/v1
kind: Deployment
metadata:
  name: stable-diffusion
  labels:
    app: stable-diffusion
spec:
  replicas: 1
  selector:
    matchLabels:
      app: stable-diffusion
  template:
    metadata:
      name: stable-diffusion
      labels:
        app: stable-diffusion
        alibabacloud.com/eci: "true"
      annotations:
        k8s.aliyun.com/eci-use-specs: ecs.gn7i-c16g1.4xlarge     # Specify a GPU-accelerated ECS instance type.
        k8s.aliyun.com/eci-data-cache-bucket: "default"          # Specify the bucket in which you want to store the DataCache.
    spec:
      containers:
      - name: stable-diffusion
        image: registry.cn-hangzhou.aliyuncs.com/eci_open/ubuntu:cuda11.7.1-cudnn8-ubuntu20.04  # Use the GPU-accelerated image.
        resources:
            limits:
              nvidia.com/gpu: "1"           # Specify the number of GPUs that are required by the container.
        command: ["/bin/sh"]
        args: ["-c","python3 http-server.py"]
        volumeMounts:
        - name: "model"
          mountPath: "/data/model/"         # Specify the mount path of the model data in the container.
      volumes:
      - name: "model"
        hostPath:
          path: "/model/stable-diffusion/"    # Mount the model data.
Check whether the application is deployed.
kubectl get deployment stable-diffusion
kubectl get Pod
The following example shows that the Stable Diffusion application is deployed.

Check whether the model data is mounted.
kubectl exec -it <POD_NAME> -- bash
ls /data/model
The following example shows that the model data is mounted in the
/data/modeldirectory of the container.
Create a Service to allow external access to the Stable Diffusion application.
kubectl create -f stable-diffusion-svc.yamlThe following example shows the content of the stable-diffusion-svc.yaml. You can use the configuration file to create a pay-as-you-go Internet-facing LoadBalancer Service. The Service exposes port 8888 and forwards data transfers to port 8888 of pods that have the
app: stable-diffusionlabel (pods that correspond to Stable Diffusion applications).apiVersion: v1 kind: Service metadata: annotations: service.beta.kubernetes.io/alibaba-cloud-loadbalancer-address-type: internet service.beta.kubernetes.io/alibaba-cloud-loadbalancer-instance-charge-type: PayByCLCU name: stable-diffusion-svc namespace: default spec: externalTrafficPolicy: Local ports: - port: 8888 protocol: TCP targetPort: 8888 selector: app: stable-diffusion type: LoadBalancerView the IP address of the Service.
kubectl get svc stable-diffusion-svcIn the following example, the IP address of the Service that is displayed in the
EXTERNAL-IPcolumn is 39.106.XX.XX.
Test the model
Pass in a text description to test whether the Stable Diffusion application can generate an image.
Add an inbound rule to the security group to which the pod belongs and open port 8888.
Open a browser and visit the external IP address of the Service over port 8888.
http://39.106.XX.XX:8888?input=xxxPass in a text description in
input=xxx. The Stable Diffusion application generates an image based on the text description and saves the image to the/workspace/picdirectory of the container. Example:
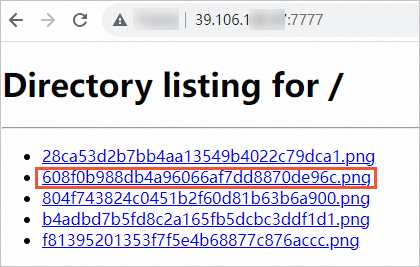
View the image that is generated by the Stable Diffusion application.
Add an inbound rule to the security group to which the pod belongs to open a port to view images. In this example, port 7777 is used.
Update the Service to add port 7777 that is required to view images.
kubectl patch service stable-diffusion-svc --type='json' -p '[{"op": "add", "path": "/spec/ports/-", "value": {"name":"image", "port": 7777, "targetPort": 7777}}]'Start a new HTTP service that uses port 7777.
kubectl exec -it stable-diffusion-7fb849b98f-b9d9t -- bash
python3 -m http.server 7777 --directory /workspace/pic/ &
Open a browser, visit the external IP address of the Service over port 7777, and view the generated image.
Use the image that supports WebUI
Create a DataCache
Visit Hugging Face and obtain the ID of the model.
In this example, the hanafuusen2001/BeautyProMix model is used. Find the model in Hugging Face and copy the ID of the model in the upper part of the model details page.
Write a YAML configuration file for the DataCache. Then, use the YAML file to create a DataCache and pull the BeautyProMix model data from the DataCache.
kubectl create -f datacache-test.yamlExample: datacache-test.yaml document
apiVersion: eci.aliyun.com/v1alpha1
kind: DataCache
metadata:
  name: beautypromix
spec:
  path: /model/BeautyProMix/                 # Specify the storage path of the model data.
  dataSource:
    type: URL
    options:
      repoSource: HuggingFace/Model              # Specify the model whose data source is Hugging Face.
      repoId: hanafuusen2001/BeautyProMix        # Specify the ID of the model.
  retentionDays: 1
  netConfig:
    securityGroupId: sg-2ze63v3jtm8e6s******
    vSwitchId: vsw-2ze94pjtfuj9vay******         # Specify a vSwitch for which an SNAT gateway is configured.
View the status of the DataCache.
kubectl get edc beautypromixAfter the data is downloaded and the status of the DataCache becomes Available, the DataCache is ready for use. Example:

Deploy the Stable Diffusion application
Write a YAML configuration file for the application, and then use the YAML file to deploy the Stable Diffusion application.
kubectl create -f stable-diffusion.yamlThe following example shows the content of the stable-diffusion.yaml. You can use the configuration file to create a Deployment that contains a pod replica. Select the GPU-accelerated image for the pod and mount the BeautyProMix model data to the pod. Select the GPU-accelerated image for the container in the pod. After the container starts, it runs the
python3 launch.py --listen --skip-torch-cuda-test --port 8888 --no-halfcommand to start a WebUI.apiVersion: apps/v1 kind: Deployment metadata: name: stable-diffusion labels: app: stable-diffusion spec: replicas: 1 selector: matchLabels: app: stable-diffusion template: metadata: name: stable-diffusion labels: app: stable-diffusion alibabacloud.com/eci: "true" annotations: k8s.aliyun.com/eci-use-specs: ecs.gn7i-c16g1.4xlarge # Specify a GPU-accelerated ECS instance type. k8s.aliyun.com/eci-data-cache-bucket: "default" # Specify the bucket in which you want to store the DataCache. spec: containers: - name: stable-diffusion image: registry.cn-hangzhou.aliyuncs.com/eci_open/stable-diffusion:1.0.0 # Use the image that supports WebUI. resources: limits: nvidia.com/gpu: "1" # Specify the number of GPUs that are required by the container. command: ["/bin/sh"] args: ["-c","python3 launch.py --listen --skip-torch-cuda-test --port 8888 --no-half"] volumeMounts: - name: "model" mountPath: "/stable-diffusion-webui/models/Stable-diffusion/" # Specify the mount path of the model data in the container. volumes: - name: "model" hostPath: path: "/model/BeautyProMix/" # Mount the model data.Check whether the application is deployed.
kubectl get deployment stable-diffusion
kubectl get Pod
The following example shows that the Stable Diffusion application is deployed.

Check whether the model data is mounted.
kubectl exec -it <POD_NAME> -- bash
ls /stable-diffusion-webui/models/Stable-diffusion
The following example shows that the model data is mounted in the
/stable-diffusion-webui/models/Stable-diffusiondirectory of the container.
Create a Service to allow external access to the Stable Diffusion application.
kubectl create -f stable-diffusion-svc.yamlThe following example shows the content of the stable-diffusion-svc.yaml. You can use the configuration file to create a pay-as-you-go Internet-facing LoadBalancer Service. The Service exposes port 8888 and forwards data transfers to port 8888 of pods that have the
app: stable-diffusionlabel (pods that correspond to Stable Diffusion applications).apiVersion: v1 kind: Service metadata: annotations: service.beta.kubernetes.io/alibaba-cloud-loadbalancer-address-type: internet service.beta.kubernetes.io/alibaba-cloud-loadbalancer-instance-charge-type: PayByCLCU name: stable-diffusion-svc namespace: default spec: externalTrafficPolicy: Local ports: - port: 8888 protocol: TCP targetPort: 8888 selector: app: stable-diffusion type: LoadBalancerView the IP address of the Service.
kubectl get svc stable-diffusion-svcIn the following example, the IP address of the Service that is displayed in the
EXTERNAL-IPcolumn is 101.200.XX.XX.
Test the model
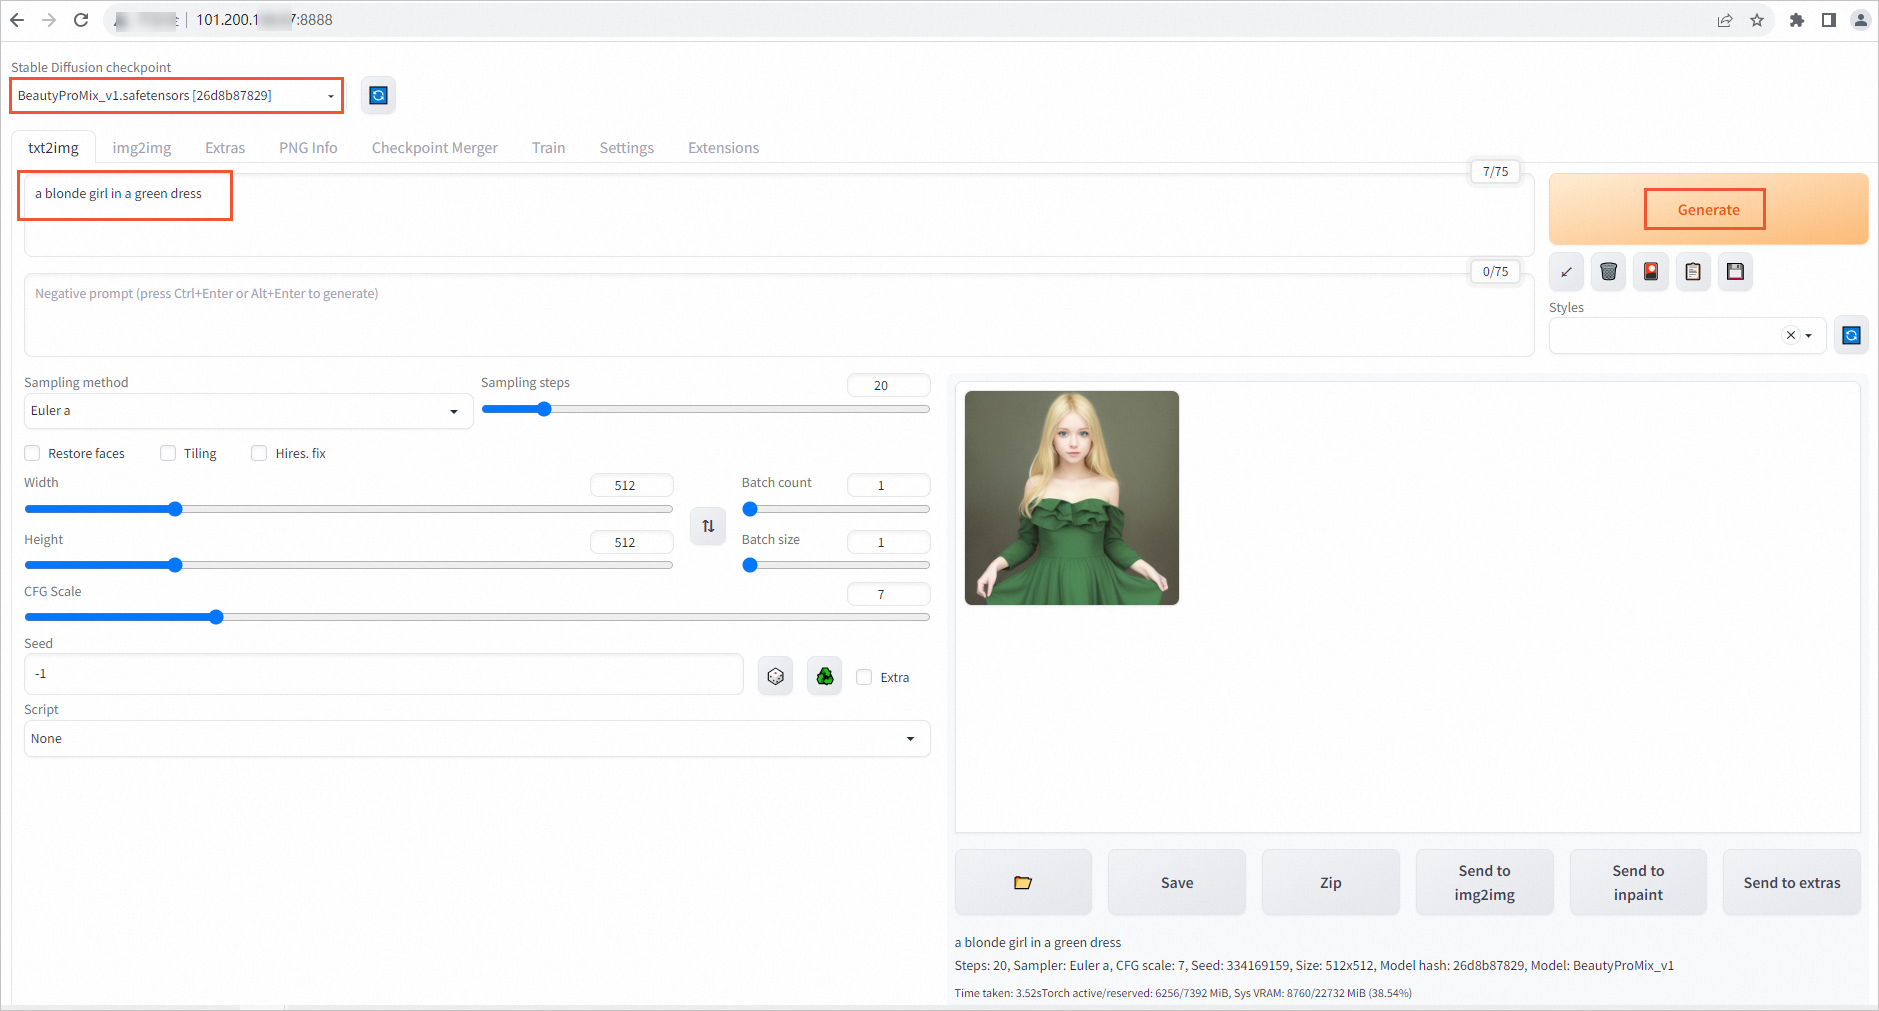
Add an inbound rule to the security group to which the pod belongs and open port 8888.
Open a browser and visit the external IP address of the Service over port 8888.
Enter a text description to test whether the application can generate an image.
Example: