Each elastic container instance (ECI) pod includes 30 GiB of temporary storage at no charge. If your workload needs more — for example, when images, build artifacts, or scratch data exceed the default allocation — you can scale up by adding an annotation or a resource request. Capacity above 30 GiB is billed based on how much you add and how long the pod runs. For pricing details, see Billing of the temporary storage space.
How it works
The 30 GiB default is shared between the container image and your workload. When ECI starts a pod, it pulls and decompresses the container image into temporary storage. The decompressed image typically occupies at least twice the compressed image size — the exact amount depends on the compression ratio. To estimate how much space your workload actually has available, subtract the decompressed image size from the total allocated capacity:
Usable space = total allocated capacity - decompressed image sizeFor example, if you allocate 50 GiB and your image decompresses to 8 GiB, your workload has approximately 42 GiB available.
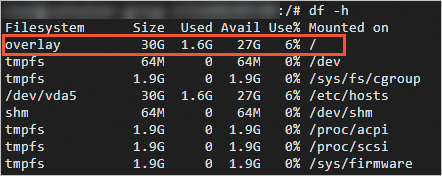
Choose a method
Two methods are available. Each uses different Kubernetes semantics:
| Method | Kubernetes semantics | Scaled-up capacity |
|---|---|---|
Annotation (k8s.aliyun.com/eci-extra-ephemeral-storage) | Limit | Exactly the value you specify |
Resource request (ephemeral-storage) | Request | Value you specify minus 30 GiB; may vary based on image cache type |
Limit vs. request semantics: The annotation sets a hard limit — the pod receives exactly the capacity you specify. The resource request influences scheduling decisions, and the actual allocated capacity may differ from the value you specify depending on the image cache type. For details, see Image cache type and storage capacity.
If you configure both methods, the greater value takes effect.
Prerequisites
Before you begin, ensure that you have:
A Kubernetes cluster with ECI as the container runtime
Permission to create or manage pods in your cluster
Scale up using an annotation
Add the k8s.aliyun.com/eci-extra-ephemeral-storage annotation to the pod's metadata section. Set the value to the amount of additional capacity you want — not the total.
Annotations take effect only when you create a pod. Annotations added or modified during a pod update have no effect. When creating a Deployment, add the annotation under spec.template.metadata, not under the top-level metadata.
The following example adds 20 GiB of additional capacity, giving the pod 50 GiB in total:
apiVersion: v1
kind: Pod
metadata:
  name: test
  annotations:
    k8s.aliyun.com/eci-extra-ephemeral-storage: "20Gi"  # Additional capacity on top of the default 30 GiB
spec:
  containers:
  - name: nginx
    image: registry-vpc.cn-beijing.aliyuncs.com/eci_open/nginx:1.14.2
    imagePullPolicy: IfNotPresent
  restartPolicy: Always
Scale up using a resource request
Set the ephemeral-storage field under resources.requests to the total capacity you want. The value must exceed 30 GiB — values at or below 30 GiB have no effect. The additional capacity equals the value you set minus 30 GiB.
The following example sets a total of 50 GiB, resulting in 20 GiB of additional capacity:
apiVersion: v1
kind: Pod
metadata:
  name: test
spec:
  containers:
  - name: nginx
    image: registry-vpc.cn-beijing.aliyuncs.com/eci_open/nginx:1.14.2
    imagePullPolicy: IfNotPresent
    resources:
      requests:
        ephemeral-storage: 50Gi  # Total capacity: 30 GiB default + 20 GiB additional
  restartPolicy: Always
Apply and verify
Save your configuration to a file (for example,
extra-storage.yaml) and create the pod:kubectl apply -f extra-storage.yamlConfirm the annotation value:
kubectl describe pod test | grep k8s.aliyun.com/eci-extra-ephemeral-storageThe following output confirms that 20 GiB of additional capacity was applied:
k8s.aliyun.com/eci-extra-ephemeral-storage: 20GiLog in to the container and check the file system:
kubectl exec -it test -- sh
df -h
In the output, the
overlayline shows the total available storage. A value of50Gconfirms that the scale-up is in effect:Filesystem Size Used Avail Use% Mounted on overlay 50G 2.1G 48G 5% / tmpfs 64M 0 64M 0% /dev tmpfs 1.9G 0 1.9G 0% /sys/fs/cgroup /dev/vda4 50G 2.1G 48G 5% /etc/hosts shm 64M 0 64M 0% /dev/shm tmpfs 4.0G 12K 4.0G 1% /run/secrets/kubernetes.io/serviceaccount tmpfs 1.9G 0 1.9G 0% /proc/acpi tmpfs 1.9G 0 1.9G 0% /sys/firmware
Image cache type and storage capacity
The actual storage layout depends on the image cache type used when the pod is created.
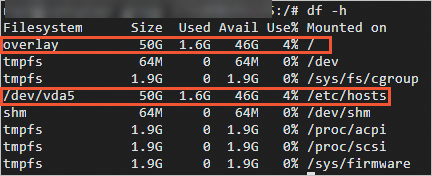
Automatic image cache: The temporary storage space resides on the system disk. The capacity of the system disk partition (/dev/vda5) equals the total temporary storage capacity.
Manual image cache: The temporary storage space resides on a data disk. The system disk partition (/dev/vda5) remains at the default 30 GiB and is not used for temporary storage.
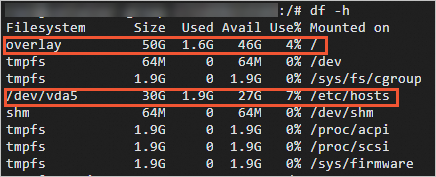
This difference explains why the actual scaled-up capacity from a resource request may differ from the value you specify.