This topic describes how to configure single sign-on (SSO) between Azure Active Directory (AD) and Elastic Desktop Service (Enterprise Edition) . After SSO is configured, the logon credentials of Azure AD users are authenticated when end users access cloud computers. This helps manage secure and unified logons.
Background
Single sign-on (SSO) is a secure communication technology that allows you to efficiently access multiple trusted application systems with a single sign-on. SSO implements logon based on identity federation.
The following terms are frequently used in SSO scenarios:
Identity provider (IdP): an entity that contains the metadata of an external identity provider. An IdP provides identity management services, collects and stores user identity information such as usernames and passwords, and verifies user identities on user logons.
Common IdPs:
On-premises IdPs: use on-premises architecture, such as Microsoft Active Directory Federation Service (AD FS) and Shibboleth.
Cloud IdP: Azure AD, Google Workspace, Okta, and OneLogin.
Service provider (SP): an application that uses the identity management feature of an IdP to provide users with specific services based on trust relationships with IdPs. In specific identity systems that do not comply with the Security Assertion Markup Language (SAML) protocol, such as OpenID Connect (OIDC), SP is the relying party of an IdP.
SAML 2.0: a standard protocol for user identity authentication for enterprises. It is one of the technical implementations for communication between SPs and IdPs. SAML is a de facto standard that is used by enterprises to implement SSO.
Procedure
If you use Azure AD to manage users, you can configure convenience users whose usernames are the same as those in Azure AD to implement SSO for Elastic Desktop Service (Enterprise Edition) . Then, Elastic Desktop Service (Enterprise Edition) serves as a service provider (SP), and Azure AD serves as an identity provider (IdP). Both of them exchange their metadata files based on the Security Assertion Markup Language (SAML) protocol to implement SSO. After you configure SSO, end users can access cloud computers by using the same logon credentials in Azure AD.
Step 1: Create convenience users whose usernames are the same as those of Azure AD users
For Azure AD users that want to use Elastic Desktop Service (Enterprise Edition) , you must create convenience users whose usernames are the same as those of the Azure AD users in the Elastic Desktop Service (Enterprise Edition) console.
In the Create User panel of the Elastic Desktop Service (Enterprise Edition) console, you can select the Manual Entry or Batch Entry tab to create convenience users by entering or importing information about multiple users at the same time. If you are creating a small number of users, you can manually enter the information about the users on the Manual Entry tab. If you are creating a large number of users, you can import information about the users by using a file that meets specific formats on the Batch Entry tab.
When you enter information in the file, make sure that the usernames of convenience users that you create are the same as those of Azure AD users. The usernames are not case-sensitive.
Before you import user information, refer to the following sections to prepare a .csv file that is used to create Elastic Desktop Service convenience users in the valid format.
Download a .csv file that contains the information about Azure AD users in Azure AD.
Log on to the Azure AD console.
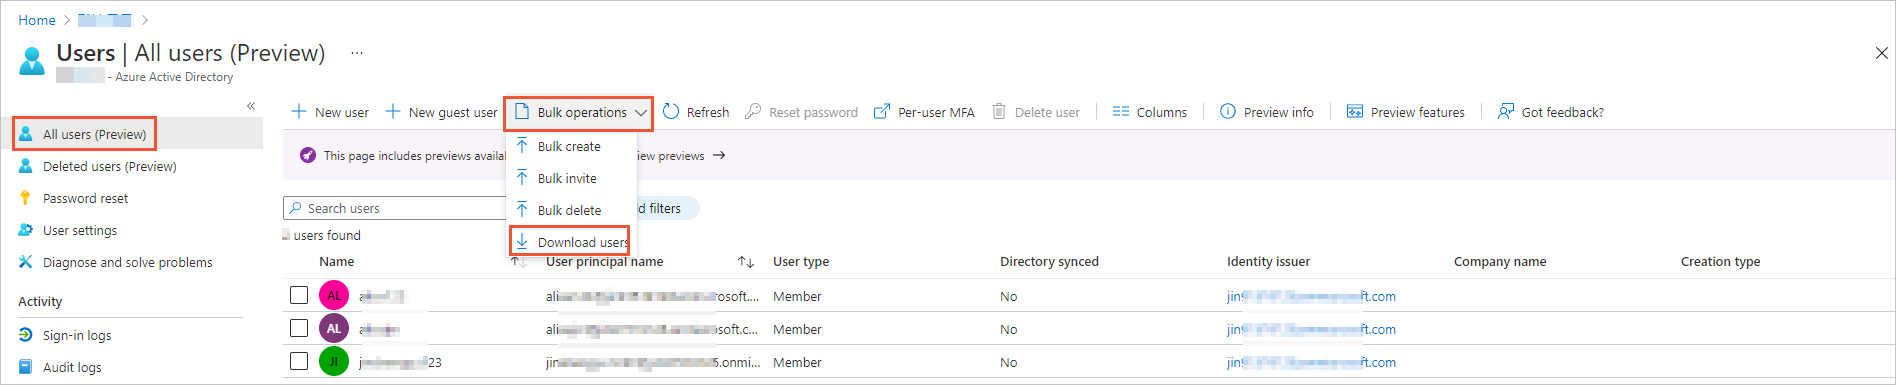
In the left-side navigation pane, click Users.
On the All users (Preview) page, check whether the credentials of the users are valid.
The usernames of the Azure AD users must follow the format requirements for creating convenience users. If the format of the username of an Azure AD user is invalid, you cannot create the convenience user that corresponds to the Azure AD user.
When you create a convenience user, the following format requirements must be met:
The username must be 3 to 24 characters in length.
The username can contain lowercase letters, digits, and special characters, including hyphens (-), underscores (_), and periods (.).
The username must start with a lowercase letter.
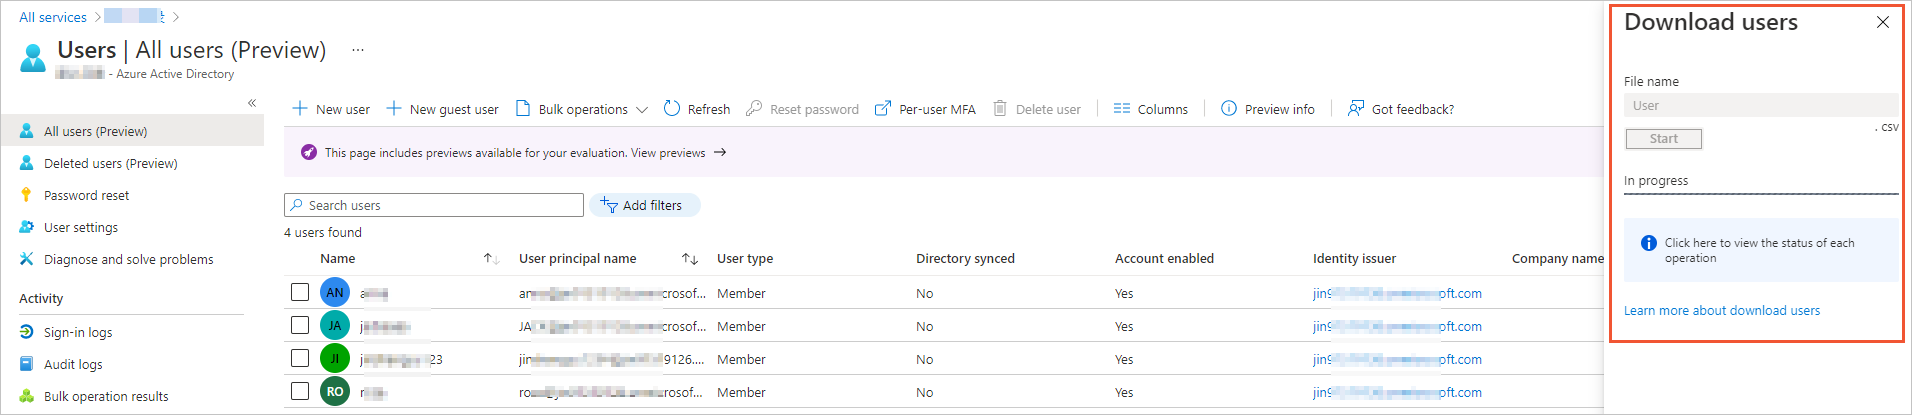
In the top navigation bar, click Bulk operations and select Download users.
Follow the on-screen instructions to download the information about Azure AD users. The downloaded information is included in a .csv file.
Use Excel to open the .csv file and enter or modify the information about users that you want to import. Make sure that the information in the file meets the format requirements for creating convenience users. Then, save the file in the .csv format.
NoteWhen you modify the user information, take note of the following format requirements:
Formats:
User-activated convenience users: The first column is Username, the second column is Email address, and the third column is Phone. The third column is optional.
Administrator-activated convenience users: The first column is Username, the second column is Email, the third column is Phone, and the fourth column is Password. The second and third columns are optional.
In the .csv file that you downloaded from the Azure AD console, the userPrincipalName column is in the
Username@Domain nameformat. You can use the Username before @ as the username of the convenience user that you want to create. If the value that is specified in the userPrincipalName column is the actual email address of the user, you can use the userPrincipalName column as the Email column. If the actual email address is different from the email address that is specified in the userPrincipalName column, specify the actual email address.
After you prepare the .csv file, click the Batch Entry tab in the Elastic Desktop Service (Enterprise Edition) console to batch create convenience users. For more information, see Create a convenience account.
After you create a convenience user that corresponds to an Azure AD user, assign a cloud computer to the convenience user at the earliest opportunity. For more information, see Manage convenience accounts.
Step 2: Create an application and assign the application to the Azure AD user
On the Azure AD side, you must create an application that corresponds to Elastic Desktop Service (Enterprise Edition) and authorize the application to the Azure AD user that wants to use Elastic Desktop Service (Enterprise Edition) . To create and assign the application, perform the following steps:
In the left-side navigation pane of the Azure AD console, click Enterprise applications.
On the All applications page, click New application.
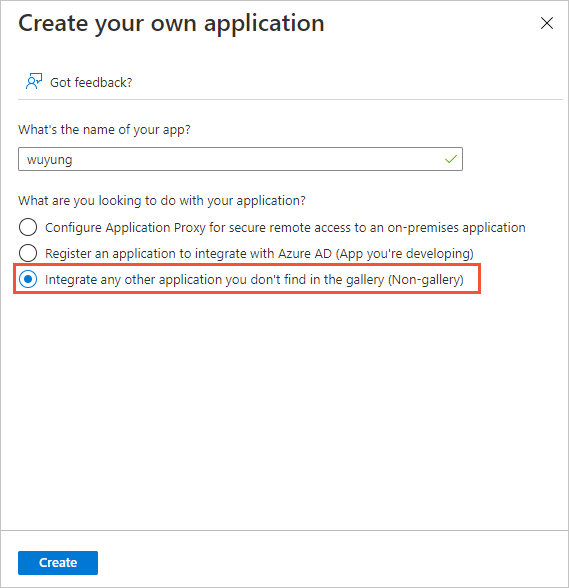
In the top navigation bar, click Create your own application.
In the dialog box that appears, enter a name for the application that you want to create, select Integrate any other application you don't find in the gallery (Non-gallery), and then click Create.
Refresh the page and click the name of the application that you created.
In the left-side navigation pane, click Users and Groups and click Add user/group.
On the Add Assignment page, select a user and click Assign.

Step 3: Configure Elastic Desktop Service (Enterprise Edition) as a trusted SAML SP in Azure AD
To configure Elastic Desktop Service (Enterprise Edition) as a trusted SAML SP, you must upload its metadata file to Azure AD. To upload the metadata file, perform the following steps:
Obtain the metadata file in the Elastic Desktop Service (Enterprise Edition) console.
Log on to the Elastic Desktop Service (EDS) console.
In the left-side navigation pane, choose .
On the Office Network (Formerly Workspace) page, find the office network for which you want to enable SSO and click the office network ID.
In the left-side navigation pane of the office network details page, click the Other tab.
On the Other tab, click Download Application Metadata File to the right of Application Metadata.
The downloaded metadata file is automatically saved to the Download folder of your local computer.
Configure SSO for the application that corresponds to Elastic Desktop Service (Enterprise Edition) in Azure AD.
In the Azure AD console, launch the application that you created in Step 2.
In the left-side navigation pane, click Single sign-on and select SAML.
Click Upload metadata file.
Select the metadata file of Elastic Desktop Service (Enterprise Edition) and click Add.
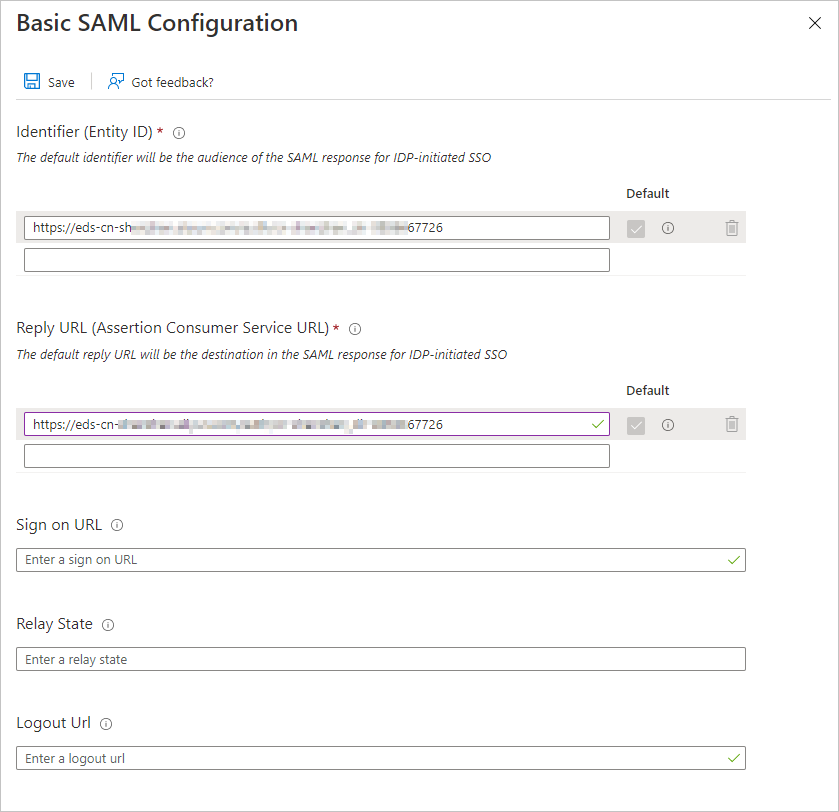
In the Basic SAML Configuration panel, check whether the values of the Identifier and Reply URL fields are valid and click Save.
NoteOpen the metadata file that is stored on your local computer and check whether the values of the Identifier and the Reply URL parameters are valid.
Identifier (Entity ID): the entityID value in the
md:EntityDescriptortag in the metadata file.
Reply URL (Assertion Consumer Service URL): the Location value in the
md:AssertionConsumerServicetag in the metadata file.
ImportantAfter you upload the metadata file, the Identifier and Reply URL fields are automatically populated. If the Identifier and Reply URL parameters are not automatically populated, specify values.
Step 4: Configure Azure AD as a trusted SAML IdP in Elastic Desktop Service (Enterprise Edition)
You can upload the Azure AD metadata file to Elastic Desktop Service (Enterprise Edition) to configure Azure AD as a trusted SAML IdP. To upload the metadata file, perform the following steps:
Obtain the Azure AD IdP metadata file.
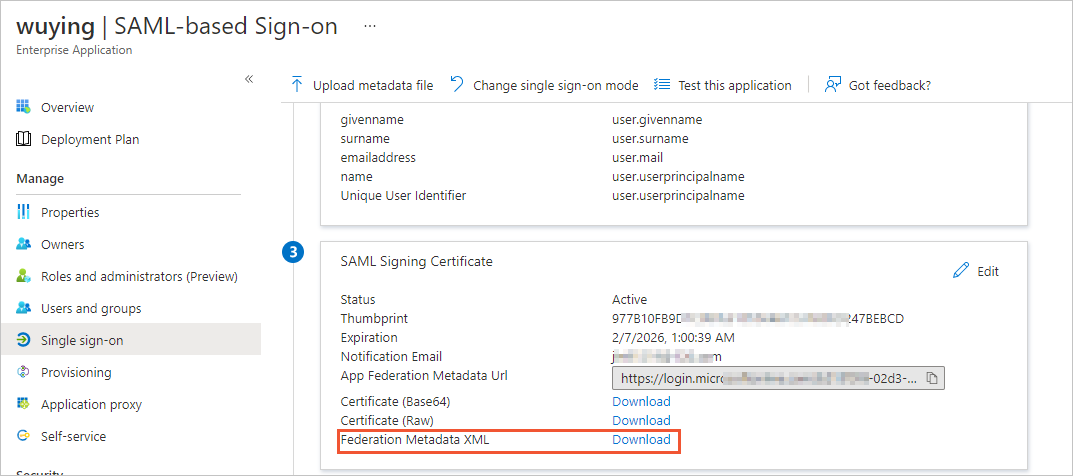
In the Azure AD console, launch the application that you created in Step 2.
In the left-side navigation pane, click Single sign-on.
In the SAML Signing Certificate section, click Download to the right of Federation Metadata XML.
The downloaded metadata file is automatically saved to the Download folder of your local computer.
In the Elastic Desktop Service console, upload the Azure AD metadata file.
Log on to the Elastic Desktop Service (EDS) console.
In the left-side navigation pane, choose .
On the Office Network (Formerly Workspace) page, find the office network for which you want to enable SSO and click the office network ID.
In the left-side navigation pane of the office network details page, click the Other tab.
On the Other tab, enable the SSO feature and upload the IdP metadata file.
SSO: Enable or disable the SSO feature for the office network.
By default, the SSO feature is disabled. When the SSO feature is disabled, SSO configurations do not take effect.
IdP Metadata: Click Upload File to upload the IdP metadata file.
If the status of the IdP Metadata parameter is Completed, Azure AD is configured as a trusted SAML IdP.
What to do next
After the SSO settings are complete, end users use the logon credentials of Azure AD users to access cloud computers. The following section describes how to implement SSO for Azure AD users to connect to cloud computers. In the following section, the Windows client of Alibaba Cloud Workspace is used.
Launch the Windows client.
On the Pro Edition (formerly Enterprise Edition) logon page, enter the ID of the office network that you enabled SSO.
On the Azure AD logon page, enter the information about an Azure AD user that corresponds to a convenience user. The Azure AD system authenticates the user credentials.
If the authentication succeeds, you can log on to the client. Cloud computers that are assigned to the user are displayed as cards. You can move your pointer over the card of the cloud computer to which you want to connect and click Connect Cloud Computer.
FAQ
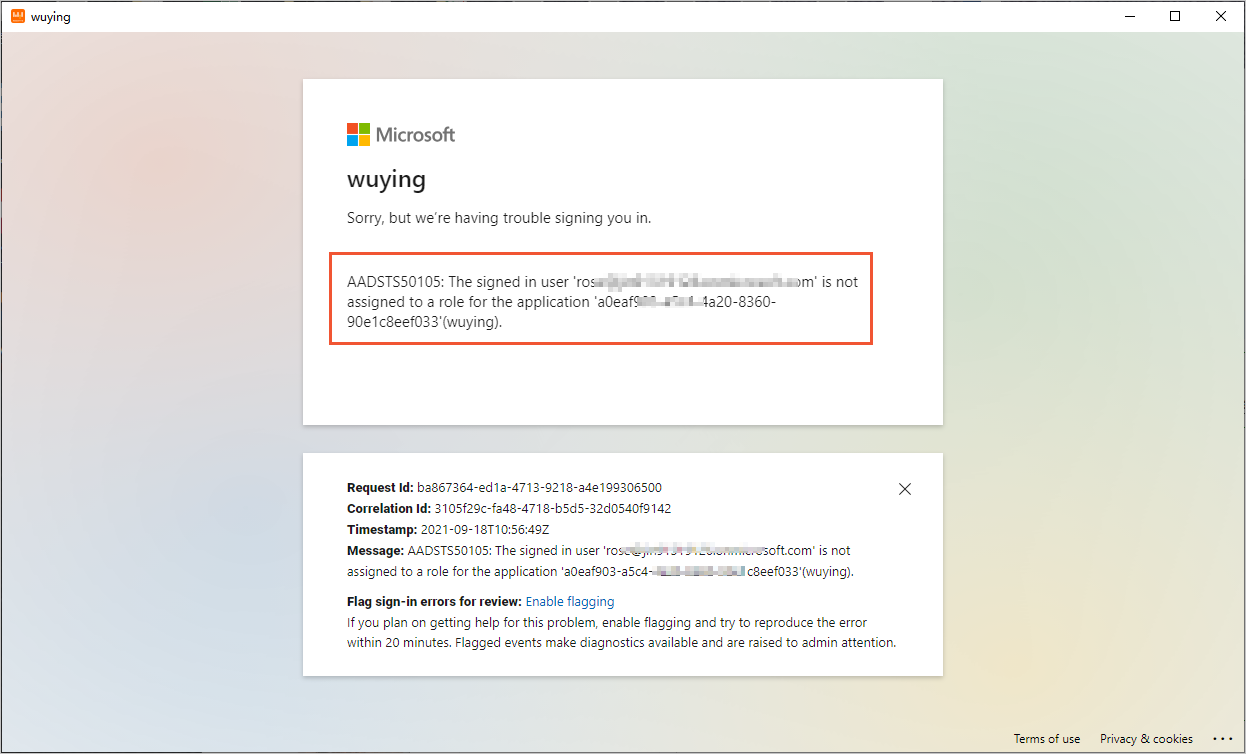
If an issue occurs on the Azure AD logon page, troubleshoot the issue as prompted.
For example, if the following error occurs, indicating that the application that corresponds to Elastic Desktop Service (Enterprise Edition) is not assigned to the user, refer to Step 2.
If you are prompted about authentication failures on the client, contact the administrator to check whether the SSO configurations are valid.
If you are prompted about internal errors on the client, contact the administrator to confirm whether a convenience user that corresponds to an Azure AD user is correctly configured.