Review the following list of frequently asked questions. Click a question to see the answer.
No network connectivity at compile-time
If you do not have network connectivity when compiling files, the compilation may fail. Follow these steps to ensure your compilation environment is connected to the network.
Confirm that you are connected to the Internet.
Confirm that you are not connected to a network proxy, such as a browser proxy or third-party proxy software.
Confirm that no IDE proxy is set.
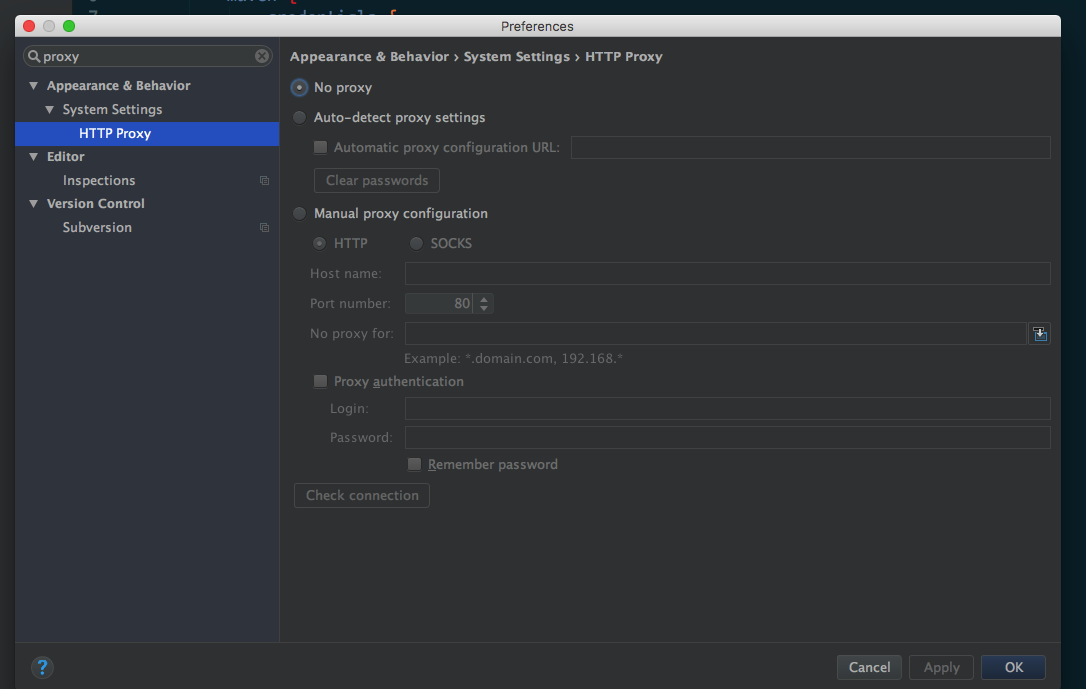
In the
gradle.propertiesfile, confirm that no Gradle proxy is set. This means thesystemProp.http.proxyHostandsystemProp.http.proxyPortproperties are not set. If they are set, delete them.
Program compilation failed
If the program fails to compile, follow these steps to troubleshoot and resolve the issue.
Follow the steps in No network connectivity at compile-time to confirm that your compilation environment has a stable network connection.
Check the Gradle execution log to confirm that the new dependency is valid.
Verify that the
group,artifact, andversion(GAV) parameters of the dependency are correct.// Reference the debug package group:artifact:version:raw@jar bundle "com.app.xxxxx.xxxx:test-build:1.0-SNAPSHOT:raw@jar" // Reference the release package group:artifact:version@jar bundle "com.app.xxxxx.xxxx:test-build:1.0-SNAPSHOT@jar" manifest "com.app.xxxxx.xxxx:test-build:1.0-SNAPSHOT:AndroidManifest@xml"In your system's command line interface, run the following command to export the Gradle execution log:
// Before you run the command, confirm that the productflavor property is not defined. Otherwise, the command will fail.
// The following command exports the execution log to the log.txt file.
gradle buildDebug --info --debug -Plog=true > log.txt
View the exported log file. A record similar to the following indicates that the new dependency does not exist.
Caused by: org.gradle.internal.resolve.ArtifactNotFoundException: Could not find nebulacore-build-AndroidManifest.xml (com.alipay.android.phone.wallet:nebulacore-build:1.6.0.171211174825).
Searched in the following locations:
http://mvn.cloud.alipay.com/nexus/content/repositories/releases/com/alipay/android/phone/wallet/nebulacore-build/1.6.0.171211174825/nebulacore-build-1.6.0.171211174825-AndroidManifest.xml
     at org.gradle.internal.resolve.result.DefaultBuildableArtifactResolveResult.notFound(DefaultBuildableArtifactResolveResult.java:38)
     at org.gradle.api.internal.artifacts.ivyservice.ivyresolve.CachingModuleComponentRepository$LocateInCacheRepositoryAccess.resolveArtifactFromCache(CachingModuleComponentRepository.java:260)
Access the HTTP link in the log (such as the third line in the log from the previous step) and log on to view the Maven repository.
NoteYou can find the username and password required for logon in the
build.gradlefile.Run the following command to purge the
gradlecache.gradle clean --refresh-dependenciesIf the Maven repository contains the dependency, delete the Gradle cache from your personal directory and then recompile. To delete the Gradle cache:
On macOS, Linux, or Unix systems, run the following commands.
cd ~
cd .gradle
cd caches
rm -rf modules-2
On Windows, navigate to the default path
C:\Users\{username}\.gradle\cachesand delete themodules-2folder.
Stuttering during compilation
If the compilation process is unusually slow (for example, it takes more than 20 minutes), you can follow these steps to improve compilation efficiency.
Follow the steps in the previous section to confirm that your compilation environment has a stable network connection.
Confirm that the firewall is disabled.
Confirm that no network proxy is configured for the IntelliJ IDEA compiler.
In your code, configure the Maven repository in advance. For example, the following code configures the Alibaba Cloud Maven repository.
 apply plugin: 'maven'
 buildscript {
     repositories {
         mavenLocal()

 // First, load the Maven image
         maven{ url 'http://maven.aliyun.com/nexus/content/groups/public/'}

         maven {
             credentials {
                 username "Use a known user"
                 password "Use a known password"
             }
             url "http://mvn.cloud.alipay.com/nexus/content/repositories/releases/"
         }
     }
     dependencies {
         classpath 'com.android.tools.build:gradle:2.1.3'
         classpath 'com.alipay.android:android-gradle-plugin:2.1.3.3.3'
         classpath 'com.neenbedankt.gradle.plugins:android-apt:1.8'
     }
 }
 allprojects {
     repositories {
         flatDir {
             dirs 'libs'
         }
         mavenLocal()
         maven {
             credentials {
                 username "xxxxxxxxx"
                 password "xxxxxxx"
             }
             url "http://mvn.cloud.alipay.com/nexus/content/repositories/releases/"
         }
         maven{ url 'http://maven.aliyun.com/nexus/content/groups/public/'}
     }
 }
Compilation fails with a NullPointerException
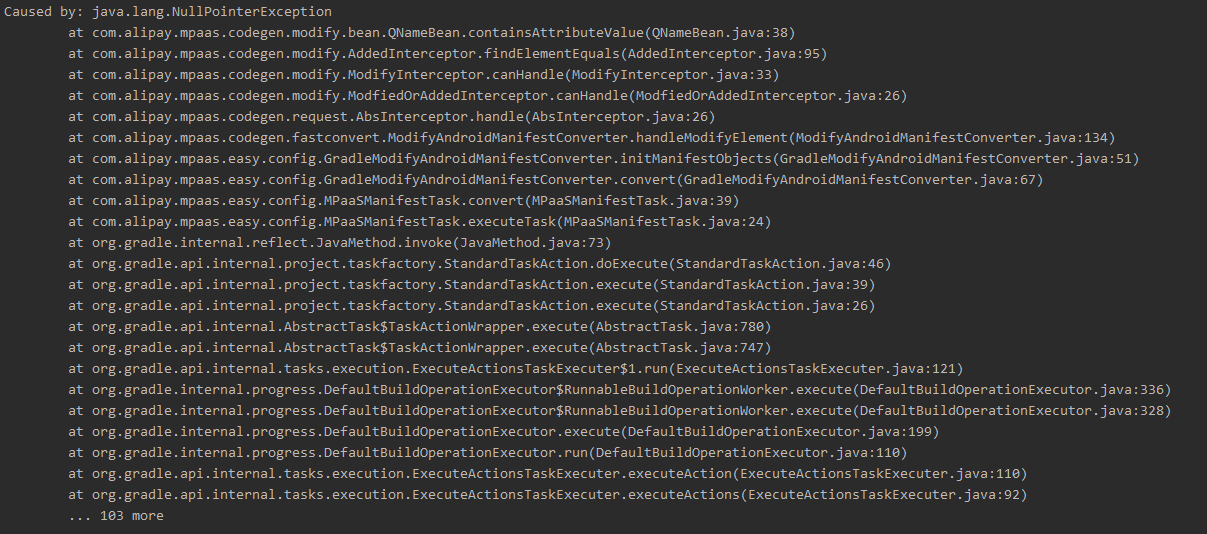 When connecting to Apsara Stack, the compilation may fail with a
 NullPointerException after you download the configuration file and connect to mPaaS. If this occurs, inspect the configuration file. Ensure that all 13 required fields are present and that the field names match those in the file downloaded from the public cloud.
How to debug an application
You need to debug code during development. This topic describes two debugging methods.
Start the application in debug mode
Debug the application after it is running
Start the application in debug mode
Scenarios
You want to debug the initial code when the application starts, such as the initialization code during
application init.Procedure
Run the command
adb shell am start -W -S -D <application_package_name>/<first_activity_class_name>. For example, the package name of the mPaaS Demo iscom.mpaas.demo, and the first activity class name iscom.alipay.mobile.quinox.LauncherActivity. You can run the commandadb shell am start -W -S -D com.mpaas.demo/com.alipay.mobile.quinox.LauncherActivityto start the application in debug mode. The first activity class name is shown in the following figure.
After you run the command, the following dialog box appears on your phone.

Set a breakpoint on the line of code you want to debug, and then attach to the application's process, as shown in the figure.
Debug the application after it is running
Scenarios
You need to debug after an event is triggered, such as clicking a button or navigating to a page.
Procedure
After the application is running, click the Attach to process (
 ) button to start debugging.
Notes on using MultiDex in mPaaS Portal and Bundle projects
We do not recommend using MultiDex for Portal and Bundle projects. The only exception is if a single portal project requires multiDexEnabled true. If a Bundle is too large, split the bundle instead of enabling MultiDex support for it.
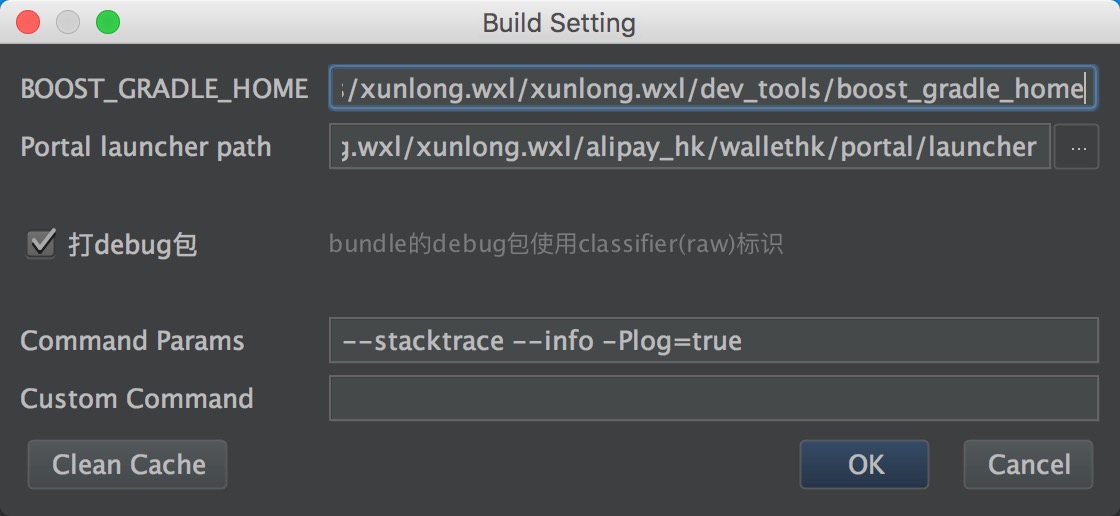
How to clear the Gradle cache
Open the settings interface for the Gradle plugin and click the Clean Cache button to delete all cached data for the Gradle plugin.
How to upgrade to the latest Gradle plugin
This section applies only to the 10.1.68 baseline series. For more information about this baseline version, see Baseline introduction and 10.1.68 baseline series release notes.
The official Android Gradle Plugin from Google is version 3.5.x.
mPaaS also provides a compatible plugin at version 3.5.x, which supports the APIs of Google Android Gradle Plugin 3.5.3 and Gradle 6.2.
Changes to the import method
You only need to add the following dependency to import the mPaaS plugin. You do not need to import the official Android Gradle Plugin because it is automatically imported due to transitive dependencies.
dependencies {
classpath 'com.alipay.android:android-gradle-plugin:3.5.18'
}
The Gradle Wrapper version must be 5.6 or later. We recommend using version 6.2.
Changes to usage
You no longer need to use
apply plugin:'com.android.application'If you have a portal project, you only need to use
apply plugin:'com.alipay.portal'.If you have a bundle project, delete
apply plugin:'com.android.application', and use onlyapply plugin:'com.alipay.bundle'.If you have a library project, delete
apply plugin:'com.alipay.library', and use onlyapply plugin:'com.android.library'.
If you use the latest stable version of Android Studio 3.5 or later, you need to add
android.buildOnlyTargetAbi=falseto thegradle.propertiesfile.Because the mPaaS Security Guard component does not support V2 signing, you must disable V2 signing to debug and install the APK using Android Studio. If you build from the command line and your minSdkVersion is 24 or greater, you also need to disable V2 signing. To disable V2 signing:
v2SigningEnabled false
After clearing the cache, monitor and confirm that the miniapp and H5 pages work as expected.
The input file tag cannot open the camera on Huawei EMUI 10
Because the URI implementation on Huawei EMUI 10 differs from standard Android, you may not be able to open the camera on Huawei EMUI 10. Follow these steps to resolve this issue.
1. Upgrade the baseline
If you are using the 32 series baseline, upgrade to 10.1.32.18 or later.
If you are using the 60 series baseline, upgrade to 10.1.60.9 or later.
If you are using the 68 series baseline, upgrade to 10.1.68-beta.3 or later.
2. Configure FileProvider
You can reuse your existing FileProvider or create a new one.
Create a new Java class that inherits from FileProvider.
import android.support.v4.content.FileProvider;
public class NebulaDemoFileProvider extends FileProvider {
}
In res/xml, create a new file named nebula_fileprovider_path.xml.
<?xml version="1.0" encoding="utf-8"?>
<paths xmlns:android="http://schemas.android.com/apk/res/android">
 <external-path name="external" path="."/>
</paths>
Add the configuration to AndroidManifest.
<provider android:name="com.mpaas.demo.nebula.NebulaDemoFileProvider" android:authorities="com.mpaas.demo.nebula.provider" android:exported="false" android:grantUriPermissions="true"> <meta-data android:name="android.support.FILE_PROVIDER_PATHS" android:resource="@xml/nebula_fileprovider_path" /> </provider>NoteThe value of
android:authorities,com.mpaas.demo.nebula.provider, is a sample from the mPaaS demo. You must set this value for your own application and must not usecom.mpaas.demo.nebula.providerto prevent conflicts with other mPaaS applications.
3. Implement H5NebulaFileProvider
Create a new Java class that implements
H5NebulaFileProvider. Implement thegetUriForFilemethod. In this method, call theFileProvideryou implemented above to generate a URI.public class H5NebulaFileProviderImpl implements H5NebulaFileProvider { private static final String TAG = "H5FileProviderImpl"; @Override public Uri getUriForFile(File file) { try { return getUriForFileImpl(file); } catch (Exception e) { H5Log.e(TAG, e); } return null; } private static Uri getUriForFileImpl(File file) { Uri fileUri = null; if (Build.VERSION.SDK_INT >= 24) { fileUri = NebulaDemoFileProvider.getUriForFile(LauncherApplicationAgent.getInstance().getApplicationContext(), "com.mpaas.demo.nebula.provider", file); } else { fileUri = Uri.fromFile(file); } return fileUri; } }Register
H5NebulaFileProvider. After mPaaS initialization is complete and before starting the offline package, registerH5NebulaFileProvider. The registration is global and only needs to be done once.H5Utils.setProvider(H5NebulaFileProvider.class.getName(), new H5NebulaFileProviderImpl());
How to use or depend on mPaaS in a Library
When using the mPaaS framework, you sometimes need to reuse modules. To do this, add the module as a dependency. This topic uses the mPaaS Scan component's module as an example.
Prerequisites
You have connected your project to mPaaS using the native AAR method.
Procedure
In your Android project, create an Android Library module named
scan.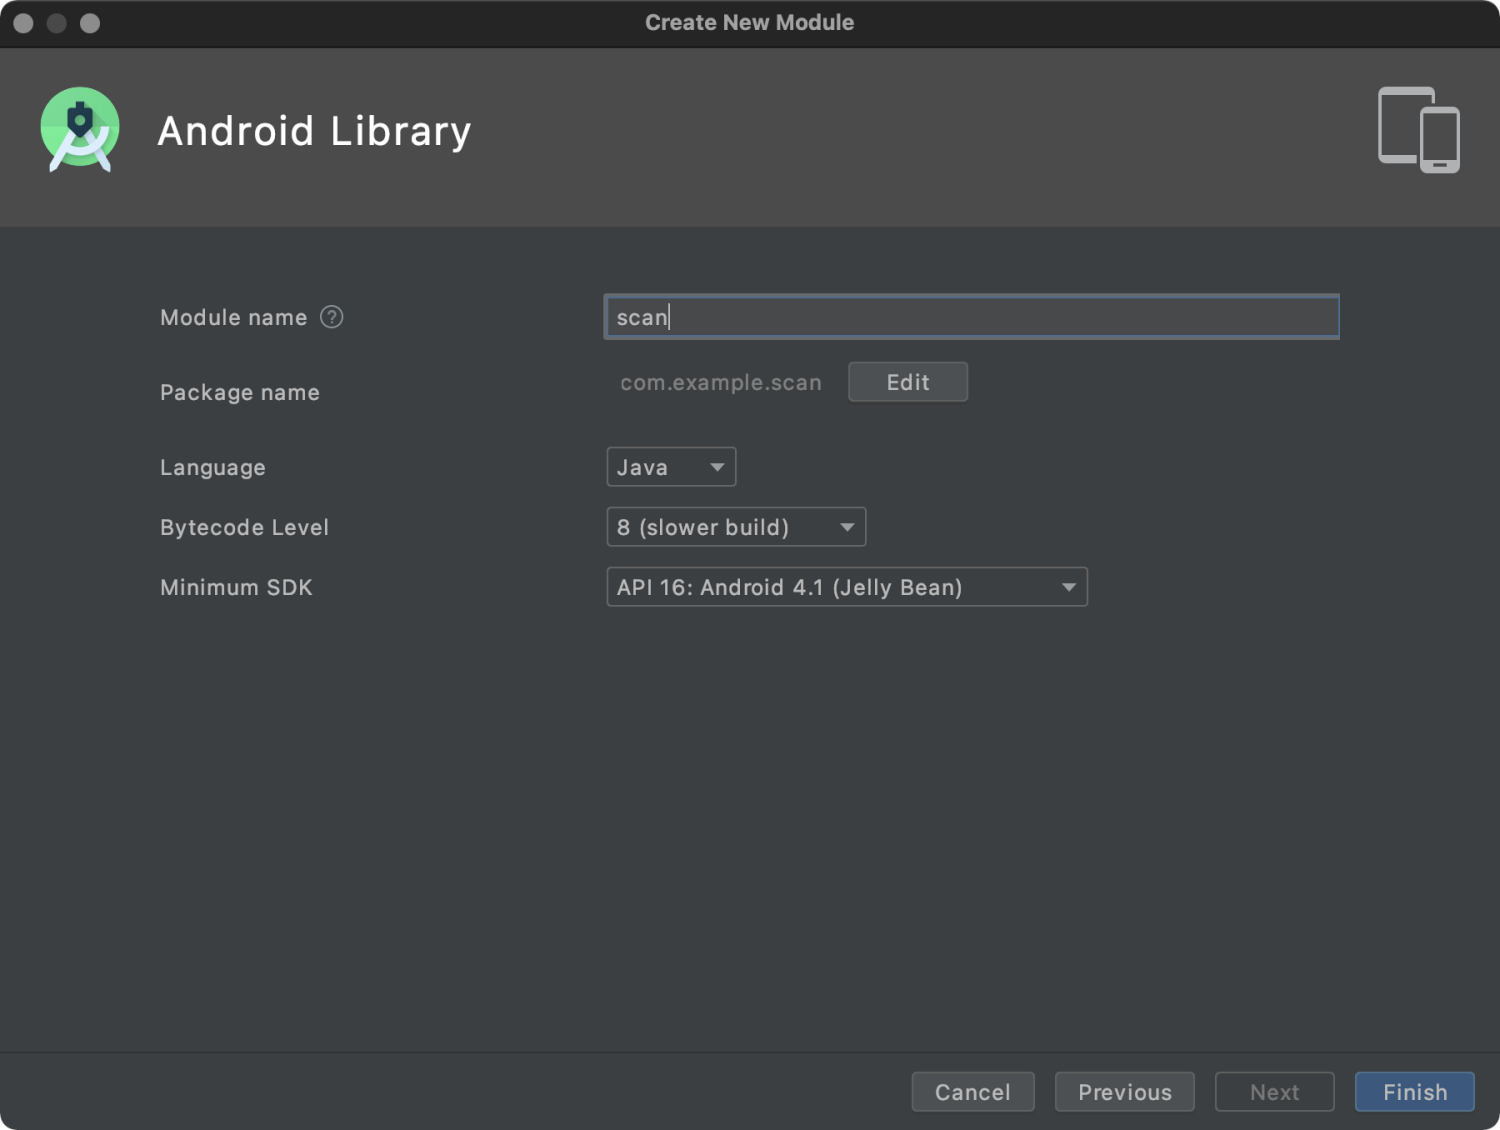
In the build.gradle file of the new scan module, add
api platform("com.mpaas.android:$mpaas_artifact:$mpaas_baseline"). The following is an example:dependencies { …… // This must be added when using mPaaS component features in a module. api platform("com.mpaas.android:$mpaas_artifact:$mpaas_baseline") …… }Use the mPaaS plugin in Android Studio to install the Scan component for the scan module. The menu path is: mPaaS > Native AAR Connection > Configure/Update Component > Start Configuration. After installation, the Scan component loads automatically.
Configure the main app project.
 plugins {
     id 'com.android.application'

     ......
     // You must add baseline.config (baseline) to the build.gradle file under app.
     id 'com.alipay.apollo.baseline.config'
 }
Add the scan module as a dependency where you need to use the Scan component.
 dependencies {
     api platform("com.mpaas.android:$mpaas_artifact:$mpaas_baseline")

     ....
     api project(':scan')// Scan component
 }
How to resolve runtime error 608 or libsgmain native errors
If an exception occurs at runtime, search for the keyword SecException in the Android Studio operational log. If you find error code 608 or a libsgmain native error, follow these steps to troubleshoot.
Check if the
res/drawable/yw_1222.jpgfile exists.Check if the configuration file contains Base64.
Check if the Gradle plugin
baseline.updateorbaseline.configis applied.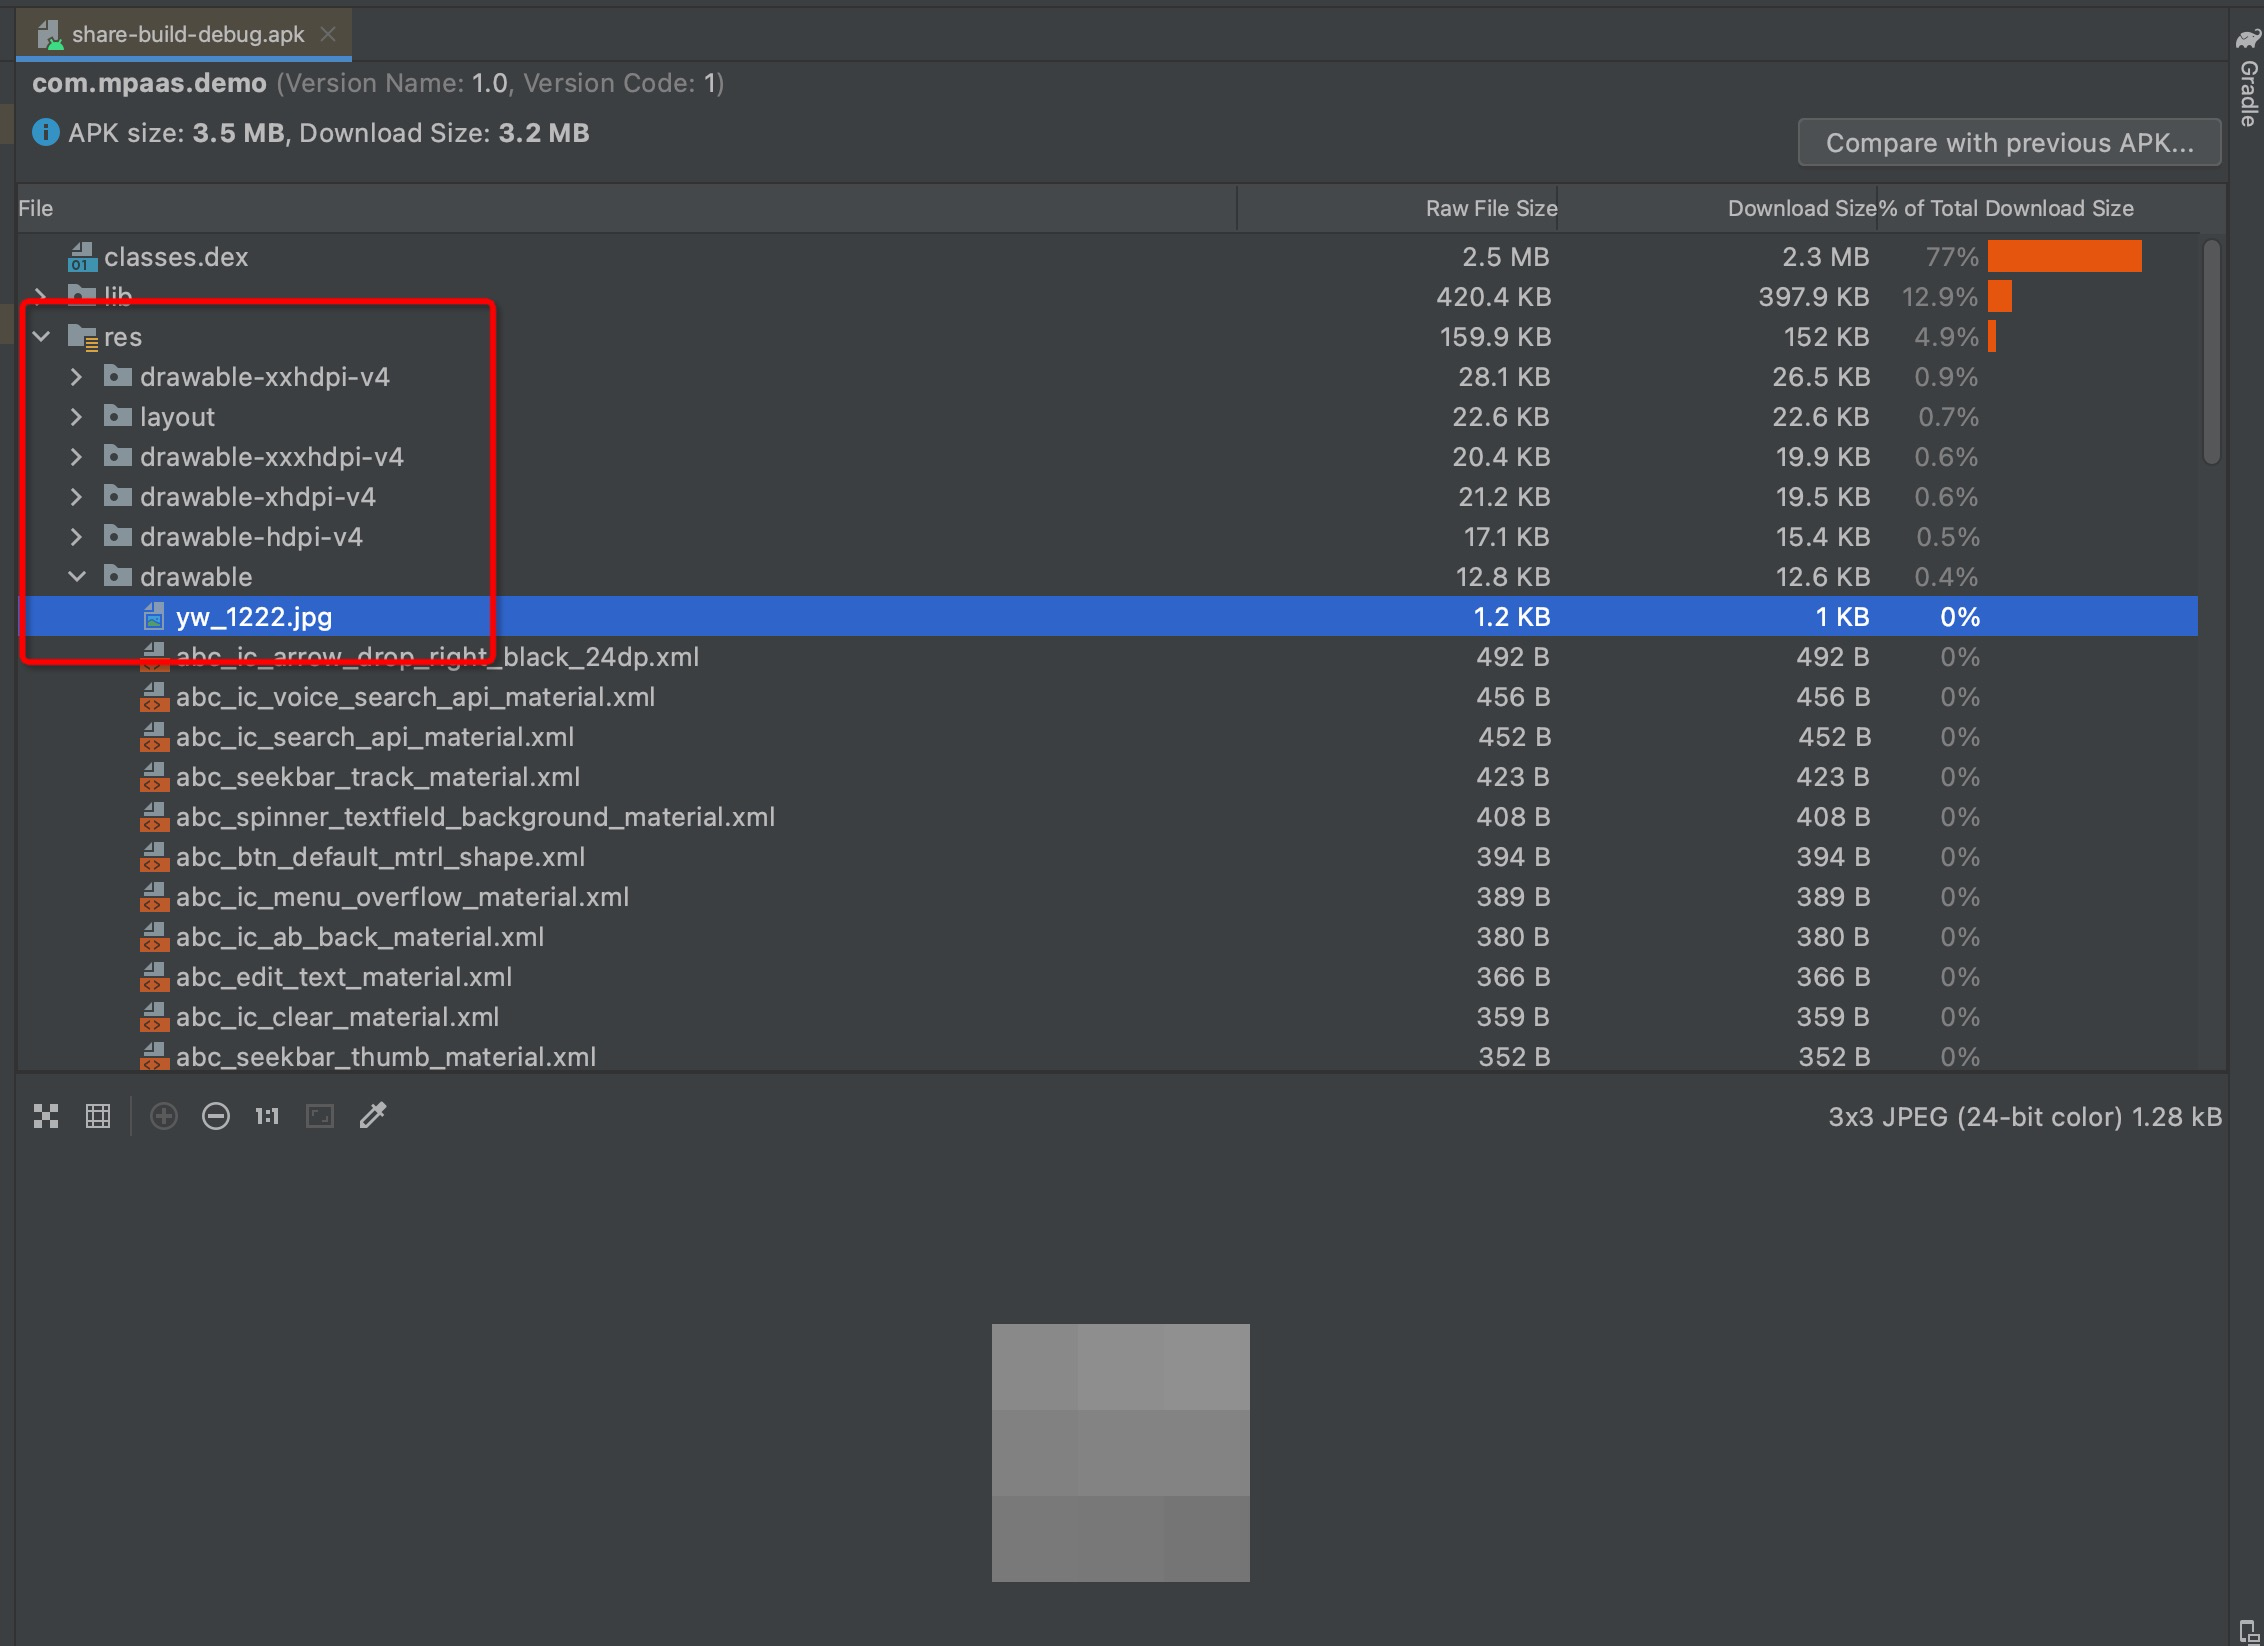
Check if the META-INF folder contains the three files:
CERT.SF,MANIFEST.MF, andCERT.RSA.In
app/build.gradle, enablev1SignEnabled.Check if the
build.gradlefile in the project's root directory containsapply plugin: 'com.alipay.apollo.optimize'.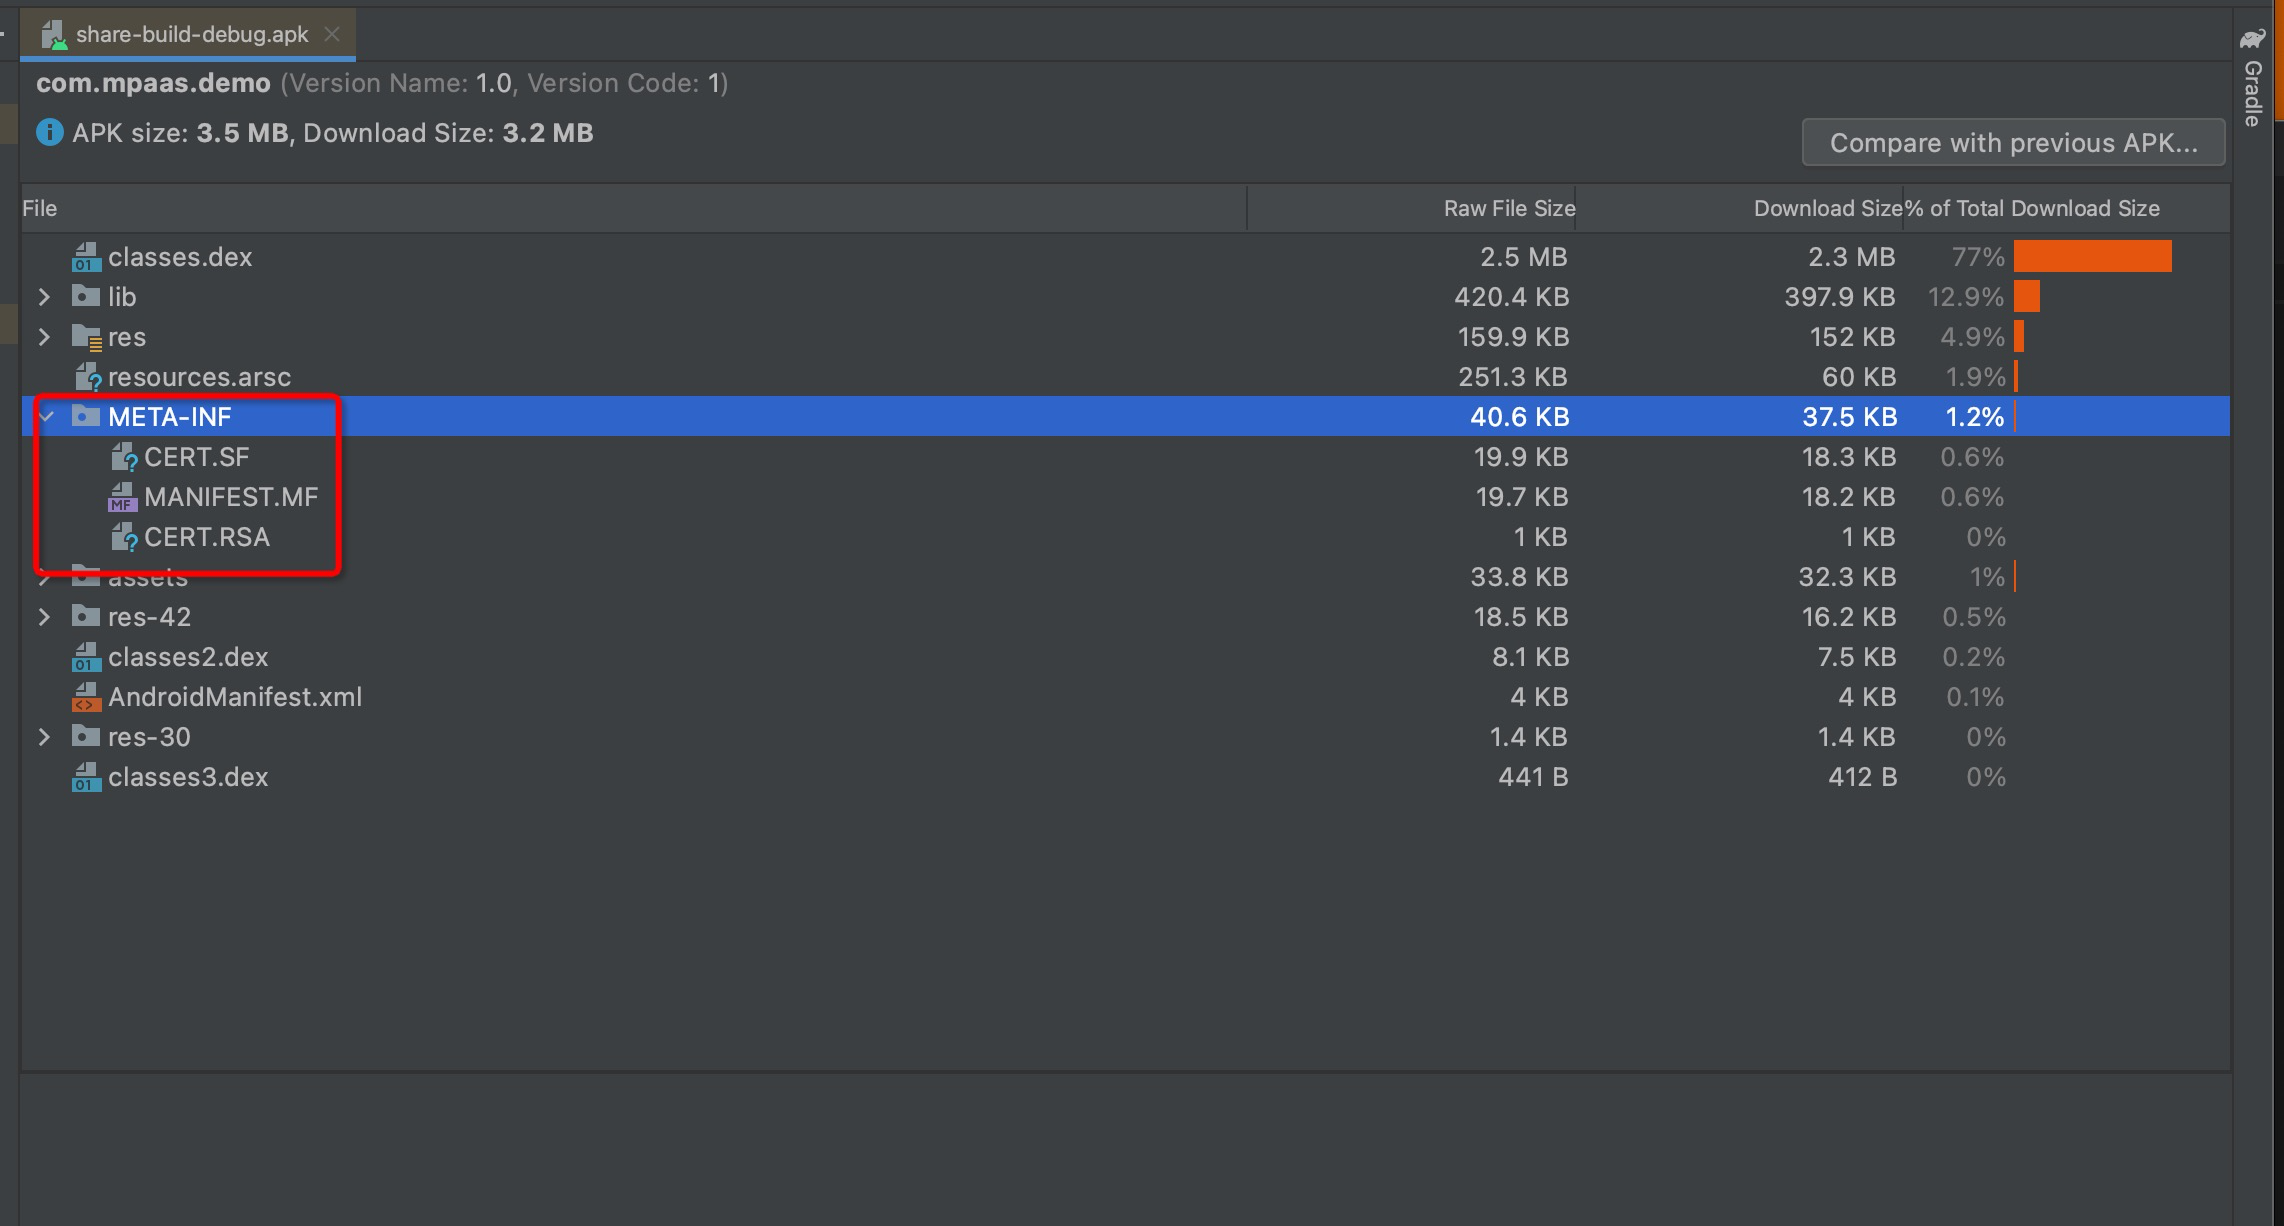
If all these checks pass, the issue is likely with the signed APK package that was uploaded to the console, such as a signature error. You must upload the APK package again.