DataWorks allows you to use workflows to organize your nodes in DataStudio based on your business requirements. DataWorks provides two types of workflows: auto triggered workflows and manually triggered workflows. Nodes in an auto triggered workflow are scheduled to run on a regular basis, and nodes in a manually triggered workflow are manually triggered to run. This topic describes how to create, design, commit, and view a workflow and how to modify or delete multiple nodes in a workflow at a time.
Background information
A workspace supports various types of compute engines, such as MaxCompute, Hologres, and E-MapReduce (EMR), and can contain multiple workflows. A workflow is a collection of multiple types of objects. The objects can be nodes for Data Integration and nodes for the compute engines. For example, the object can be an ODPS SQL node or a node that is used to synchronize the schemas of MaxCompute tables.
Each type of object corresponds to an independent folder. You can create subfolders in the folder. To manage objects in an efficient manner, we recommend that you create up to four levels of subfolders. If you create more than four levels of subfolders, your workflow becomes excessively complex. In this case, we recommend that you split your workflow into two or more workflows and add the workflows to the same solution to improve work efficiency.
Auto triggered workflows and manually triggered workflows
DataWorks provides two types of workflows: auto triggered workflows and manually triggered workflows. Nodes in an auto triggered workflow are scheduled to run on a regular basis, and nodes in a manually triggered workflow are manually triggered to run. You can use the two types of workflows to develop nodes in DataStudio. After a node is developed, you can commit and deploy the node to Operation Center in the production environment. The following table describes the differences between auto triggered workflows and manually triggered workflows.
Item | Auto triggered workflow | Manually triggered workflow |
Use scenario | You want all nodes in a workflow to run as scheduled on a regular basis. | You want all nodes in a workflow to be manually triggered to run. |
Running mode | The workflow is run as scheduled on a regular basis. | The workflow is manually triggered to run. |
Configurations for node development | You must configure the following parameters for nodes in the workflow: the Run At parameter and the parameters in the Dependencies section of the Properties tab. | You do not need to configure parameters that are related to auto triggered workflows, such as Parent Nodes, Output, and Run At. Note The configurations of nodes in manually triggered workflows are the same as the configurations of nodes in auto triggered workflows except for the parameters that you do not need to configure. This topic describes the configurations of nodes in an auto triggered workflow. |
Entry point |
|
|
If you cannot find the entry points in the left-side navigation pane of DataStudio, you can configure the modules that you want to display in DataStudio. For more information, see Adjust the displayed DataStudio modules.
Create an auto triggered workflow
In DataStudio, you can implement data development by using the components in workflows, such as nodes. Before you create a node, you must create a workflow. After you create a workflow, you can design the workflow based on your business requirements. For more information, see Design a workflow. To create an auto triggered workflow, perform the following steps:
Go to the DataStudio page.
Log on to the DataWorks console. In the top navigation bar, select the desired region. In the left-side navigation pane, choose . On the page that appears, select the desired workspace from the drop-down list and click Go to Data Development.
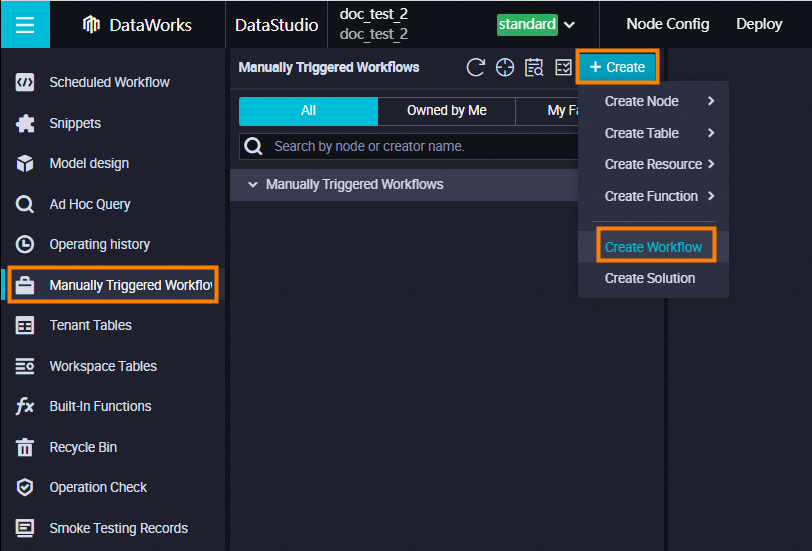
On the DataStudio page, move the pointer over the
 icon and select Create Workflow.
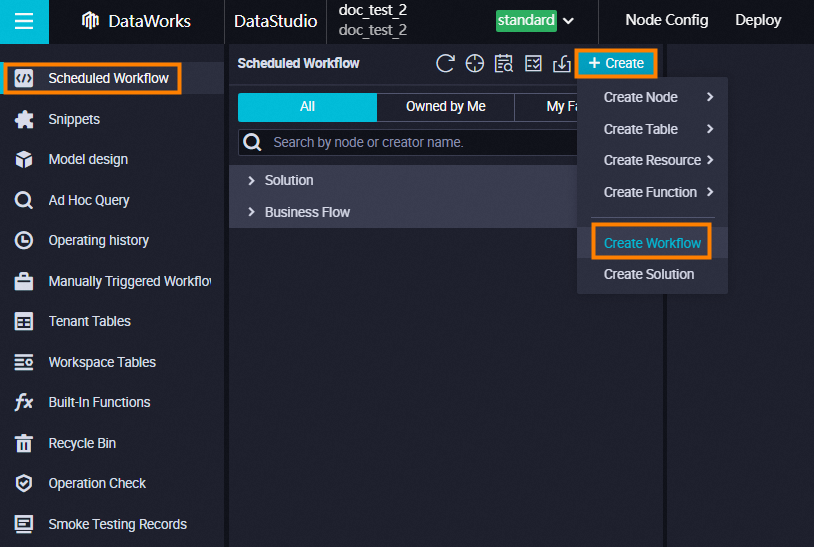
In the Create Workflow dialog box, configure the Workflow Name and Description parameters.
Click Create.
After the workflow is created, you can perform the following operations:
Develop nodes of a compute engine in the workflow. For more information, see Design the business logic.
Commit the workflow to commit and deploy the nodes that you developed in the workflow to the production environment. For more information, see Commit a workflow.
Manage the workflow. For more information, see View all workflows, Delete a node from a workflow, Export a common workflow for replication, and Export multiple workflows from a DataWorks workspace at a time and import them to other DataWorks workspaces or open source engines.
Design a workflow
Code development is implemented in workflows. To develop code in a workflow, you can create a node under a folder of a compute engine type in the directory tree. You can also double-click a workflow. On the workflow configuration tab, drag the components including nodes of different compute engine types to the canvas and connect the components to form a directed acyclic graph (DAG). 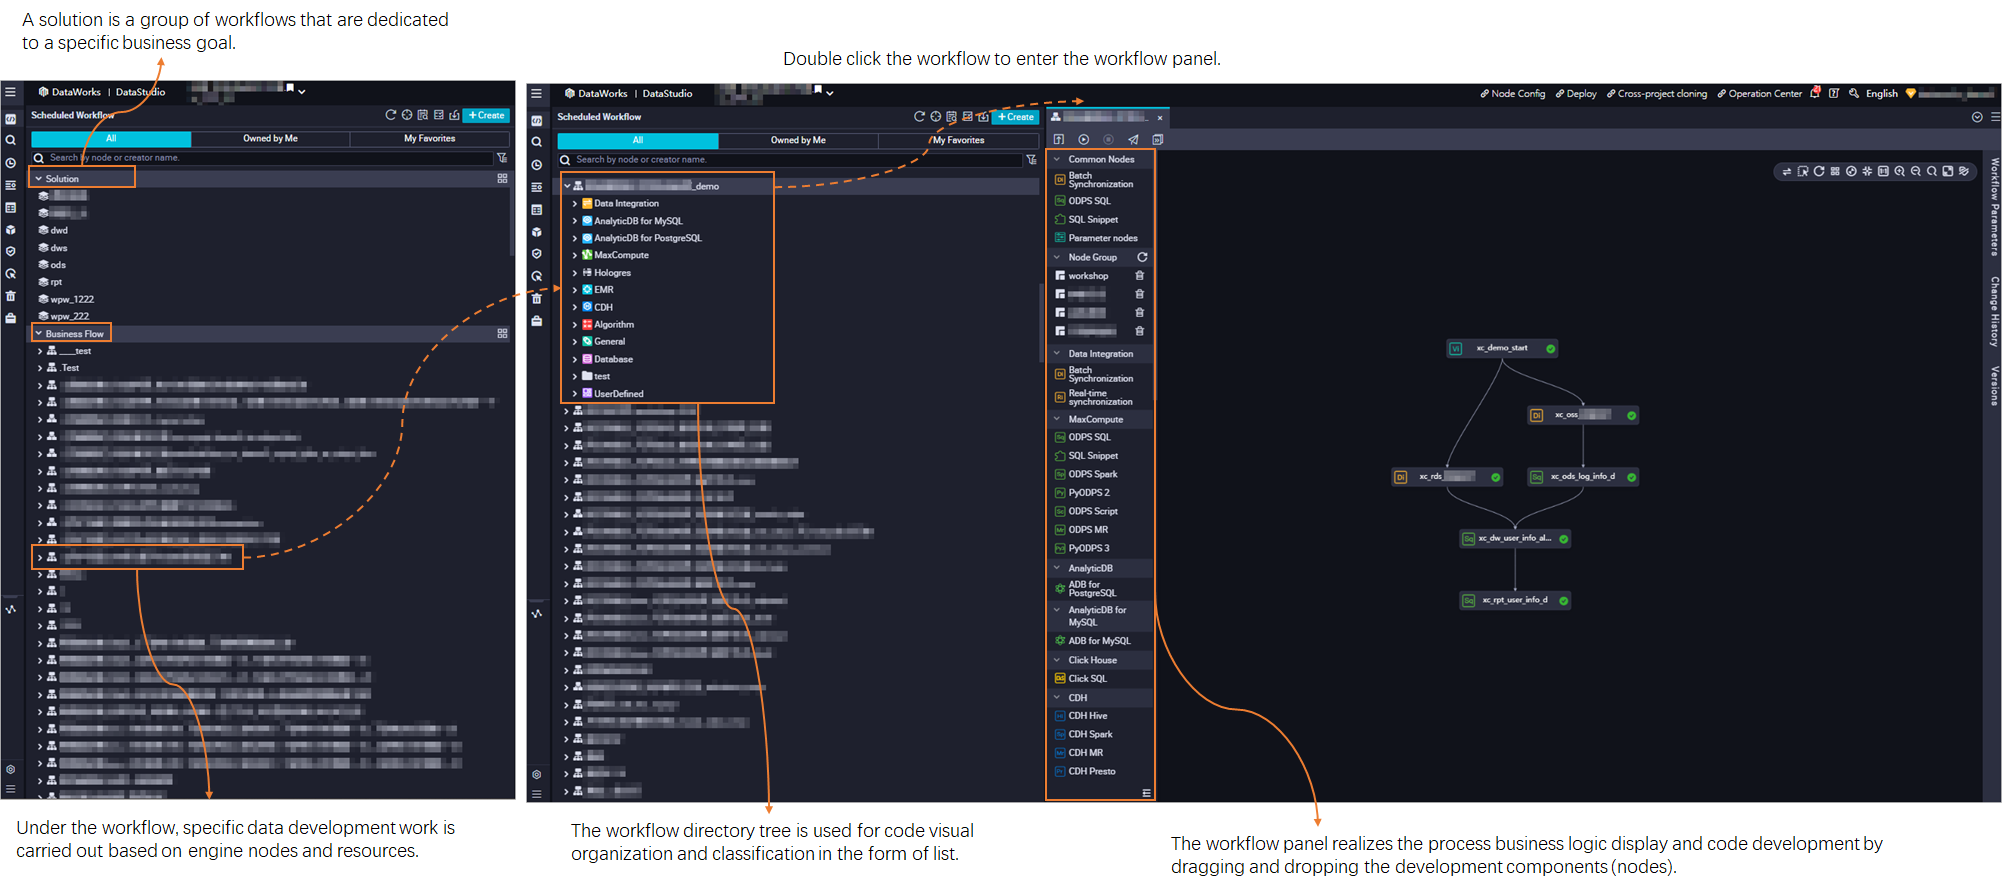 When you design a workflow, take note of the following items:
If a large number of nodes are created in a workflow, the running of the workflow may be affected. We recommend that you create no more than 100 nodes in a workflow.
NoteYou can create a maximum of 1,000 nodes in a workflow.
In the DAG, you can draw a line between two nodes to configure dependencies between the two nodes. You can also open the Properties panel on the configuration tab of a node and configure node dependencies in the panel. For more information, see Scheduling dependency configuration guide.
If you create a node in the directory tree of a workflow, the node dependencies can be configured based on the lineage in the code. For more information, see Scheduling dependency configuration guide.
Design the business logic
DataWorks encapsulates the capabilities of different compute engines in different types of nodes. You can use nodes of different compute engine types to develop data without the need to run complex commands on compute engines. You can also use the general nodes of DataWorks to design complex logic.
You can configure nodes in a workflow, such as nodes for Data Integration and nodes for compute engines.
You can configure nodes for Data Integration to synchronize data, such as batch synchronization nodes and real-time synchronization nodes.
You can perform data cleansing based on nodes for compute engines in a workflow, such as ODPS SQL nodes for a MaxCompute compute engine. If you want to use resources or functions when you develop code, DataWorks allows you to create resources and functions in a visualized manner.
For more information about the supported types of nodes that encapsulate the capabilities of different compute engines and the supported features for development in DataWorks, see DataStudio.
For more information about how to configure scheduling dependencies and basic properties, see Configure basic properties.
Commit a workflow
In a workspace in standard mode, the DataStudio page only allows you to develop and test nodes in the development environment. To commit the code to the production environment, you can commit multiple nodes in the workflow at a time and deploy them on the Deploy page.
After you design a workflow, click the
 icon in the toolbar.
 In the Commit dialog box, select the nodes that you want to commit and enter your comments in the Change Description field. Then, determine whether to select Ignore I/O Inconsistency Alerts based on your business requirements. If you do not select Ignore I/O Inconsistency Alerts, an error message is displayed if the system determines that the input and output that you configured do not match the input and output identified in code lineage analysis. For more information, see When I commit a node, the system reports an error that the input and output of the node are not consistent with the data lineage in the code developed for the node. What do I do?
Click Confirm.
NoteIf you have not modified the code or properties of a node and you have committed the node on the configuration tab of the node, you cannot select the node in the Commit dialog box. If you have modified the code or properties of a node but you have not committed the node on the configuration tab of the node, you can select the node in the Commit dialog box. Then, you can enter your comments in the Change Description field and click Confirm. The modification to the code or properties of the node is committed.
Deploy the nodes in the workflow. For more information, see Deploy a node in a workspace that is in standard mode.
View operating history
You can go to the Operating history pane of the DataStudio page to view the records of all nodes that are run in the last three days within your current logon account.
After you run a node in DataStudio, the node is issued to the corresponding compute engine instance. Even if you accidentally close the node during the running of the node, the node is continuously run. You can go to the Operating history pane to view run logs of the node or stop the node.
View all workflows
In the Scheduled Workflow pane, right-click Business Flow and select All Workflows to view all the workflows in the current workspace.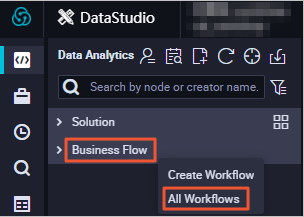
Click the card of a workflow. The configuration tab of the workflow appears.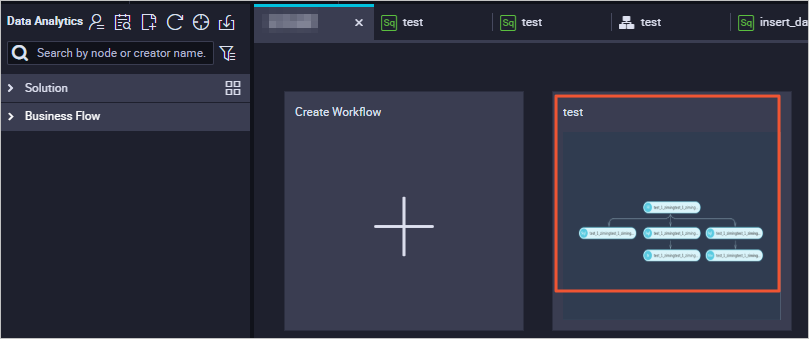
Manage workflows by using the solution feature
You can include one or more workflows in a solution. Solutions have the following benefits:
A solution can contain multiple workflows.
A workflow can be added to multiple solutions.
Workspace members can collaboratively develop and manage all solutions in a workspace.
If you manage workflows by using solutions, you can perform the following operations:
In the lower part of the left-side navigation pane of the DataStudio page, click the
 icon. The Personal Settings tab of the Settings page appears. In the File Management section of the Personal Settings tab, select Show Solution.
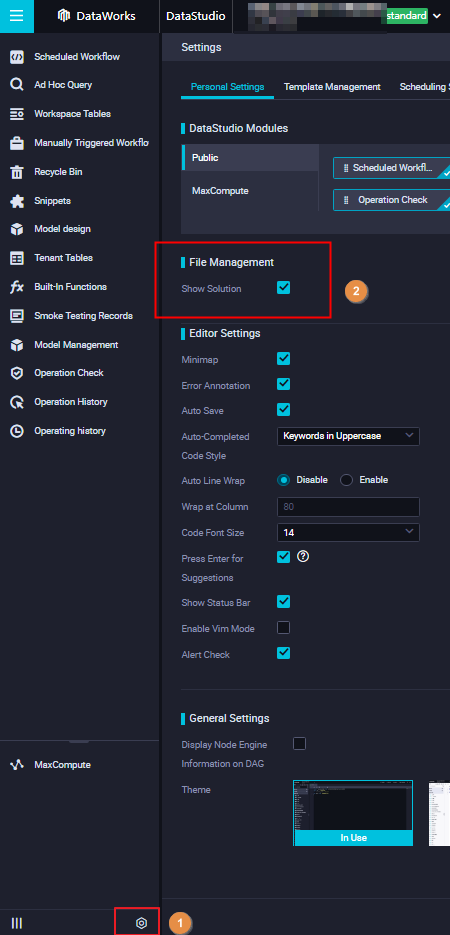
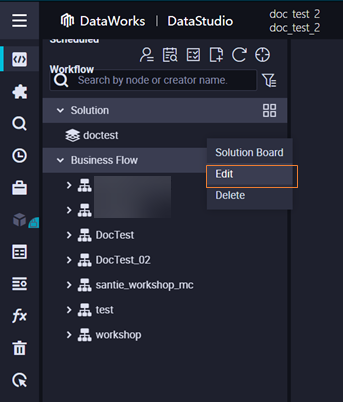
Add multiple workflows to a solution at a time. To do so, right-click a solution, select Edit, and then modify the Workflows parameter in the Change Solution dialog box.
Delete a node from a workflow
Delete nodes by using the Batch Operation feature
You can use the Batch Operation feature to modify scheduling properties for multiple nodes at a time. For example, you can modify the resource groups that are used by multiple nodes at a time. You can also use the feature to commit multiple nodes for review at a time. You can filter nodes by node type, workflow, and resource group for scheduling.
You can modify scheduling properties for multiple nodes in the development environment at a time. If you want the modifications to take effect in the production environment, you must deploy the nodes to the production environment.
On the DataStudio page, click the
 icon on the right side of Scheduled Workflow to go to the Node tab.
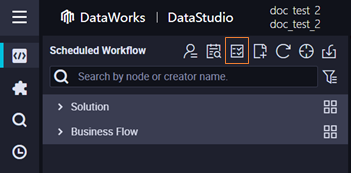
Modify or delete nodes.
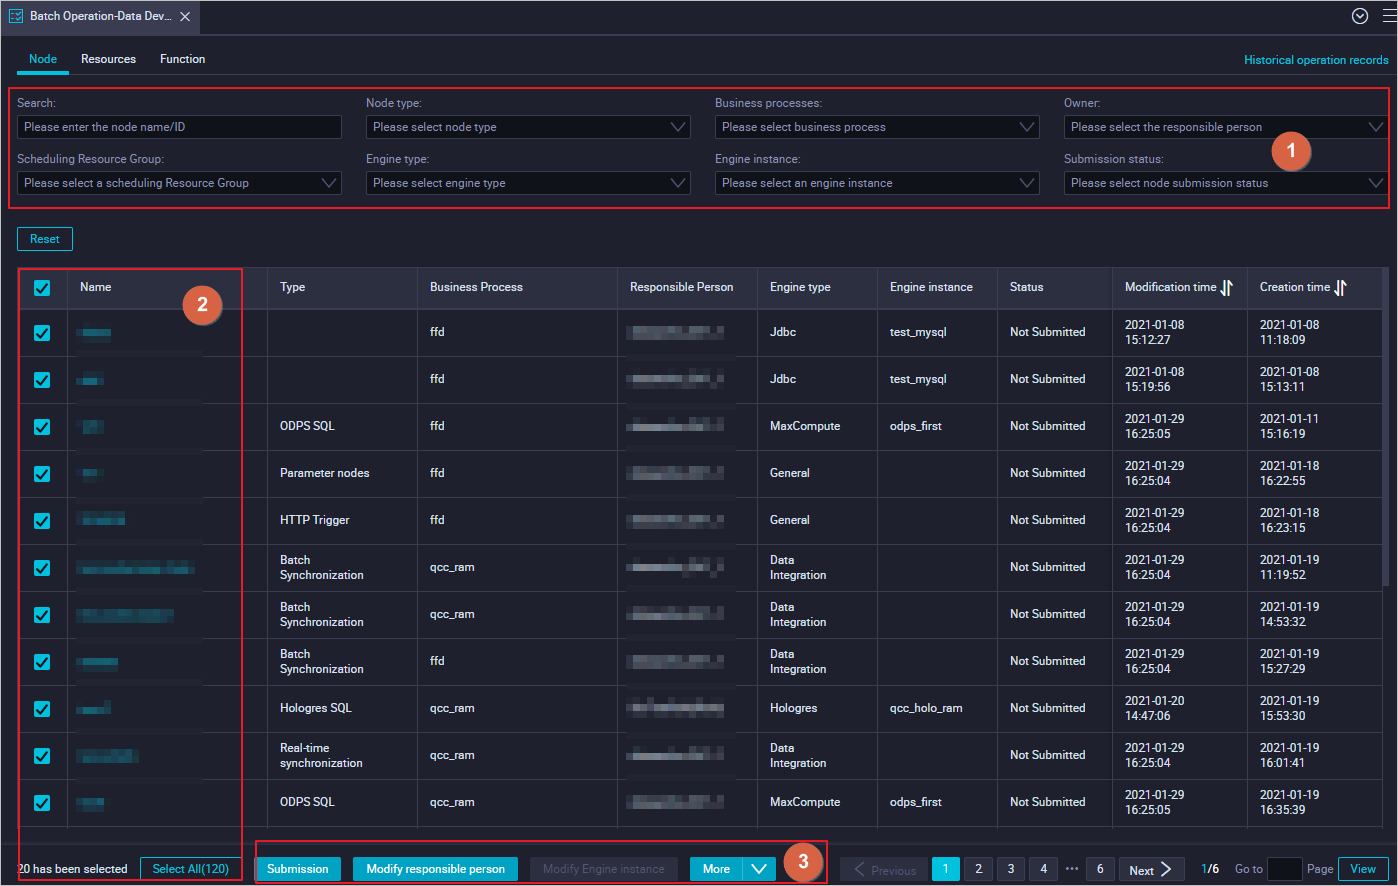
Configure filter conditions, such as the node name, node ID, node type, and workflow, to find the nodes that you want to modify or delete.
Select specific or all nodes.
Modify or delete nodes.
Modify nodes: You can modify only the owners and resource groups for scheduling of multiple nodes at a time. You can click Change Owner or Change Resource Group for Scheduling in the lower part of the Node tab to modify the owners or resource groups for scheduling of multiple nodes at a time.
In the dialog box that appears, you can modify all the selected nodes if you set the Forcibly Modify parameter to Yes. If you set this parameter to No, you can modify only the nodes that you lock.
Delete nodes: To delete the selected nodes, choose in the lower part of the Node tab.
In the Delete Node dialog box, you can delete all the selected nodes if you set the Forcibly Delete parameter to Yes. If you set this parameter to No, you can delete only the nodes that you lock.
Delete nodes by using a node group
You can create, reference, split, and delete a node group. For more information, see Create and manage a node group.
Export a common workflow for replication
You can use the node group feature to quickly group all nodes in a workflow as a node group and then reference the node group in a new workflow. For more information, see Create and manage a node group.
Export multiple workflows from a DataWorks workspace at a time and import them to other DataWorks workspaces or open source engines
If you want to export multiple workflows in a workspace at a time and import the workflows to another workspace, you can use the Migration Assistant service of DataWorks. For more information, see Overview.