Feature description
You can use the secondary DNS feature to synchronize DNS configurations from self-managed data centers to Alibaba Cloud.
After you enable the secondary DNS feature for a zone, you cannot modify the DNS records of the zone in the Alibaba Cloud DNS console. You must synchronize DNS records from the primary DNS server to update the DNS records in the Alibaba Cloud DNS console.
To synchronize data from the primary DNS server in a self-managed data center, you must specify a public IP address that supports data synchronization and enable TCP port 53 or UDP port 53.
Preparations
Before you enable secondary DNS, you must configure related data on the primary DNS server. Then, enable secondary DNS in the Alibaba Cloud DNS console. The following example shows how to configure a self-managed primary DNS server that uses BIND 9.9.4 or later.
Add the following code to the configuration file "named.conf" for the primary DNS server that uses BIND 9:
zone "Zone, such as example.com" IN {
    type master;
    allow-update { 127.0.0.1; };
    allow-transfer {key test_key;};
    notify explicit;
    also-notify {39.107.XXX.XXX port 53 key test_key;39.107.XXX.XXX port 53 key test_key;};
    file "zone_file";
};
Parameter description
Zone: the zone for which you want to enable the secondary DNS feature.
allow-transfer: the name of the transaction signature (TSIG) key that is used to enable communication between the primary and secondary DNS servers.
Note: Based on RFC protocols, we recommend that you use TSIG to ensure the security of communication between DNS servers. Typically, TSIG uses shared keys and one-way hashing to authenticate the communication between DNS servers. This ensures that data can be securely synchronized between the primary and secondary DNS servers. You can generate a TSIG key that is encrypted by the Message-Digest algorithm 5 (MD5), Secure Hash Algorithm 256 (SHA-256), or SHA-1 algorithm and then specify the key in the configurations of your primary and secondary DNS servers.
also-notify: the IP address of the secondary DNS server to which notifications are sent if a zone is changed. You can specify the IP addresses of multiple secondary DNS servers. In this example, the IP addresses of two secondary DNS servers are configured. You can go to the Secondary DNS page in the Alibaba Cloud DNS console to obtain the IP addresses of the servers.
Secondary DNS servers: 39.107.XXX.XXX, 39.107.XXX.XXXNote: After you modify the named.conf file, you must run the following command to restart the primary DNS service:
Restart command: rndc reconfigGenerate a TSIG key
1. Use the DNS Security Extensions (DNSSEC) key generation tool dnssec-keygen to generate a TSIG key. Sample command:
dnssec-keygen -a HMAC-SHA256 -b 128 -n HOST test_keyThe preceding command can be run only by a root user. To avoid system stability or data security issues, proceed with caution when you perform operations as a root user.
Returned result:
Generating key pair
test_key.+157+64252
Command description:
-a: the encryption algorithm that is used to generate the key. Valid values: HMAC-MD5, HMAC-SHA1, and HMAC-SHA256.
-b: the number of bytes in the key. The size of the key is determined by the encryption algorithm that is used. An HMAC key must be 1 to 512 bytes in size.
-n: the owner type of the key file. Valid values: ZONE, HOST, ENTITY, and USER. In most cases, the value of -n is HOST or ZONE.
test_key: the name of the key file. The value of this parameter is used as the value of the allow-transfer parameter in the configurations of the primary DNS server in the BIND configuration file and is also used as the value of the TSIG Key Name parameter in the Primary DNS Information section in the Alibaba Cloud DNS console.
After you run the preceding command, a .key file and a .private file are generated in the current directory. For example, the Ktest_key.+157+64252.key and Ktest_key.+157+64252.private files are generated. The .key file contains the DNS KEY record, which indicates the value of the generated TSIG key. When you configure parameters in the Primary DNS Information section of the Alibaba Cloud DNS console, set the TSIG Key Value parameter to the DNS KEY record. The .private file contains the fields that are specified by the encryption algorithm that is used.
2. Add the generated TSIG key to the named.conf file.
Copy and paste the following configuration to the named.conf file:
key "test_key" { algorithm hmac-sha256; secret "Key content";};Use the include() method to add the TSIG key to the named.conf file.
Sample command:
include "/etc/named/dns-key";The content of the /etc/named/dns-key file is in the following format:
key "test_key" {
        algorithm hmac-sha256;
        secret "Key content";
};
Procedure
Log on to the Alibaba Cloud DNS console.
In the left-side navigation pane, click Secondary DNS. On the page that appears, click Add Secondary DNS. In the Add Secondary DNS panel, specify the zone for which you want to enable the secondary DNS feature.
On the Add Secondary DNS page, complete settings in the Primary DNS Information and Server IP Addresses of Notification Senders sections, and specify whether to receive notifications on failures.
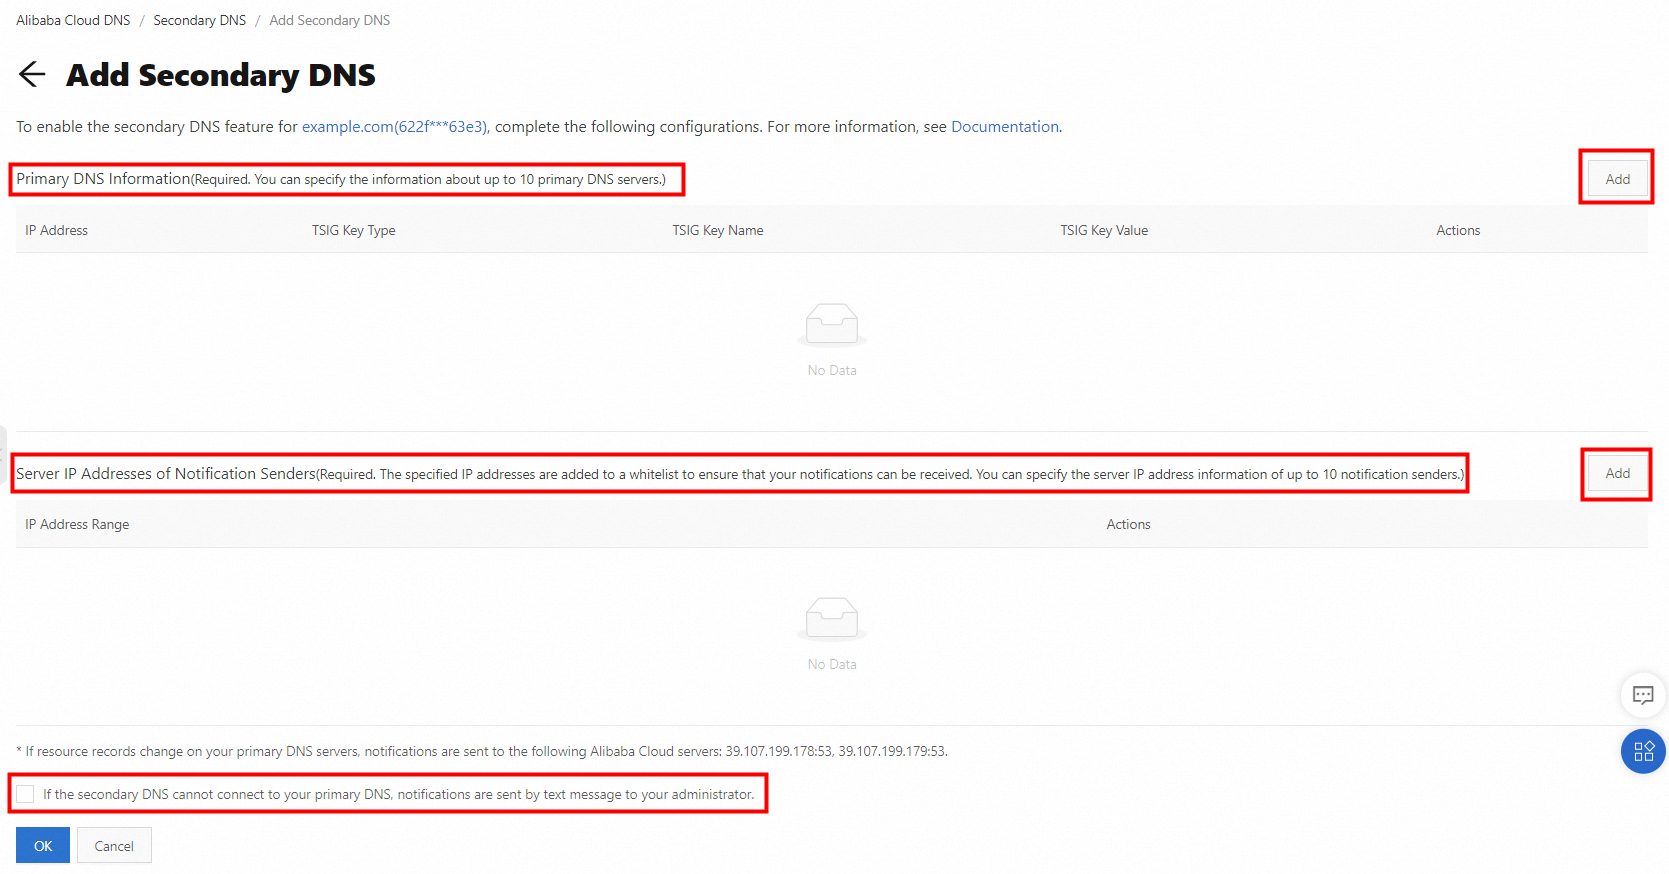
Primary DNS Information: In the upper-right corner of this section, click Add. Then, add a record for the primary DNS server.
Parameter description:
IP Address: the IP address of the primary DNS server. Make sure that the IP address can be accessed over the Internet.
TSIG Key Type: the encryption algorithm. Valid values: SHA1, SHA256, and MD5.
TSIG Key Name: the name of the generated TSIG key.
TSIG Key Value: the value of the generated TSIG key.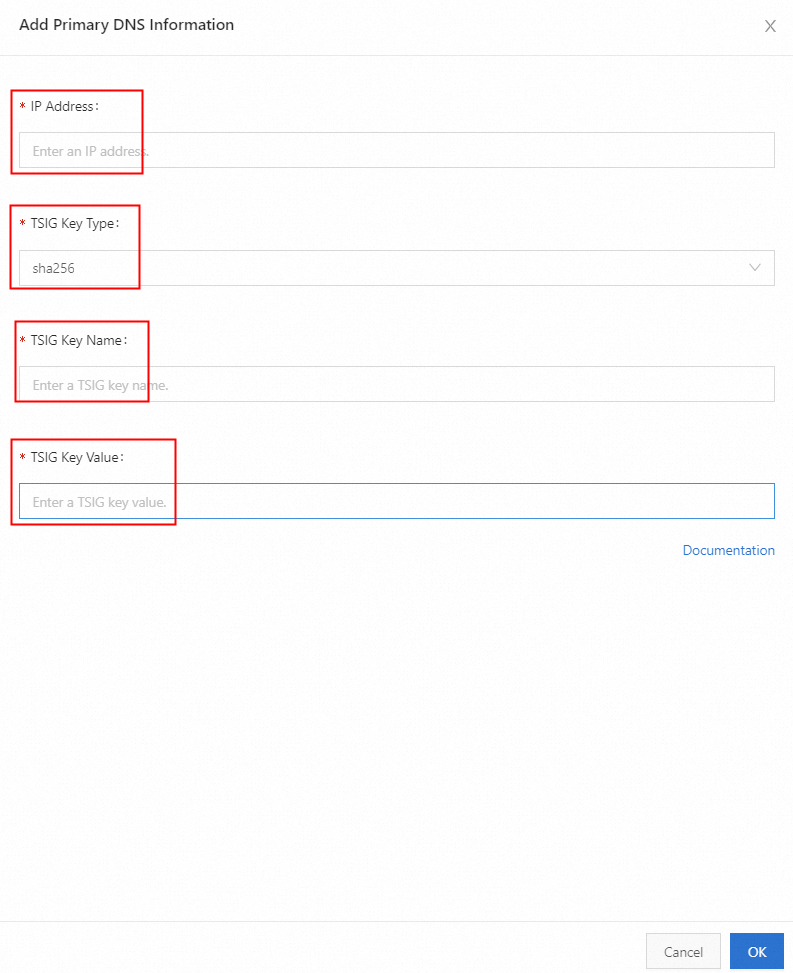
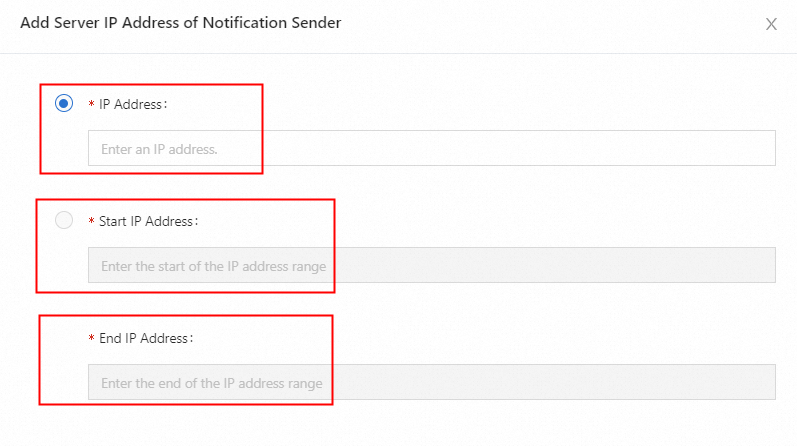
Server IP Addresses of Notification Senders: In the upper-right corner of this section, click Add. Then, specify the IP Address parameter or the Start IP Address and End IP Address parameters.
IP Address: the IP address of the server that is used to send notifications when the DNS records of the primary DNS server are changed based on the standard Notify Protocol. Make sure that the IP address can be connected to prevent notifications from being blocked.
Setting of whether to receive notifications on failures: After you select the check box, Private DNS sends text messages to you if the communication between the primary and secondary DNS servers is interrupted.

After you configure the secondary DNS feature, you can view the status of the secondary DNS feature on the Secondary DNS page.
If the switch in the Synchronization column is turned on, the secondary DNS feature is enabled for the zone in Private DNS.
If the value that is displayed in the Primary/Secondary DNS Connection Status column is Blocked, check whether the configuration on the Secondary DNS page is correct, whether the primary DNS server runs as expected, and whether the IP address of the primary DNS server can be connected. After you troubleshoot the issue, click Connect to Primary DNS to connect to the primary DNS server.