Scenarios
Businesses that rely on websites, games, or video streaming often use a Content Delivery Network (CDN) to accelerate content delivery to users worldwide. While a CDN improves performance, ensuring high availability is also critical. A standard CDN configuration cannot detect the health of your origin, which means it cannot automatically redirect traffic away from a failed server. Global Traffic Manager (GTM) solves this problem by providing load balancing, health checks, and automatic failover.
Solution
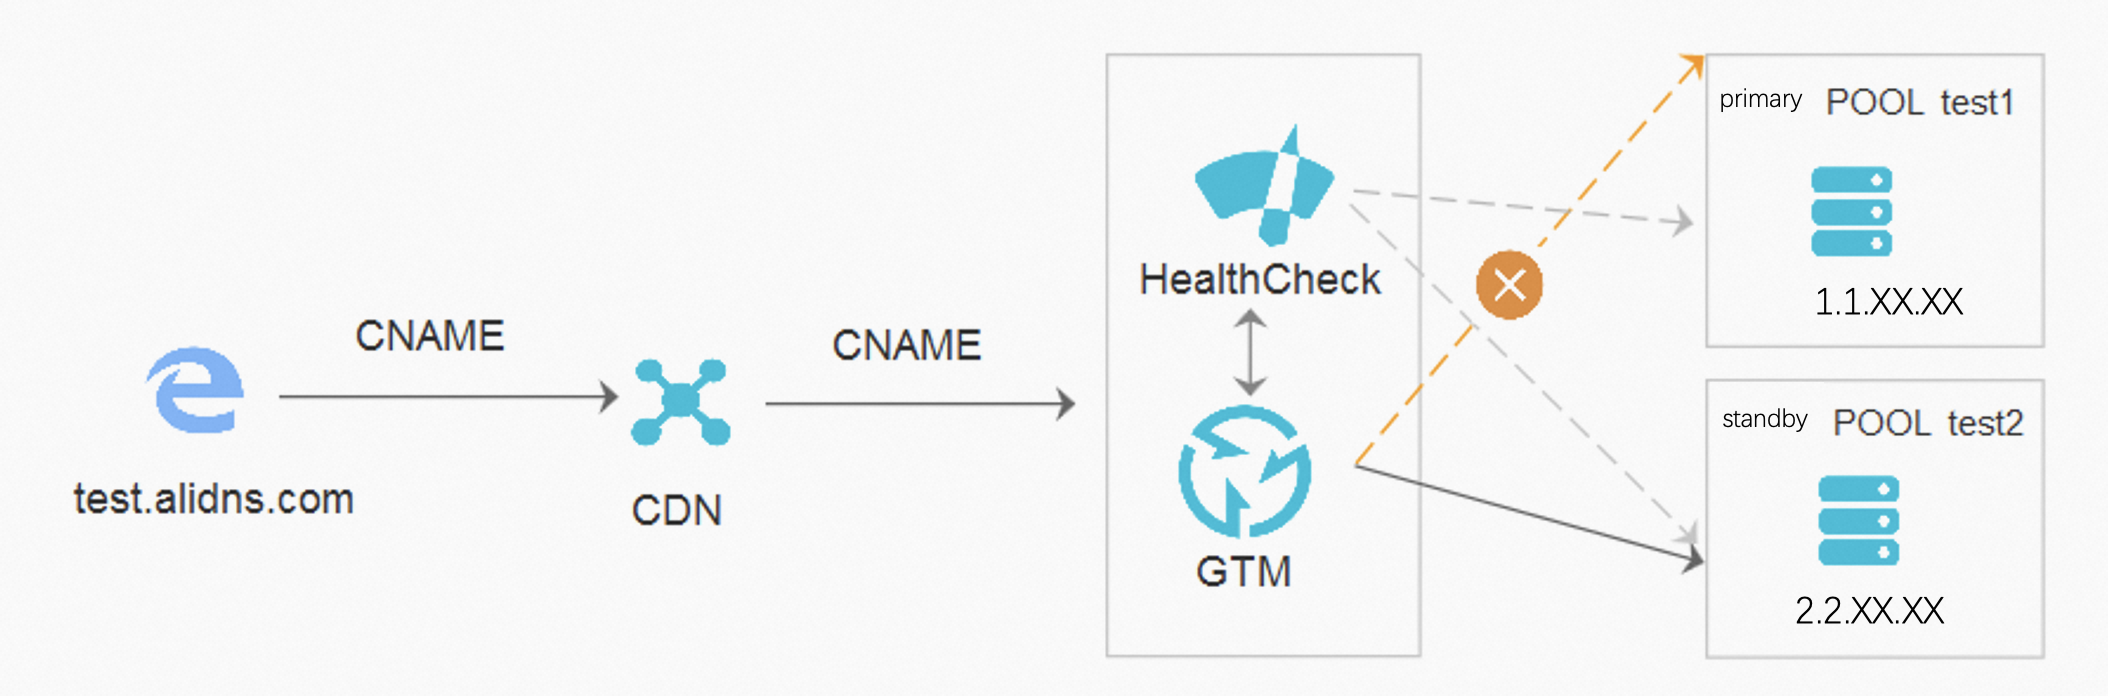
Both CDN and Global Traffic Manager (GTM) use CNAME domains to provide their services. You cannot point a single subdomain to two different CNAME domains simultaneously. If you do, the authoritative DNS server responds to queries in a round-robin manner, which can cause one of the services to fail. To use CDN for acceleration and GTM for high availability, you must configure them in a series. This solution guides you through chaining the services: user traffic first reaches the CDN, and the CDN then uses GTM as its origin to intelligently route requests to healthy servers.
Procedure
Overview
-
Configure Global Traffic Manager.
-
Configure CDN acceleration.
Prerequisites
-
A test domain name, such as
test.alidns.com. -
You have created a GTM instance.
-
You have activated the Alibaba Cloud CDN service.
Step 1: Configure Global Traffic Manager
Configure address pools and health checks
-
Navigate to the Cloud DNS-Global Traffic Manager console. In the instance list, find your target instance and click Actions in the Configure column.
-
On the Basic Settings page, click the Address Pool Settings tab, and then click Add Address Pool. Create two address pools with the following settings:
Pool name
IP address
Mode
test1
1.1.XX.XX
Intelligent Return
test2
2.2.XX.XX
Intelligent Return
-
On the Address Pool Settings page, click the + icon next to an address pool to expand its settings. Then, click Health Check next to Add and configure the health check parameters.
Configure an access policy
-
On the Basic Settings page, for Access Policy Type, select Geography-based access policy. Then, click Configure in this section.
-
Click Add Access Policy and create a new policy with the following settings:
Policy name
Primary pool set
Backup pool set
Request source
Global
test1
test2
Global
For both the primary and backup address pool sets, the address pool type is IPv4, the load balancing policy is Return All Addresses, and the minimum number of available addresses is 1.
Basic settings
-
On the Basic Settings page, click Edit. In the dialog box that appears, configure the Instance Name, CNAME Access Domain, Business Domain, Global TTL, Alert Contact Group, and Alert Method.
Step 2: Configure CDN acceleration
-
On the Basic Settings tab in the Global Traffic Manager console, copy the CNAME Access Domain for your GTM instance.
-
Log on to the CDN console. In the left-side navigation pane, click Domain Names. On the Domain Names page, click Add Domain Name. Configure the Acceleration Areas, Accelerated Domain Name, Business Type, and Origin Server as needed.
NoteFor the origin, paste the CNAME access domain that you copied from GTM.
-
After you add the acceleration domain, its status is displayed as Reviewing or Configuring. Wait a few minutes for the status to change to Active. Next, go to the Cloud DNS console and add a CNAME record that points your business domain (
test.alidns.com) to the CDN CNAME domain. -
After you add the CNAME record, return to the Domain Names page in the CDN console. If the CNAME status is Configured, your business domain is successfully connected to the CDN.