Data Management (DMS) task orchestration lets you build automated workflows by connecting task nodes into a directed task flow and scheduling them to run on a recurring basis. This tutorial walks through a concrete e-commerce scenario: automatically issuing coupons to users whose cumulative purchase amount crosses a threshold.
The task flow uses three node types:
SQL Assignment for Single Instance — queries the promotion configuration and exposes the results as output variables
Conditional Branch — evaluates whether a promotion is active
Single Instance SQL — inserts qualifying users into the coupon issuance table
By the end, you will have a task flow that runs this logic on a schedule and writes results to the database automatically.
Prerequisites
Before you begin, ensure that you have:
A database instance created in DMS
Change permissions on the target database (see Overview for how to request permissions)
Step 1: Set up the database tables
This task flow reads from two source tables and writes results to one output table:
activity_setting — stores promotion configuration (whether a promotion is active, the purchase threshold, and the coupon discount value)
consumption_records — records each user's purchase transactions
voucher_send_list — stores the coupon issuance results generated by the task flow
Follow these steps to create the tables and load test data.
Open SQL console
Log on to the DMS console V5.0.
Move the pointer over the
 icon in the upper-left corner and choose All functions > SQL Console > SQL Console.
In normal mode, choose SQL Console > SQL Console from the top navigation bar.
In the Please select the database first dialog box, search for your database and select it from the results, then click Confirm.
Create the tables
Run each of the following SQL statements in the SQL editor. Copy and paste each statement, then click Execute.
activity_setting (promotion configuration table):
CREATE TABLE `activity_setting` (
    `has_promotion` tinyint(1) NOT NULL COMMENT 'Whether discounts are provided',
    `consumption_limit` int(11) NOT NULL COMMENT 'Limit on purchase amount',
    `quota` int(11) NOT NULL COMMENT 'Coupon discount',
    PRIMARY KEY (`has_promotion`)
) ENGINE=InnoDB
DEFAULT CHARACTER SET=utf8 COLLATE=utf8_general_ci
ROW_FORMAT=COMPACT
AVG_ROW_LENGTH=16384;
consumption_records (purchase transaction table):
CREATE TABLE `consumption_records` (
    `id` bigint(20) UNSIGNED NOT NULL AUTO_INCREMENT COMMENT 'Record ID',
    `time` datetime NOT NULL COMMENT 'Purchase time',
    `count` int(11) NOT NULL COMMENT 'Purchase amount',
    `user_id` bigint(20) NOT NULL COMMENT 'User ID',
    PRIMARY KEY (`id`)
) ENGINE=InnoDB
DEFAULT CHARACTER SET=utf8mb4 COLLATE=utf8mb4_general_ci
COMMENT='Purchase record table'
AUTO_INCREMENT=8001
ROW_FORMAT=COMPACT
AVG_ROW_LENGTH=54;
voucher_send_list (coupon issuance table):
CREATE TABLE `voucher_send_list` (
    `Id` int(11) NOT NULL AUTO_INCREMENT COMMENT 'Record ID',
    `user_id` int(11) NULL COMMENT 'User ID',
    `consumption_sum` int(11) NULL COMMENT 'Purchase amount',
    `quota` int(11) NULL COMMENT 'Coupon discount',
    PRIMARY KEY (`Id`)
) ENGINE=InnoDB
DEFAULT CHARACTER SET=utf8 COLLATE=utf8_general_ci
AUTO_INCREMENT=1
ROW_FORMAT=COMPACT
AVG_ROW_LENGTH=0;
Load data
Insert the promotion configuration. This example sets has_promotion = 1 (active), a purchase threshold of 100, and a coupon discount of 30:
INSERT INTO activity_setting(has_promotion, consumption_limit, quota)
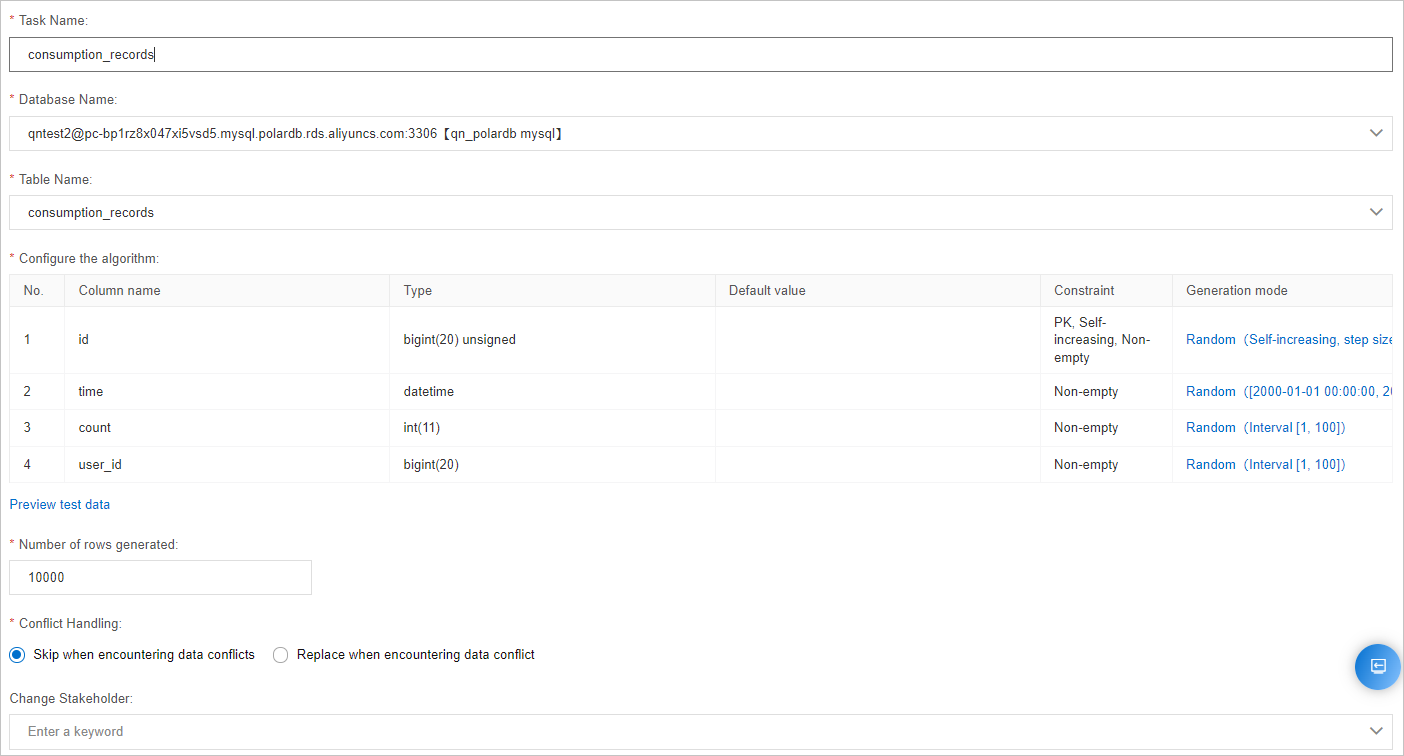
VALUES('1','100','30');Generate test purchase records for consumption_records using the DMS test data generation feature. For details, see Generate test data.
The following figure shows an example configuration for generating data in the consumption_records table.
Step 2: Create a task flow
Log on to the DMS console V5.0.
Move the pointer over the
icon in the upper-left corner and choose All Features > Data+AI > Data Development > Task Orchestration.In normal mode, choose Data+AI > Data Development > Task Orchestration from the top navigation bar.
On the Task orchestration page, click Create Task Flow.
In the New Task Flow dialog box, set Task Flow Name and Description, then click OK.
Step 3: Add and connect nodes
From the Task Type list on the left side of the canvas, drag the following nodes onto the canvas: SQL Assignment for Single Instance, Conditional Branch, and Single Instance SQL.
Connect the nodes in order:
Move the pointer over SQL Assignment for Single Instance, click the hollow circle on its right side, and draw a line to Conditional Branch.
Move the pointer over Conditional Branch, click the hollow circle on its right side, and draw a line to Single Instance SQL.
Step 4: Configure the nodes
SQL Assignment for Single Instance node
This node reads the promotion settings from activity_setting and stores each column value in an output variable. Downstream nodes reference these variables using the ${variable_name} syntax.
Double-click the SQL Assignment for Single Instance node.
Search for and select your database from the drop-down list.
In the SQL editor, enter:
select * from activity_setting limit 1In the right-side navigation pane, click the Variable Setting tab, then select the Output Variables tab.
Click Increase Variable and add the following output variables:
Quota,HasPromotion, andConsumptionLimit.
After the node runs, the query result is mapped to these three variables. The Conditional Branch and Single Instance SQL nodes reference them as ${HasPromotion}, ${Quota}, and ${ConsumptionLimit}.
For configuration details, see Configure an SQL assignment node.
Conditional Branch node
Double-click the Conditional Branch node.
Configure the conditional expression to evaluate whether
HasPromotionis active.
The following figure shows the configured conditional expression.

For configuration details, see Configure a conditional branch node.
Single Instance SQL node
Double-click the Single Instance SQL node.
In the SQL editor, enter the following statement. It uses the
${Quota},${ConsumptionLimit}, and${bizdate}variables to insert qualifying users intovoucher_send_list:INSERT INTO `voucher_send_list`(`user_id`,`consumption_sum`,`quota`) SELECT * FROM (SELECT `user_id`, sum(count) AS consumption_sum,${Quota} FROM `consumption_records` WHERE `time` > '${bizdate}' GROUP BY `user_id`) `consumption_records` where `consumption_sum`>${ConsumptionLimit}
Step 5: Test the task flow
In the upper-left corner of the canvas, click Try Run.
After the run completes, verify the results on the SQL Console tab by running:
SELECT * FROM voucher_send_list;The table should contain rows for each user whose total purchase amount exceeded the configured threshold (
consumption_limit = 100). Each row includes the user ID, total purchase amount, and the coupon discount value (quota = 30).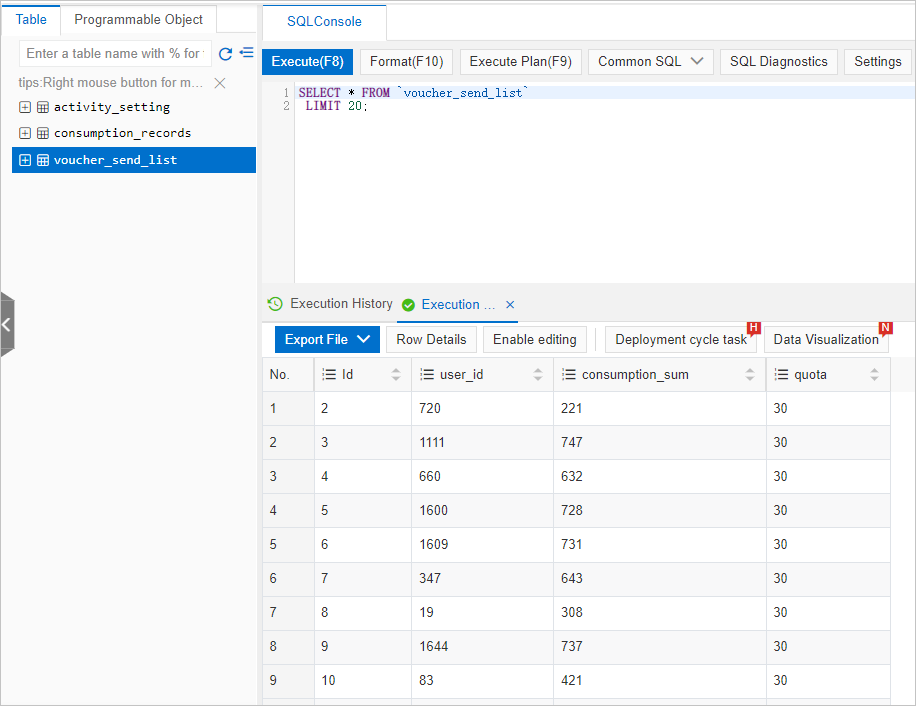
Step 6: Configure scheduling (optional)
To run the task flow on a recurring schedule:
Click the Hide/Show icon at the bottom of the canvas.
Click the Task Flow Information tab.
In the Scheduling Settings section, turn on Enable Scheduling and configure the scheduling cycle. For details, see Configure a task flow.
Step 7: Publish the task flow
After publishing, the task flow runs automatically according to the configured scheduling cycle.
In the upper-left corner of the canvas, click Publish.
In the Publish dialog box, set Remarks and click Publish.
What's next
Configure an SQL assignment node — full parameter reference for the SQL Assignment node
Configure a conditional branch node — full parameter reference for the Conditional Branch node
Configure a task flow — all scheduling and task flow configuration options