Data Management (DMS) lets you create and manage accounts for MongoDB databases and assign role-based permissions to each account.
MongoDB database accounts are separate from your DMS user role. DMS roles (DMS administrator, database administrator (DBA), or instance owner) control access to the DMS console. MongoDB database accounts control access to the database itself.
On the Database Accounts page, you can:
-
Create database accounts and assign roles
-
Modify account passwords and permissions
-
Delete accounts
Prerequisites
Before you begin, make sure you have:
-
A MongoDB database connected to DMS
-
A DMS administrator, DBA, or instance owner role — see System roles
-
The database account credentials (username and password) for the MongoDB database
-
(To create accounts for the admin database) The
dbAdminAnyDatabase,userAdmin, oruserAdminAnyDatabasepermission on the target instance
Create a database account
-
Log on to the DMS console V5.0.
-
Log on to the MongoDB database. For details, see Log on to a database instance.
ImportantFor an ApsaraDB for MongoDB replica set instance, log on to the primary node.
-
In the left-side navigation pane, right-click the instance and select Account Management.
-
On the Database Accounts page, find the database for which you want to create an account.
-
Click Create a database account in the upper-left corner.
-
Configure the account parameters.
Parameter Description Destination Database The database that owns this account. Set to adminto create a privileged account with instance-wide permissions. Set to another database to create a regular account scoped to that database.Database Account The account username. Letters, digits, and the special characters ! # $ % ^ & * ( ) _ + - =are allowed. Chinese characters are not allowed.Password A password 8–32 characters long, containing three types of the following characters: English letters (case-sensitive), digits, and special characters ! # $ % ^ & * ( ) _ + - =.Confirm password Re-enter the password to confirm. 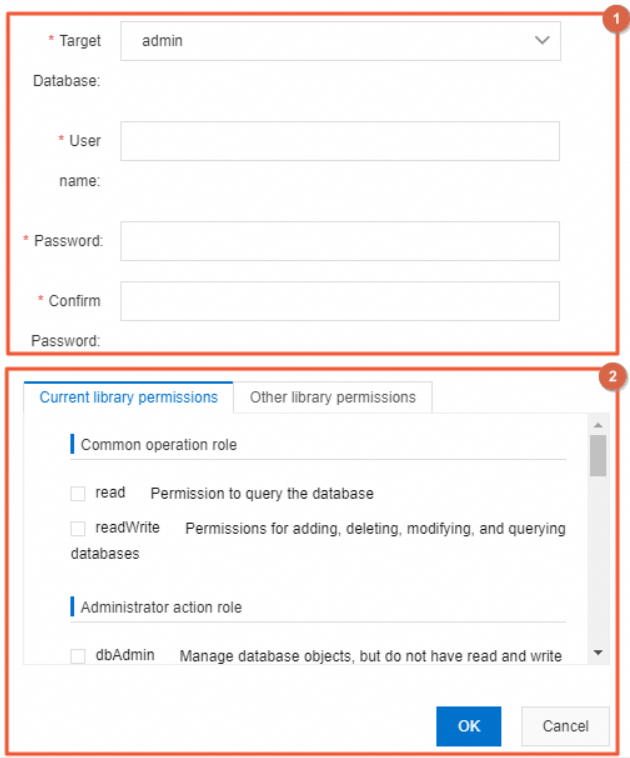
-
Grant permissions to the account on the Current database permissions tab. For a description of each role and its permissions, see Role reference.
-
If Destination Database is `admin`: You can assign any of the six role types — Common operation role, Administrator action role, Instance-level role, Cluster administrator role, Backup and Recovery roles, and Super role. Use the Other database permissions tab to grant additional permissions on other databases in the instance.
-
If Destination Database is not `admin`: You can assign only Common operation role and Administrator action role. The Other database permissions tab is unavailable.
-
-
Click OK.
NoteDMS generates SQL statements based on your configuration. If the instance runs in Security Collaboration mode, the SQL statements may fail due to security rules. Follow the on-screen instructions, or contact your DBA or DMS administrator.
Modify or delete a database account
-
Log on to the DMS console V5.0.
-
In the left-side instance list, right-click the target database instance and select Database Accounts.
-
On the Database Accounts page, find the account.
-
Click Edit or Delete in the Actions column.
Role reference
The following table lists all available roles and their permissions. For the full MongoDB built-in role specification, see the MongoDB documentation.
| Role type | Role name | Permissions |
|---|---|---|
| Common operation role | read |
Query data in the database. |
readWrite |
Insert, delete, update, and query data in the database. | |
| Administrator action role | dbAdmin |
Manage data in the database. Does not include read or write access to data. |
userAdmin |
Create users for the database. | |
dbOwner |
Perform all operations on the database. | |
| Instance-level role | readAnyDatabase |
Query data in all databases on the instance. |
readWriteAnyDatabase |
Insert, delete, update, and query data in all databases on the instance. | |
userAdminAnyDatabase |
Create users for all databases on the instance. | |
dbAdminAnyDatabase |
Manage data in all databases on the instance. | |
| Cluster administrator role | hostManager |
Manage data in the database. Does not include read or write access to data. |
clusterMonitor |
Query clusters and replica sets. | |
clusterManager |
Manage and monitor clusters and replica sets. | |
clusterAdmin |
Perform all cluster management operations. | |
| Backup and Recovery roles | backup |
Query data in all databases on the instance. |
restore |
Insert, delete, update, and query data in all databases on the instance. | |
| Super role | Root |
Perform all operations on all resources in the instance. |