Iteration templates define the R&D pipeline that database change tickets must follow before they reach production. Each template maps out a series of stages — for example, Dev → Test → Production — and sets the rules for advancing between stages: which ticket types are required, who can promote the iteration, and whether approval is needed.
Use iteration templates to standardize how your team handles data change, schema design, SQL review, and database synchronization across projects.
Prerequisites
Before you begin, ensure that you have access to the DMS console V5.0.
Create an iteration template
-
Log on to the DMS console V5.0.
-
In the top navigation bar, move the pointer over the All Features icon and choose R&D Space > DevOps.
-
Click the Iteration Template tab.
-
Click Create Iteration Template.
-
In the Create Iteration Template dialog box, set the following parameters and click OK.
| Parameter | Description |
|---|---|
| Template Name | The name of the iteration template. |
| Usage Scope | Who can use this template. Available for All Users: all users in the current tenant. Specific Users: only designated users. |
| Description | A description that helps you identify and manage the template. |
Manage an iteration template
After creating a template, you can update its name and description, enable or disable it, duplicate it, and review its change history.
-
Log on to the DMS console V5.0.
-
In the top navigation bar, move the pointer over the All Features icon and choose R&D Space > DevOps.
-
Click the Iteration Template tab.
-
Click the name of the template you want to manage. The Template Details page opens.
On the Template Details page, you can perform the following operations:
-
Edit the template name: Click the
 icon next to the template name.
 -
Change the template status: Turn on the Status toggle and click OK in the confirmation message.
-
Enabled: The template can be selected when creating a project or an iteration.
-
Disabled: The template is unavailable for new projects and iterations.
-
-
Edit the description: Click the
icon next to Template Description. -
Duplicate the template: Click Create As in the upper-right corner. In the Replicate Iteration Template dialog box, set the Name and Description, then click OK.
-
View operation history: Click Operation History in the upper-right corner. The Operation History panel shows the time, operator, and log entry for each change made to the template.
To configure the stages and rules of the template, see Configure an iteration template.
Configure an iteration template
Configuring a template means defining the stages of your R&D pipeline and setting rules for each stage. A stage represents one environment in the change lifecycle — for example, Dev → Test → Production. A new template has two default stages — Dev and Product — both of which can be modified or deleted.
For each stage, you configure three aspects:
-
Basic rules: which database environments are in scope, who can advance the iteration, and whether rollback is allowed
-
Ticket requirements: which ticket types must exist in the stage and what status they must reach
-
Approval flow: what happens when tickets meet or don't meet the stage requirements
Open the template
-
Log on to the DMS console V5.0.
-
In the top navigation bar, move the pointer over the All Features icon and choose R&D Space > DevOps.
-
Click the Iteration Template tab.
-
Click the name of the template you want to configure. The Template Details page opens.
Manage stages
In the left-side pane, you can add, rename, and delete iterative stages.
-
Add a stage: Click Add, enter a name in the field, then click a blank area on the page.
-
Rename a stage: Click the
 icon next to the stage name.
 -
Delete a stage: Click the
 icon next to the stage name, then click OK.
Configure rules for each stage
Click a stage in the left-side pane to configure its rules. Repeat for each stage in your pipeline.
Basic rule configuration
The Basic Rule Configuration tab controls which databases are in scope for the stage, who can advance the iteration, and whether rollback is allowed after promotion.
| Rule | Description | How to set |
|---|---|---|
| Database environment type | The environment types whose databases can be selected when creating tickets in this stage. | Click the value in the Parameter column and select one or more environment types from the drop-down list. |
| Stage promotion personnel authority | The user types who can advance the iteration to the next stage. | Click the value in the Parameter column and select one or more user types from the drop-down list. |
| Fallback management | Whether the iteration can be rolled back after it advances to the next stage. | Click the value in the Parameter column and select Allow Rollback or Rollback not allowed. |
Tickets and checkpoints
The Tickets and Checkpoints tab specifies which ticket types are required in the stage and what status each ticket must reach before the iteration can advance. Use this tab when you want to enforce that specific work — such as a data change or SQL review — is completed before the team can move to the next stage.
To add a ticket rule:
-
Click Create Ticket Rule.
-
From the Ticket Type drop-down list, select a ticket type.
Ticket type Included tickets Data change Normal Data Modify, Lockless change, Data Import, Programmable Object Schema design Schema design tickets SQL Review SQL review tickets Library table synchronization Schema Synchronization, Empty Database Initialization -
From the Required (Click Value to Modify) drop-down list, select whether this ticket type is mandatory.
-
Yes: The iteration cannot advance unless at least one ticket of this type exists in the stage.
-
No: The iteration can advance regardless of whether a ticket of this type was created.
-
-
From the Stage Status (Click Value to Modify) drop-down list, select the ticket status that allows the iteration to advance. You can select multiple statuses.
Note For schema design tickets, the nth node option refers to the node sequence configured in the schema design security rules. To view the node configuration, go to the Details page of the security rules for the database, click the Schema Design tab, find the R&D process rule under the Basic Configuration Item checkpoint, and click Edit.Ticket type Available status values Data change Do not check / Successful execution / Closed Schema design Do not check / Design node completed / The nth node has been completed (n: 1–7) / Published / Work order closed / Closed SQL Review Do not check / Audit successful Library table synchronization Do not check / Successful execution / Closed
To delete a ticket rule: Click Delete in the Actions column of the rule.
Procedure and approval
The Procedure and Approval tab defines how the system responds when the team tries to advance an iteration — specifically, what happens when ticket statuses meet the stage requirements, and what happens when they don't.
| Rule | Description | Options |
|---|---|---|
| Non-compliance status check | Action taken when ticket statuses do not meet the stage requirements. | No propulsion allowed: blocks the iteration from advancing. Can be promoted and requires approval: allows advancement after approval. When selected, approvers are set to project testers and project administrators in sequence. 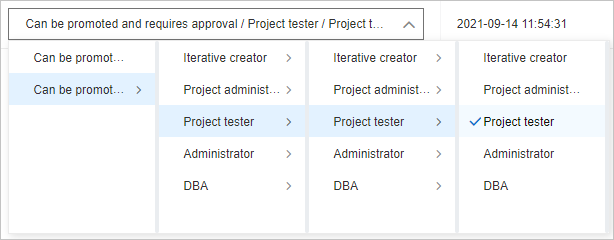 |
| Compliance check | Action taken when ticket statuses meet the stage requirements. | Can be promoted without approval: the iteration advances immediately. Can be promoted and requires approval: allows advancement after approval. When selected, project testers are set as approvers. |