Deploy a highly available Dify service
Dify on DMS supports multi-replica deployment through OSS data sharing. With dual replicas, if one fails, the other continues serving requests. Deploy through one-click resource purchase or by using existing resources.
Billing
You will be charged if you purchase new RDS PostgreSQL, Redis, AnalyticDB for PostgreSQL, and OSS instances.
Prerequisites
-
The Dify workspace and the four resource instances must be in the same region.
-
When you deploy Dify, set Storage Configuration to OSS and set Replica count to dual-replica.
Before you begin
-
In the OSS console, create a bucket in the same region as your Dify workspace.
NoteIf you already have a suitable bucket, register the OSS instance with DMS instead.
-
Log in to DMS 5.0.
Move the pointer over the
 icon in the upper-left corner of the DMS console and choose . Note
If you use the DMS console in normal mode, choose in the top navigation bar.
On the Instance Management page, click New and configure the required information.
NoteEnable Security hosting for your instance.
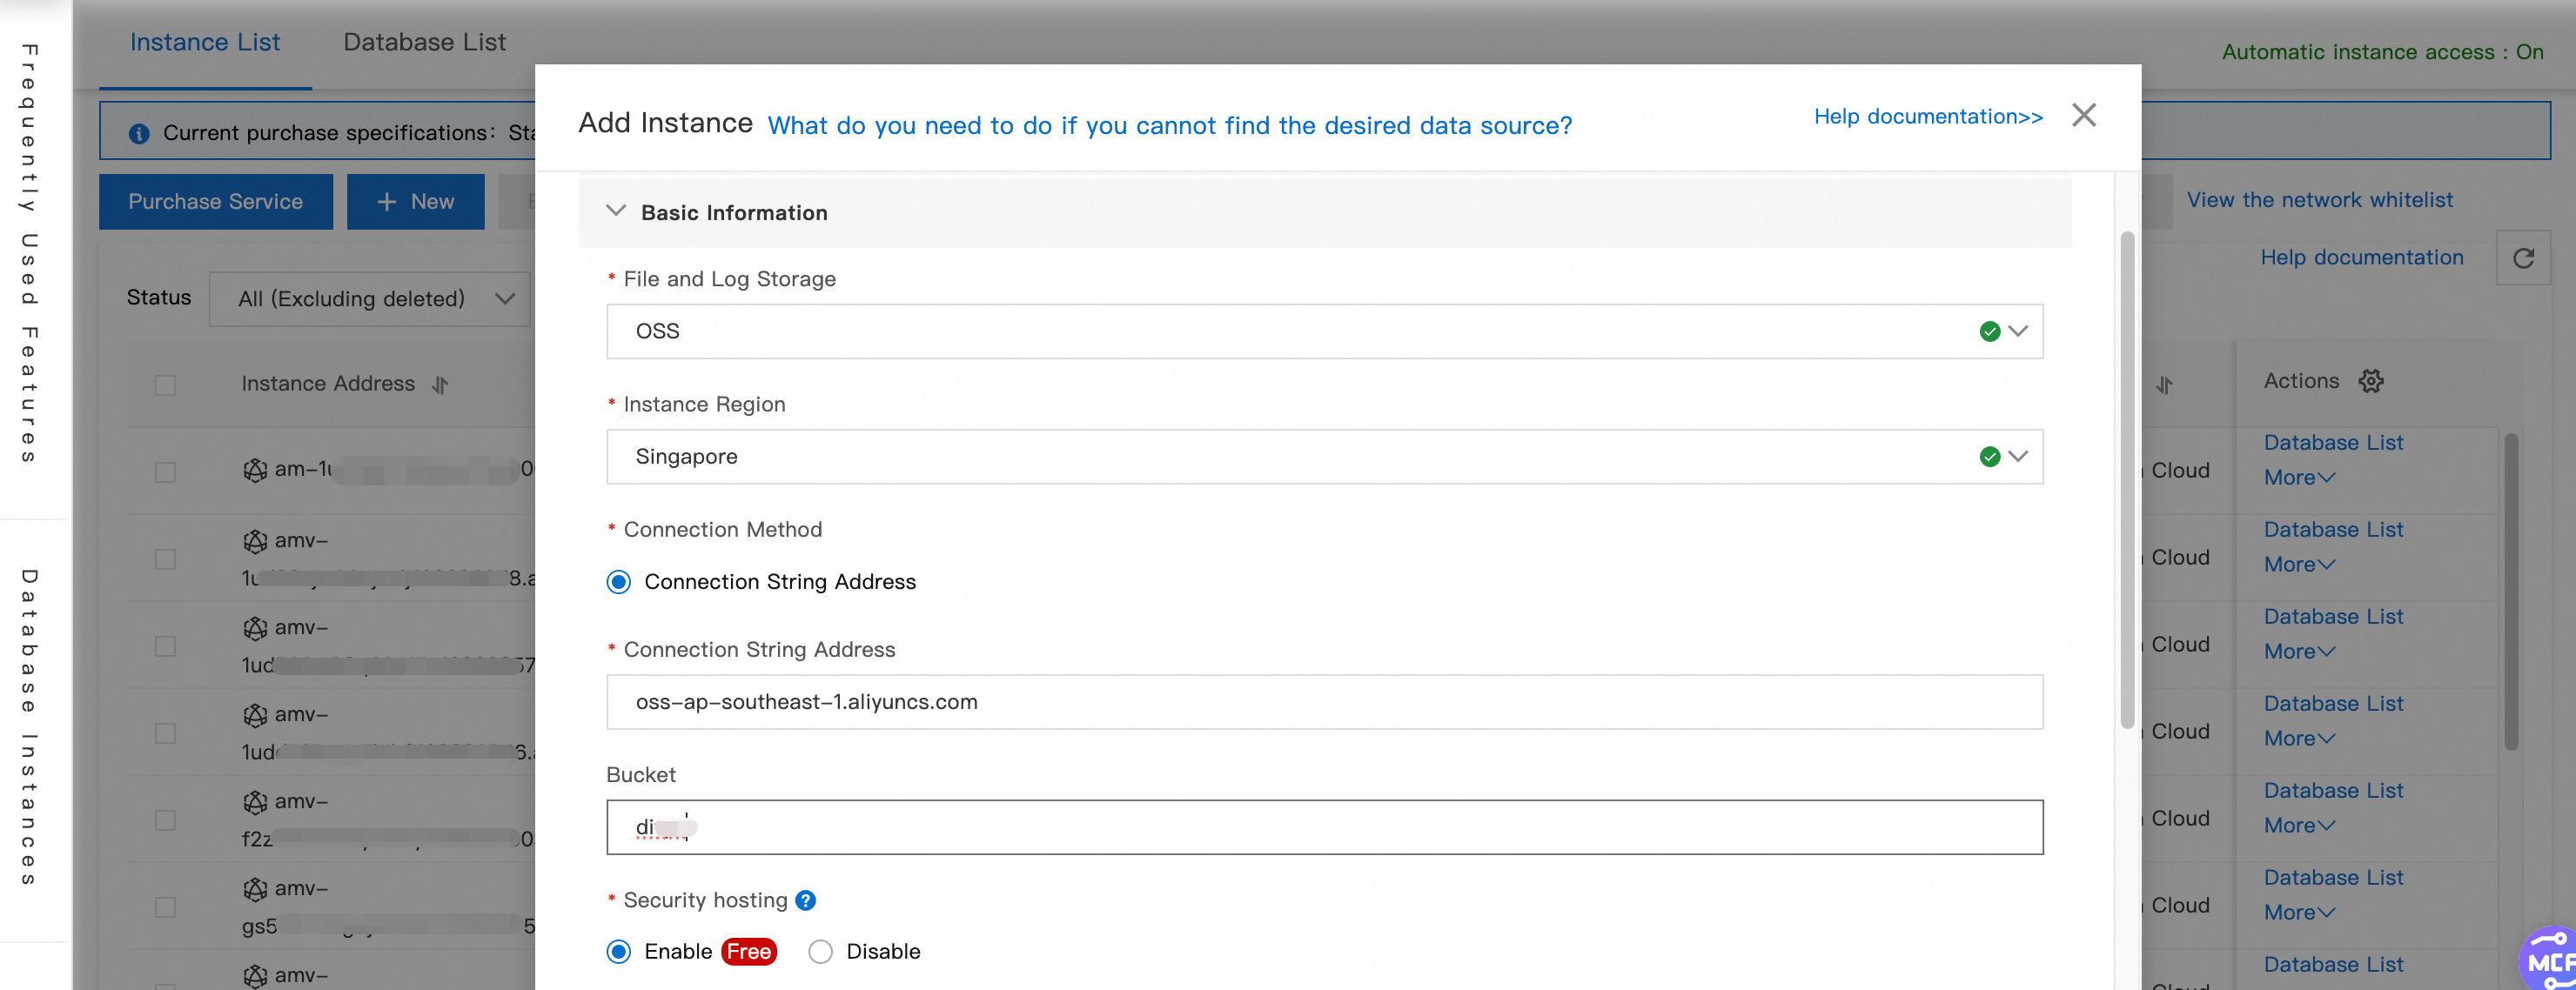
For more information about how to obtain an AccessKey pair, see View a RAM user’s AccessKey information.
After completing the configuration, click Submit.
Procedure
If you do not have existing RDS PostgreSQL, Redis, or AnalyticDB for PostgreSQL instances, use one-click deployment.
One-click deployment
1. Select billing method and region
Go to the Purchase Database Resources page and select a billing method and region.
All resources used by Dify on DMS must be in the same region.
2. Check permissions
-
Skip this step if your account shows an "Authorized" status.
-
DMS checks only DMS-related permissions. Service-Linked Role (SLR) authorization for one-click purchase is not verified.
If your account lacks permissions, copy the link and contact your Alibaba Cloud account administrator. If you are using the primary account, click Open Link to grant permissions directly.
3. Configure the Dify workspace
Create a workspace
-
Enter a workspace name.
DMS pre-fills
dify_defaultas the default workspace name.ImportantThe workspace name must be unique, or the creation will fail.
-
Configure the network and availability zone for the workspace and its resource instances.
Use an existing workspace
Select an existing workspace and configure the availability zone and vSwitch.
4. Configure the deployment scope
Select the deployment scope: Dify Only or Dify+DeepSeek.
5. Configure storage and resource specifications
Configure OSS storage
Select an OSS instance added to DMS and set Replica Count to Dual-replica. The path must start with a forward slash (/), for example, /dify. Access Path.
6. Configure RDS PostgreSQL
-
If you need to create a new RDS PostgreSQL database, select Create Cloud Database and configure the other parameters.
-
If you have added an RDS PostgreSQL instance to DMS and enabled Secure - Manual for it, select Import RDS PostgreSQL instance, and then select Database.
7. Configure Redis
-
If you need to create a new Redis database, select Create Redis Instance.
NoteOne-click purchase supports only Redis 5.0 Standard Architecture instances.
-
If you have already registered a Redis instance with DMS and enabled the Secure - Manual access method, select Import Redis Instance and then choose the Database.
8. Configure AnalyticDB for PostgreSQL and DeepSeek
Configure AnalyticDB for PostgreSQL
-
If you need to create a new AnalyticDB for PostgreSQL database, select Create AnalyticDB Instance.
NoteOne-click purchase supports only AnalyticDB for PostgreSQL 6.0 Standard Edition and High-Performance (Basic) instances.
-
If you have already registered an AnalyticDB for PostgreSQL instance with DMS and enabled the Secure - Manual access method, select Import AnalyticDB Instance and then choose the Database.
Configure DeepSeek
The DeepSeek Configurations section appears only when you set Deployment Scope to Dify+DeepSeek.
Select the DeepSeek Model Version and Node Specifications for the AnalyticDB for PostgreSQL instance.
The following table lists VRAM requirements and recommended node specifications.
|
DeepSeek model |
Type |
VRAM requirement (GB) |
AnalyticDB for PostgreSQL Recommended Specifications |
|
7B |
Full precision |
9.4 |
ADB.AIStandard.1 |
|
14B |
Full precision |
18 |
ADB.AIStandard.2 |
|
32B |
Full precision |
40 |
ADB.AIMedium.2 |
|
70B |
Full precision |
90 |
ADB.AILarge.2 |
9. Create database accounts
Create identical database accounts for all databases and select a security group.
Managed security groups are not supported.
10. Purchase instances and deploy Dify
Select a Subscription Duration and click Buy Now to complete the purchase.
Use existing resources
1. Add RDS PostgreSQL, Redis, and AnalyticDB for PostgreSQL instances to DMS
This section uses an RDS PostgreSQL instance as an example.
Log in to DMS 5.0.
Move the pointer over the
icon in the upper-left corner of the DMS console and choose . NoteIf you use the DMS console in normal mode, choose in the top navigation bar.
On the Instance Management page, click New and configure the required information.
NoteEnable Security hosting for your instance.
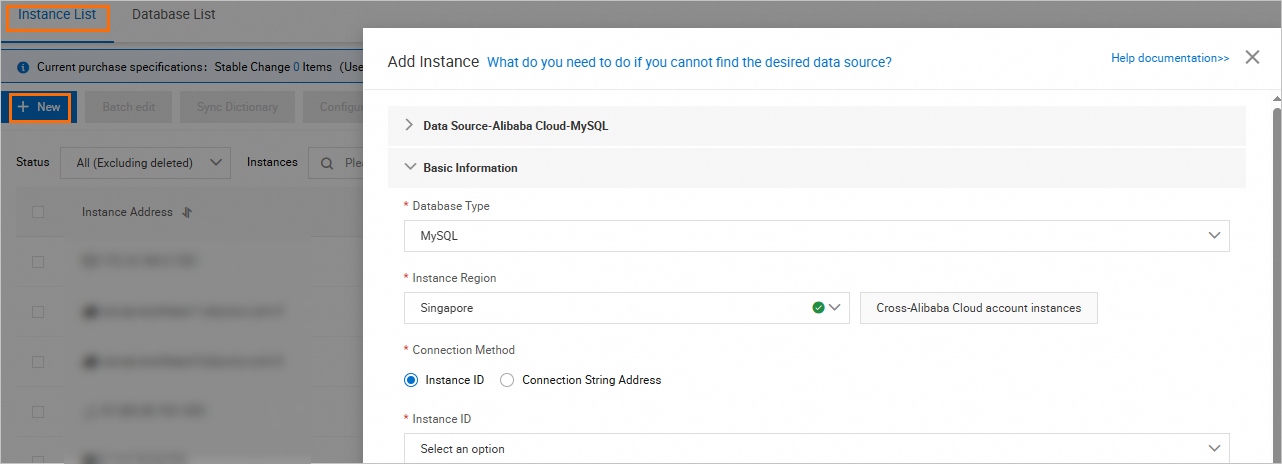
After completing the configuration, click Submit.
2. Create and enter a workspace
Log in to DMS 5.0.
-
Move the pointer over the
icon in the upper-left corner and choose . NoteIf you do not use the DMS console in Simple mode, choose in the top navigation bar.

-
Click your workspace name to open it.
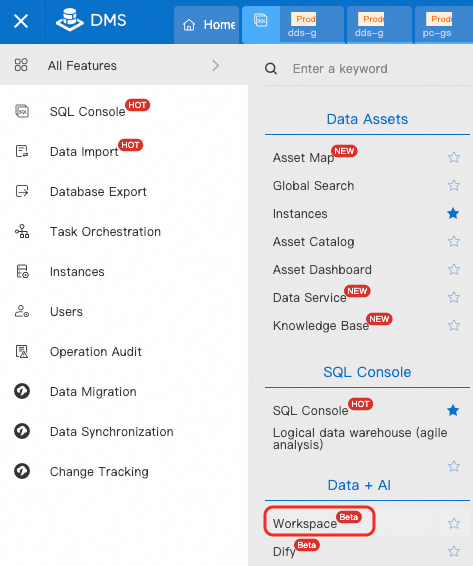
3. Create Dify resources
-
In the left-side navigation pane, choose
> Dify. -
On the Dify tab, click Create Configuration and configure the following parameters.
NoteIf an instance is not yet registered with DMS, click "Create XXX Instance" in the upper-right corner to go to the instance management page. Register a cloud database.
Parameter
Required
Description
RDS PG instance
Yes
Select a DMS-registered RDS PostgreSQL instance.
Redis instance
Yes
Select a DMS-registered Redis instance.
Vector engine type
Yes
Currently, only AnalyticDB for PostgreSQL is supported.
ADB vector engine instance
Yes
Select a DMS-registered AnalyticDB for PostgreSQL instance.
NoteThe vector space name cannot be configured and defaults to 'Dify'.
OSS bucket
No
Select an OSS bucket in the same region as the workspace. Register a cloud database.
NoteWhen deploying with existing resources instead of the one-click purchase and deployment method, you must specify an OSS bucket for data storage.
OSS path
No
The OSS path for Dify data storage. Create this directory in advance.
NoteIf you select an OSS bucket, you must configure a data storage path.
Dify resource specifications
Yes
The resource size for Dify. Larger specifications improve stability.
Supported specifications: 4 CU, 8 CU, 12 CU, and 16 CU.
Replica count
Yes
Set to 2.
Improves availability, performance, and fault tolerance.
VPC ID
No
Automatically uses the VPC specified during workspace creation.
NoteIf Dify requires public network access, enable it for the VPC. Public network access.
vSwitch
Yes
Select a vSwitch in the same VPC as Dify.
Only the following regions and availability zones are supported for vSwitches:
-
China (Hangzhou): Zone H, Zone J.
-
China (Beijing): Zone F, Zone G, Zone H, Zone K.
-
China (Shanghai): Zone B, Zone E, Zone F, Zone G.
-
China (Shenzhen): Zone A, Zone B, Zone C, Zone D, Zone E, Zone F.
-
China (Zhangjiakou): Zone A, Zone B.
-
Singapore: Zone A, Zone B, Zone C.
Security group
Yes
Select the security group to control network access to the Dify service.
-
-
Click OK to start the resource deployment.
Deployment is complete when the Dify status changes to Running.
 > Dify
Related operations
-
Enter the Dify workspace
After deployment, click
in the left navigation pane to enter the Dify workspace. -
Check the deployment progress of Dify resources
After purchase, check deployment progress on the resource management page.
NoteDeployment succeeds when the Dify status is Running.
 in the left navigation pane to