After you add your website to Anti-DDoS, you can configure rules based on specific HTTP field characteristics if you experience an HTTP flood attack. These rules enhance the detection and blocking of HTTP flood attacks and can be used for scenarios such as hotlink protection and protecting your website's management backend. This topic describes how to configure HTTP flood mitigation policies.
Introduction to products that defend against HTTP flood attacks
A Challenge Collapsar (CC) attack is a type of distributed denial-of-service (DDoS) attack. CC attacks are typically Application-layer attacks. In a CC attack, an attacker uses multiple controlled hosts to continuously send forged HTTP or HTTPS requests to a target web server. For example, an attacker might frequently request a search or logon page that consumes a large amount of server resources. This exhausts the server's resources or network bandwidth, which causes the website to respond slowly and become unable to process requests from legitimate users.
Unlike traditional network-layer DDoS attacks, HTTP flood attacks are more stealthy because they mimic legitimate user requests. To improve the security of your website services, Alibaba Cloud provides Anti-DDoS Pro, Anti-DDoS Premium, and Web Application Firewall (WAF) to defend against HTTP flood attacks.
Anti-DDoS Pro and Anti-DDoS Premium
Anti-DDoS Pro and Anti-DDoS Premium focus on protecting against volumetric attacks. These products ensure that your network infrastructure is not affected by bandwidth or resource exhaustion. They are typically deployed at the network edge. Anti-DDoS Pro and Anti-DDoS Premium provide intelligent protection and HTTP flood mitigation to defend against HTTP flood attacks.
Intelligent protection: This feature uses Alibaba Cloud's big data capabilities to learn your website's traffic patterns. The feature uses algorithms to analyze attack anomalies and automatically generates accurate access control rules. It dynamically adjusts the protection model for your services to help you promptly detect and block malicious web attacks, such as malicious bots and HTTP flood attacks. After you add a website to Anti-DDoS Pro or Anti-DDoS Premium, intelligent protection is enabled by default. For more information, see Configure intelligent protection.
HTTP flood mitigation: This is the feature described in this topic. If your website is under an HTTP flood attack, you can analyze the characteristics of its HTTP request fields. You can then create accurate access control rules or frequency control rules for your website. These rules use measures such as rate limiting, behavior analysis, and IP blacklists to improve your defense against DDoS attacks.
Web Application Firewall (WAF)
WAF primarily analyzes HTTP and HTTPS traffic at the application layer. It identifies and protects against malicious patterns in the service traffic of your website or application. This prevents issues, such as performance degradation, that are caused by malicious intrusions into your web server. WAF uses multiple methods to identify and defend against application-layer attacks. These methods include input validation, rule sets for specific vulnerabilities, session tracing, and protection mechanisms such as verification codes, JavaScript challenges, and cookie validation. WAF is typically deployed close to the server. This deployment allows WAF to closely monitor traffic that reaches the server and enforce application-layer security policies.
The two products have different protection focuses. If your primary concern is HTTP flood attacks, Anti-DDoS Pro and Anti-DDoS Premium are recommended if the attack volume is high, for example, if an attack makes your website inaccessible. If the attack volume is not high, for example, if your website is only responding slowly, Web Application Firewall is recommended. However, for the best protection, we recommend that you deploy both products. This deployment ensures that your website services are protected from malicious traffic and attackers.
Recommendations for configuring HTTP flood mitigation policies
We recommend that you configure these policies only when your website is under an HTTP flood attack. You can use this feature to strengthen your defenses by allowing or filtering traffic that has specific characteristics. This feature is not recommended for daily protection.
You can check for obvious characteristics in HTTP requests, such as identical source IP addresses or a recurring field in the URI. You can then configure HTTP flood mitigation policies based on these characteristics.
On the Attack Analysis page, you can view the Web Resource Exhaustion events recorded by Anti-DDoS Pro and Anti-DDoS Premium. The event details include information such as the source IP address, User-Agent, Referer, HTTP-Method, and Client Fingerprint. For more information, see Attack analysis.
On the Log Analysis page, you can view fields in the logs for Anti-DDoS Pro and Anti-DDoS Premium, such as
real_client_ip,http_user_agent,http_referer, andrequest_method. For a description of these fields, see Full log fields.
Introduction to HTTP flood mitigation policies
Rules are classified as accurate access control rules or frequency control rules depending on whether you enable Rate Limiting when creating a rule. The matching logic checks accurate access control rules first, and then frequency control rules. Once a request matches a rule, no subsequent rules are checked.
NoteThe accurate access control rules that are automatically generated by the intelligent protection feature of Anti-DDoS Pro and Anti-DDoS Premium, which are rules that start with
smartcc_, also follow this matching logic.To improve the default protection against HTTP flood attacks, the protection engine of the product includes two built-in frequency control rules. The details of these rules are displayed in the Frequency Control Rule configuration area. The names of the rules are Built-in HTTP Flood Mitigation Rule - Based on Request Frequency of Clients and Built-in HTTP Flood Mitigation Rule - Based on Response Codes of Origin Servers. Currently, you can only view and delete these rules.
Rule name | Accurate access control rule | Frequency control rule |
Description | The action is executed as soon as the request meets the matching conditions. Note If you see a rule that starts with | The action is executed only when the statistical object meets the matching conditions and its access frequency reaches the specified threshold within the statistical period. Important Deleted built-in HTTP flood mitigation rules cannot be recovered. Proceed with caution. If you delete a built-in rule, we recommend that you create custom frequency control rules based on the access frequency and characteristics of your important business domain names or interfaces. This improves the effectiveness of your HTTP flood protection. |
Rule effective duration | You can set the duration to permanent or a custom period from 5 to 120 minutes. Note If you set a custom duration, the rule is automatically deleted when it expires. | Permanent. |
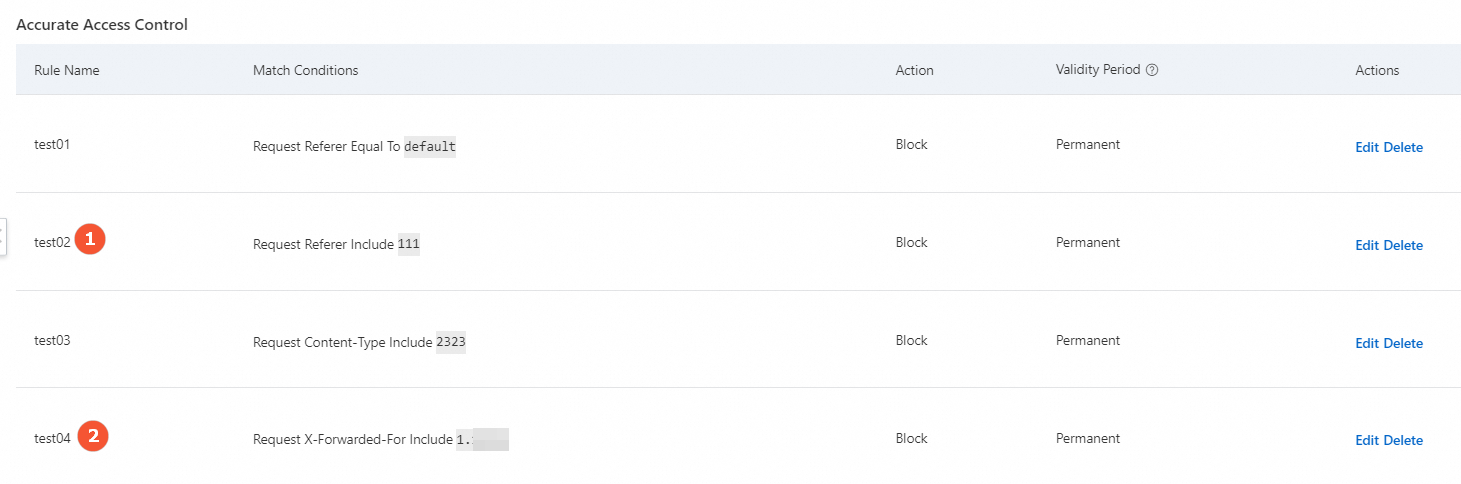
Matching principle | All rules are checked for matches. If a request hits multiple rules, the action of the rule with the highest priority is executed. For example, if a request hits both Rule ① and Rule ②, the action for Rule ① is executed.
| All rules are checked for matches. If a request hits multiple rules, the action of one of the matched rules is randomly executed. |
Condition | The maximum number of accurate access control rules that you can configure for each domain name is as follows:
| The maximum number of frequency control rules that you can configure for each domain name is as follows:
|
How cookies are inserted
For Layer 7 services, cookies are inserted in the following two scenarios.
Scenario 1: The HTTP flood protection feature is enabled in the Protection for Website Services policy for the domain name.
After you enable an HTTP flood mitigation policy, Anti-DDoS Pro and Anti-DDoS Premium inserts a cookie into the client, such as a browser, to differentiate and count different clients. When a user accesses the website, the cookie information is included in the HTTP message. Anti-DDoS Pro and Anti-DDoS Premium uses the statistical results to determine whether an HTTP flood attack exists in the service traffic and activates the HTTP flood attack traffic scrubbing policy.
Scenario 2: The rule action for the HTTP flood mitigation policy is set to JavaScript Challenge.
When the JavaScript Challenge rule action is enabled for an HTTP flood mitigation policy, a cookie is inserted into the HTTP message header to obtain the fingerprint information of the client browser. The collected fingerprint information includes the host field of the HTTP message and the height and width of the browser. When access traffic hits the rule, Anti-DDoS Pro and Anti-DDoS Premium initiate a challenge probe to the client. The service then uses the browser's fingerprint statistics to determine whether the client is abnormal and identify HTTP flood attack behavior from abnormal clients.
To disable cookie insertion by Anti-DDoS Pro and Anti-DDoS Premium for your service, go to the page in the console. Click Edit in the Actions column. In the website configuration panel, turn off the Cookie Settings switch. However, this action also prevents Anti-DDoS Pro and Anti-DDoS Premium from actively detecting and protecting against HTTP flood attacks using the HTTP flood mitigation policy.
Configure HTTP flood mitigation policies
Prerequisites
A website service is added to Anti-DDoS Proxy. For more information, see Add websites.
Procedure
Log on to the Anti-DDoS Proxy console.
In the top navigation bar, select the region of your instance.
Anti-DDoS Proxy (Chinese Mainland): Choose the Chinese Mainland region.
Anti-DDoS Proxy (Outside Chinese Mainland): Choose the Outside Chinese Mainland region.
In the left-side navigation pane, choose .
On the General Policies page, click the Protection for Website Services tab and select the domain name to configure from the list on the left.
Go to the HTTP Flood Mitigation section. Click Settings and then Create Rule in the upper-right corner. Configure the rule and click OK.
Parameter
Description
Rule Name
The name of the rule. It can contain letters, digits, and underscores (_). The name can be up to 128 characters long.
Match Conditions
The matching conditions for the rule. For more information about the fields, see Appendix 1: Supported HTTP request fields.
NoteThe Field Value cannot be empty. The match content for accurate access control rules is case-sensitive. The match content for frequency control rules is not case-sensitive.
You can set up to five matching conditions. If you add multiple conditions, a request is considered a hit only if it meets all the conditions.
Rate Limiting
Specifies whether to enable frequency setting validation.
Switch off: The rule is an accurate access control rule.
Switch on: The rule is a frequency control rule. If you enable this, you need to configure Statistical Object (supports IP, Custom Header, Session, Custom Cookie, Custom Request Parameter), Statistical Period (s), and Threshold (times). You can also set more detailed rules based on the number or proportion of response codes.
Action
The action to take on a request when it hits the matching conditions. Valid values:
Allow: Allows the access request.
Block: Blocks the access request.
JavaScript Challenge: Validates the source IP address of the access request using a challenge algorithm.
Monitor: Records logs for requests that hit the monitor rule and allows the access request.
NoteWhen frequency settings are enabled, Action only supports Block, JavaScript Challenge, and Monitor.
Validity Period
When the frequency settings switch is off: This is the effective duration of the accurate access rule. It supports permanent or a custom duration from 5 to 120 minutes.
NoteIf you set a custom duration, the rule is automatically deleted when it expires.
When the frequency settings switch is on: This is the duration for which the rule action is executed when the frequency control rule is met. It only supports a custom duration from 1 to 1440 minutes.
Advanced Settings
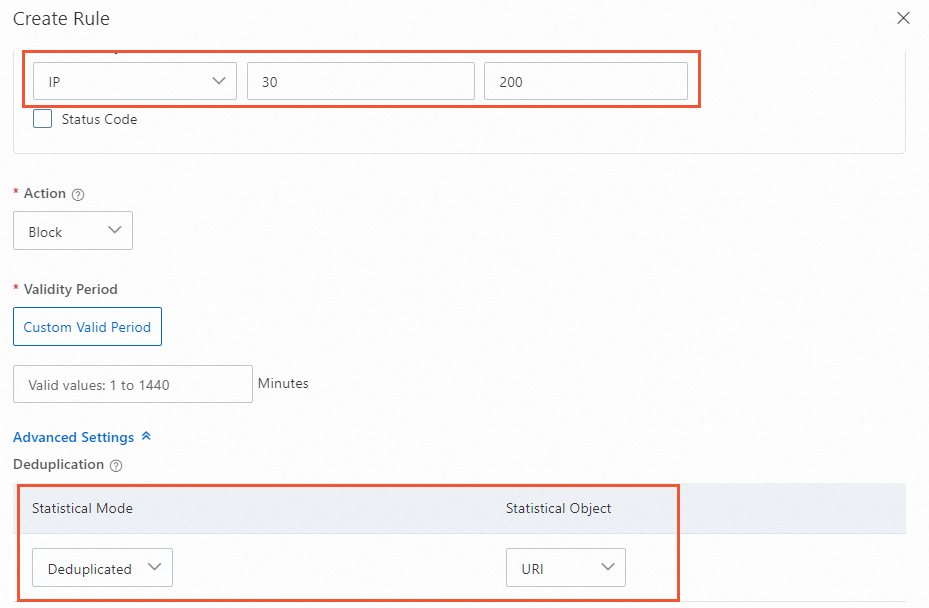
When frequency settings are enabled, you can configure deduplication for statistics. The statistical object can be set to IP, Header, or URI.
Scenario 1: Deduplication is enabled
In the example below, when the matching conditions are met, if the same source IP address accesses 200 or more different URIs within 30 seconds, the specified action is executed to block requests from that IP. Because deduplication is enabled, multiple requests from the same source IP to the same URI are counted as one request.
Scenario 2: Deduplication is disabled
In the example below, when the matching conditions are met, if the same source IP address makes 200 or more requests within 30 seconds, the specified action is executed to block requests from that IP. Because deduplication is disabled, if the same source IP accesses the same URI 10 times, the access count is 10.

Return to the HTTP Flood Protection section and turn on the Status switch.
Appendix 1: Supported HTTP request fields
Match Field | Field Description | Logic Operator | Field Example |
IP | The source IP address of the access request. Supports multiple IP addresses or IP address/mask combinations. | is, is not, is in list, is not in list | 10.10.10.10 |
URI | The URI of the access request. For example: | contains, does not contain, is, is not, length is less than, length is, length is greater than, prefix matches, is one of, is not one of Note If the logic operator is "is" or "is not", the input string must start with | /action/member/id.php?id=1&td=2 |
User-Agent | Browser-related information from the client that initiated the access request, such as the browser identifier, rendering engine identifier, and version information. | contains, does not contain, is, is not, length is less than, length is, length is greater than, is one of, is not one of | Mozilla/5.0 (Windows NT 10.0; Win64; x64) AppleWebKit/537.36 (KHTML, like Gecko) Chrome/119.0.XX.XX Safari/537.36 |
Cookie | The cookie information carried in the access request. | contains, does not contain, is, is not, length is less than, length is, length is greater than, does not exist, is one of, is not one of | cna=Z87DHXX/jXIBASQBsYAimToU; sca=234ea940; yunpk=177699790**** |
Referer | The source URL of the access request, which is the page from which the request was redirected. | contains, does not contain, is, is not, length is less than, length is, length is greater than, does not exist, is one of, is not one of | https://example.aliyundoc.com/ |
Content-Type | The specified response HTTP content type for the access request, which is the Multipurpose Internet Mail Extensions (MIME) type information. | contains, does not contain, is, is not, length is less than, length is, length is greater than, is one of, is not one of | text/plain;charset=UTF-8 |
X-Forwarded-For | The originating IP address of the client making the access request. Format: | contains, does not contain, is, is not, length is less than, length is, length is greater than, does not exist, is one of, is not one of | 36.18.XX.XX,192.18.XX.XX |
Content-Length | The number of bytes included in the access request. | value is less than, value is, value is greater than | 806 |
Post-Body | The content information of the access request. | contains, does not contain, is, is not, is one of, is not one of | Content-Type: application/x-www-form-urlencoded name=John&age=25&email=**** |
Http-Method | The method of the access request. Valid values: GET, POST, DELETE, PUT, OPTIONS, CONNECT, HEAD, TRACE. | is, is not, is one of, is not one of | POST |
Header | The header information of the access request, used to customize HTTP header fields and match content. | contains, does not contain, is, is not, length is less than, length is, length is greater than, does not exist, is one of, is not one of | *text/html,application/xhtml+xml,application/xml;q=0.9,image/webp,image/**** |
Params | The parameter part of the URL in the access request, which is usually the part after the | contains, does not contain, is, is not, length is less than, length is, length is greater than, is one of, is not one of | action=login |
Raw-URI | The unencoded URI, which retains the original character sequence. A Raw-URI can contain special characters and spaces, but it needs to be encoded before use to avoid ambiguity or errors during network transmission and parsing. | contains, does not contain, is, is not, length is less than, length is, length is greater than, regex matches, byte contains, byte is, is one of, is not one of | GET /images/logo.png HTTP/1.1 |
Tls-Fingerprint | A client fingerprint value derived from the TLS fingerprint of the client that initiated the access request. It is identified and calculated using Alibaba Cloud's proprietary algorithm for matching and protecting against access requests. How to view the client fingerprint:
| Equal to or Not equal to | 74dcbf6b790160370bb6b7bea98d5978 |
HTTP/HTTPS | The protocol type of the access request. Supports HTTP and HTTPS. | Equal to or not equal to | HTTP |
HTTP Version | The version of the HTTP protocol. Supports HTTP/1.0, HTTP/1.1, and HTTP/2.0. | is, is not, is one of, is not one of | HTTP/1.0 |
HTTP/2.0 Fingerprint | An HTTP/2.0 fingerprint generated by processing the original fingerprint of the HTTP/2 client with the MD5 algorithm. It is used to analyze and identify different clients for more secure and efficient communication. | is, is not | ad8424af1cc590e09f7b0c499bf7fcdb |
JA3 Fingerprint | Anti-DDoS Pro and Anti-DDoS Premium generate a JA3 fingerprint by applying MD5 hashing to key parameters from the TLS handshake process. These parameters include the TLS version, cipher suites, compression algorithms, and TLS extensions. The resulting string represents the client's TLS configuration. The JA3 fingerprint can be used to identify and differentiate various types of TLS clients, such as web browsers, mobile applications, and malware. | is, is not, is one of, is not one of | eb6f49e8db7ad1809f885d12232f4855 |
JA4 Fingerprint | The JA4 fingerprint reduces the potential for duplicates found in JA3 fingerprints by incorporating more contextual information and algorithms, such as the browser version and operating system. The JA4 fingerprint can more accurately distinguish between real users and impersonators, reducing the rate of false positives. | is, is not, is one of, is not one of | f436b9416f37d134cadd04886327d3e8 |
Continent/Country | The geographical location of the source IP. | Location Blacklist selection | Europe |
Appendix 2: Configuration examples
The following examples provide configuration recommendations for common business scenarios. The specific configuration depends on your actual business needs. These examples are for demonstration purposes only.
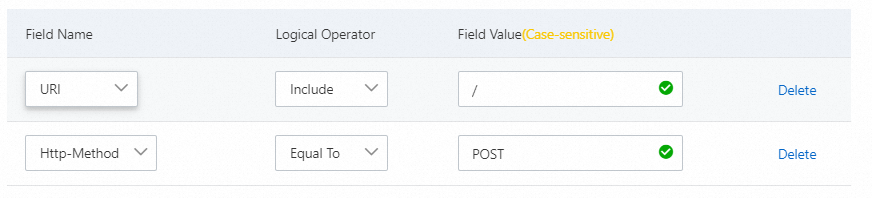
Block specific attack requests
Legitimate business traffic does not typically include POST requests to the root directory. If your website experiences an HTTP flood attack and you notice many POST requests to the root directory, you can evaluate the legitimacy of these requests. If you confirm that they are not legitimate business requests, you can configure the following rule.
Block web crawlers
If you notice a large amount of web crawler traffic to your website over a period of time, and you cannot rule out that it is an attack from botnets that are impersonating crawlers, you can block the crawler requests. The following figure shows an example rule configuration.

Hotlink protection
When a browser accesses a webpage, it includes a Referer field that tells the server which page linked to the request. By configuring access control rules for the Referer field, you can block hotlinking from specific websites. For example, if you find that "https://example.aliyundoc.com" is extensively hotlinking images from your site, you can configure the following rule.
Set frequency limits based on User-Agent
For example, if a specific User-Agent accesses URIs that have the prefix /game/all_ more than 30 times in 10 seconds, you can apply a challenge action to requests from that User-Agent.
Set frequency limits for logon
For example, to prevent malicious high-frequency dictionary attacks on your logon interface, you can specify the address of the logon interface and configure a rule to block requests that exceed a frequency of 20 times in 60 seconds.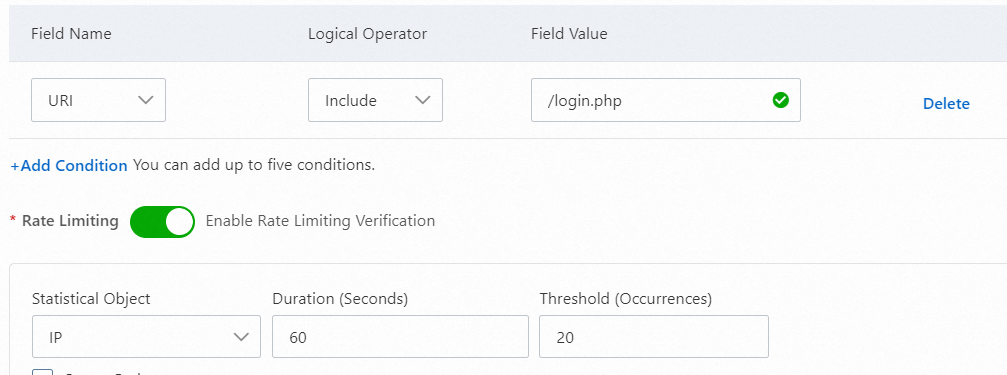
Set frequency limit rules based on origin server response codes
By configuring trigger conditions based on the number or proportion of origin server response codes, you can improve the accuracy of your protection on top of existing frequency mitigation policies. This reduces the risk of false positives that affect normal business. When the number of requests from a statistical object exceeds the threshold within the statistical period and the configured origin server response code count or ratio is also exceeded, the corresponding action is triggered.
200
When the origin server has strong processing capabilities, it may still respond normally to high-frequency requests from attackers. In this case, you can manage IPs that exceed the normal request frequency for your business. This can have a rate-limiting effect and protect the availability of your origin server and services. You can use a configuration similar to the following: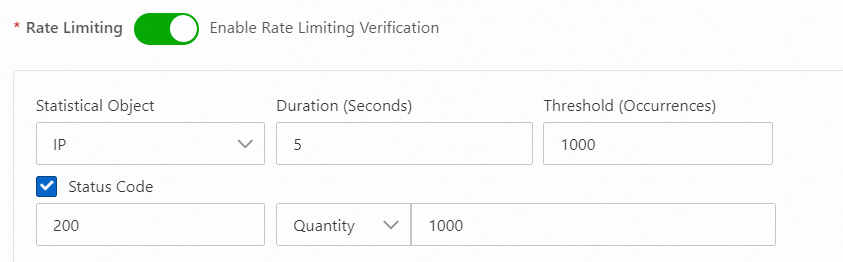
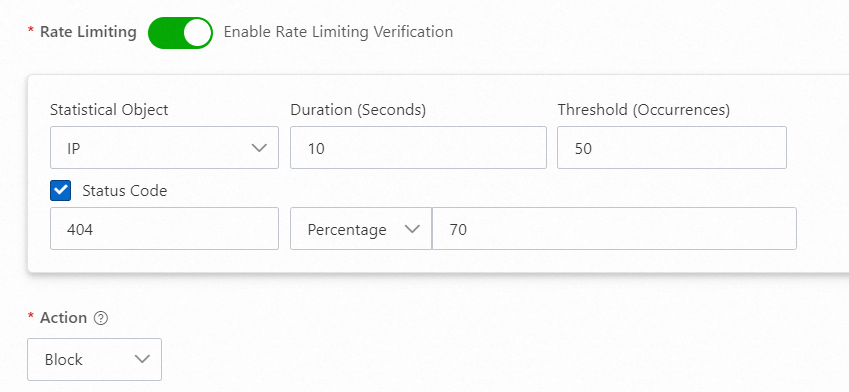
404
When an attacker launches a URI scanning attack or continuously requests paths that do not exist on the origin server, the server often responds with multiple 404 status codes. You can configure a policy to add the attacking IP address to a blacklist. You can use a configuration similar to the following:
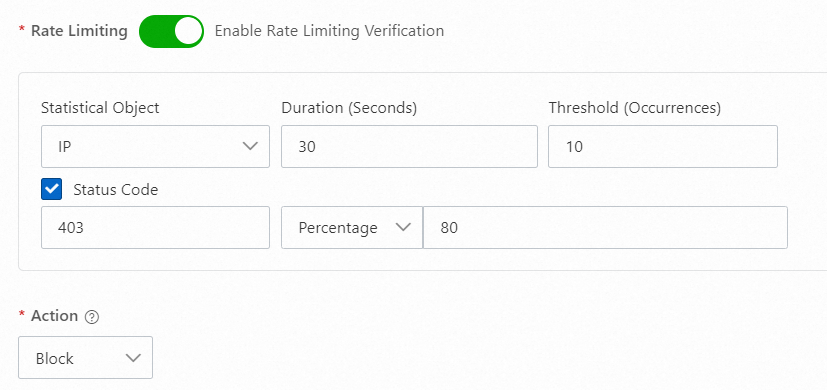
403
When an attacker launches a web-based attack and the backend of Anti-DDoS Pro and Anti-DDoS Premium is a product such as WAF, you can configure rules based on the response codes from other protection products. For example, Alibaba Cloud WAF blocks web attacks and responds with a 403 status code. You can configure a policy in Anti-DDoS Pro and Anti-DDoS Premium to add the attacking IP address to a blacklist in advance. You can use a configuration similar to the following:
429
If your origin server has its own rate-limiting or business validation configurations, it may respond with a 429 Too Many Requests status code or a custom response code when an attacker's requests hit these rules. You can configure a policy to add the attacking IP address to a blacklist to relieve pressure on the origin server. You can use a configuration similar to the following: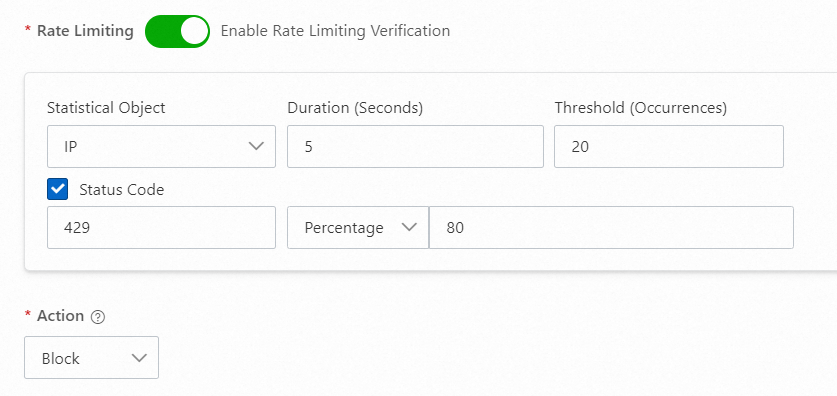
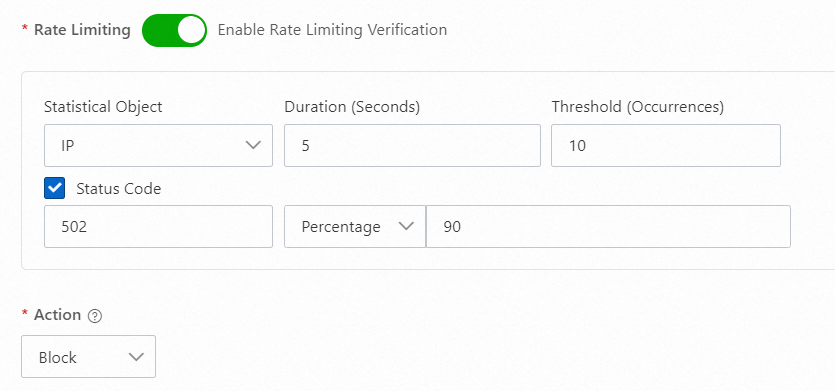
502
When the origin server experiences a long request processing time due to a sudden increase in requests, which results in abnormal 502 responses, you can configure a policy to add the IP addresses that make high-frequency requests to a blacklist. This ensures the availability of the origin server. You can use a configuration similar to the following:
555
If your origin server has special business logic and responds to unexpected requests with a custom status code, such as 555, you can use this characteristic in Anti-DDoS Pro and Anti-DDoS Premium to manage the IP addresses that send these unexpected requests. You can use a configuration similar to the following: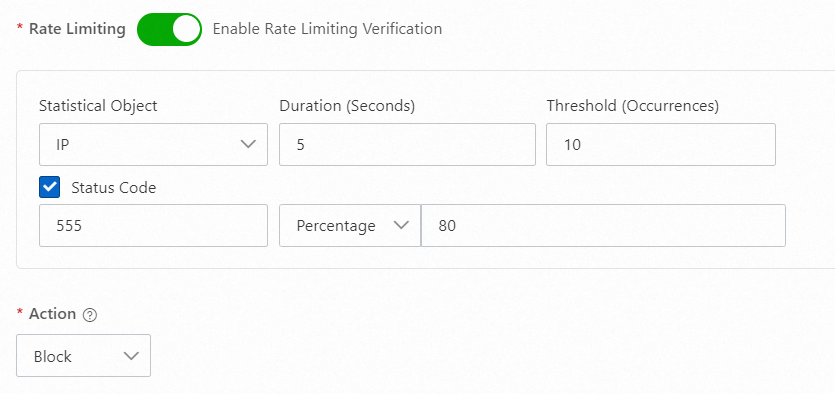
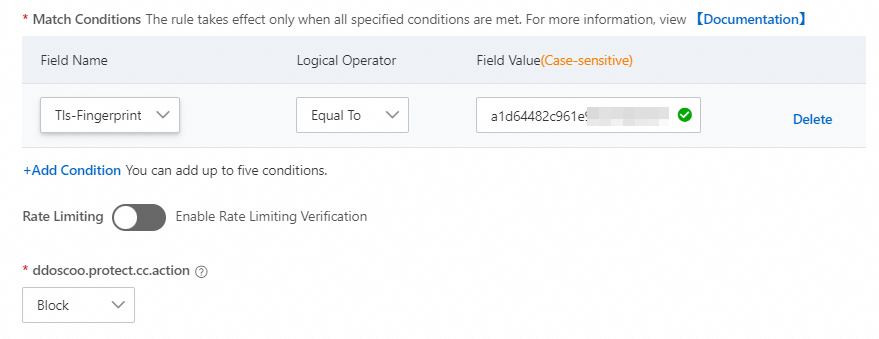
Block invalid client fingerprints
Attackers can forge client fingerprints to impersonate real clients and attempt to establish many connections or HTTP requests. This can cause the server to crash or result in a denial of service. You can reject connections by inspecting and identifying client fingerprints.
For example, during a volumetric HTTP flood attack, if attackers use the same script or tool, the number or proportion of requests with the same fingerprint value will suddenly increase. On the Domain Names tab of the Security Overview page, you can view the top data for Client TLS Fingerprint. You can combine this with the ssl_client_tls_fingerprinting_md5 field in the Log Analysis to check the proportion of top client fingerprints. This analysis helps you promptly identify suspicious fingerprint values and set policies.