Data Integration supports real-time synchronization of data from a single table in data sources such as DataHub, Hologres, Kafka, and LogHub to Hologres. This topic describes how to synchronize data in real time from a single table in LogHub (SLS) to Hologres.
Prerequisites
You have purchased a Serverless resource group or an exclusive resource group for Data Integration.
You have created LogHub (SLS) and Hologres data sources. For more information, see Create a data source in Data Integration.
You have established network connectivity between the resource group and data sources. For more information, see Network connectivity solutions.
Procedure
1. Select the synchronization task type
Go to the Data Integration page.
Log on to the DataWorks console. In the top navigation bar, select the desired region. In the left-side navigation pane, choose . On the page that appears, select the desired workspace from the drop-down list and click Go to Data Integration.
In the left-side navigation pane, click Synchronization Task, and then click Create Synchronization Task at the top of the page to go to the task creation page. Configure the following basic information:
Data Source And Destination:
LogHub→HologresNew Task Name: Customize the synchronization task name.
Synchronization Type:
Real-time synchronization of single table.
2. Configure network and resources
In the Network And Resource Configuration section, select the Resource Group for the synchronization task. You can allocate the number of CUs for Task Resource Usage.
Select the added data source as the Source Data Source
LogHubDestination Data Source and the addedHologresdata source as the Destination Data Source, and then click Test Connectivity.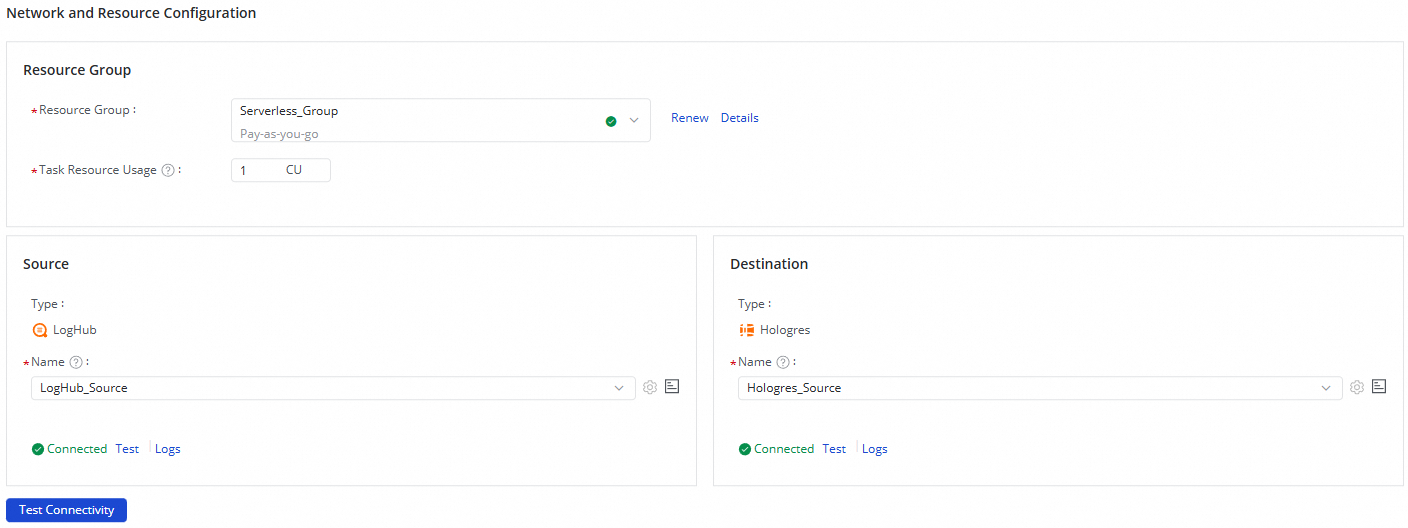
After ensuring that both the source and destination data sources are successfully connected, click Next.
3. Configure the synchronization link
1. Configure the SLS source
Click the SLS data source at the top of the page to edit the SLS Source Information.

In the SLS Source Information section, select the Logstore in LogHub (SLS) that you want to synchronize.
Click Data Sampling in the upper-right corner.
In the dialog box that appears, specify the Start Time and Sampled Data Records, and then click Start Collection. You can sample data from the Logstore and preview the data, which provides input for data preview and visualization configurations of subsequent data processing nodes.
After you select the Logstore, the system automatically loads data from the Logstore in the Output Field Configuration section and generates corresponding field names. You can adjust the Data Type, Delete fields, and Add Output Fields Manually.
NoteIf an output field does not exist in the Simple Log Service data source, NULL is written to the destination.
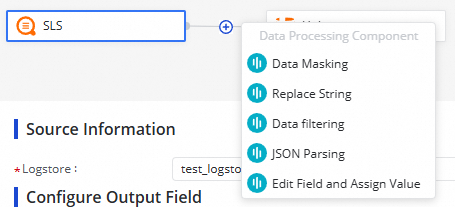
2. Edit data processing nodes
You can click the  icon to add data processing methods. The following data processing methods are supported: Data Masking, Replace String, Data filtering, JSON Parsing, and Edit Field and Assign Value. You can arrange the data processing methods based on your business requirements. When the synchronization task is run, data is processed based on the processing order that you specify.
After you complete the configuration of a data processing node, you can click Preview Data Output in the upper-right corner. In the dialog box that appears, click Re-obtain Output Of Ancestor Node to simulate the result of processing the Logstore sample data through the current data processing node.
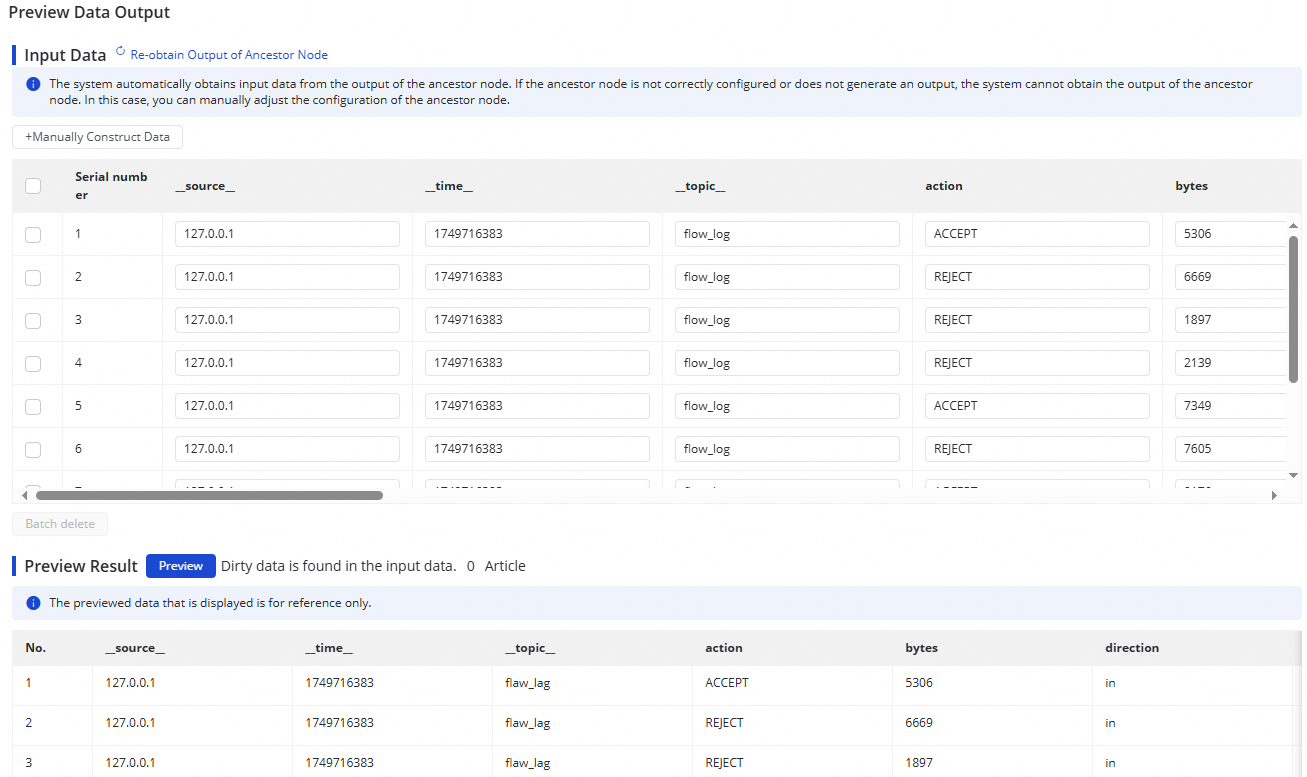
The data output preview strongly depends on the Data Sampling from the LogHub (SLS) source. Before executing the data output preview, you need to complete data sampling in the LogHub (SLS) source form.
3. Configure Hologres destination information
Click the Hologres data destination at the top of the page to edit the Hologres Destination Information.

In the Hologres Destination Information section, select the Schema where the Hologres table you want to write to is located, and choose whether the destination table is Create Table or Use Existing Table.
If you select Create Table, a table with the same name as the data source will be created by default. You can manually modify the destination table name.
If you select Use Existing Table, select the destination table you want to synchronize from the drop-down list.
(Optional) Modify the schema of a destination table.
If you select Create tables automatically for the Destination Table parameter, click Edit Table Schema. In the dialog box that appears, edit the schema of the destination table that will be automatically created. You can also click Re-generate Table Schema Based on Output Column of Ancestor Node to re-generate a schema based on the output columns of an ancestor node. You can select a column from the generated schema and configure the column as the primary key.
NoteThe destination table must have a primary key. Otherwise, the configurations cannot be saved.
Set the Job Type and Write Conflict Policy.
Job Type:
Replay: This represents the mirroring function. When the source inserts a record, Hologres also inserts a record. When the source updates or deletes a record, Hologres also updates or deletes the corresponding record.
Insert: This treats Hologres as a stream storage, using INSERT to save all data from the source.
Write Conflict Policy: The policy for handling data write conflicts. Options include Overwrite and Ignore.
Configure mappings between fields in the source and fields in the destination.
After you complete the preceding configuration, the system automatically establishes mappings between fields in the source and fields in the destination based on the same-name mapping principle. You can modify the mappings based on your business requirements. One field in the source can map to multiple fields in the destination. Multiple fields in the source cannot map to the same field in the destination. If a field in the source has no mapped field in the destination, data in the field in the source is not synchronized to the destination.
4. Configure alert rules
To prevent the failure of the synchronization task from causing latency on business data synchronization, you can configure different alert rules for the synchronization task.
In the upper-right corner of the page, click Configure Alert Rule to go to the Configure Alert Rule panel.
In the Configure Alert Rule panel, click Add Alert Rule. In the Add Alert Rule dialog box, configure the parameters to configure an alert rule.
NoteThe alert rules that you configure in this step take effect for the real-time synchronization subtask that will be generated by the synchronization task. After the configuration of the synchronization task is complete, you can refer to Manage real-time synchronization tasks to go to the Real-time Synchronization Task page and modify alert rules configured for the real-time synchronization subtask.
Manage alert rules.
You can enable or disable alert rules that are created. You can also specify different alert recipients based on the severity levels of alerts.
5. Configure advanced parameters
DataWorks allows you to modify the configurations of specific parameters. You can change the values of these parameters based on your business requirements.
To prevent unexpected errors or data quality issues, we recommend that you understand the meanings of the parameters before you change the values of the parameters.
In the upper-right corner of the configuration page, click Configure Advanced Parameters.
In the Configure Advanced Parameters panel, change the values of the desired parameters.
6. Configure resource groups
You can click Configure Resource Group in the upper-right corner of the page to view and change the resource groups that are used to run the current synchronization task.
7. Perform a test on the synchronization task
After the preceding configuration is complete, you can click Perform Simulated Running in the upper-right corner of the configuration page to enable the synchronization task to synchronize the sampled data to the destination table. You can view the synchronization result in the destination table. If specific configurations of the synchronization task are invalid, an exception occurs during the test run, or dirty data is generated, the system reports an error in real time. This can help you check the configurations of the synchronization task and determine whether expected results can be obtained at the earliest opportunity.
In the dialog box that appears, configure the parameters for data sampling from the specified table, including the Start At and Sampled Data Records parameters.
Click Start Collection to enable the synchronization task to sample data from the source.
Click Preview to enable the synchronization task to synchronize the sampled data to the destination.
8. Run the synchronization task
After the configuration of the synchronization task is complete, click Complete in the lower part of the page.
In the Tasks section of the Synchronization Task page, find the created synchronization task and click Start in the Operation column.
Click the name or ID of the synchronization task in the Tasks section and view the detailed running process of the synchronization task.
Synchronization task O&M
View the running status of the synchronization task
After the synchronization task is created, you can go to the Synchronization Task page to view all synchronization tasks that are created in the workspace and the basic information of each synchronization task.

You can Start or Stop the synchronization task in the Actions column. In the More menu, you can Edit, View, and perform other operations on the synchronization task.
For tasks that have been started, you can see the basic status of the task in Execution Overview, or click the corresponding overview area to view execution details.
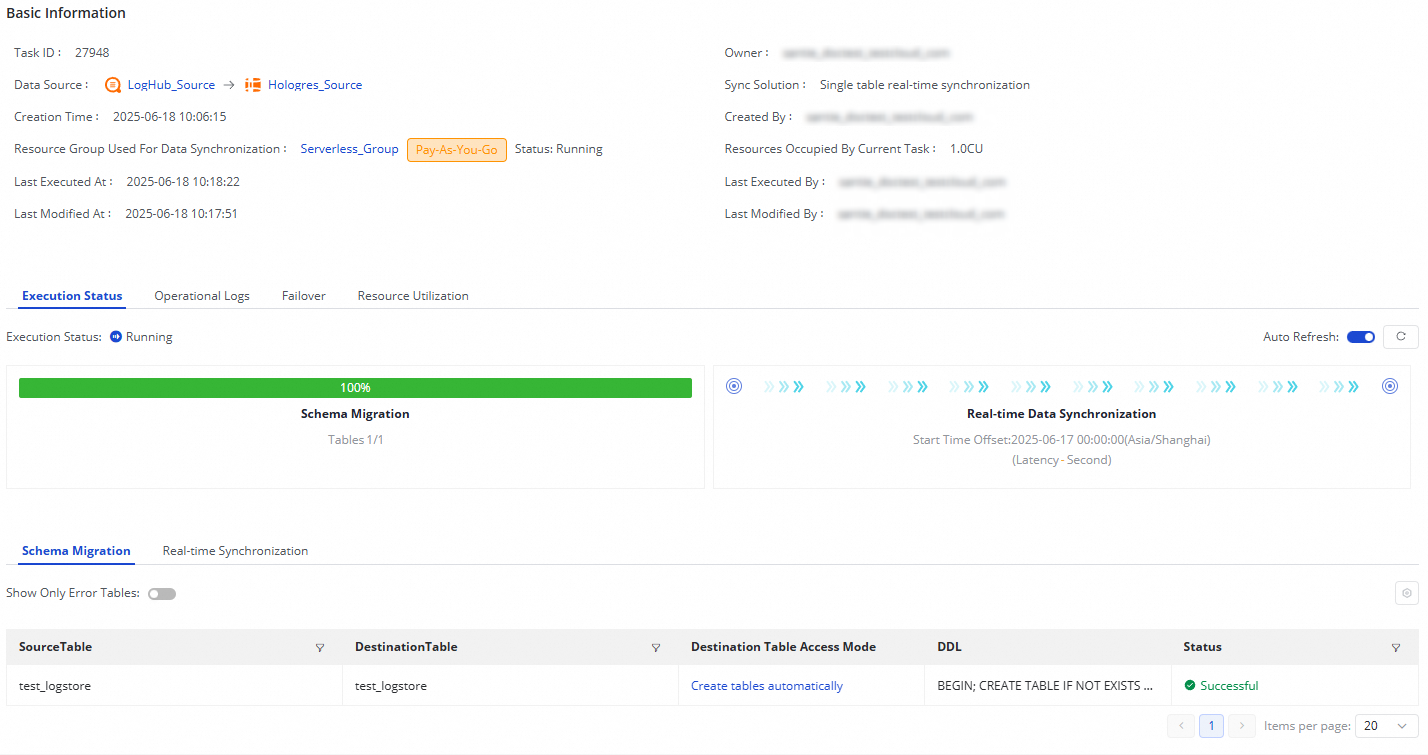
The synchronization task from LogHub (SLS) to Hologres has two stages: Schema Migration and Real-time Data Synchronization:
Schema Migration: This tab displays information such as the generation methods of destination tables. The generation methods of destination tables include Use Existing Table and Create Table. If the generation method of a destination table is Create Table, the DDL statement that is used to create the table is displayed.
Real-time Data Synchronization: This tab displays statistics about real-time synchronization, including real-time running information, DDL records, alert information, and more.
Rerun the synchronization task
In some special cases, if you want to modify the fields to synchronize, the fields in a destination table, or table name information, you can also click Rerun in the Operation column of the desired synchronization task. This way, the system synchronizes the changes that are made to the destination. Data in the tables that are already synchronized and are not modified will not be synchronized again.
Directly click Rerun without modifying the configurations of the synchronization task to enable the system to rerun the synchronization task.
Modify the configurations of the synchronization task and then click Complete. Click Apply Updates that is displayed in the Operation column of the synchronization task to rerun the synchronization task for the latest configurations to take effect.