DataWorks Data Integration provides MongoDB Reader that allows you to read data from a MongoDB data source. Then, you can use a writer to write the data to another data source. This topic provides an example on how to use a batch synchronization task in Data Integration to synchronize data from a MongoDB data source to a MaxCompute data source.
Background information
In this topic, a MongoDB data source is used as the source and a MaxCompute data source is used as the destination. Before data synchronization, you must refer to the "Make preparations" section of this topic to prepare MongoDB data and a MaxCompute table that are used for data synchronization.
Prerequisites
DataWorks is activated and a MaxCompute data source is added to a DataWorks workspace.
An exclusive resource group for Data Integration is purchased and configured. The resource group is used to run the batch synchronization task in this topic. For more information, see Create and use an exclusive resource group for Data Integration.
NoteYou can also use new-version resource groups. For more information, see Create and use a resource group of the new version.
Make preparations
In this example, you must prepare a MongoDB data collection and a MaxCompute table for data synchronization.
Prepare a MongoDB data collection.
In this example, ApsaraDB for MongoDB is used. The following sample code provides an example on how to prepare an ApsaraDB for MongoDB data collection.
Create a data collection named
di_mongodb_conf_test.db.createCollection('di_mongodb_conf_test')Insert sample data into the data collection.
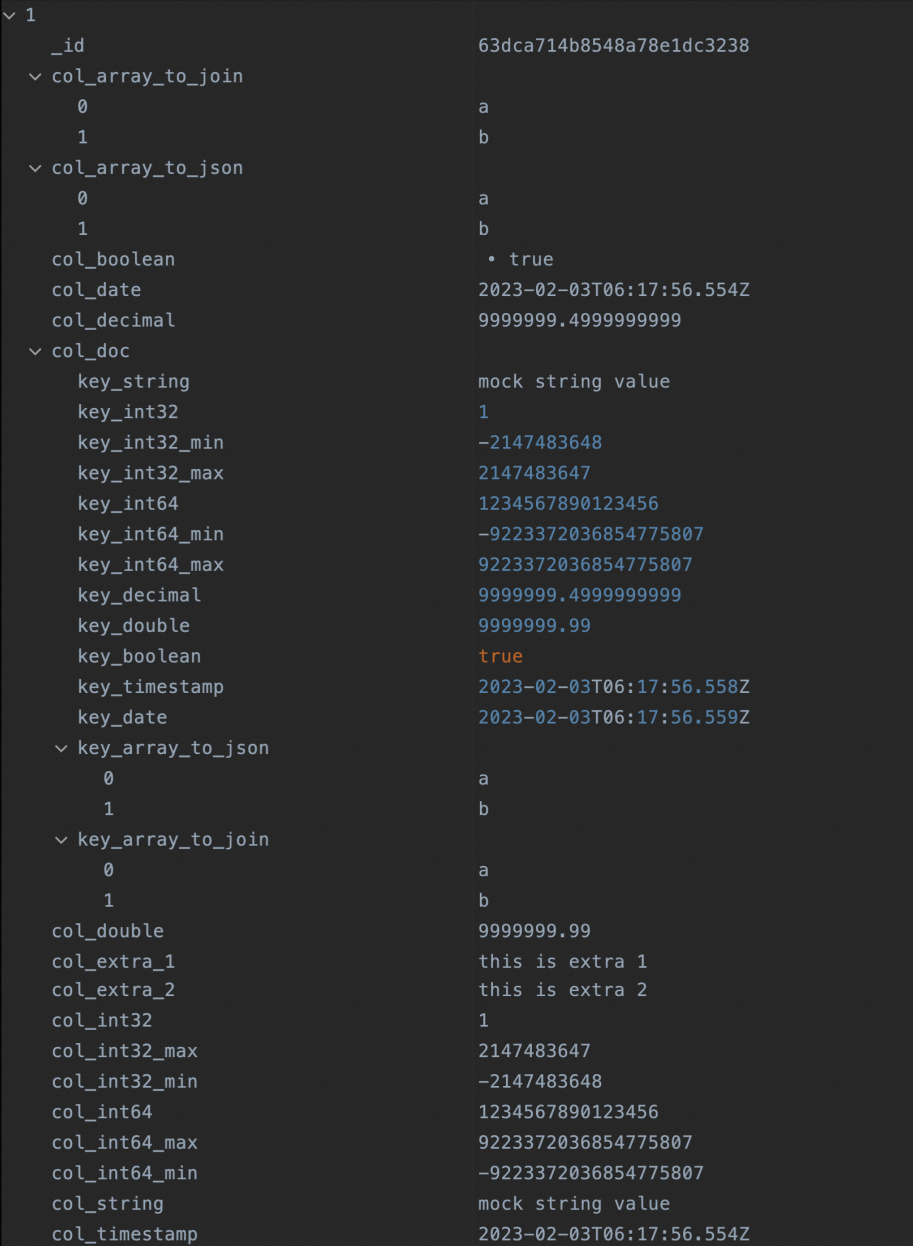
db.di_mongodb_conf_test.insertOne({
    'col_string':'mock string value',
    'col_int32':NumberInt("1"),
    'col_int32_min':NumberInt("-2147483648"),
    'col_int32_max':NumberInt("2147483647"),
    'col_int64':NumberLong("1234567890123456"),
    'col_int64_min':NumberLong("-9223372036854775807"),
    'col_int64_max':NumberLong("9223372036854775807"),
    'col_decimal':NumberDecimal("9999999.4999999999"),
    'col_double':9999999.99,
    'col_boolean':true,
    'col_timestamp':ISODate(),
    'col_date':new Date(),
    'col_array_to_json':['a','b'],
    'col_array_to_join':['a','b'],
    'col_doc':{
        'key_string':'mock string value',
        'key_int32':NumberInt("1"),
        'key_int32_min':NumberInt("-2147483648"),
        'key_int32_max':NumberInt("2147483647"),
        'key_int64':NumberLong("1234567890123456"),
        'key_int64_min':NumberLong("-9223372036854775807"),
        'key_int64_max':NumberLong("9223372036854775807"),
        'key_decimal':NumberDecimal("9999999.4999999999"),
        'key_double':9999999.99,
        'key_boolean':true,
        'key_timestamp':ISODate(),
        'key_date':new Date(),
        'key_array_to_json':['a','b'],
        'key_array_to_join':['a','b'],
    },
    'col_extra_1':'this is extra 1',
    'col_extra_2':'this is extra 2',
})
Query the data that is inserted into the MongoDB data collection.
db.getCollection("di_mongodb_conf_test").find({})The following figure shows the query result.
Prepare a MaxCompute table.
Create a partitioned table named
di_mongodb_conf_test. The partition field ispt.CREATE TABLE IF NOT EXISTS di_mongodb_conf_test ( `id` STRING ,`col_string` STRING ,`col_int32` INT ,`col_int32_min` INT ,`col_int32_max` INT ,`col_int64` BIGINT ,`col_int64_min` BIGINT ,`col_int64_max` BIGINT ,`col_decimal` DECIMAL(38,18) ,`col_double` DOUBLE ,`col_boolean` BOOLEAN ,`col_timestamp` TIMESTAMP ,`col_date` DATE ,`col_array_to_json` STRING ,`col_array_to_join` STRING ,`key_string` STRING ,`key_int32` INT ,`key_int32_min` INT ,`key_int32_max` INT ,`key_int64` BIGINT ,`key_int64_min` BIGINT ,`key_int64_max` BIGINT ,`key_decimal` DECIMAL(38,18) ,`key_double` DOUBLE ,`key_boolean` BOOLEAN ,`key_timestamp` TIMESTAMP ,`key_date` DATE ,`key_array_to_json` STRING ,`key_array_to_join` STRING ,`col_doc` STRING ,`col_combine` STRING ) PARTITIONED BY ( pt STRING ) LIFECYCLE 36500 ;Add the value
20230202to the partition field.alter table di_mongodb_conf_test add if not exists partition (pt='20230202');Check whether the partitioned table is correctly created.
SELECT*FROM di_mongodb_conf_test
WHEREpt='20230202';
Configure a batch synchronization task
Step 1: Add a MongoDB data source
Add a MongoDB data source and make sure that a network connection is established between the data source and the exclusive resource group for Data Integration. For more information, see Add a MongoDB data source.
Step 2: Create and configure a batch synchronization task
Create a batch synchronization task on the DataStudio page in the DataWorks console and configure items such as the items related to the source and destination for the batch synchronization task. This step describes only some items that you must configure. For the other items, retain the default values. For more information, see Configure a batch synchronization task by using the codeless UI.
Establish network connections between the data sources and the exclusive resource group for Data Integration.
Select the MongoDB data source that you added in Step 1, the MaxCompute data source that you add, and the exclusive resource group for Data Integration. Then, test the network connectivity between the data sources and the resource group.
Select the data sources.
Select the MongoDB data collection and partitioned MaxCompute table that you prepare in the data preparation step.
Configure field mappings.
If a MongoDB data source is added, the method of mapping fields in a row of the source to the fields in the same row of the destination is used by default. You can also click the
 icon to manually edit fields in the source collection. The following sample code provides an example on how to edit fields in the source collection:
 {"name":"_id","type":"string"} {"name":"col_string","type":"string"} {"name":"col_int32","type":"long"} {"name":"col_int32_min","type":"long"} {"name":"col_int32_max","type":"long"} {"name":"col_int64","type":"long"} {"name":"col_int64_min","type":"long"} {"name":"col_int64_max","type":"long"} {"name":"col_decimal","type":"double"} {"name":"col_double","type":"double"} {"name":"col_boolean","type":"boolean"} {"name":"col_timestamp","type":"date"} {"name":"col_date","type":"date"} {"name":"col_array_to_json","type":"string"} {"name":"col_array_to_join","type":"array","splitter":","} {"name":"col_doc.key_string","type":"document.string"} {"name":"col_doc.key_int32","type":"document.long"} {"name":"col_doc.key_int32_min","type":"document.long"} {"name":"col_doc.key_int32_max","type":"document.long"} {"name":"col_doc.key_int64","type":"document.long"} {"name":"col_doc.key_int64_min","type":"document.long"} {"name":"col_doc.key_int64_max","type":"document.long"} {"name":"col_doc.key_decimal","type":"document.double"} {"name":"col_doc.key_double","type":"document.double"} {"name":"col_doc.key_boolean","type":"document.boolean"} {"name":"col_doc.key_timestamp","type":"document.date"} {"name":"col_doc.key_date","type":"document.date"} {"name":"col_doc.key_array_to_json","type":"document"} {"name":"col_doc.key_array_to_join","type":"document.array","splitter":","} {"name":"col_doc","type":"string"} {"name":"col_combine","type":"combine"}After you edit the fields, the new mappings between the source fields and destination fields are displayed on the configuration tab of the task.
Step 3: Commit and deploy the batch synchronization task
If you use a workspace in standard mode and you want to periodically schedule the batch synchronization task in the production environment, you can commit and deploy the task to the production environment. For more information, see Deploy nodes.
Step 4: Run the batch synchronization task and view the synchronization result
After you complete the preceding configurations, you can run the batch synchronization task. After the running is complete, you can view the data synchronized to the MaxCompute table. 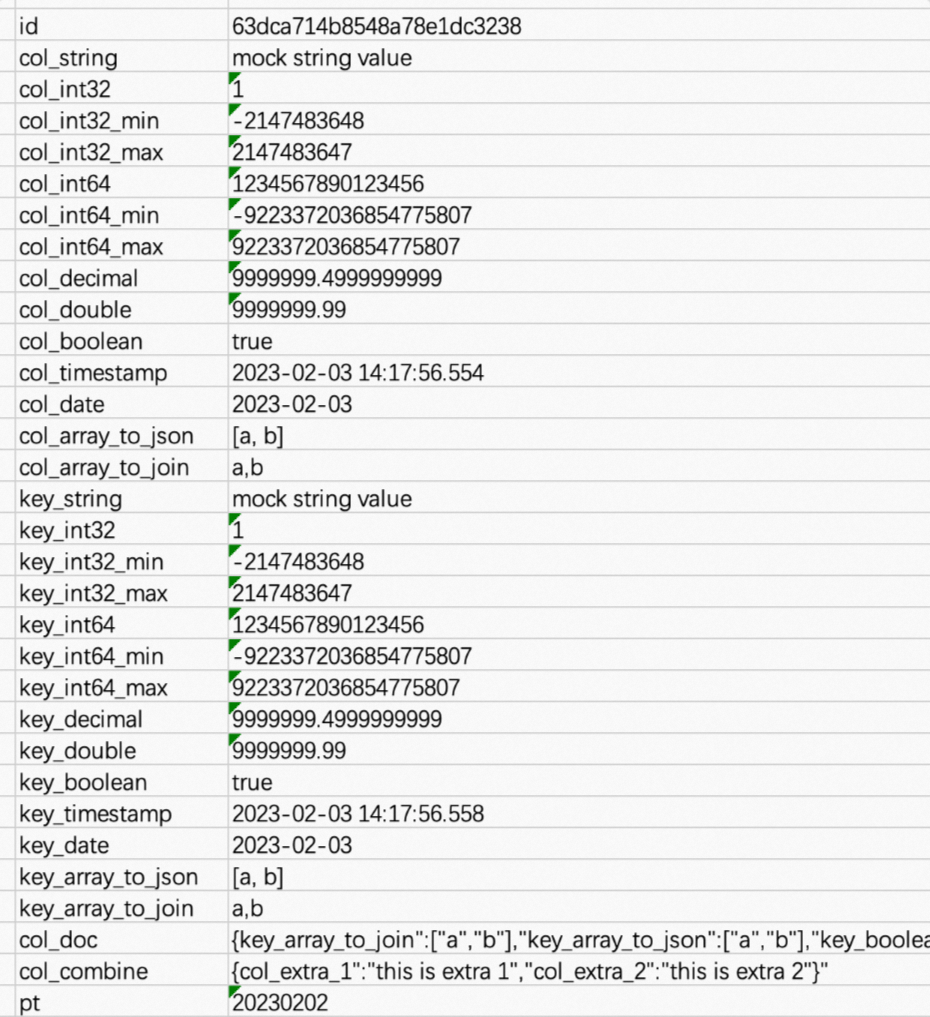
The following figure shows data in the
col_docfield.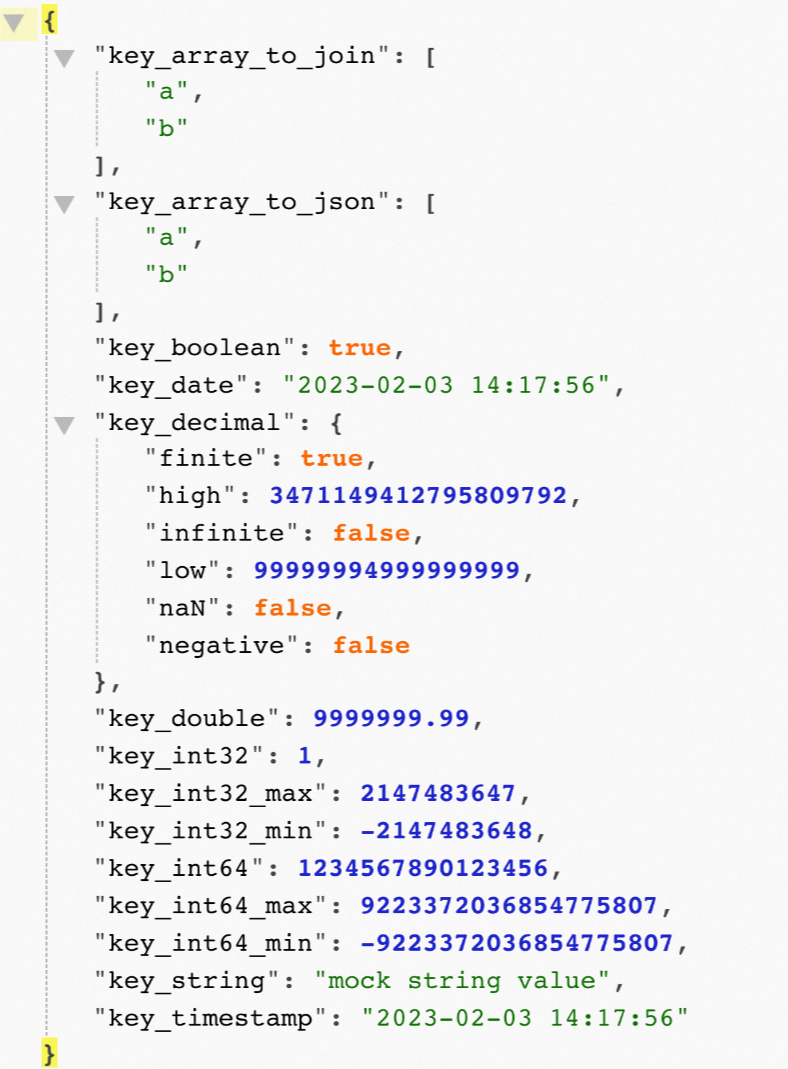
The following figure shows data in the
col_combinefield.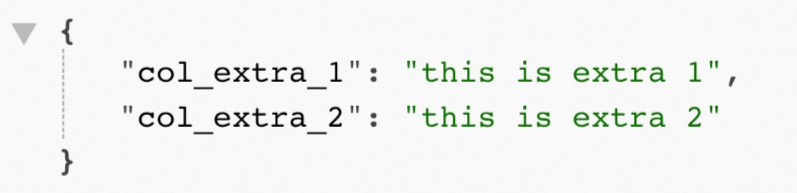
For information about issues related to output data that is converted from data of the DECIMAL type, see the Appendix 2: Issues related to output data that is converted from data of the DECIMAL type section of this topic.
Appendix 1: Data type conversion during data synchronization
Convert arrays into JSON data: col_array_to_json
Raw MongoDB data | Field mapping configuration | Conversion result |
| If you set the | |
Convert arrays into concatenated strings: col_array_to_join
Raw MongoDB data | Field mapping configuration | Conversion result |
| If you set the | |
Read data from a specified nested field in a MongoDB document
Raw MongoDB data | Field mapping configuration | Conversion result |
|
| |
Convert data in a MongoDB document into JSON data
Raw MongoDB data | Field mapping configuration | Conversion result |
| If you set the | |
Convert data in fields except the configured fields in a MongoDB document into JSON data
Raw MongoDB data | Field mapping configuration | Conversion result |
| The MongoDB document contains four fields: col_1, col_2, col_3, and col_4. The col_1 and col_2 fields are not of the COMBINE data type and are configured in the batch synchronization task. The fields col_3 and col_4 is converted into JSON data when the task is run. | |
Appendix 2: Issues related to output data that is converted from data of the DECIMAL type
The following sample code shows the default output after data of the Decimal128 type is converted into JSON data:
{
    "key_decimal":
    {
        "finite": true,
        "high": 3471149412795809792,
        "infinite": false,
        "low": 99999994999999999,
        "naN": false,
        "negative": false
    }
}
You can perform the following steps if you want to convert data of the Decimal128 type into numbers:
When you configure the batch synchronization task, click Conversion script in the top toolbar of the task configuration tab to switch to the script mode.
Modify the configurations of the source by adding the
decimal128OutputTypeparameter in parameters and set the parameter tobigDecimalas a fixed value.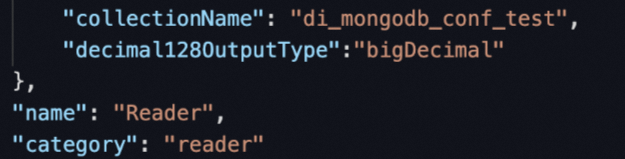
Run the batch synchronization task again and view the result.
{
    "key_decimal": "9999999.4999999999"
}