Data Integration supports real-time synchronization of entire databases from MySQL, Oracle, PolarDB, and other sources to DataHub. This topic describes how to synchronize data from an entire MySQL database to DataHub in both full and incremental modes.
Prerequisites
You have purchased a Serverless resource group or an exclusive resource group for Data Integration.
You have created MySQL and DataHub data sources. For more information, see Create a data source for Data Integration.
You have established network connectivity between the resource group and data sources. For more information, see Network connectivity solutions.
Procedure
Step 1: Select the synchronization task type
Go to the Data Integration page.
Log on to the DataWorks console. In the top navigation bar, select the desired region. In the left-side navigation pane, choose . On the page that appears, select the desired workspace from the drop-down list and click Go to Data Integration.
In the left-side navigation pane, click Sync Tasks, and then click Create Sync Task at the top of the page to go to the sync task creation page. Configure the following basic information:
Data Source And Destination:
MySQL→DataHubNew Task Name: Customize the name of the synchronization task.
Synchronization Type:
Entire Database Real-time.Synchronization Steps: Select Full Synchronization and Incremental Synchronization.
Step 2: Configure network and resources
In the Network And Resource Configuration section, select the Resource Group for the synchronization task. You can allocate the number of CUs for Task Resource Usage.
For Source Data Source, select the added
MySQLdata source. For Destination Data Source, select the addedDataHubdata source, and then click Test Connectivity.
After you confirm that both the source and destination data sources are connected successfully, click Next.
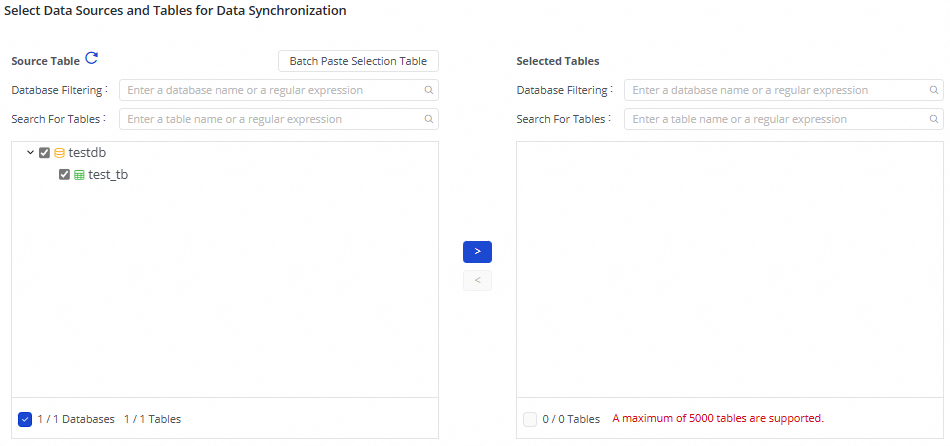
3. Select the tables from which you want to synchronize data
In this step, you can select the tables from which you want to synchronize data in the Source Table list and click the ![]() icon to move the selected tables to the Selected Tables list.
icon to move the selected tables to the Selected Tables list.
Step 4: Map destination tables
After you select the tables from which you want to synchronize data, the selected tables are automatically displayed in the Mapping Rules for Destination Tables section. The properties of the destination tables are waiting to be mapped. You must manually define mappings between the source tables and destination tables to determine the data reading and writing relationships. Then, you can click Refresh in the Actions column. You can directly refresh mappings between source tables and destination tables. You can also refresh mappings between source tables and destination tables after you configure settings related to destination tables.
You can select the tables to be synchronized and click Batch Refresh Mapping. If no mapping rule is configured, the default Topic name rule is
${source_database_name}_${source_table_name}. If a topic with the same name does not exist in the destination, a new one will be automatically created.In the Custom Destination Topic Name Mapping column, you can click the Edit button to customize the destination table name rule.
You can use built-in variables and manually entered strings to form the final destination Topic name. You can edit the built-in variables. For example, you can create a new table name rule to add a suffix to the source table name as the destination Topic name.
a. Modify data type mappings for fields
Default mappings exist between data types of source fields and data types of destination fields. You can click Edit Mapping of Field Data Types in the upper-right corner of the Mapping Rules for Destination Tables section to configure data type mappings between source fields and destination fields based on your business requirements. After the configuration is complete, click Apply and Refresh Mapping.
b. Modify the schema of a destination table to add fields to the table and assign values to the fields
If a destination table is in the To Be Created state, you can perform the following steps to add fields to the table and assign values to the fields:
Add fields to one or more destination tables.
Add fields to a single destination table: Find the destination table to which you want to add fields and click the
 icon in the Destination Table Name column. In the dialog box that appears, add fields.
 Add fields to multiple destination tables at a time: Select the destination tables to which you want to add fields at a time, click Batch Modify in the lower part of the page, and then click Destination Table Schema - Batch Modify and Add Field.
Assign values to the fields. You can perform one of the following operations to assign values to the fields:
Assign values to the fields that are added to a single destination table: Find the destination table in which you want to assign values to newly added fields and click Configure in the Value assignment column. In the Additional Field dialog box, assign values to the fields.
Assign values to the fields that are added to multiple destination tables at a time: Select the destination tables in which you want to assign values to newly added fields, click Batch Modify in the lower part of the page, and then click Value assignment to assign values to the same fields in the selected destination tables at a time.
NoteYou can click the
 icon to switch the value assignment method and assign constants and variables to the fields that are added to a destination table.
3. Customize advanced parameters
If you need to make fine-grained configurations for the task to meet custom synchronization requirements, you can click the Custom Advanced Parameters column's Configure button to modify advanced parameters.
Before you modify the configurations of advanced parameters, make sure that you understand the meanings of the parameters to prevent unexpected errors or data quality issues.
5. Configure alert rules
To prevent the failure of the synchronization task from causing latency on business data synchronization, you can configure different alert rules for the synchronization task.
In the upper-right corner of the page, click Configure Alert Rule to go to the Alert Rule Configurations for Real-time Synchronization Subnode panel.
In the Configure Alert Rule panel, click Add Alert Rule. In the Add Alert Rule dialog box, configure the parameters to configure an alert rule.
NoteThe alert rules that you configure in this step take effect for the real-time synchronization subtask that will be generated by the synchronization task. After the configuration of the synchronization task is complete, you can refer to Run and manage real-time synchronization tasks to go to the Real-time Synchronization Task page and modify alert rules configured for the real-time synchronization subtask.
Manage alert rules.
You can enable or disable alert rules that are created. You can also specify different alert recipients based on the severity levels of alerts.
6. Configure advanced parameters
You can change the values of specific parameters configured for the synchronization task based on your business requirements. For example, you can specify an appropriate value for the Maximum read connections parameter to prevent the current synchronization task from imposing excessive pressure on the source database and data production from being affected.
To prevent unexpected errors or data quality issues, we recommend that you understand the meanings of the parameters before you change the values of the parameters.
In the upper-right corner of the configuration page, click Configure Advanced Parameters.
In the Configure Advanced Parameters panel, change the values of the desired parameters.
7. Configure DDL processing rules
DDL operations may be performed on the source. You can click Configure DDL Capability in the upper-right corner of the page to configure rules to process DDL messages from the source based on your business requirements.
For more information, see Configure rules to process DDL messages.
8. View and change resource groups
You can click Configure Resource Group in the upper-right corner of the page to view and change the resource groups that are used to run the current synchronization task.
9. Run the synchronization task
After the configuration of the synchronization task is complete, click Complete in the lower part of the page.
In the Synchronization Task section of the Data Integration page, find the created synchronization task and click Start in the Operation column.
Click the Name/ID of the synchronization task in the Tasks section and view the detailed running process of the synchronization task.
Perform O&M operations on the data synchronization solution
View the status of the data synchronization solution
After you create a synchronization task, you can view the list of created synchronization tasks and the basic information of each task on the synchronization task page.
You can click Start or Stop a synchronization task in the Operation column. In the More menu, you can Edit, View, and perform other operations on the synchronization task.
For started tasks, you can see the basic running status in Execution Overview, or click the corresponding overview area to view execution details.

The real-time synchronization task from MySQL to DataHub for the entire database consists of three steps:
Schema Migration: This tab displays information such as whether a destination table is a newly created table or an existing table. For a newly created table, the DDL statement that is used to create the table is displayed.
Full Data Initialization: This tab displays information such as the source tables and destination tables involved in batch synchronization, the synchronization progress, and the number of data records that are synchronized.
Real-time Data Synchronization: This tab displays statistics information for real-time synchronization (running information, DDL records, and alert information).
Rerun the synchronization task
In some special cases, if you add tables to or remove tables from the source, or change the schema or name of a destination table, you can click More in the Operation column of the synchronization task and then click Rerun to rerun the task after the change. During the rerun process, the synchronization task synchronizes data only from the newly added tables to the destination or only from the mapped source table to the destination table whose schema or name is changed.
If you want to rerun the synchronization task without modifying the configuration of the task, click More in the Actions column and then click Rerun to rerun the task to perform full synchronization and incremental synchronization again.
If you want to rerun the synchronization task after you add tables to or remove tables from the task, click Complete after the change. In this case, Apply Updates is displayed in the Actions column of the synchronization task. Click Apply Updates to trigger the system to rerun the synchronization task. During the rerun process, the synchronization task synchronizes data from the newly added tables to the destination. Data in the original tables is not synchronized again.