This topic describes how to add an API data source in DataV and how to configure related parameters. Open APIs are used to call the API operations of Alibaba Cloud services. You can use Open APIs to call the API operations of cloud services. In DataV, the most common scenario is to call the API operations of other cloud services to obtain and display data.
Prerequisites
The Open API data source to be added is prepared.Procedure for adding an API data source
- Log on to the DataV console.
- On the My Data tab, click Data Sources and click Add Data.
- From the Type list, select Open API.
- Enter information about Open API.
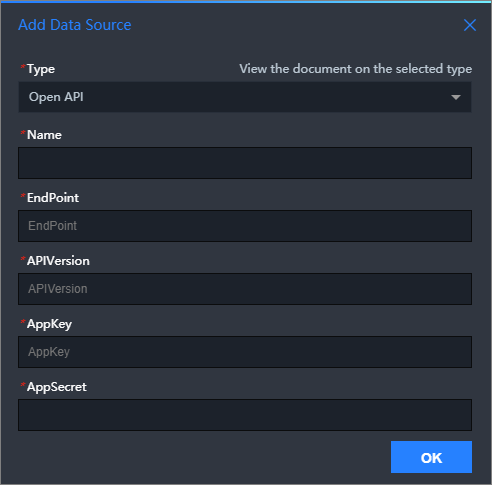
Parameter Description Name The name of the data source you want to add. You can set this parameter to a custom name. EndPoint The service address of the API. You must obtain the service address from the API documentation of the cloud service. For example, the API service address of ECS is ecs.aliyuncs.com, CloudMonitor the API service address of Hangzhou ismetrics.cn-hangzhou.aliyuncs.com.APIVersion The API version of a cloud product. You can obtain this information from the API documentation of the related cloud product. For example, the API version for CloudMonitor is 2017-03-01.AppKey The AccessKey ID of the account that can call the Open API. AppSecret The AccessKey secret of the account that can call API operations. - After you enter the information about the Tablestore data source, click OK.
The added data source is displayed in the data source list.
Procedure for using an API data source
- Log on to the DataV console.
- On the Projects tab, move the pointer over the project that you want to edit and click Edit. Important If you have not created a visualization application on the My Visualizations page, see Use a template to create a PC-side visual application to create a visualization application.
- In Canvas Editor, click a widget on the canvas.
If no widget is added to the canvas, add a widget first. For more information, see Add a domain name.
- In the right-side configuration panel, click the Data tab and then Set.
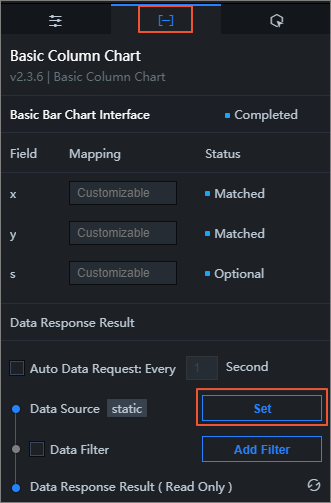
- In the Set Data Source panel, set Data Source Type to Open API.
- Select the Open API data source from the Select Existing Data Source drop-down list.
- Select a request method from the Request Method drop-down list. You can select GET or POST.
- Specify Interface Name.
Enter the name of the API operation that you want to call. The operation name is the value of the Action parameter that you specify to call the operation. The value comes from the API list provided by cloud products, such as CloudMonitor
DescribeMetricList. - Optional:Enter Path of Responses.
Take a part of the results returned by the Open API as the return result path.
For example, the Open API returns:{ "data": [ { "x": 1, "y": 2 }, { "x": 2, "y": 4 } ] }If you enter data in Path of Responses, the response results are as follows:[ { "x": 1, "y": 2 }, { "x": 2, "y": 4 } ]Note This conversion can be performed by using the filter. The Path of Responses parameter can be left blank. - Enter query parameters in the edit box under the Path of Responses parameter.
- Query parameters are API parameters of Open APIs and are filled in as JSON objects.
- For more information about the parameter names, see the descriptions of the input parameters in the API documentation of the related cloud product.
- The callback ID is specified in the value of the JSON object.
The query parameters of the DescribeMetricList API of CloudMonitor.{ "MetricName": "cpu_idle", "Namespace": "acs_ecs_dashboard", "Dimensions": [ { "instanceId": "i-j6c0kyh2qh7fi0r4k351" } ], "StartTime": "2021-01-27 14:00:00", "EndTime": "2021-01-27 15:00:00", "Period": "60" } - Click Object to Array below the check box to automatically convert the returned objects to numeric values. Examples:
// Original data
{
  "name": "..."
}
 =>
// The converted data.
[{
  "name": "..."
}]
Note This configuration items is not often used, and it is recommended that you use filters for data format conversion. - Click Preview Data Response to view the returned data.