X-Data Engineering automatically generates integration tasks, data models (conceptual models, logical models, and analytical models), and code tasks based on your requirements.
Prerequisites
You must activate the Intelligent R&D Edition to use X-Data Engineering.
You have configured and enabled the X-Data Engineering assistant. For more information, see Intelligent applications.
Limits
The GaussDB (DWS) compute engine does not support intelligent applications.
After a subject area model is generated, only users who have enabled Asset Operations or and have the Catalog Design - Management permission can use the Create as Asset Topic Folder operation.
Permission description
Super administrators, system administrators, operations administrators, and custom global roles with the X-Data Engineering-View permission can view and use the X-Data Engineering assistant.
If a user does not have the Planning-Business-View permission, the user cannot use X-Data Engineering to complete conceptual modeling.
If a user does not have the Planning-Business-Management permission, the user cannot publish concept models.
Create a conversation
X-Data Engineering lets you create conceptual models from business descriptions and logical models from business entities.
Create a conceptual modeling conversation
On the Dataphin home page, choose Super X > X-Data Engineering from the top menu bar to open the X-Data Engineering page.
On the X-Data Engineering page, click the Conceptual Modeling card.
In the dialog box at the bottom, enter your requirements. You can also click the
 icon to upload description files.
Supported file formats include txt, md, html, doc, docx, pdf, xls, xlsx, ppt, pptx, and csv. You can upload a maximum of 10 files at a time. Each file cannot exceed 2 MB.
(Optional) X-Data Engineering provides two examples. To use one, click Use Example below it. The system then creates a conceptual model based on the information in the example.
After the conceptual model is generated, you can modify the model as needed. When you are finished, click Publish Model in the Conceptual Modeling panel. The system automatically creates the corresponding objects in the current tenant.
Click the
 icon next to a description file in the conversation message to download the file.
After the model is generated, click the
 icon in the conversation message to regenerate the model.
You can provide feedback on the generated model by clicking the like or dislike icon. If you dislike the model, you can enter and submit feedback up to 512 characters in length. You can also close the feedback dialog box without entering text. In this case, the system only records your dislike.
Click a Business Unit, Data Domain, or business entity node to reference it in the conversation.
The system automatically numbers each response starting from 1. Click the
 icon in a conversation message to roll back the model to the version that corresponds to that message.
(Optional) After you publish the conceptual model, you can generate a logical model. For more information, see Create a logical modeling conversation.
Create a logical modeling conversation
On the Dataphin home page, choose Super X > X-Data Engineering from the top menu bar to open the X-Data Engineering page.
On the X-Data Engineering page, click the Logical Modeling card.
Generate logical tables in the selected project for the selected business entity and its associated entities. You can also add a description for the business entity or upload documents.
Business Entity: Select a published business entity that does not have an existing logical table. You can select from all Business Units in the current tenant. This includes general business objects and all business activities.
Project: You must select a business entity before you select a project. You can select any project that is attached to the Business Unit of the selected business entity.
After you send the request, the system automatically retrieves the associated entities for the selected Business Entity. Associated entities are general business objects that do not have logical tables. You can hover over the
 icon next to each business entity to view its name, code, subject area, and entity type.
You also need to confirm the source data for the logical table. The system recommends a source table for each entity. The system prioritizes tables in the project attached to the entity's Business Unit. You can delete the recommended table or add other source tables. Click Add to add multiple source tables in the Source Tables For Logical Table panel. The panel shows the source table name, its Business Unit, Data Domain, and project. You can enter a keyword to quickly search for a table name. You can also filter by Business Unit, project, and table type.
After you configure the source tables for all business entities and ensure that a source is specified for each entity, click Generate Logical Table. The system generates the field list and then the calculation logic for the logical table.
Field list for the logical table: The field list includes the field name, display name, data type, field category, and description. You can modify the generated field information as needed.
Calculation logic for the logical table: After you have modified the field list, click Next. The system automatically generates the calculation logic for the logical table. After the logic is generated, you can enter optimization instructions in the dialog box on the left. The system then regenerates the calculation logic. You can edit and format the logic code. After you edit the code, you must validate it again. Click Start Validation. You can submit the logic only after it passes validation.
(Optional) After each conversation, you can provide feedback on the response by clicking the like or dislike icon. If you dislike the response, you can enter and submit feedback up to 512 characters in length. You can also close the feedback dialog box without entering text. In this case, the system only records your dislike.
Click Submit. Upon successful submission, the status of the logical table changes to Successful.
Conversation management
Conversation Records: Click Conversation Records in the upper right corner. In the Conversation Records dialog box, you can view the last 20 conversation records and perform the following operations.
Search: You can search for conversation records by title keywords.
Rename: Click the Rename icon after the conversation record name to rename the conversation record. The name cannot exceed 256 characters.
Delete: You can click the Clear icon after the search box to delete all conversation records, or click the Delete icon after a conversation record name to delete a single conversation record.
Create Conversation: Click Create Conversation in the upper right corner to start a new conversation.
Operations supported in modeling
Operations supported in conceptual modeling
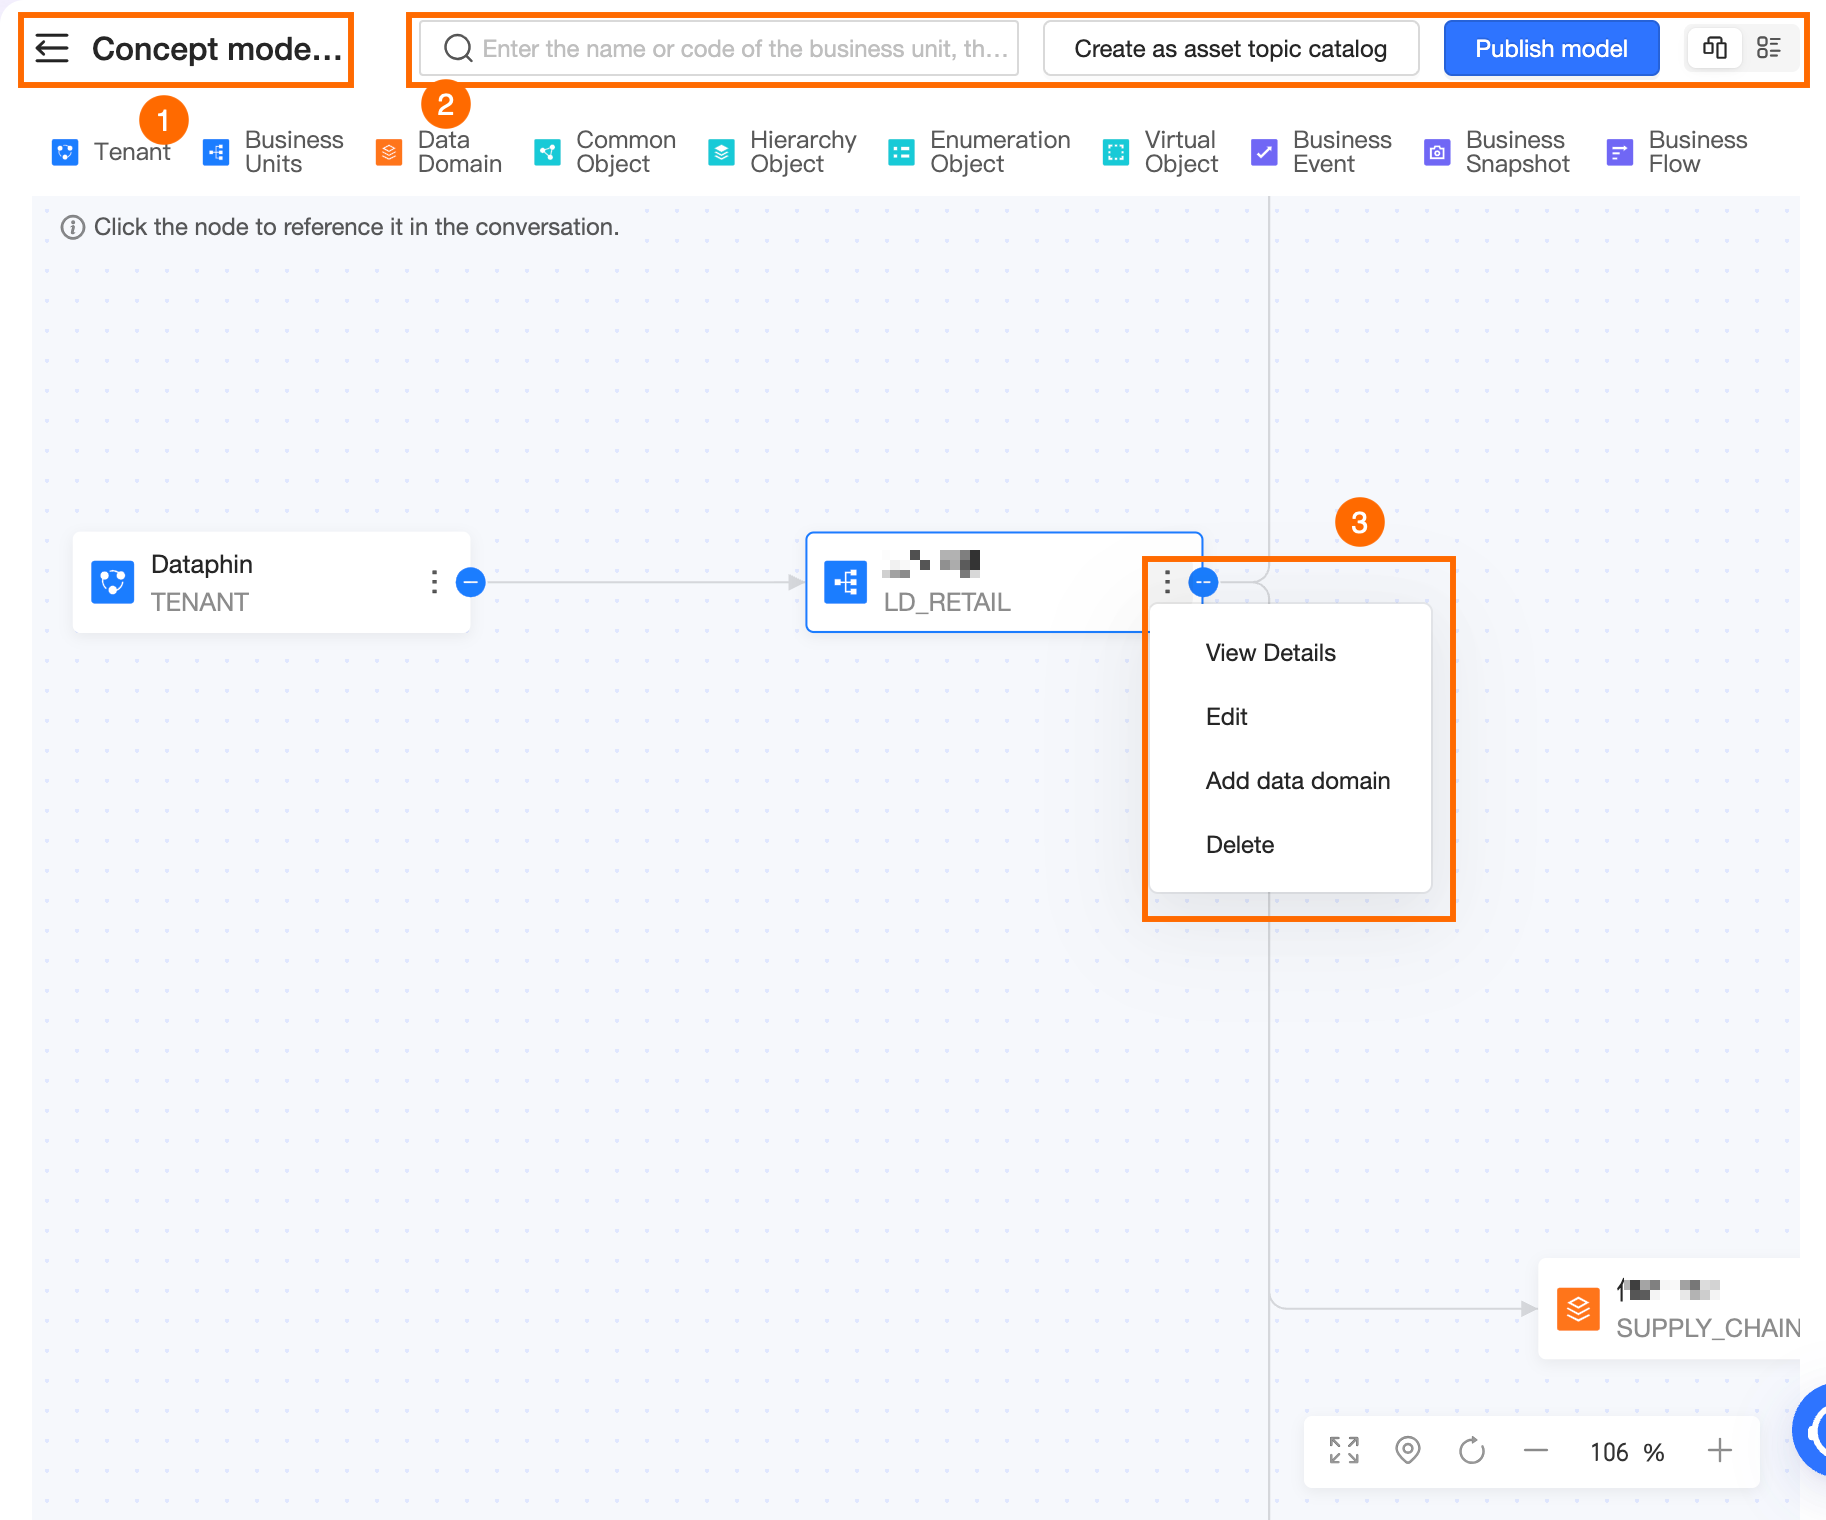
Section | Description |
①Full screen display | Click the |
②Search and view switch |
|
③Operations supported on each node | Tenant, Business Unit, Data Domain, and business entity nodes support the following operations:
Note You cannot edit or delete Business Units, Data Domains, and business entities that already exist in the current tenant. For more information about each operation, see Operations supported on tenant nodes, Operations supported on Business Unit nodes, Operations supported on Data Domain nodes, and Operations supported on business entity nodes. |
Operations supported on tenant nodes
Operation | Description |
View Details | Click the |
Add Data Unit | Add a new Business Unit to the existing model. Click the
|
Operations supported on Business Unit nodes
Operation | Description |
View Details | Click the |
Edit | Click the
|
Add Subject Area | Add a subject area to the current or another data block. Click the
|
Delete | Click the Note Deleting a data block also deletes all nodes within it. |
Operations supported on Data Domain nodes
Operation | Description |
View Details | Click the |
Edit | Click the
|
Add Subdomain | Add a subdomain under the current or another Data Domain. Click the |
Add Entity | Click the
|
Delete | Click the Note Deleting the current Data Domain also deletes all nodes contained within it. |
Operations supported on business entity nodes
Operation | Description |
View Details | Click the |
Edit | Click the |
View Entity Relationships | Click the |
Delete | Click the |
Operations supported in logical modeling
Operations supported on the field list page
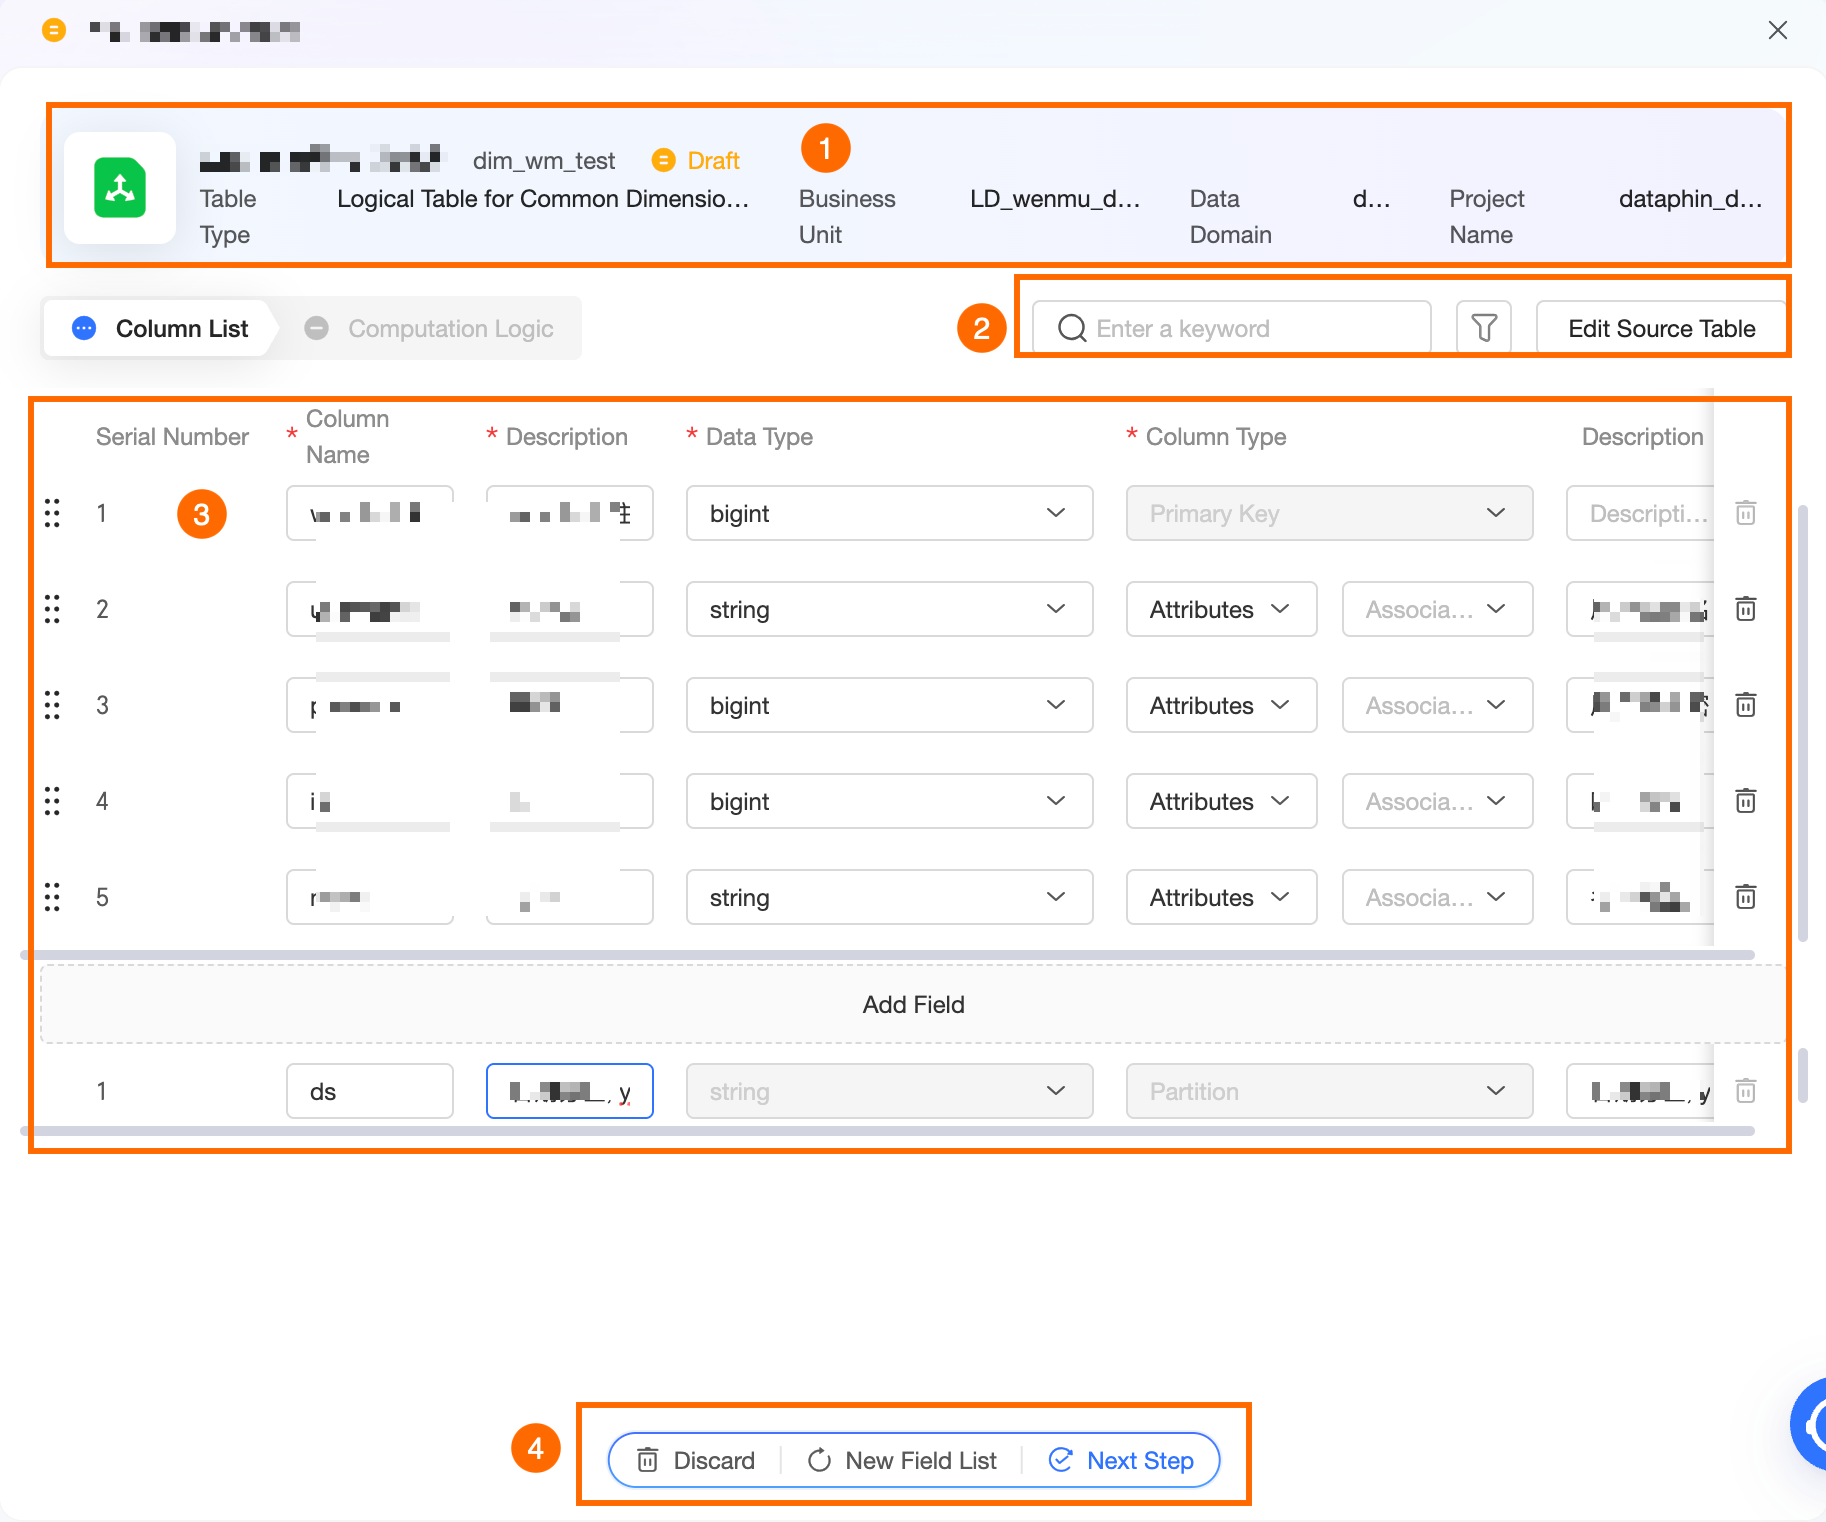
Section
Description
①Basic information of the logical table
The basic information includes the Chinese name, English name, status, table type, Business Unit, Data Domain, and project of the logical table. The table type is determined by the business entity type. You can modify the Chinese and English names of the logical table as needed. The prefix and suffix of the English name are generated based on the Table Naming Conventions in the R&D Specifications of the Business Unit to which the business entity belongs.
②Search, filter, and edit source tables
Search and filter: You can enter a field name keyword in the search box to perform a fuzzy search, or click the
 icon to filter by Data Type and Field Type in the filter dialog box.
Edit Source Tables: Click Edit Source Tables to select one or more source tables in the source tables panel. You can enter a table name keyword to perform a fuzzy search. You can also filter by the logical table's Business Unit, project, and table type. In addition, you can click the
 icon in the Actions column to view the field list of the corresponding logical table. After you modify the source tables, the system regenerates the field list for the logical table.
③Field list
The field list includes Serial Number, Column Name, Remarks, Data Type, Field Type, and Description.
Column Name: It can contain English letters, digits, and underscores (_) and be up to 128 characters long.
Data Type: Supported data types include string, bigint, double, timestamp, decimal, Text, Numeric, Datetime Variable, and Other.
Field Type: Primary Key, Business Time (flow start time, flow end time, event time, snapshot time), Property, Measure, Partition.
In the field list, you can also add, delete, and adjust the order of fields.
Add Field: Click Add Field to add a blank row at the end of the field list. You can then configure the field information.
Delete Field: Click the
 icon in the Actions column of a field to delete it.Note
You cannot delete a primary key field.
Adjust Field Order: Drag the
 icon next to a field to adjust its order.
④Operations for the entire field list
Deprecate: Skips the creation of the current logical table and marks it as deprecated. You cannot edit a deprecated logical table. This operation cannot be undone. Proceed with caution.
Regenerate Field List: Click Regenerate Field List to regenerate the field list for the selected business entity.
Next: After you confirm the field list information, click Next to generate the related calculation logic.
Operations supported on the calculation logic page
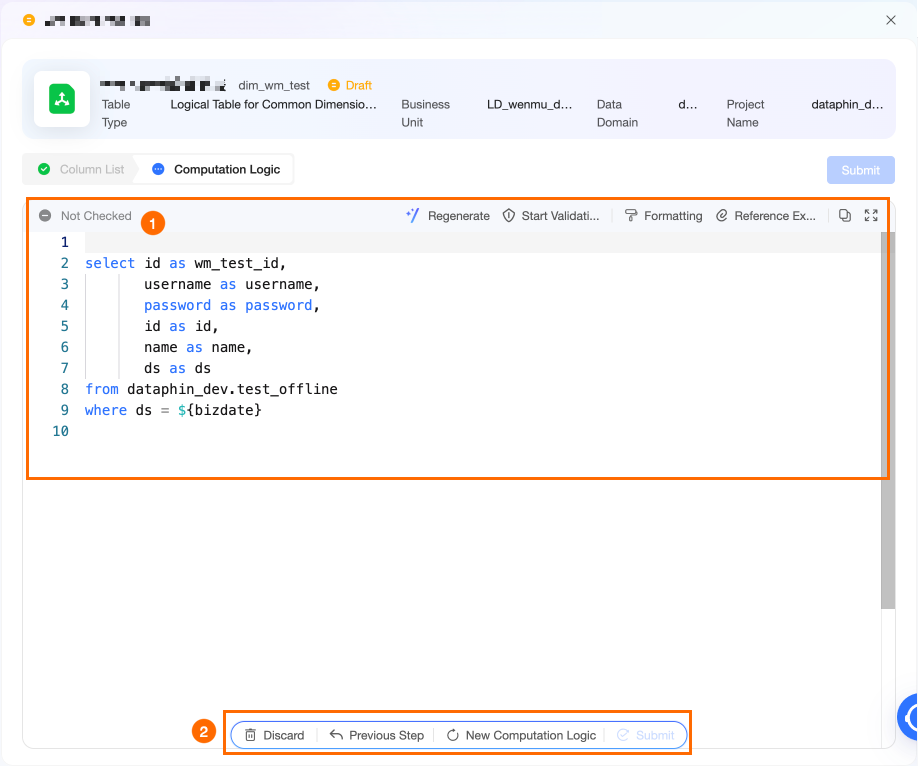
Section
Description
①Calculation logic SQL area
Generates the logical table SQL based on the table information and source table schema you provide.
Regenerate: Click Regenerate. The system regenerates the calculation logic for the current logical table. If you enter modification instructions for the calculation logic in the dialog box on the left, the system also regenerates the calculation logic.
Start Validation: You must perform validation after modifying the field list or calculation logic, including formatting operations. If validation fails, you can view the error log and modify the corresponding SQL. You can also click Smart Modify to send the current calculation logic SQL and error message to the logical modeling conversation. The system will regenerate the calculation logic. You can submit the logic only after it passes validation.
Format: Use code formatting to optimize code layout and readability.
Parameter Examples: You can refer to simple parameter examples to edit or modify the calculation logic SQL.
②Operations for the entire calculation logic
Deprecate: Deprecate and skip the creation of the current logical table. You cannot edit a deprecated logical table. This operation cannot be undone. Proceed with caution.
Previous: Click Previous to return to the field list. If you modify the field list, the calculation logic will be regenerated.
Regenerate Calculation Logic: Click Regenerate Calculation Logic. The system regenerates the calculation logic for the current logical table. If you enter modification instructions for the calculation logic in the dialog box on the left, the system also regenerates the calculation logic.
Submit: You must complete the calculation logic validation before submitting. Click Submit to start the submission process. After a successful submission, you can view the details of the current logical table in Administration > Administration Checklist.