If a compute engine experiences performance bottlenecks, lacks resources, or requires controlled task execution, you can configure throttling rules. These rules apply to tasks in both development and production environments and help ensure system stability and timely data output.
Background information
-
Without throttling, tasks run as soon as their upstream dependencies are met, the scheduled runtime arrives, and schedule resources are available. This can cause the following problems:
-
Batch data backfills that cover a long period can monopolize schedule resources, which affects recurring tasks and ad hoc queries.
-
Low-priority tasks might run before high-priority tasks, consuming computing resources and slowing down important tasks.
-
If schedule or computing resources are limited, many tasks may be forced to wait, which can lead to a compute engine crash.
-
-
Throttling helps you achieve the following goals:
-
Control the number of concurrent tasks submitted to the compute engine, preventing crashes caused by excessive concurrency or an excessive number of requests, and ensuring system stability.
-
Prioritize high-priority tasks for resource access, ensuring timely and orderly data processing.
-
Limits
-
You have purchased the artificial intelligence for IT operations (AIOps) value-added service, and the AIOps module has been enabled for the current tenant.
-
Before you configure throttling, note the following limits:
-
Throttling is supported only for offline tasks. It is not supported for real-time tasks, such as real-time computing and real-time integration tasks.
-
You can create a maximum of 50 throttling rules.
-
-
If you enable high availability (HA) for DataService Studio or Tag Online Service without purchasing AIOps, only one throttling rule is supported.
Permission description
The following table describes the permissions required for throttling operations.
|
Operation |
Role |
|
Add, batch operations |
super administrator, system administrator |
|
Edit, delete |
super administrator, system administrator, rule owner |
|
View rule details |
No permission control |
Throttling configuration overview
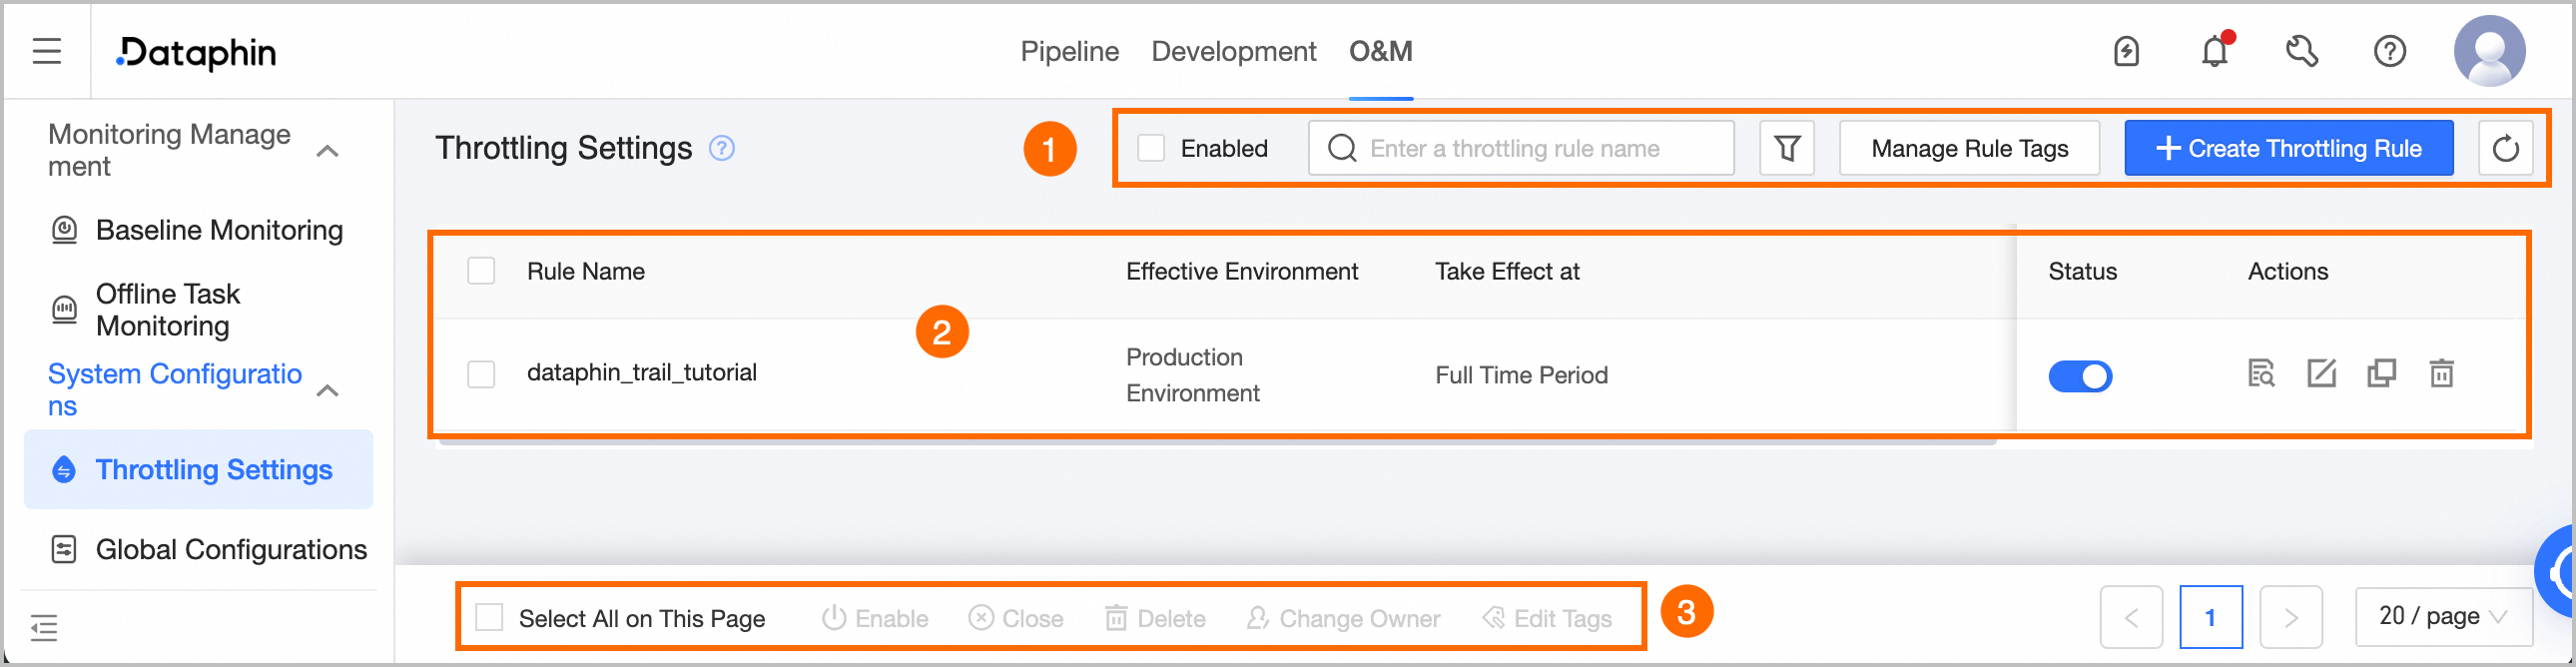
The throttling configuration page contains an operation area, a throttling rule list, and batch operations. Use this page to create and manage throttling rules.
|
Area |
Description |
|
①Operation area |
|
|
②Throttling rule list |
Lists the created throttling rules. The list includes Rule Name, Effective Environment, Effective Time, Concurrent Runs, Last Updated, Owner, Enabling Status, and available Operations. Important
After you create a throttling rule, its Enabling Status is on by default. If you turn off the status, the rule becomes inactive.
|
|
③Batch operations |
|
 filter icon to filter rules by tag, owner, or effective environment.
 refresh icon to refresh the rule list.
Create a throttling rule
Throttling rules take effect immediately after they are configured. Therefore, you must evaluate the potential impact on your business data before you proceed.
-
In the navigation pane on the left, choose System Configuration > Throttling Configuration.
-
On the Throttling Configuration page, click + Create Throttling Rule.
-
In the Create Throttling Rule dialog box, configure the parameters.
Parameter
Description
Rule Name
Enter a custom name for the throttling rule. The name can be up to 128 characters long.
Description
Enter a brief description of the rule. The description can be up to 256 characters long.
Owner
The default owner is the user who creates the rule. Click the drop-down list to select a different owner.
Tag
Click the drop-down list to select a created tag. For more information, see Manage throttling rule tags.
Effective Environment
The environment where the rule takes effect. Options are Production Environment and Development Environment.
NoteThe configurable objects differ by environment. Switching the environment clears the current rule settings, and you must reconfigure the rule.
Rule Configuration
Global Throttling: Throttles all tasks in the target environment.
Custom Rule: Throttles tasks that match the specified filter conditions. Supported task properties include Project, Schedule type, Task type, Business type, and Task name. The available conditions and values vary by task property.
-
Project:
-
Condition: Supports Belongs to and Does not belong to.
-
Condition value:
-
If Effective Environment is set to Development Environment, you can search for all Dev projects in the current tenant.
-
If Effective Environment is set to Production Environment, you can search for all Basic and Prod projects in the current tenant.
-
-
-
Schedule Type:
-
Condition: Supports Equals and Does not equal.
-
Value:
-
Recurring Instance: Instances that are automatically generated by auto triggered tasks based on their schedules.
-
One-time Instance: Instances generated by compute tasks, integration tasks, sync tasks, data backfill tasks for extraction, and test runs of tag-related tasks.
-
Data Backfill Instance: An instance created by a data backfill operation.
-
One-time Run: Includes ad hoc queries, trial runs of compute tasks, smoke testing for logical tables, and trial runs of integration tasks.
-
-
-
Task Type:
-
Condition: Supports Belongs to and Does not belong to.
-
Value: Different compute engines support different task types. For the specific types supported, see the UI.
-
-
Business Type:
-
Condition: Supports Equals and Does not equal.
-
Value:
-
Integration Sync: Corresponds to offline integration tasks.
-
Offline Data Processing: Corresponds to offline computing tasks, sync tasks, and Flink Batch tasks.
-
Modeling R&D: Corresponds to all logical table tasks. This is supported only in the Enterprise Edition for Intelligent Data Development.
-
-
-
Task name:
-
Condition: Supports Equals, Does not equal, Contains, Does not contain, Belongs to, Does not belong to, Starts with, Does not start with, Ends with, and Does not end with.
-
Value: Enter any filter value. If the condition is Belongs to or Does not belong to, you can enter multiple task names. Enter one task name per line.
-
Concurrent Runs
Set the number of concurrent runs for your throttling scenario.
NoteA concurrency of 0 means no tasks are run.
Effective Time
Set the effective period for the throttling rule. You can select All Time, Specific Time Range, or Specific Time Interval.
-
All Time: The rule is always active.
-
Specific Time Range: The rule is active within the specified date and time range.
If the system time zone (in User Center) is different from the schedule time zone, both are displayed. When you select a time range, the system automatically calculates the corresponding time in the schedule time zone. For example, if the system time zone is GMT+08:00 and the schedule time zone is GMT+01:00, a specified range of 2025-06-10 00:00:00 to 2025-06-10 01:00:00 corresponds to
2025-06-09 17:00:00 ~ 2025-06-09 18:00:00in the schedule time zone.NoteThis is useful for scenarios that require throttling during a specific time range.
-
Specific Time Interval: The rule is active during a specific time interval each day within a selected date range. For example,
00:00:00 to 11:00:00 from 2022-09-11 to 2022-09-12.If the system time zone is different from the schedule time zone, both are displayed. When you select a start and end time, the system calculates the corresponding time in the schedule time zone. If the calculated time falls on a different day,
(-1)indicates the previous day and(+1)indicates the next day. For example, if the system time zone is GMT+08:00 and the schedule time zone is GMT+01:00, a specified interval of00:00 to 01:00 from 2025-06-10 to 2025-06-11corresponds to17:00(-1) to 18:00(-1) from 2025-06-10 to 2025-06-11in the schedule time zone.NoteThis is useful for scenarios that require throttling during a specific time interval each day.
-
-
Click OK to create the throttling rule.
Manage throttling rule tags
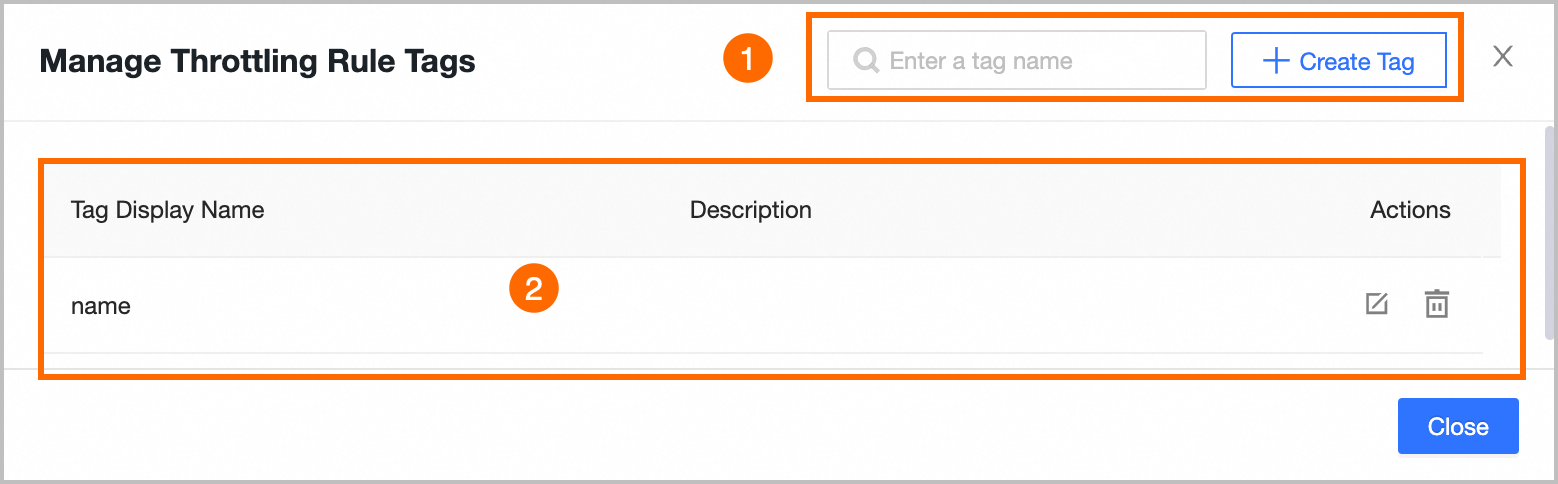
Throttling rule tags identify and classify rules. Create tags and set keywords to find specific rules quickly. Manage tags in the Manage Throttling Rule Tags dialog box.
|
Area |
Description |
|
①Operation area |
|
|
②Tag list |
For existing tags, you can perform Edit and Delete operations. |
 confirm icon to create the tag.