Upload local text, Excel (xls, xlsx), and CSV files to Dataphin and synchronize data with other data sources.
Limits
The local file input component is only configurable for one-time tasks.
Procedure
-
On the Dataphin home page, navigate to the top menu bar and select Development > Data Integration.
-
At the top menu bar of the integration page, select Project (Dev-Prod mode requires selecting the environment).
-
In the left-side navigation pane, single click Batch Pipeline. Then, in the Batch Pipeline list, single click the desired offline pipeline to access its configuration page.
-
Click the Component Library in the upper right corner to open the Component Library panel.
-
In the Component Library panel's left-side navigation pane, select Input. Locate the Local File component in the list on the right and drag it onto the canvas.
-
Click the
 icon on the component card to open the Local File Input Configuration dialog box.
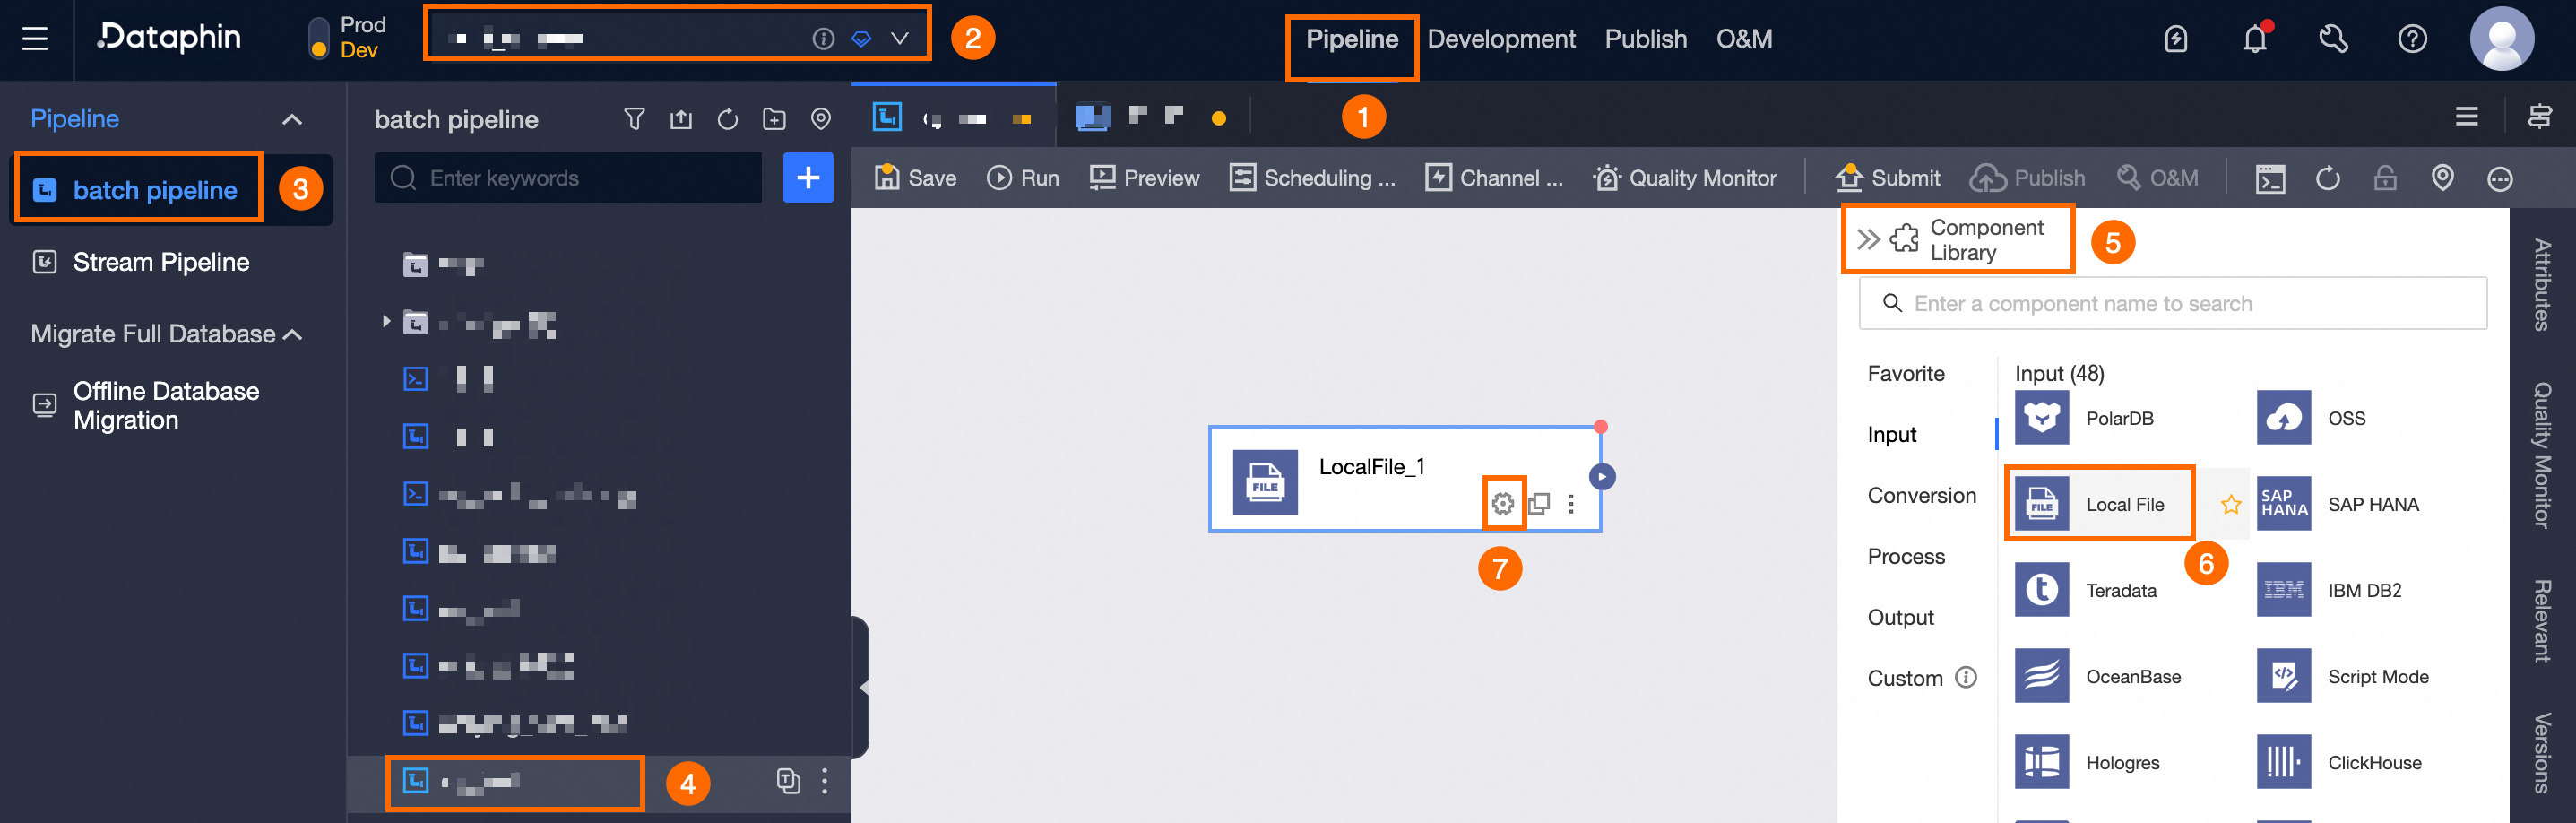
-
In the Local Text Input Configuration dialog box, you can select file types such as csv, text, xls, and xlsx. Follow these configuration instructions:
Text file type
Parameter
Description
Step Name
Dataphin auto-generates a step name, which you can modify. Naming convention:
-
Must only contain Chinese characters, uppercase and lowercase English letters, underscores (_), and numbers.
-
Should not exceed 64 characters in length.
File Type
Choose the text file type.
File Path
Click Select File or drag the file into the file path area.
NoteOnly .txt format files are supported, and the file size must not exceed 500MB.
First Row Content Type
Select whether the first row contains Data Content or a Column Name.
First Row Content Start Row
-
If the first row content type is Column Name, the data content start row must be 2 or greater.
-
If the first row content type is Data Content, the data content start row must be 1 or greater.
Row Delimiter, Column Delimiter (optional)
Row Delimiter: The delimiter separating rows in the file. If not specified, the default is
\n. For other characters, enter them and click Parse.Column Delimiter: The delimiter separating columns in the file. If not specified, the default is a comma (,).
File Encoding
Select the file encoding. Supported encodings: UTF-8 and GBK.
Advanced Configuration
Enter the read control configuration. Example:
{
 "textReaderConfig":{
 "caseSensitive":true,
 "useTextQualifier":false,
 "textQualifier":"\"",
 "trimWhitespace":false
 }
}
Create Output Fields
Configure the output fields.
-
Batch Add Fields.
-
Click Batch Add.
-
Enter batch configuration in JSON format. Example:
[{ "index": 0, "name": "cf1a", "type": "String" }, { "index": 1, "name": "cf1b", "type": "String" }]NoteHere, 'index' refers to the column number, 'name' to the field name, and 'type' to the field type. For instance,
"name":"user_id","type":"String"introduces a field named user_id with the String type. -
Enter batch configuration in TEXT format. Example:
0,cf1a,String 1,cf1b,String-
The row delimiter separates each field's information, defaulting to a line feed (\n). It supports line feed (\n), semicolon (;), and period (.).
-
The column delimiter separates the field name from the field type, defaulting to a comma (,).
-
-
-
Click Confirm to save the configuration.
-
-
Create Output Fields.
Click Create Output Fields, then fill in the Source Ordinal Number and Column, and select the Type. For text files, the source ordinal number must match the column's numeric index, starting from 0.
-
Manage Output Fields.
You can perform these actions on added fields:
-
Click and drag the Column icon
 to reorder the fields.
 -
Click the operation column's
 icon to modify existing fields.
 -
Single-click the operation column's
 icon to remove the selected field.
-
CSV file type
Parameter
Description
Step Name
Dataphin generates a default step name, which you can customize. Naming convention:
-
Include only Chinese characters, uppercase and lowercase English letters, underscores (_), and numbers.
-
Limit the name to a maximum of 64 characters.
File Type
Choose the CSV file type.
File Path
Click Select File or drag the file into the file path area.
NoteOnly csv file types are supported, with a maximum file size of 500MB.
Character Delimiter
Specify the column delimiter for the file. If left blank, the default is a comma (,).
File Encoding
Select the file encoding. Supported encodings: UTF-8 and GBK.
First Row Content Type
Choose whether the first row contains Data Content or Column Names.
Data Content Start Row
-
If Column Name is selected for the first row, the data content must start from row 2 or higher.
-
If Data Content is selected for the first row, the data content must start from row 1 or higher.
Create Output Fields
Configure the output fields.
-
Batch add fields
-
Single click Batch Add.
-
Enter batch configuration in JSON format. For example:
[{ "index": 0, "name": "cf1a", "type": "String" }, { "index": 1, "name": "cf1b", "type": "String" }]NoteHere, 'index' specifies the column number, 'name' the field name, and 'type' the field data type. For instance,
"name":"user_id","type":"String"adds a field named user_id with a String data type. -
Enter batch configuration in TEXT format. For example:
0,cf1a,String 1,cf1b,String-
A row delimiter separates each field's information, with the default being a line feed (\n). Supported delimiters include line feed (\n), semicolon (;), and period (.).
-
A column delimiter separates the field name from the field type, with the default being a comma (,).
-
-
-
Single click Confirm.
-
-
Create Output Fields.
Click Create Output Fields, then enter the Source Ordinal Number and Column, and select the Type. For CSV files, the source ordinal number must match the column's numeric index, starting from 0.
-
Manage Output Fields.
You can perform these actions on added fields:
-
To rearrange field positions, single click and drag the Column icon
. -
Click the operation column's
icon to edit existing fields. -
Single click the operation column's
icon to delete the existing field.
-
XLS or XLSX file type
Parameter
Description
Step Name
Dataphin auto-generates a step name, which you can modify. Naming convention:
-
May include Chinese characters, uppercase and lowercase English letters, underscores (_), and numbers.
-
Cannot exceed 64 characters in length.
File Type
Choose either the xls or xlsx file type.
File Path
Click Select File or drag the file into the file path area.
Note-
For xls file type, only .xls format is supported; for xlsx, only .xlsx format is supported. The maximum file size is 500MB.
-
System parsing supports files up to 50MB. If the file size exceeds 50MB, automatic parsing of output fields is not available. Please create output fields manually.
Sheet Selection
Choose sheets by name or index.
-
By Name: Specify the sheet name to read.
-
By Index: Specify the sheet index to read, starting from 0.
First Row Content Type
Choose between data content and column names for the first row.
Data Content Start Row
If the first row is column names, the data content must start from row 2 or higher; if it's data content, it must start from row 1 or higher.
Data Content End Row
The data content end row must be equal to or greater than the start row. If unspecified, the system reads to the last row containing data by default.
Export Sheet Name
When selected, Output Fields includes a Source Sheet field formatted as
{file name}-{sheet name}.File Encoding
Select the file encoding. Supported encodings: UTF-8 and GBK.
Output Fields
Configure the output fields.
-
Batch Add Fields.
-
Click Batch Add.
-
Enter batch configurations in JSON format. For example:
[{ "index": 0, "name": "cf1a", "type": "String" }, { "index": 1, "name": "cf1b", "type": "String" }]NoteHere, 'index' refers to the column number, 'name' to the field name, and 'type' to the field type. For instance,
"name":"user_id","type":"String"introduces a field named user_id with the String type. -
Enter batch configurations in TEXT format. For example:
0,cf1a,String 1,cf1b,String-
Use the row delimiter to separate each field's information, with the default being a line feed (\n). It supports line feed (\n), semicolon (;), and period (.).
-
Use the column delimiter to separate the field name from the field type, with the default being a comma (,).
-
-
-
Click Confirm.
-
-
Create Output Fields.
Click Create Output Fields and follow the prompts to fill in the Source Ordinal Number, Column, and select the Type.
-
Manage Output Fields.
You can perform these actions on added fields:
-
Click and drag the Column icon
to rearrange the fields. -
To edit existing fields, single-click the
icon in the operation column. -
Single click the operation column's
icon to delete the existing field.
-
-
-
Click Confirm to save the Local Text input component configuration.