This document provides guidance on configuring the SAML protocol using Azure as an example.
Prerequisites
Ensure you have a third-party IDP account and are subscribed to Azure Active Directory.
The SAML protocol log on feature must be enabled in Dataphin.
Acquire the metadata file. The method for obtaining the metadata file varies by IDP. For details on acquiring the ADFS metadata file, see ADFS.
Obtain the SAML metadata configuration file in Azure
Navigate to the list page, select Azure Active Directory - Enterprise Applications, and access the enterprise applications page.

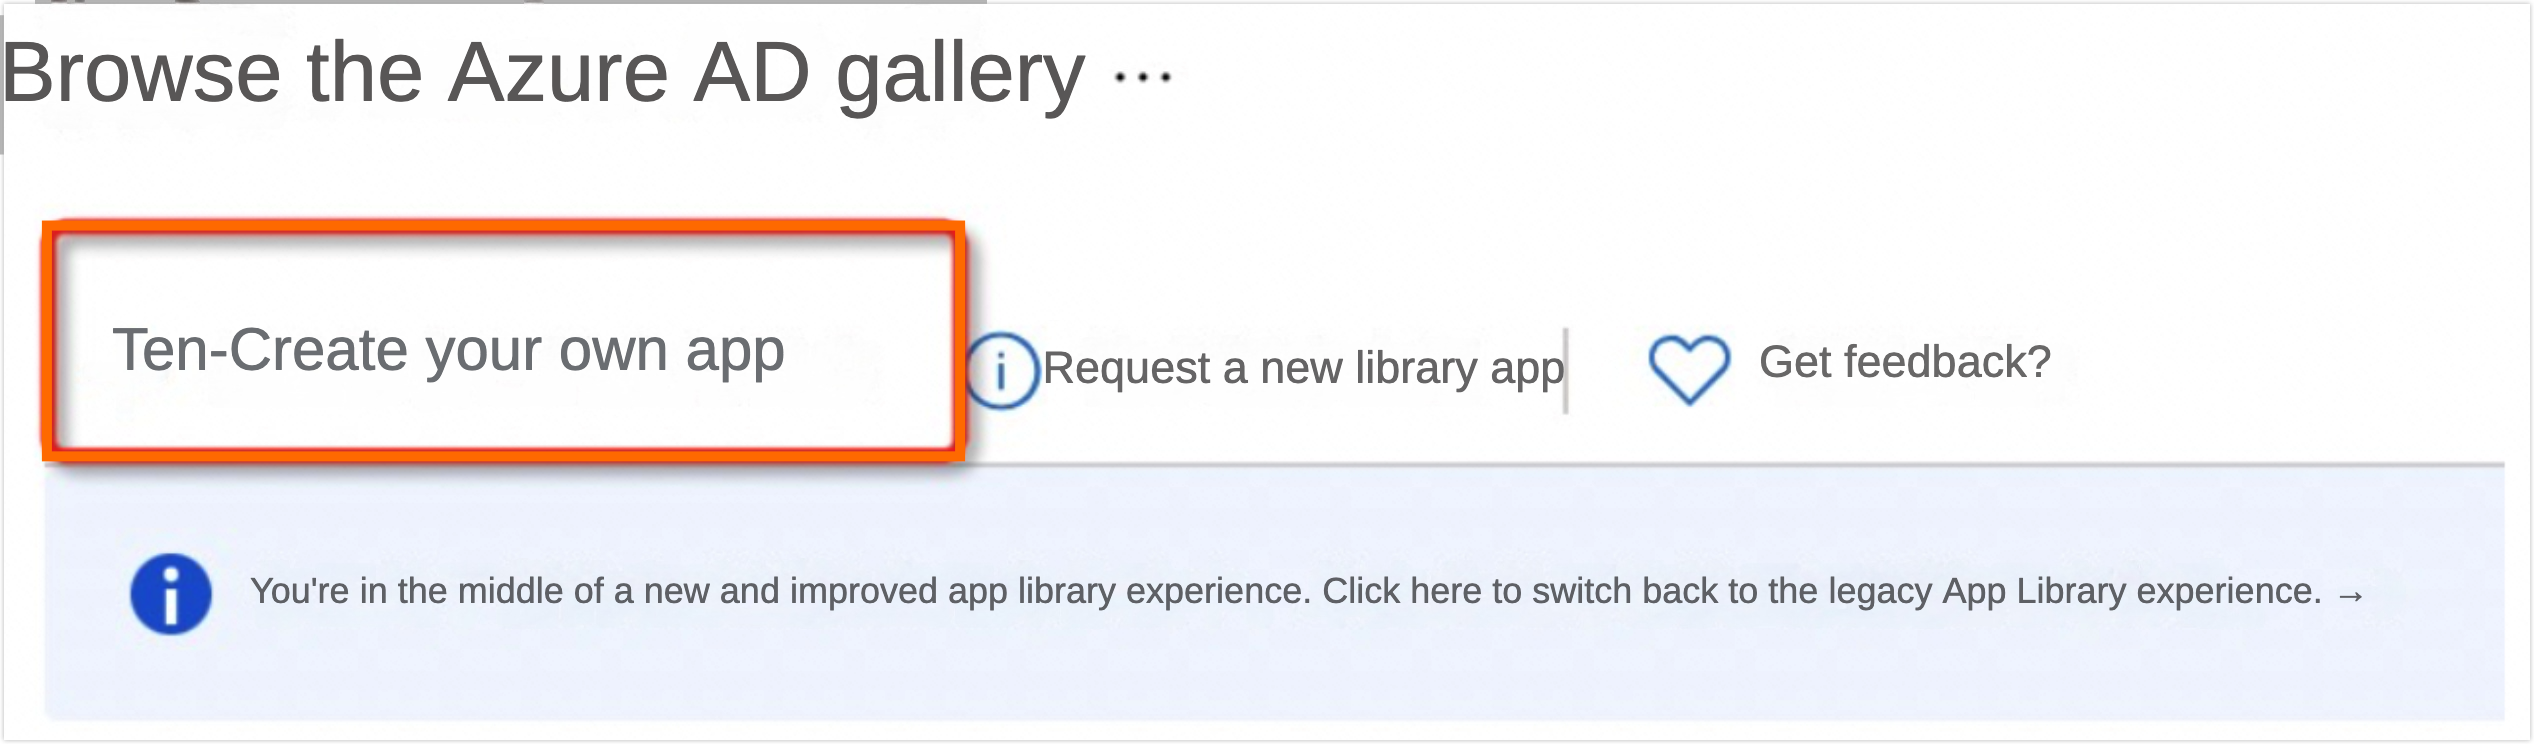
Create a new application.
On the Browse Azure AD Gallery page, click Create Your Own Application to initiate the creation of a custom application.
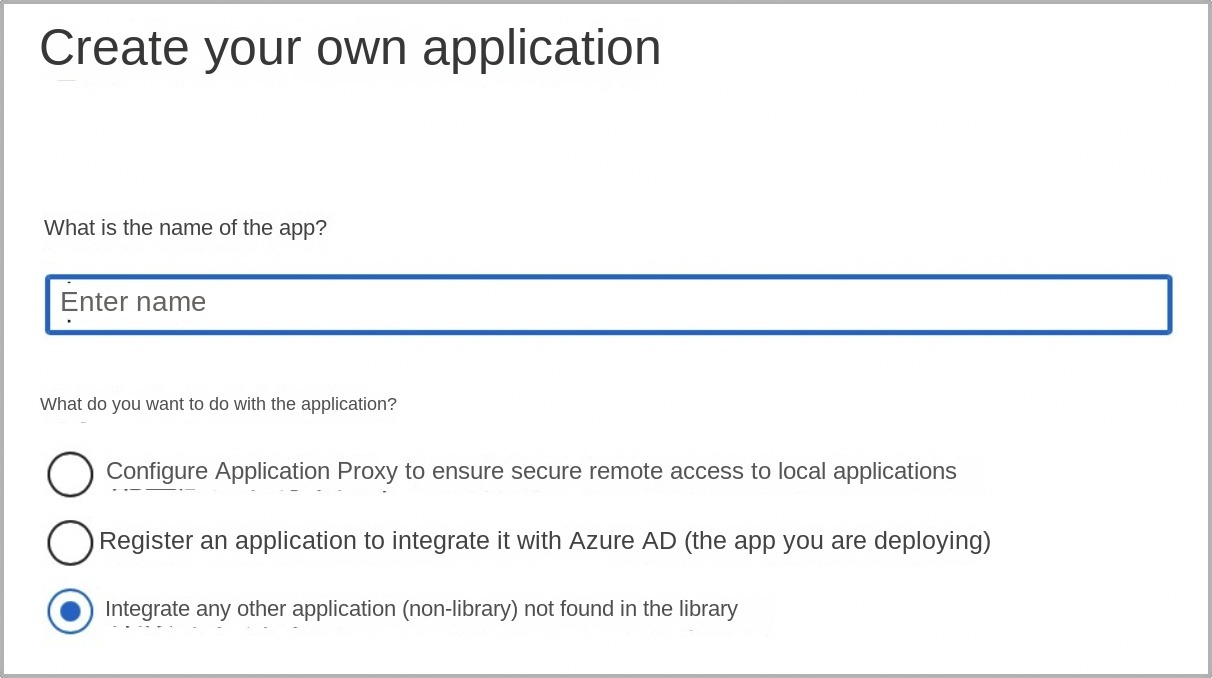
Enter the application name and choose Integrate Any Other Application You Don't Find In The Gallery (non-gallery).
For instance, let's name the application 'saml-test'.
Navigate to the Set Up Single Sign-on section, click Get Started, and then select the SAML protocol.

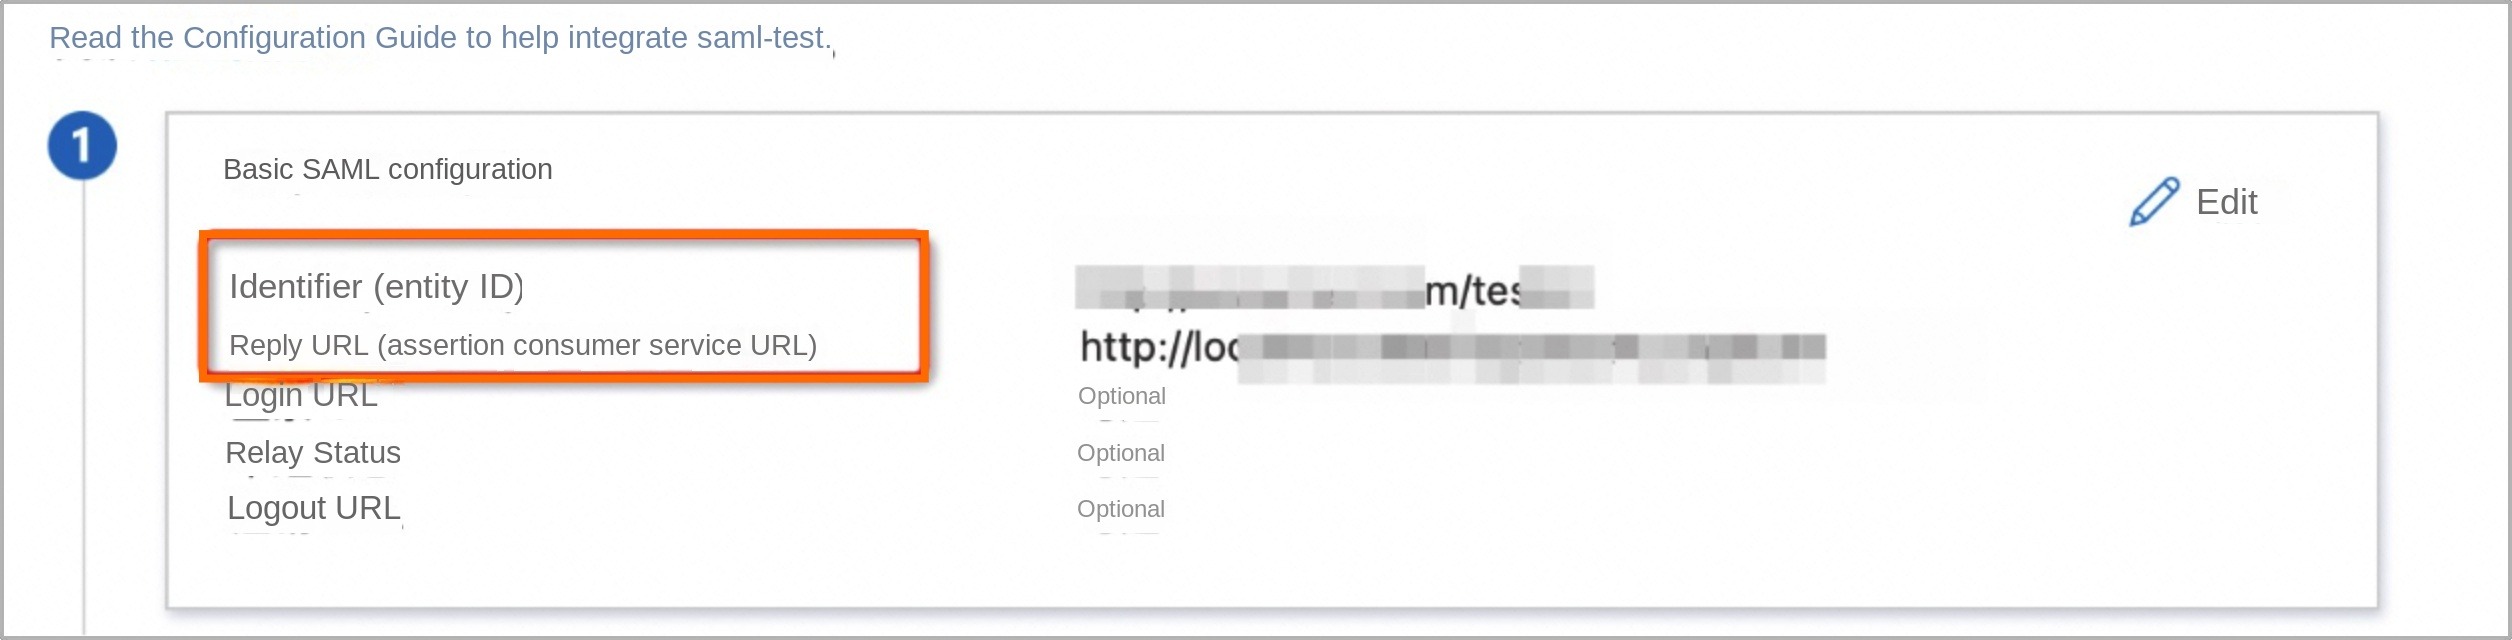
On the Basic SAML Configuration page, configure the Identifier (entity ID) and Reply URL (Assertion Consumer Service URL).
 Note
NoteThe Reply URL (Assertion Consumer Service URL) is the service provider's address where users are redirected after successfully logging on.
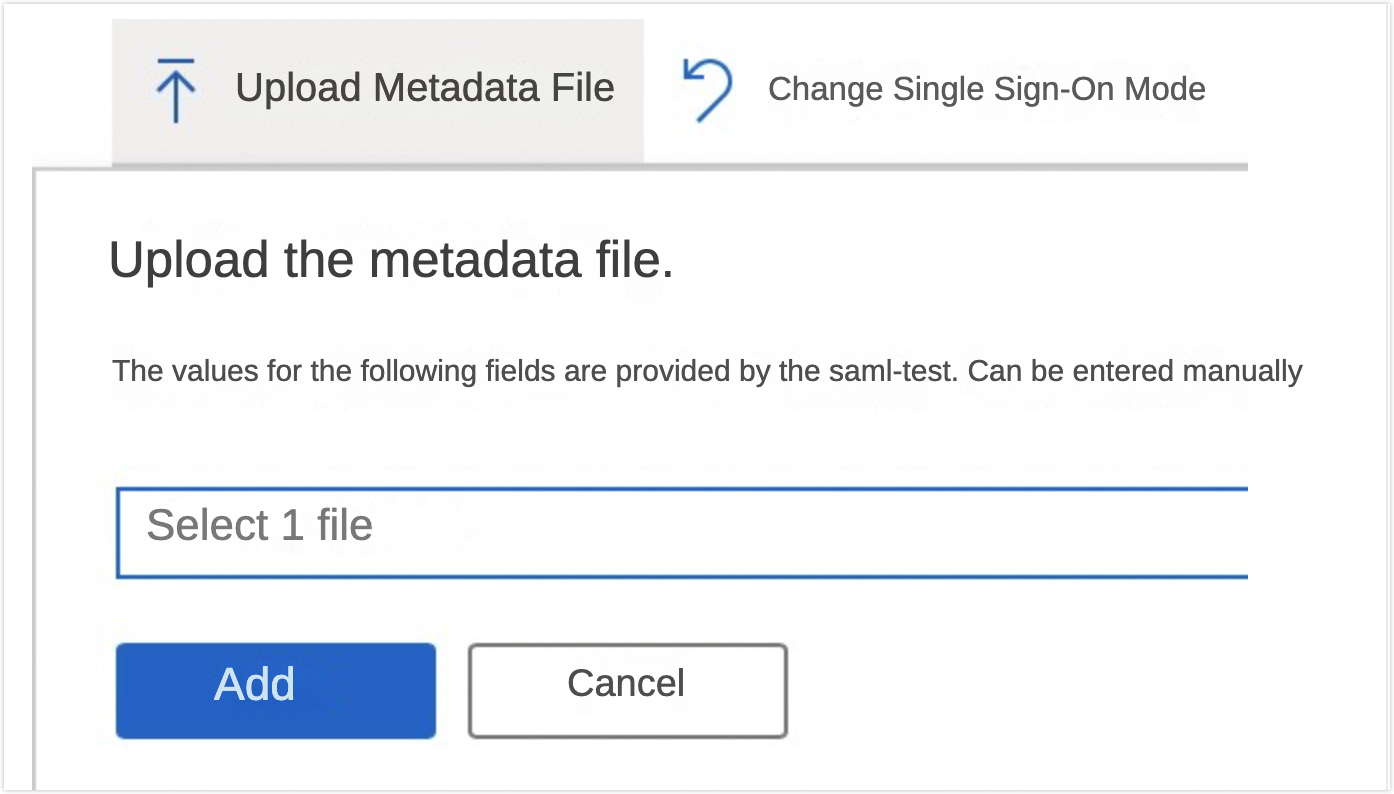
Alternatively, you can upload the metadata file to finalize the SAML configuration.
Retrieve the configuration file.
To the right of Federation Metadata XML, select Download to obtain the Azure-specific metadata file.
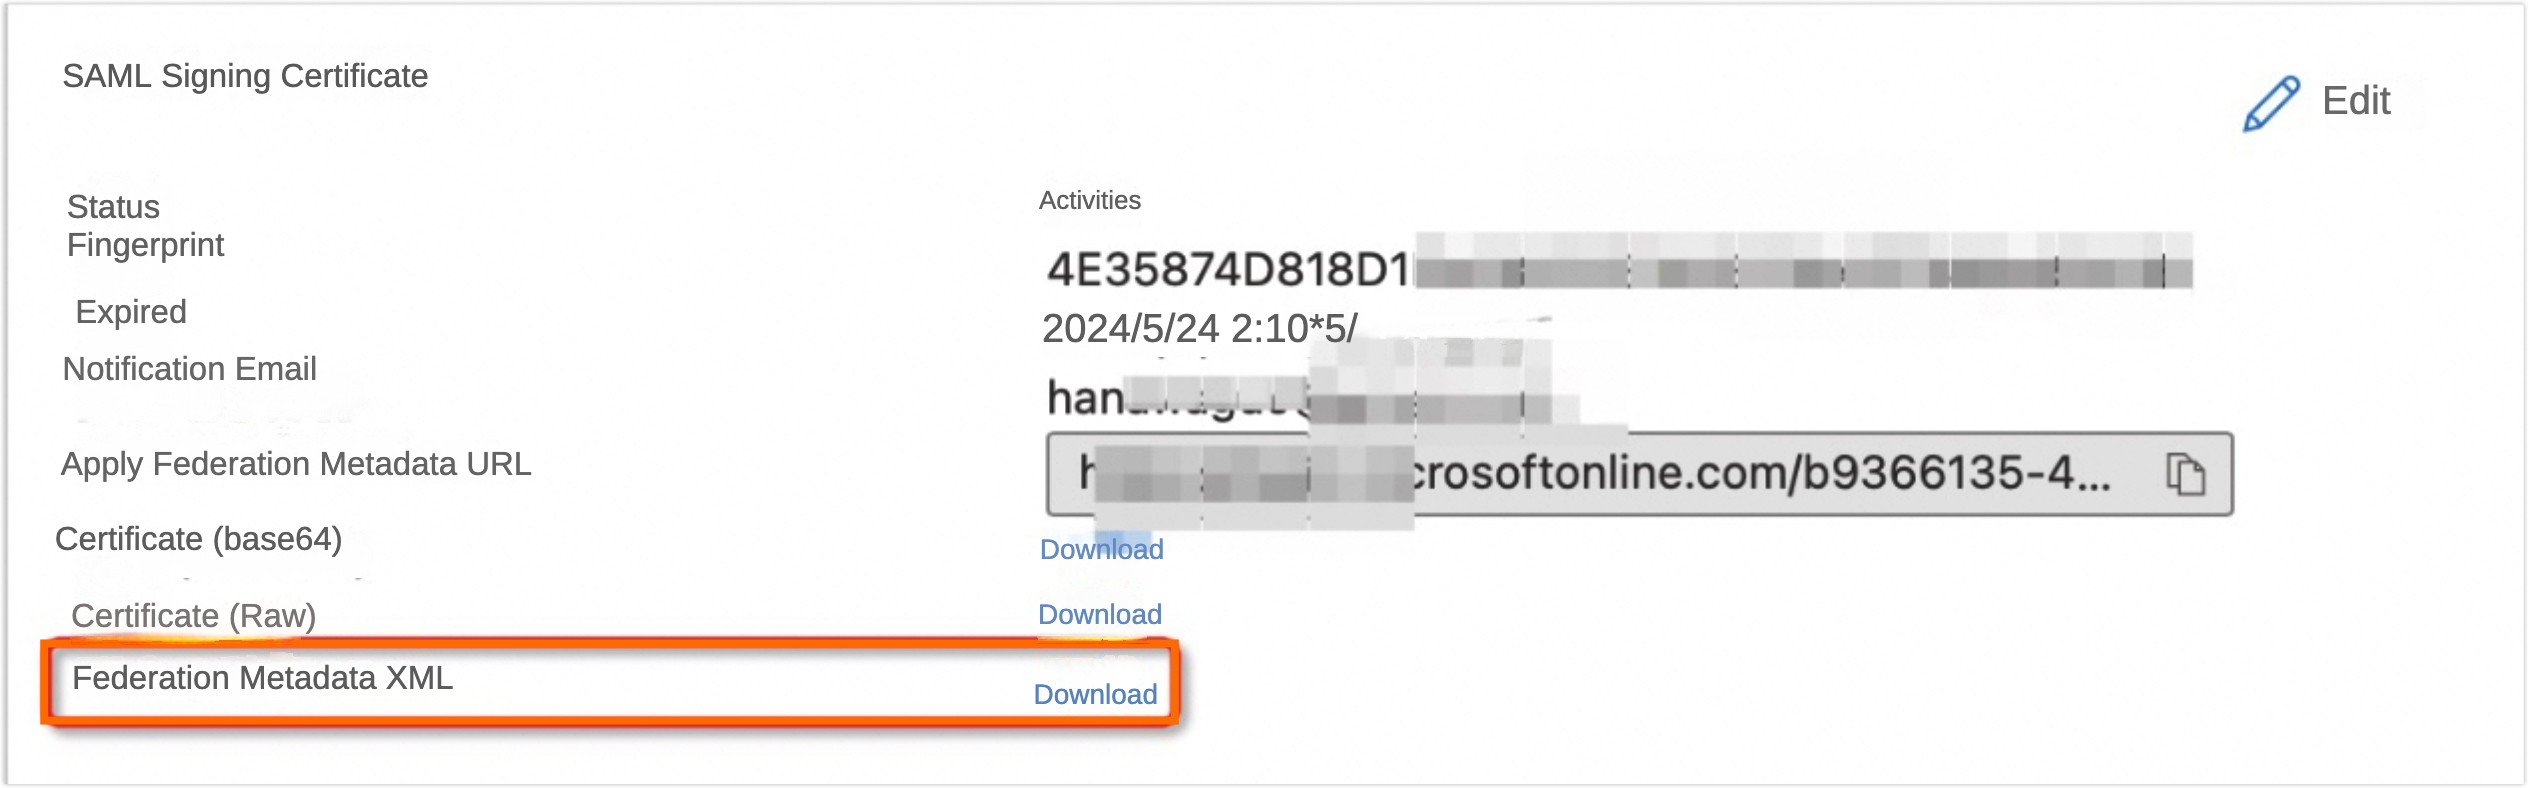 Note
NoteThis metadata XML includes the public key x509 certificate.
The download interface may differ by platform. The instructions here pertain to downloading the metadata XML for Azure's SAML log on. Each downloaded document is an XML file featuring the IDPSSODescriptor tag.
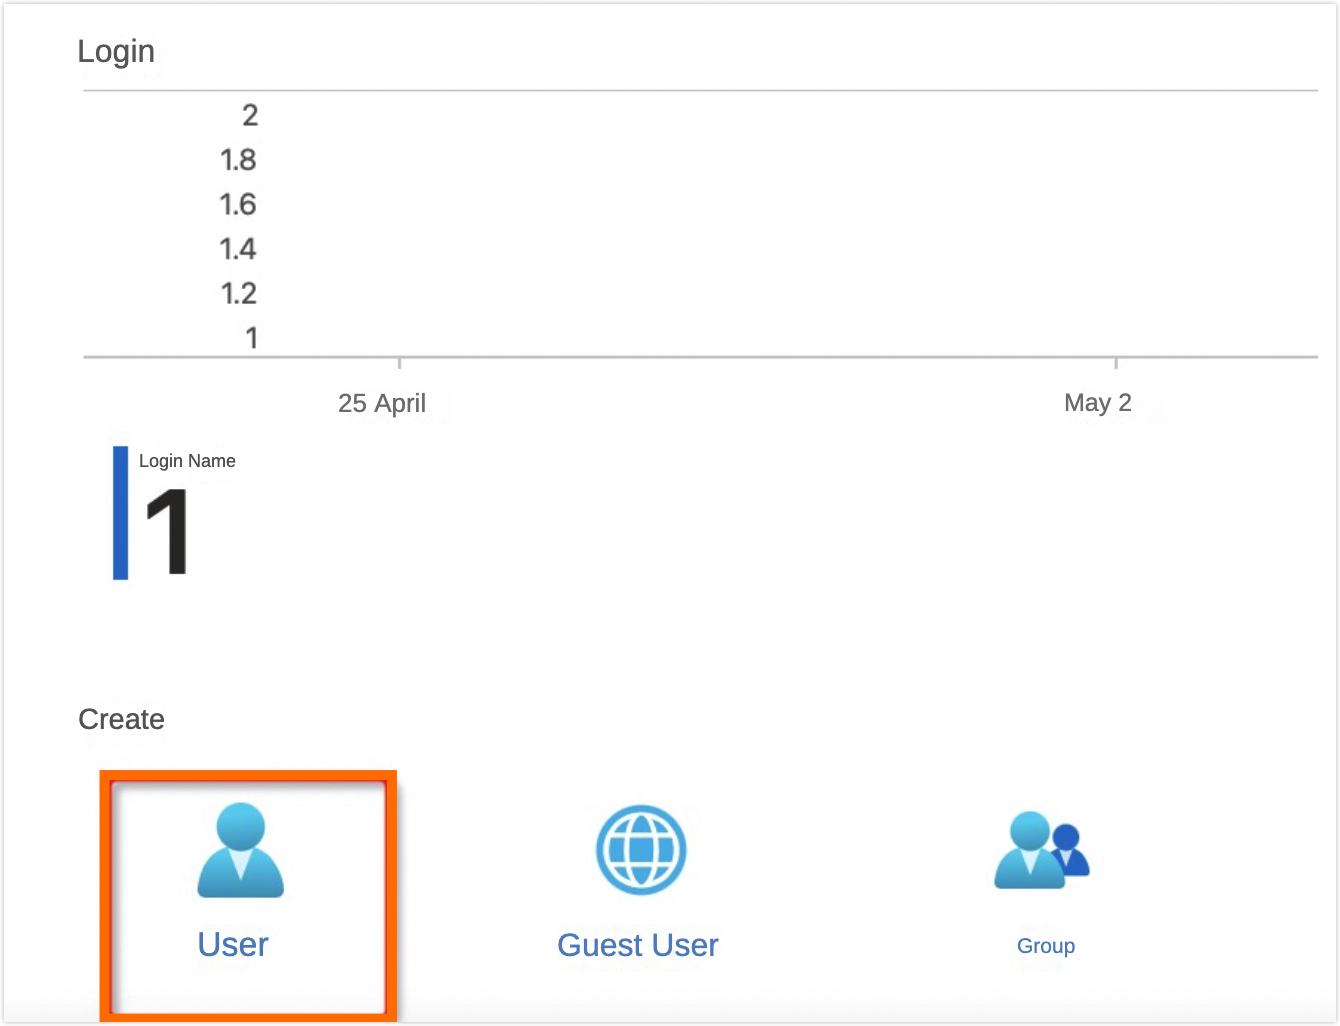
(Optional) Add users and grant them access to the application by returning to the Azure Active Directory (default directory).
As a sub-user, sign in using the SAML protocol. This step is not required for the main account.
Create the user 'saml2'.
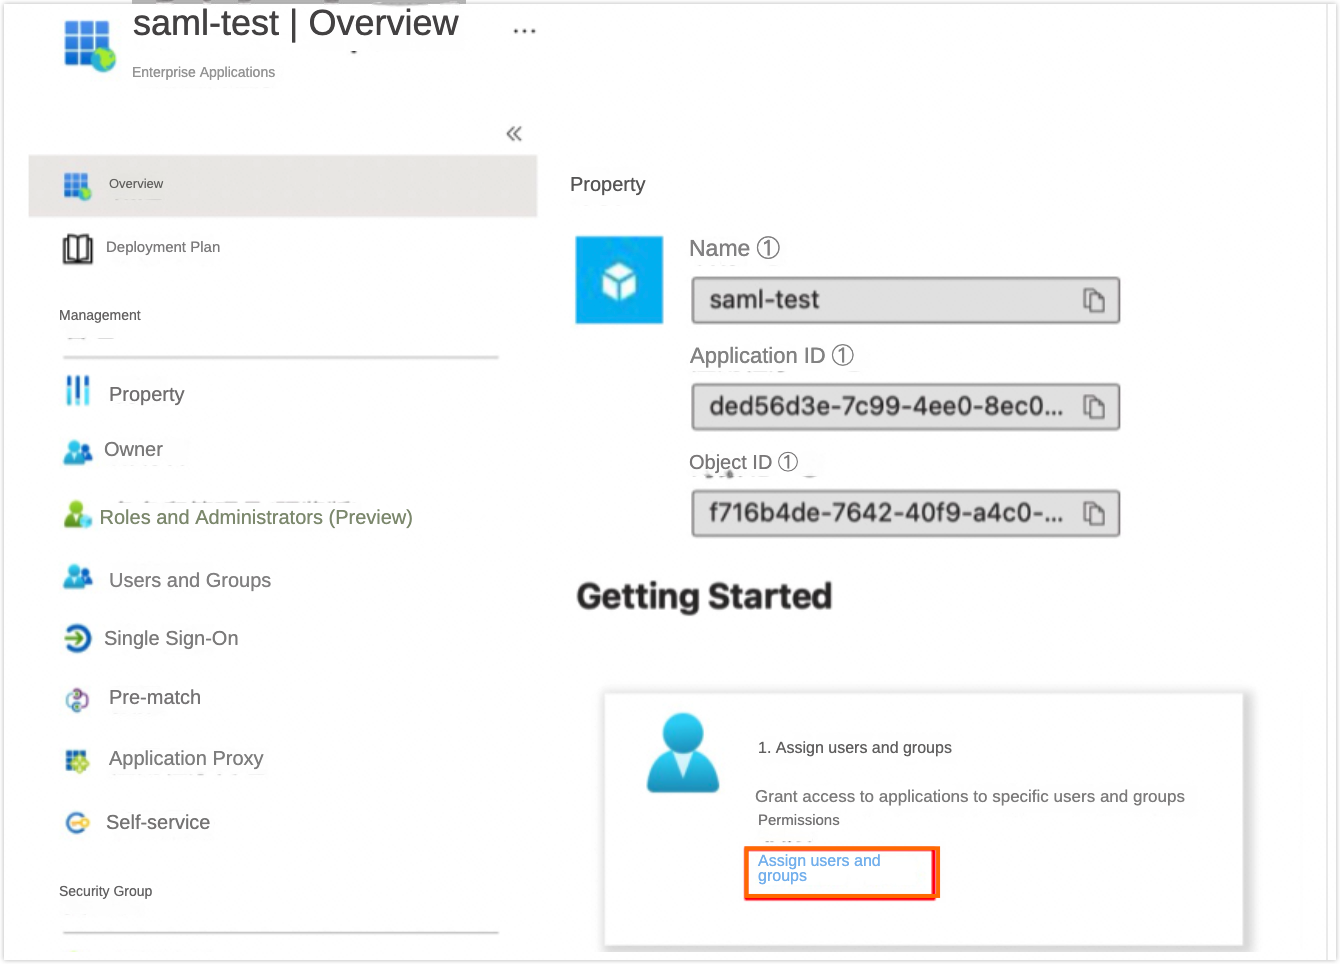
After successful creation, navigate back to the enterprise applications, select the 'saml-test' program, and click Assign Users And Groups.
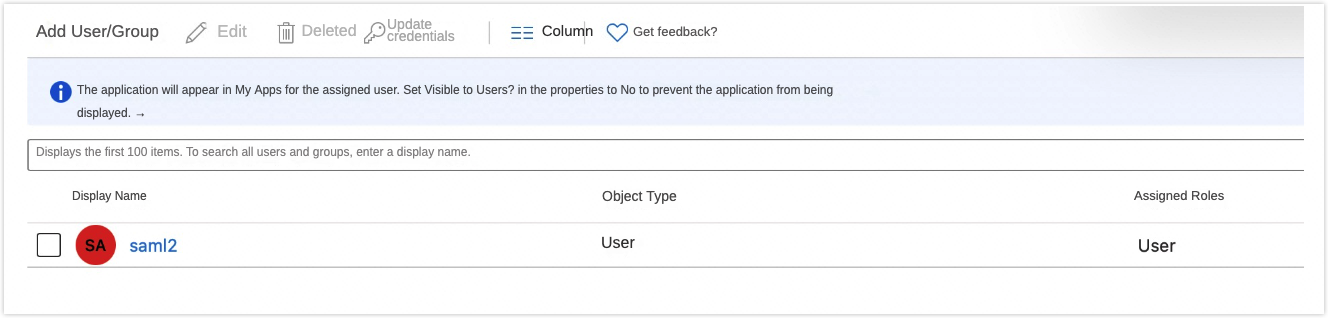
Click Add User/group.
Select the user you just created.
Upon successful addition, the interface below will appear, confirming that the user now has access to the 'saml-test' application.
Metadata File Example
Below is an example of a metadata file. Replace ${domain} with your configured domain name.
<EntityDescriptor xmlns="urn:oasis:names:tc:SAML:2.0:metadata" xmlns:saml="urn:oasis:names:tc:SAML:2.0:assertion" xmlns:ds="http://www.w3.org/2000/09/xmldsig#" entityID="urn:alibaba:cloudcomputing">
<SPSSODescriptor protocolSupportEnumeration="urn:oasis:names:tc:SAML:2.0:protocol" WantAssertionsSigned="true">
<KeyDescriptor use="signing">
<ds:KeyInfo xmlns:ds="http://www.w3.org/2000/09/xmldsig#">
<ds:X509Data>
<ds:X509Certificate>MIIDXjCCAkagAwIBAgIEXHToLjANBgkqhkiG9w0BAQsFADBwMQswCQYDVQQGEwJDTjERMA8GA1UE CBMISGFuZ3pob3UxKTAnBgNVBAsTIEFsaWJhYmEgQ2xvdWQgQ29tcHV0aW5nIENvLiBMdGQuMSMw IQYDVQQDExp1cm46YWxpYmFiYTpjbG91ZGNvbXB1dGluZzAgFw0xOTAyMjYwNzE4MDZaGA8yMTE5 MDIwMjA3MTgwNlowcDELMAkGA1UEBhMCQ04xETAPBgNVBAgTCEhhbmd6aG91MSkwJwYDVQQLEyBB bGliYWJhIENsb3VkIENvbXB1dGluZyBDby4gTHRkLjEjMCEGA1UEAxMadXJuOmFsaWJhYmE6Y2xv dWRjb21wdXRpbmcwggEiMA0GCSqGSIb3DQEBAQUAA4IBDwAwggEKAoIBAQDDjD53ZENEHoYNXAOf OIbVBJhj7SCWKmdjnbnxq8WAFWEeZtS6hZLPpWh1z7b0NjJkvCf5oFVqBJYbbW5kEKV+9CpV6VHZ qOXmsIRlkvZB+Wnc3SduwiiiUR9JojSPxVQvSf4WLT+HDASlrBztuRV2vHj9utLbvy+6bgVBqF8g emL9Pcif1robDH8HlqUcADXLAt18E4MbToldVoHjpFc6fAKUXujWH5feAL8g0CKlmf/JVlHLEtu4 vKPxBQ8sgkysk6EnrjXl6Q4a4t+vbPG5uczA1ouTkDupMCRlaWHIHaJL/AoDGabn8sVXdaVJUKC5 54FNkRznBhRQll+Nuc2rAgMBAAEwDQYJKoZIhvcNAQELBQADggEBAE8k4S4HvOglthJwF3aMQXGi LKW6Becs9SljA0/5VtZQDrDf2By/1BIMvWfZ/dFnO+MylDLVdS6XWvWat/DW0fOGxU4s1WNfshX7 DJDGR2G1XgtGoDZEYIDahUp5katAPypCkY57fGZlI0d3nq46/2qT/Zpne+pFE3DI/x8klZMniniw YjNXbG96y/M4DYi1J7RR8mLIfVvz5o1SMGT4Ta2p/USE2M9F6O7/zc2j62dQgXiYa9OONo31RiXR TmvGEUNuQoBZhVrFIvOnNjIfFT7Xd3CUowwJKP1floserrx4B5jScRAi9yK3x2a2lhfc+PksXfTs aqIr5TQL4OorLEE=</ds:X509Certificate>
</ds:X509Data>
</ds:KeyInfo>
</KeyDescriptor>
<NameIDFormat>urn:oasis:names:tc:SAML:2.0:nameid-format:transient</NameIDFormat>
<NameIDFormat>urn:oasis:names:tc:SAML:2.0:nameid-format:persistent</NameIDFormat>
<NameIDFormat>urn:oasis:names:tc:SAML:1.1:nameid-format:emailAddress</NameIDFormat>
<NameIDFormat>urn:oasis:names:tc:SAML:1.1:nameid-format:unspecified</NameIDFormat>
<NameIDFormat>urn:oasis:names:tc:SAML:1.1:nameid-format:X509SubjectName</NameIDFormat>
<NameIDFormat>urn:oasis:names:tc:SAML:1.1:nameid-format:WindowsDomainQualifiedName</NameIDFormat>
<NameIDFormat>urn:oasis:names:tc:SAML:2.0:nameid-format:kerberos</NameIDFormat>
<NameIDFormat>urn:oasis:names:tc:SAML:2.0:nameid-format:entity</NameIDFormat>
<AssertionConsumerService index="1" isDefault="true" Binding="urn:oasis:names:tc:SAML:2.0:bindings:HTTP-POST" Location="https://signin.aliyun.com/saml-role/sso"/>
<AttributeConsumingService index="1">
<ServiceName xml:lang="en">Alibaba Cloud Console Single Sign-On</ServiceName>
<RequestedAttribute isRequired="true" Name="https://www.aliyun.com/SAML-Role/Attributes/Role" FriendlyName="RoleEntitlement"/>
<RequestedAttribute isRequired="true" Name="https://www.aliyun.com/SAML-Role/Attributes/RoleSessionName" FriendlyName="RoleSessionName"/>
<RequestedAttribute isRequired="false" Name="https://www.aliyun.com/SAML-Role/Attributes/SessionDuration" FriendlyName="SessionDuration"/>
</AttributeConsumingService>
</SPSSODescriptor>
<Organization>
<OrganizationName xml:lang="en">Alibaba Cloud Computing Co. Ltd.</OrganizationName>
<OrganizationDisplayName xml:lang="en">AlibabaCloud</OrganizationDisplayName>
<OrganizationURL xml:lang="en">https://www.aliyun.com</OrganizationURL>
</Organization>
</EntityDescriptor>