This topic describes how to configure the transformation components supported by the extract, transform, and load (ETL) feature of Data Transmission Service (DTS).
Background information
The ETL feature supports the following transformation components:
JOIN
Field Calculator
Table Record Filter
Limits
The transformation components supported by the ETL feature have the following limits:
JOIN: You can perform JOIN operations only between two tables.
Field Calculator and Table Record Filter: Only a single table schema is supported.
Prerequisites
A source database is configured.
Configure the JOIN component
- Go to the ETL page. Note
You can also perform the following steps to configure an ETL task in the Data Management (DMS) console:
- Go to the DMS console.
- In the top navigation bar, click DTS. Then, in the left-side navigation pane, choose .
- Click
 . In the Create Data Flow dialog box, specify an ETL task name in the Data Flow Name field and set the Development Method parameter to DAG.
 - Click OK.
In the upper-left corner of the page, select the region where you create the ETL task.
NoteYou can create an ETL task only in the China (Hangzhou), China (Shanghai), China (Qingdao), China (Beijing), China (Zhangjiakou), China (Shenzhen), and China (Guangzhou) regions. Select a region based on your needs.
In the left-side navigation pane, click ETL.
On the ETL page, click Create Task (Pay-as-you-go).
Configure the source database. For more information, see Configure source databases.
In the Transform section on the left side of the page, select JOIN and drag it to the canvas on the right side of the page.
Move the pointer over the destination database, and click the dot to draw a line between the destination database and the JOIN component.
Click JOIN on the canvas.
In the Transform JOIN section, configure the JOIN component.
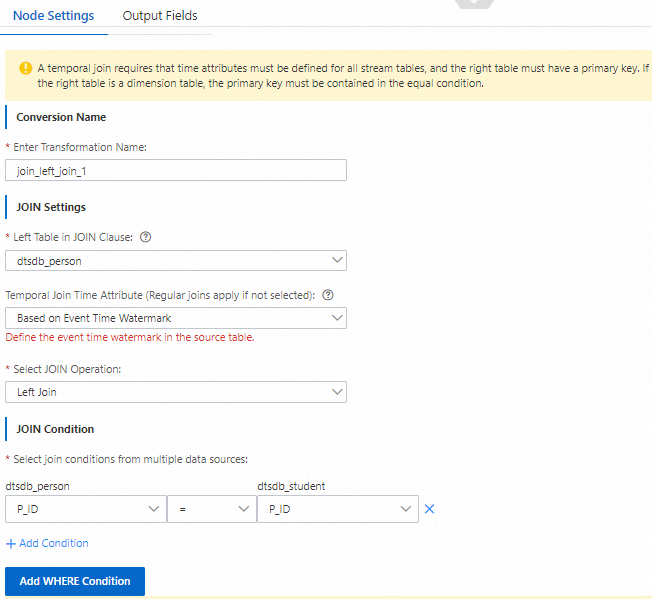
On the Node Settings tab, set the required parameters.
Section
Parameter
Description
Transformation Name
Enter Transformation Name
We recommend that you specify a descriptive name that makes it easy to identify. You do not need to use a unique name.
JOIN Settings
Left Table in JOIN Clause
Select the left table in the JOIN clause.
Temporal Join Time Attribute
Select the time attribute of temporal joins. Default value: Join.
Based on Event Time Watermark
Based on Processing Time
NoteA temporal join requires that time attributes must be defined for all stream tables, and the right table must have a primary key. If the right table is a dimension table, the primary key must be contained in the equal condition.
Select JOIN Operation
Select a JOIN operation.
Inner Join: The data is the intersection of two tables.
Left Join: The data in the left table remains unchanged. The data in the right table is the intersection of two tables.
Right Join: The data in the left table is the intersection of two tables. The data in the right table remains unchanged.
JOIN Conditions
+ Add Condition
Click + Add Condition and select JOIN conditions from multiple data sources.
NoteThe fields on the left side of the equal sign (=) belong to the left table of the data source. The fields on the right side of the equal sign (=) belong to the right table of the data source.
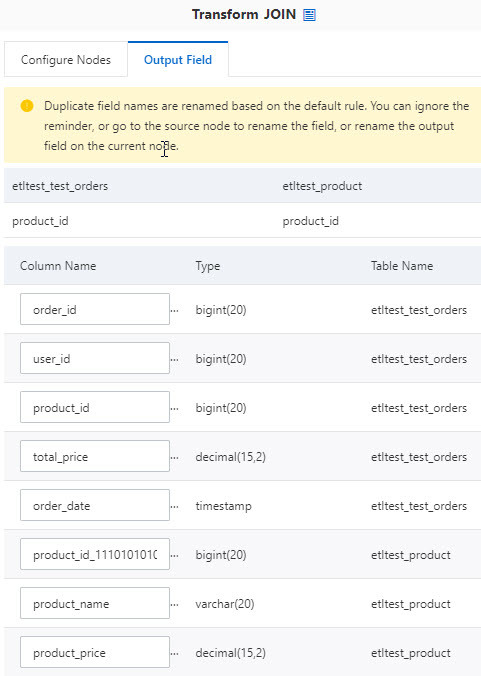
After you configure the JOIN conditions, click the Output Fields tab. On this tab, select the column names based on your needs and set the related parameters.
Configure the Field Calculator component
Go to the Data Migration page of the new DTS console.
NoteYou can also log on to the Data Management (DMS) console. In the top navigation bar, click DTS. Then, in the left-side navigation pane, choose .
In the upper-left corner of the page, select the region where you create the ETL task.
NoteYou can create an ETL task only in the China (Hangzhou), China (Shanghai), China (Qingdao), China (Beijing), China (Zhangjiakou), China (Shenzhen), and China (Guangzhou) regions. Select a region based on your needs.
In the left-side navigation pane, click ETL.
On the ETL page, click Create Task (Pay-as-you-go).
Configure the source database. For more information, see Configure source databases.
In the Transform section on the left side of the page, select Field Calculator and drag it to the canvas on the right side of the page.
Move the pointer over the destination database, and click the dot to draw a line between the destination database and the Field Calculator component.
Click Field Calculator on the canvas.
In the Transform Field Calculator section, configure the Field Calculator component.
In the Conversion Name section, enter the name of the Field Calculator component.
NoteWe recommend that you specify an informative name for easy identification. You do not need to use a unique name.
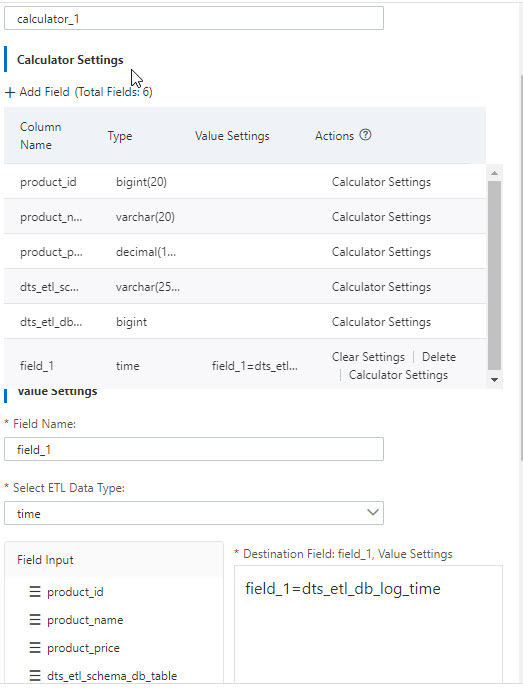
In the Calculator Settings section, click + Add Field.
Find the added field and click Calculator Settings in the Actions column.
In the Value Settings section, set the following parameters.
Parameter
Description
Field name
DTS automatically generates a field name. We recommend that you specify a descriptive name that makes it easy to identify. You do not need to use a unique name.
Select ETL Data Type
Select the ETL data type.
Destination Field: Field Name, Value Settings
Specify a calculation method for the destination field by using one of the following methods:
Enter the calculation method.
Click an option in the Field Input, Function Set, or Operator section to specify the calculation method.
Configure the Table Record Filter component
Go to the Data Migration page of the new DTS console.
NoteYou can also log on to the Data Management (DMS) console. In the top navigation bar, click DTS. Then, in the left-side navigation pane, choose .
In the upper-left corner of the page, select the region where you create the ETL task.
NoteYou can create an ETL task only in the China (Hangzhou), China (Shanghai), China (Qingdao), China (Beijing), China (Zhangjiakou), China (Shenzhen), and China (Guangzhou) regions. Select a region based on your needs.
In the left-side navigation pane, click ETL.
On the ETL page, click Create Task (Pay-as-you-go).
Configure the source database. For more information, see Configure source databases.
In the Transform section on the left side of the page, select Table Record Filter and drag it to the canvas on the right side of the page.
Move the pointer over the destination database, and click the dot to draw a line between the destination database and the Table Record Filter component.
Click Table Record Filter on the canvas.
In the Transform Table Record Filter section, configure the Table Record Filter component.
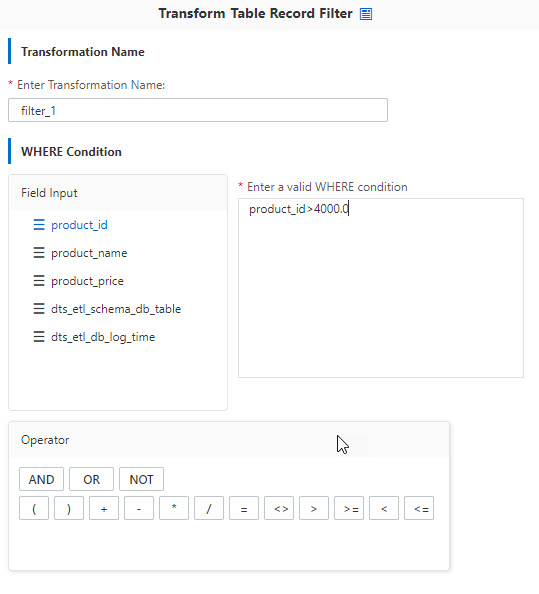
In the Transformation Name section, enter the name of the Table Record Filter component.
NoteWe recommend that you specify an informative name for easy identification. You do not need to use a unique name.
In the WHERE Condition section, specify a WHERE condition by using one of the following methods:
Enter the WHERE condition.
Click an option in the Field Input or Operator section to specify the WHERE condition.
Result
After a transformation component is configured, the  icon appears on the right side of the transformation component.