This topic describes how to connect external self-managed databases to Database Autonomy Service (DAS). These databases can be in on-premises data centers, hosted by other cloud providers, or running on virtual machines.
Prerequisites
DAS supports the following self-managed database engines:
-
MySQL
-
MongoDB
-
PostgreSQL
-
Redis
NoteDAS supports self-managed Redis instances running version 6.0 or earlier.
Usage notes
DAS is accessible over the public network only on port 80. The DAS gateway (DBGateway) communicates with DAS over this port. Data is encrypted in transit with gRPC and Transport Layer Security (TLS) to ensure its security.
Connection modes
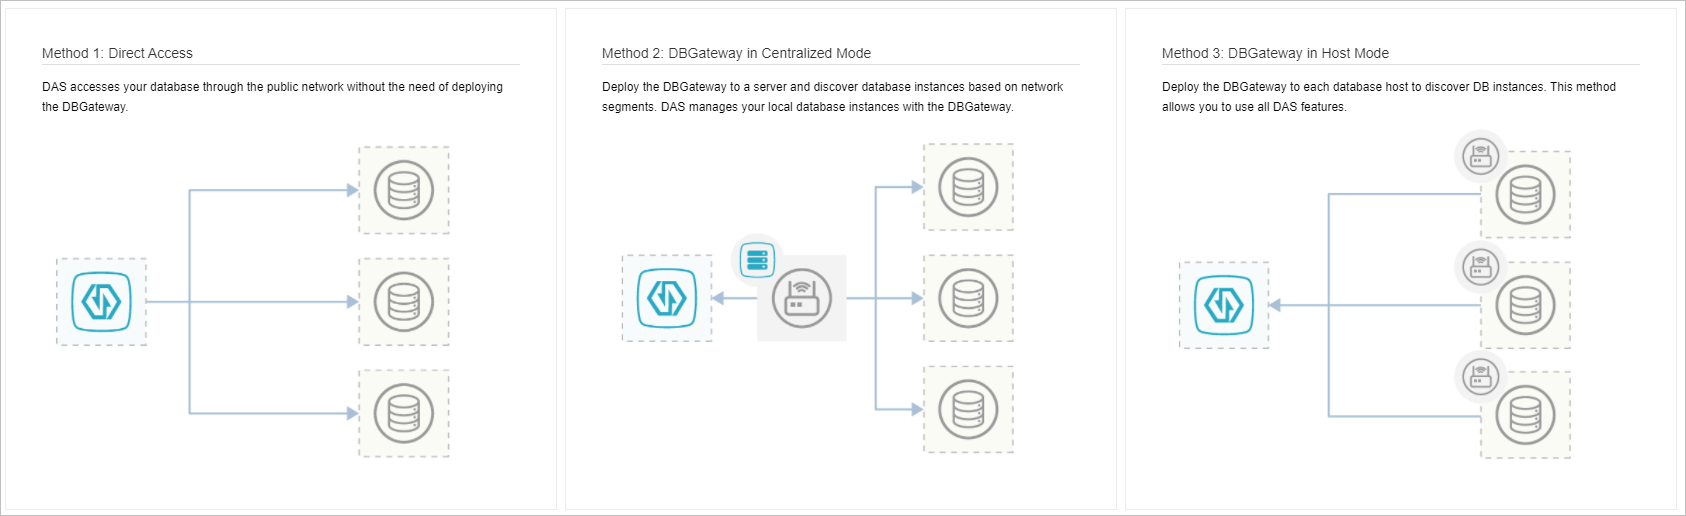
DAS supports three modes for connecting an external self-managed database:
-
Direct mode: This mode connects directly to your database over the public network and does not require a DAS gateway (DBGateway). You only need to provide the database account and password to add the instance. This mode currently supports MySQL, MongoDB, and Redis.
-
Centralized mode: Deploy a DAS gateway (DBGateway) on at least one server. The gateway automatically discovers your database instances by scanning a CIDR block. For high availability, deploy the gateway on two or more servers.
-
Host mode: Deploy a DAS gateway (DBGateway) on each server that hosts a database. The gateway automatically discovers the database instance on its host. This mode enables all DAS features, including full request analysis, SQL response time, and security audit. For a detailed feature comparison, see Feature comparison of connection modes.
The DAS gateway (DBGateway) can be deployed only on Linux.
Feature comparison of connection modes
|
Feature |
Direct mode |
Centralized mode |
Host mode (recommended) |
|
Database metric monitoring |
Supported |
Supported |
Supported |
|
Real-time performance |
Supported |
Supported |
Supported |
|
Real-time sessions |
Supported |
Supported |
Supported |
|
storage analysis |
Supported |
Supported |
Supported |
|
Slow request analysis |
Supported |
Supported |
Supported |
|
Host metric monitoring |
Not supported |
Not supported |
Supported |
|
Request diagnostics |
Not supported |
Not supported |
Supported |
|
Full request analysis |
Not supported |
Not supported |
Supported |
|
Request response time |
Not supported |
Not supported |
Supported |
|
security audit |
Not supported |
Not supported |
Supported |
Direct connection
Log on to the DAS console.
-
In the left-side navigation pane, choose Intelligent O&M Center > Instance Monitoring.
-
In the upper-right corner of the page, click Access Instance.
-
Click Other On-premise and Cloud Databases.
-
Click Direct mode.
-
Configure the database connection information.
Parameter
Description
Instance location
Select the region that is closest to your database.
Select Engine:
Select the engine type of the database that you want to connect.
Database Account
Enter the database account.
Password
Enter the password for the database account.
Instances
Enter the instances that you want to connect in the
Address:portformat. -
Click Test Connection.
-
If the Status is Verified, click Save Instance. Otherwise, if the status is not Verified, ensure that the login information is correct and click Test Connection again.
-
To add more databases, click Add More.
Centralized connection
Log on to the DAS console.
-
In the left-side navigation pane, choose Intelligent O&M Center > Instance Monitoring.
-
In the upper-right corner of the page, click Access Instance.
-
Click Other On-premise and Cloud Databases.
-
Click Use a centralized DBGateway.
-
Choose an access method.
NoteIf you have not deployed a DAS gateway in the target VPC, click Deploy a new DAS DBGateway and search for instances.. If you have already deployed a DAS gateway in the target VPC, click Use existing DAS DBGateway to scan for new instances .
-
Deploy a new DAS DBGateway and search for instances.:
-
Click Deploy a new DAS DBGateway and search for instances..
-
Select a network type and click Generate Deployment Command.
Note-
Network Type: Select a value based on how the host that runs DBGateway connects to Alibaba Cloud. For example:
-
For a self-managed database on the public network, select Public Network (Classic Network).
-
For a database in an on-premises data center or on another cloud connected to an Alibaba Cloud VPC by a leased line, select Proprietary Network (VPC/Leased Line).
-
-
Network Domain: You can use this parameter to manage different environments, such as on-premises data centers and self-managed databases on other cloud providers, for isolation.
-
-
Copy the deployment command. Then, log on to the target device and run it.
NoteIf the command line returns
successfully, the DAS gateway is deployed. DAS automatically discovers the gateway. If the deployment fails, see Troubleshoot DBGateway deployment, resolve the issue, and try again. -
If the Current Status shows Normal, click Next.
-
-
Use existing DAS DBGateway to scan for new instances :
-
Click Use existing DAS DBGateway to scan for new instances .
-
On the Select DBGateway page, select the DAS gateway to use and click Discover Instance.
-
-
-
On the Discover Instance page, scan for the database instances that you want to connect.
-
DAS provides two discovery methods:
-
Select Automatic scan:
-
In the Scan address text box, enter the CIDR block to scan.
-
In the Port range text box, enter the port range.
-
Click Scan.
-
-
Select Enter Instances:
-
Follow the on-screen instructions to enter the Instances.
-
Click Scan.
NoteThe DAS gateway automatically scans for and discovers the database instances.
-
-
-
Click Next.
-
-
Enter the login credentials for the database.
Parameter
Description
Select Engine:
Select the engine type of the database that you want to connect.
Database Account
Enter the database account.
Password
Enter the password for the database account.
Database IP
Select the database IP address to authorize.
NoteThe account for the self-managed database requires specific permissions. For more information, see Required permissions.
-
If an account with the required permissions already exists, enter the database account and password, and then click Authorize.
-
If an account with the required permissions does not exist, enter the account and password, click Generate Authorization Command, copy and run the generated command on the database, and then click Authorize.
-
-
Click Authorize. After you click Authorize, the status may show Normal Connection or one of the following common errors:
-
Unauthorized: No account or password is configured.
-
Failed to access.: The network is unreachable or the instance is down.
-
Failed to verify.: The username or password is incorrect.
-
Insufficient Permissions: The instance is reachable, but the account lacks the required permissions. For more information, see Required permissions.
-
-
Click Complete.
Host mode connection
Log on to the DAS console.
-
In the left-side navigation pane, choose Intelligent O&M Center > Instance Monitoring.
-
In the upper-right corner of the page, click Access Instance.
-
Click Other On-premise and Cloud Databases.
-
Click Use a host-mode DBGateway.
-
Select a network type and click Generate Authorization Command.
Note-
Network Type: Select a value based on how the host that runs DBGateway connects to Alibaba Cloud. For example:
-
For a self-managed database on the public network, select Public Network (Classic Network).
-
For a database in an on-premises data center or on another cloud connected to an Alibaba Cloud VPC by a leased line, select VPC.
-
-
Network Domain: You can use this parameter to manage different environments, such as on-premises data centers and self-managed databases on other cloud providers, for isolation.
-
-
Copy the deployment command. Then, log on to the target device and run it.
NoteIf the command line returns
successfully, the DAS gateway is deployed and DAS automatically discovers the gateway. If the Current Status shows Normal, click Next. If the deployment fails, see Troubleshoot DBGateway deployment, resolve the issue, and try again. -
Enter the login credentials for the database.
Parameter
Description
Select Engine:
Select the engine type of the database that you want to connect.
Database Account
Enter the database account.
Password
Enter the password for the database account.
Database IP
Select the database IP address to authorize.
NoteThe account for the self-managed database requires specific permissions. For more information, see Required permissions.
-
If an account with the required permissions already exists, enter the database account and password, and then click Authorize.
-
If an account with the required permissions does not exist, enter the account and password, click Generate Authorization Command, copy and run the generated command on the database, and then click Authorize.
-
-
Click Authorize. After you click Authorize, the status may show Normal Connection or one of the following common errors:
-
Unauthorized: No account or password is configured.
-
Failed to access.: The network is unreachable or the instance is down.
-
Failed to verify.: The username or password is incorrect.
-
Insufficient Permissions: The instance is reachable, but the account lacks the required permissions. For more information, see Required permissions.
-
-
Click Complete.
API reference
|
API |
Description |
|
Connects a database instance to DAS. |