You can create volume snapshots from disks to back up application data and then restore the application data from the volume snapshots. This topic describes how to use the VolumeSnapshot resource to create a volume snapshot from a disk volume and how to restore data from a volume snapshot.
Prerequisites
An ACK managed cluster is created and the Kubernetes version of the cluster is 1.18 or later.
The Elastic Compute Service (ECS) Snapshot service is activated. You can activate the ECS Snapshot service free of charge. You are charged only for the snapshots that you create. For more information, see Activate ECS Snapshot.
Feature description
In most cases, Container Service for Kubernetes (ACK) clusters use disk volumes to enable persistent storage for StatefulSets. Kubernetes enables data backup and restoration based on disk snapshots and the following features:
VolumeSnapshot: a resource that allows you to back up data in disk volumes.
DataSource: a persistent volume claim (PVC) field that is used to restore data from a volume snapshot.
Billing description
In ACK clusters, volume snapshots are implemented based on Elastic Compute Service (ECS) snapshots. You are charged for using ECS snapshots. For more information about the billing rules of ECS snapshots, see Snapshot billing.
Usage notes
To implement the features related to volume snapshots, ACK defines the following types of custom resources by using CustomResourceDefinitions (CRDs):
Resource type | Description |
VolumeSnapshotContent | A disk snapshot created and managed by administrators. A VolumeSnapshotContent does not belong to any namespace. A VolumeSnapshotContent is similar to a persistent volume (PV). |
VolumeSnapshot | A request for a volume snapshot. It is created and managed by users. A VolumeSnapshot belongs to a specific namespace. A VolumeSnapshot is similar to a PVC. |
VolumeSnapshotClass | Specifies the attributes of a VolumeSnapshot, such as the parameters and controllers that are used to create volume snapshots. A VolumeSnapshotClass is similar to a StorageClass. |
The following list describes the relationships among the preceding resources:
When you create a volume snapshot, you must bind a VolumeSnapshot to a VolumeSnapshotContent. The binding is similar to PVC-PV binding.
If you specify the VolumeSnapshotClassName parameter of a VolumeSnapshot, the ACK cluster automatically creates a VolumeSnapshotContent for the VolumeSnapshot. If the VolumeSnapshotClassName parameter is set to an invalid value or is not specified, the cluster does not automatically create a VolumeSnapshotContent. In this case, you must manually create a VolumeSnapshotContent and bind the VolumeSnapshotContent to the VolumeSnapshot.
The binding between VolumeSnapshotContents and VolumeSnapshots is one-to-one mapping.
When you delete a VolumeSnapshotContent, the related volume snapshot is also deleted.
Dynamically create a volume snapshot
Procedure
The following figure shows how ACK creates a dynamically provisioned snapshot from a disk volume.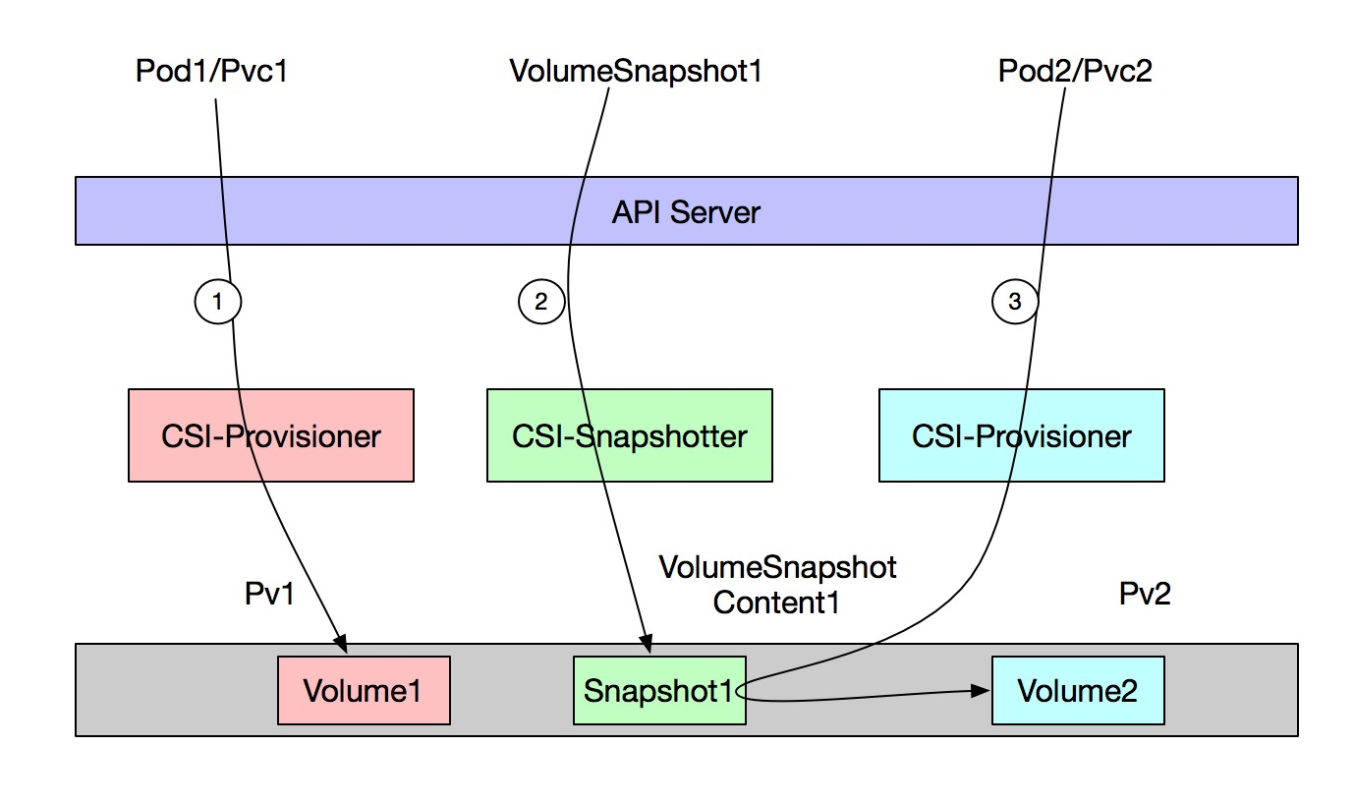
By default, the instance access feature is enabled for dynamically provisioned snapshots created from volumes that are used to mount Enterprise SSDs (ESSDs) or ESSD AutoPL disks of the following performance levels (PLs): PL0, PL1, PL2, and PL3.
The following table describes the procedure.
Step | Description |
① | Create an application that has a disk volume mounted. |
② | Create a VolumeSnapshot that uses a VolumeSnapshotClass. Then, the ACK cluster automatically creates a VolumeSnapshotContent and a disk snapshot. |
③ | Create another application that uses a PVC to reference the volume snapshot created in Step ②. |
The preceding steps are performed to achieve the following objectives:
Use Snapshot1 to back up data in Volume1.
Restore data from Snapshot1 to Volume2.
Examples
Create a VolumeSnapshotClass
Create a file named volumesnapshotclass.yaml and copy the following content to the file:
apiVersion: snapshot.storage.k8s.io/v1
kind: VolumeSnapshotClass
metadata:
 name: default-snapclass
driver: diskplugin.csi.alibabacloud.com
parameters:
  retentionDays: "5"
  forceDelete: "true"
deletionPolicy: Delete
Parameter
Description
retentionDaysThe retention period of the volume snapshot. Unit: days.
forceDeleteTo forcefully delete the volume snapshot, set
forceDeleteto"true".The default value is "false" for csi-provisioner 1.26.5-92f859a-aliyun and later. The default value is "true" for csi-provisioner versions earlier than 1.26.5-92f859a-aliyun. Valid values:
"true": forcefully deletes all volume snapshots.
"false": deletes only unused snapshots.
deletionPolicyThe reclaim policy of the volume snapshot. Valid values:
Delete: When you delete a VolumeSnapshot, the corresponding VolumeSnapshotContent and snapshot are also deleted.Retain: When you delete a VolumeSnapshot, the corresponding VolumeSnapshotContent and snapshot are retained.
Create a VolumeSnapshotClass
kubectl apply -f volumesnapshotclass.yaml
Create an application and write data to the application.
Create a file named nginx.yaml and copy the following content to the file:
apiVersion: apps/v1
kind: StatefulSet
metadata:
  name: nginx
spec:
  selector:
    matchLabels:
      app: nginx
  serviceName: "nginx"
  replicas: 1
  template:
    metadata:
      labels:
        app: nginx
    spec:
      containers:
      - name: nginx
        image: anolis-registry.cn-zhangjiakou.cr.aliyuncs.com/openanolis/nginx:1.14.1-8.6
        imagePullPolicy: IfNotPresent
        volumeMounts:
        - name: disk
          mountPath: /data
  volumeClaimTemplates:
  - metadata:
      name: disk
    spec:
      accessModes: [ "ReadWriteOnce" ]
      storageClassName: "alicloud-disk-topology-alltype"
      resources:
        requests:
          storage: 20Gi
Create an application.
kubectl apply -f nginx.yamlCheck the deployment progress of the application pods.
kubectl get pod -l app=nginxExpected output:
NAME        READY   STATUS    RESTARTS   AGE
nginx-0     1/1     Running   0          82s
Write data to the mount path in the container.
kubectl exec -it nginx-0 -- touch /data/test
kubectl exec -it nginx-0 -- ls /data
Expected output:
lost+found test
Create a VolumeSnapshot.
ImportantIf the version of the CSI plug-in installed in your cluster is V1.22.12-b797ad9-aliyun or later, you can create a snapshot from a used disk volume, regardless of whether the PVC of the disk volume is used by a pod that is in the Running state.
If the version of the CSI plug-in installed in your cluster is V1.22.12-b797ad9-aliyun or later, you can create a snapshot only from a disk volume whose PVC is used by a pod that is in the Running state.
Create a file named snapshot-1.yaml and copy the following content to the file:
apiVersion: snapshot.storage.k8s.io/v1
kind: VolumeSnapshot
metadata:
  name: new-snapshot-demo
  namespace: default
spec:
  volumeSnapshotClassName: default-snapclass   # The VolumeSnapshotClass used by the VolumeSnapshot.
  source:
    persistentVolumeClaimName: disk-nginx-0
Create a VolumeSnapshot.
kubectl apply -f snapshot-1.yaml
Check the VolumeSnapshot and VolumeSnapshotContent.
NoteYou can also view the volume snapshot that corresponds to the VolumeSnapshotContent in the ECS console.
Run the following command to check the VolumeSnapshot:
kubectl get volumesnapshotsExpected output:
NAME                READYTOUSE   SOURCEPVC      SOURCESNAPSHOTCONTENT   RESTORESIZE   SNAPSHOTCLASS       SNAPSHOTCONTENT                                    CREATIONTIME   AGE
new-snapshot-demo   true         disk-nginx-0                           20Gi          default-snapclass   snapcontent-48b04625-679a-490f-9ef3-f04b2b8e6c57   28s            28s
Run the following command to check the VolumeSnapshotContent:
kubectl get VolumeSnapshotContentExpected output:
NAME                                               READYTOUSE   RESTORESIZE   DELETIONPOLICY   DRIVER                            VOLUMESNAPSHOTCLASS   VOLUMESNAPSHOT      VOLUMESNAPSHOTNAMESPACE   AGE
snapcontent-48b04625-679a-490f-9ef3-f04b2b8e6c57   true         21474836480   Delete           diskplugin.csi.alibabacloud.com   default-snapclass     new-snapshot-demo   default                   49s
Optional: Create an application and use a VolumeSnapshot to restore data in the application.
Create a file named nginx-restore and copy the following content to the file.
Set
dataSource.nameto the VolumeSnapshot you created anddataSource.kindtoVolumeSnapshotin thevolumeClaimTemplatessection.apiVersion: apps/v1 kind: StatefulSet metadata: name: nginx-restore spec: selector: matchLabels: app: nginx serviceName: "nginx" replicas: 1 template: metadata: labels: app: nginx spec: containers: - name: nginx image: anolis-registry.cn-zhangjiakou.cr.aliyuncs.com/openanolis/nginx:1.14.1-8.6 imagePullPolicy: IfNotPresent volumeMounts: - name: disk mountPath: /data volumeClaimTemplates: - metadata: name: disk spec: accessModes: [ "ReadWriteOnce" ] storageClassName: "alicloud-disk-topology-alltype" resources: requests: storage: 20Gi dataSource: name: new-snapshot-demo kind: VolumeSnapshot apiGroup: snapshot.storage.k8s.ioCreate an application.
kubectl apply -f nginx-restore.yamlCheck whether data is restored in the mount path in the container.
kubectl exec -it nginx-restore-0 -- ls /dataExpected output:
lost+found test
Optional: If you do not need to create a workload, you can create a PVC that references the VolumeSnapshot.
Use the following YAML template to create a pvc-restore file.
Set
dataSource.kindtoVolumeSnapshotanddataSource.nameto the name of the VolumeSnapshot.apiVersion: v1 kind: PersistentVolumeClaim metadata: name: pvc-disk namespace: default spec: accessModes: - ReadWriteOnce resources: requests: storage: 20Gi dataSource: name: new-snapshot-demo kind: VolumeSnapshot apiGroup: snapshot.storage.k8s.io storageClassName: alicloud-disk-topology-alltype volumeMode: FilesystemCreate the PVC.
NoteIn the configurations of the alicloud-disk-topology-alltype StorageClass, the VolumeBindingMode parameter is set toWaitForFirstConsumer. PVCs that use StorageClasses in this binding mode remain in the Pending state until it is mounted to a pod. Therefore, before the PVC is mounted, make sure that the relavant VolumeSnapshot, VolumeSnapshotContent, and ECS snapshot are not deleted.
kubectl apply -f pvc-restore.yaml
Create a statically provisioned volume snapshot from an existing disk snapshot
To import an existing disk snapshot to an ACK cluster, perform the following steps:
Create a VolumeSnapshotContent by using the existing disk snapshot.
Create a file named snapshot-content.yaml and copy the following content to the file:
apiVersion: snapshot.storage.k8s.io/v1
kind: VolumeSnapshotContent
metadata:
  name: new-snapshot-content-test
spec:
  deletionPolicy: Retain
  driver: diskplugin.csi.alibabacloud.com
  source:
    snapshotHandle: <YOUR-SNAPSHOTID>
  volumeSnapshotRef:
    name: new-snapshot-demo
    namespace: default
Parameter
Description
snapshotHandleThe ID of the existing disk snapshot. You can obtain the snapshot ID on the Snapshots page in the ECS console.
volumeSnapshotRefInformation about the VolumeSnapshot to be created for the VolumeSnapshotContent.
name: the name of the VolumeSnapshot.namespace: the namespace to which the VolumeSnapshot belongs.
Create a VolumeSnapshotContent:
kubectl apply -f snapshot-content.yaml
Create a VolumeSnapshot and bind it with the VolumeSnapshotContent you created.
Create a file named snapshot-2.yaml and add the following content to the file:
apiVersion: snapshot.storage.k8s.io/v1
kind: VolumeSnapshot
metadata:
  name: new-snapshot-demo
  namespace: default
spec:
  source:
    volumeSnapshotContentName: new-snapshot-content-test
Parameter
Description
metadata.nameThe name of the VolumeSnapshot. The value must be the same as the value of the
volumeSnapshotRef.nameparameter of the VolumeSnapshotContent you created.volumeSnapshotContentNameThe name of the VolumeSnapshotContent that you want to bind with the VolumeSnapshot.
Create a VolumeSnapshot.
kubectl apply -f snapshot-2.yaml
Optional: Create an application and use a VolumeSnapshot to restore data in the application.
Create a file named nginx-restore and copy the following content to the file.
Set
dataSource.nameto the VolumeSnapshot you created anddataSource.kindtoVolumeSnapshotin thevolumeClaimTemplatessection.apiVersion: apps/v1 kind: StatefulSet metadata: name: nginx-restore spec: selector: matchLabels: app: nginx serviceName: "nginx" replicas: 1 template: metadata: labels: app: nginx spec: containers: - name: nginx image: anolis-registry.cn-zhangjiakou.cr.aliyuncs.com/openanolis/nginx:1.14.1-8.6 imagePullPolicy: IfNotPresent volumeMounts: - name: disk mountPath: /data volumeClaimTemplates: - metadata: name: disk spec: accessModes: [ "ReadWriteOnce" ] storageClassName: "alicloud-disk-topology-alltype" resources: requests: storage: 20Gi dataSource: name: new-snapshot-demo kind: VolumeSnapshot apiGroup: snapshot.storage.k8s.ioCreate an application.
kubectl apply -f nginx-restore.yamlCheck whether data is restored in the mount path in the container.
kubectl exec -it nginx-restore-0 -- ls /dataExpected output:
lost+found test