Containers have the advantages of high cost-effectiveness, efficient deployment, high portability, and environment consistency. You can use Server Migration Center (SMC) to migrate source Linux servers as container images to Container Registry and then use the container images to deploy container applications. This implements the migration of containerized applications in a cost-effective way.
Container Registry is a service that allows you to manage and distribute cloud-native artifacts that meet the standards of Open Container Initiative (OCI) in an effective manner. The artifacts include container images and Helm charts. Container Registry Enterprise Edition provides end-to-end acceleration capabilities to support global image replication, distribution of large images at scale, and image building based on multiple code sources. The service seamlessly integrates with Container Service for Kubernetes (ACK) to help enterprises reduce delivery complexity and provide a one-stop solution for cloud-native applications. For more information, see What is Container Registry?
ACK is one of the first services to participate in the Certified Kubernetes Conformance Program in the world. ACK provides high-performance containerized application management services and supports lifecycle management for enterprise-class containerized applications. By using ACK, you can run and manage containerized applications on the cloud with ease and efficiency. For more information, see Product Introduction.
Limits
You can migrate only Linux servers of the x86 architecture as container images.
Impacts
Before you migrate servers, take note of the impacts described in the following table.
Item | Description |
Data directory | During server migration, SMC can obtain the partitioning scheme of a source disk used by the migration source and generate the same partitioning scheme for the destination disk. This accelerates data transmission during the migration.
|
Intermediate instance | Do not perform operations on the intermediate instance during the migration. To run a migration job, SMC creates a temporary intermediate instance named Note When you migrate a server to an ECS instance, the ECS instance serves as the intermediate instance. |
IP address | After the migration, the IP address of your server is changed. If your business involves IP address configuration, change the IP address after the source server is migrated. |
Underlying hardware | After the migration, the underlying hardware may change, and the application licenses that are associated with the underlying hardware may become invalid. Perform checks as needed. |
Prerequisites
The preparations for server migration are complete. For more information, see Before you begin.
Container Registry is activated, and an image repository is created. For more information, see Create a repository and build images.
A Resource Access Management (RAM) role is created for the intermediate instance that is generated by SMC for migration. For more information, see Create a RAM role for a trusted Alibaba Cloud service.
Configure the following key parameters for the RAM role.
Select Trusted Entity: Select Alibaba Cloud Service.
Role Type: Select Normal Service Role.
Select Trusted Service: Select Elastic Compute Service.
A custom policy that meets the requirements of container image migration is created and attached to the RAM role. For more information, see Create custom policies and Grant permissions to a RAM role.
Procedure
Step 1: Import the information about a migration source
Migration sources can be servers of a variety of types, such as servers in data centers, VMs, and hosts on third-party cloud platforms. SMC supports multiple methods to import the information about migration sources. You can select a method based on your business requirements. For more information, see the How do I select the method to import the information about a migration source? section of the "FAQ" topic.
(Recommended) Use the CLI
The source server must be accessible over the Internet.
Log on to the SMC console.
In the left-side navigation pane, choose .
On the Server Migration page, click Import Migration source.
Configure the parameters as prompted and copy the activation code command. The following table describes the parameters.
Parameter
Description
Migration Source Type
The type of the migration source. Select ECS Instance.
Import Method
The method that is used to import the information about the migration source. Select Use CLI to Import Server.
Migration Source Quota
The number of migration sources whose information you want to import by using the activation code. Valid values: 1 to 1000. Default value: 10.
Validity Period
The validity period of the activation code. Unit: day. Valid values: 1 to 90. Default value: 30.
Activation Code
Generate the activation code and copy the generated command by performing the following steps:
Click Generate.
Click the Linux Shell tab.
Click Copy to copy the activation code command.
Log on to the source server and paste and run the copied command as an administrator to import the information about the migration source.
Log on to the Linux server.
Paste and run the copied command as an administrator to import the information about the migration source.

After the command is run, if a message similar to
Import Source Server [s-bp18x8751kgz2oyh****] Successfully!is returned, the information about the migration source is imported.
On the Server Migration page in the SMC console, view the status of the migration source in the Real-time Migration Status column.
If the status of the migration source is Online, the information about the migration source is imported.
If the migration source is in another state, the information fails to be imported. In this case, troubleshoot the failure based on the following solutions and import the information about the migration source again:
Troubleshoot the failure based on the message displayed in the SMC console or the log file in the directory where the SMC client is installed. By default, the SMC client is installed in the following directory:
Windows server: C:\smc
Linux server: /smc
Refer to the FAQ about Server Migration Center (SMC) and Troubleshooting topics for troubleshooting.
Use the SMC console
The source Elastic Compute Service (ECS) instance must be accessible over the Internet.
Cloud Assistant Agent must be installed on the source ECS instance. For more information about the installation, see Install Cloud Assistant Agent. For ECS instances created after December 1, 2017 based on a public image, Cloud Assistant Agent is installed on the ECS instances by default.
If you want to import the information about a migration source as a Resource Access Management (RAM) user, make sure that the following permissions are granted to the RAM user:
AliyunRAMReadOnlyAccess. For more information, see Grant permissions to a RAM user.AliyunECSAssistantFullAccess. For more information, see RAM overview.
Log on to the SMC console.
In the left-side navigation pane, choose .
On the Server Migration page, click Import Migration source.
Configure the parameters as prompted and copy the activation code command. The following table describes the parameters.
Parameter
Description
Migration Source Type
The type of the migration source. Select Physical Server/VM/ECS Instance.
Import Method
The method that is used to import the information about the migration source. Select Import through Console.
Migration Source Name
The name of the migration source. The name must be 2 to 128 characters in length. The name must start with a letter but cannot start with
http://orhttps://. The name can contain letters, digits, colons (:), underscores (_), and hyphens (-).OS Type
The type of the operating system. Select Linux.
IP Address
The IPv4 address that is used to access the migration source over the Internet. Example: 120.55.XX.XX.
Port
The SSH port number of the migration source. Valid values: 1 to 65535. Default value: 22.
Username
The username that is used to log on to the operating system of the migration source. The default username is
root.Password
The password corresponding to the username.
After you configure the parameters, click Import.
The import process takes about 3 to 10 minutes. Wait until the import is complete.
On the Server Migration page in the SMC console, view the status of the migration source in the Real-time Migration Status column.
If the status of the migration source is Online, the information about the migration source is imported.
If the migration source is in another state, the information fails to be imported. In this case, troubleshoot the failure based on the following solutions and import the information about the migration source again:
Troubleshoot the failure based on the message displayed in the SMC console or the log file in the directory where the SMC client is installed. By default, the SMC client is installed in the following directory:
Windows server: C:\smc
Linux server: /smc
Refer to the FAQ about Server Migration Center (SMC) and Troubleshooting topics for troubleshooting.
Use the SMC client
For more information about the SMC client, see Use the Windows GUI version of an SMC client.
Log on to the SMC console.
In the left-side navigation pane, choose .
On the Server Migration page, click Import Migration source.
On the Import Migration Source page, configure the parameters. The following table describes the parameters.
Parameter
Description
Migration Source Type
The type of the migration source. Select Physical Server/VM/ECS Instance.
Import Method
The method that is used to import the information about the migration source. Select Use Client to Import Server.
Description
Read the information in the Description section and download the required version of the SMC client based on the CPU architecture (ARM or x86) and bit version (32-bit or 64-bit) of the operating system of the migration source.
Import the information about the migration source.
ImportantDuring the migration, do not shut down the SMC client until the migration is complete. Otherwise, the migration source is disconnected from the SMC console, and the migration fails.
You can use a remote connection tool that supports file transfer. For example, you can use WinSCP to upload the SMC client package to the source Linux server.
Connect to the source Linux server and decompress the SMC client package.
Linux 64-bit Genericis used in the example. Run the following command to decompress the package. If you use another version of the SMC client, replace the package name in the command with the name of your SMC client.tar xf go2aliyun_client_linux_x86_64.tar.gzNoteLinux ARM64 supports the g6r general-purpose instance family and the c6r compute-optimized instance family. For more information about instance types, see the "ARM-based enterprise-level computing instance families" section of the Overview of instance families topic.
(Optional) Exclude the files or directories that you do not need from the migration. For more information, see the How do I exclude files or directories from a migration job? section of the "FAQ" topic.
ImportantIf you enable the block replication feature, you cannot exclude files or directories from the migration job.
Obtain an activation code or AccessKey pair.
(Recommend) Obtain an activation code: In the Description section in the SMC console, click Generate and copy the generated activation code information.
Obtain an AccessKey pair: An AccessKey pair consists of an AccessKey ID and an AccessKey secret. If no AccessKey pair is created, create one first. For more information, see Obtain an AccessKey pair.
In the SMC client folder, run the following commands to run the SMC client.
Run the following commands as a root or sudo user based on whether you have root or sudo permissions on the operating system of the source server.
Root user
cd go2aliyun_client_linux_x86_64
chmod +x go2aliyun_client
./go2aliyun_client
Sudo user
cd go2aliyun_client_linux_x86_64
sudo chmod +x go2aliyun_client
sudo ./go2aliyun_client
Enter the activation code or AccessKey pair as prompted. In this example, an activation code is used, as shown in the following figure.

The following messages may appear after you enter the activation code.
If no snapshot dependency is installed on your source server, a message appears. The following figure shows the details of the message. You can decide whether to install a snapshot dependency based on whether you enable the block replication feature.
If you want to enable block replication for the migration, enter
yesto automatically install a snapshot dependency.If you do not want to enable block replication for the migration, enter
no.
ImportantIf the snapshot dependency fails to be installed, do not enable block replication when you create a migration job. Otherwise, the migration may fail.

The rsync tool is installed on most mainstream migration sources. If rsync is not installed on the migration source, the SMC client displays a message. Enter
yesto install rsync, as shown in the following figure.
If SELinux is enabled on the migration source, a message that prompts you to disable SELinux appears. Enter
yesto disable SELinux. The following figure shows how to disable SELinux.
If the information about the migration source is imported, a message similar to the following one is returned:
Import Source Server [s-bp11npxndknsycqj****] Successfully!.NoteIf the information about the migration source fails to be imported, you can troubleshoot the issue based on the returned message. After you fix the issue, run the following commands to exit the background program and re-import the information about the migration source based on your permissions on the operating system of the migration source. For more information about frequently asked questions (FAQ) and solutions, see FAQ about Server Migration Center (SMC) and Troubleshooting.
Sudo user
sudo ./go2aliyun_client --abort
sudo ./go2aliyun_client
Root user
./go2aliyun_client --abort
./go2aliyun_client
On the Server Migration page in the SMC console, view the status of the migration source in the Real-time Migration Status column.
If the status of the migration source is Online, the information about the migration source is imported.
If the migration source is in another state, the information fails to be imported. In this case, troubleshoot the failure based on the following solutions and import the information about the migration source again:
Troubleshoot the failure based on the message displayed in the SMC console or the log file in the directory where the SMC client is installed. By default, the SMC client is installed in the following directory:
Windows server: C:\smc
Linux server: /smc
Refer to the FAQ about Server Migration Center (SMC) and Troubleshooting topics for troubleshooting.
Step 2: Create a migration job
Find the migration source that you want to manage and click Start Migration in the Actions column.
Configure the parameters and click Create.
Configure the basic parameters described in the following table.
Parameter
Description
Example
Migration Job Name
The name of the migration job.
Container migration
Job Description
The description of the migration job.
test
Destination Type
The destination to which you want to migrate the source server. Select Container Image.
Container Image
Destination Region
Required. The Alibaba Cloud region to which you want to migrate the source server. For more information about regions, see Regions and Zones.
China (Hangzhou)
Namespace
Required. The namespace in which to store the container image repository generated during the migration. For information about how to create a namespace, see Manage namespaces and resource quotas.
Repository Name
Required. The name of the repository in which to store the container image generated during the migration. For information about how to create an image repository, see Create a repository and build images.
Version
The version of the container image generated during the migration.
v1
RAM Role
Required. The RAM role to be assigned to the intermediate instance. For information about how to create a RAM role, see Create a RAM role for a trusted Alibaba Cloud service.
Execution Method
The mode in which the migration job is run. Valid values:
Migrate Now: The migration job starts immediately after it is created. This is the default value.
Migrate Later: The migration job automatically starts at the specified time after it is created.
NoteThe earliest time that you can specify to run a migration job is 10 minutes after the job is created.
Create Only: After the migration job is created, you must click Run in the Actions column to manually start the migration job.
Keep the default setting
Adjust the disk partition structure as needed. The following table describes the parameters.
Parameter
Description
Example
Modify Disk Partition
Determine whether to enable Modify Disk Partition based on your needs. This feature is only supported in SMC client 2.8.0 or above. For more information, see Use the SMC client.
Not enabled: By default, the disk partition structure of the destination system are the same as those of the migration source.
Enabled: You can adjust the destination disk partition structure, including partition size and order, transfer method, whether to enable LVM, and other configurations.
Configure disks
System Disk: the size of the system disk of the destination instance. Unit: GiB. Valid values: 20 to 2048,
The size of the destination system disk must be larger than the amount of data on the source system disk. For example, if the total size of the source system disk is 400 GiB but the size of data stored on this disk is only 100 GiB, you must set this parameter to a value greater than 100.
NoteThe default value of this parameter is the size of the source system disk. We recommend that you retain the default value or specify a greater value.
Data Disk <N>: the size of the data disk of the destination instance. Unit: GiB. Valid values: 1 to 32768.
The variable
<N>indicates the serial number of the data disk. If the disk is migrated to the destination instance, N is the ID of the data disk.The size of the destination data disk must be larger than the amount of data on the source data disk. For example, if the total size of the source data disk is 500 GiB but the size of data stored on this disk is only 100 GiB, you must set this parameter to a value greater than 100.
If there are no mount targets under the data disk or if all mount targets are not migrated, the data disk will not be migrated.
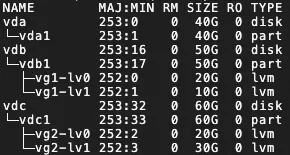
LVM: Logical Volume Manager (LVM) is a mechanism for managing disk partitions in Linux systems. LVM is more flexible than traditional disk partitions and allows for dynamic adjustment of disk space.
You can select whether to enable LVM based on your needs. After enabling LVM, the destination will automatically rebuild the disk with an LVM structure.
For each destination disk where LVM is enabled, the system will create one Physical Volume (PV) and its corresponding Volume Group (VG). On the VG, a number of Logical Volume Manager (LVM) corresponding to the mount targets are created. By default, the VG name is vgX (where X is the serial number of the disk), and the LVM name is lvX (where X is the serial number of the LVM). An example is provided in the following figure.
 Important
LVM is not supported in the following scenarios:
When the migration source is a Windows system.
When the system disk does not have a boot partition.
After enabling LVM, the feature does not take effect in the following scenarios:
The migration source does not support lvm2 or the lvm2 package is not installed.
The migration source is a Debian system with a kernel version of 3.x or earlier, and disks with XFS file systems are mounted.
Configure mount targets
Whether to Migrate: You can select whether to migrate the mount target based on your business needs.
Enable Block Replication: Enabling block replication can effectively improve the stability of migration transmission speed while ensuring consistency with the source partition structure. However, the partition size cannot be modified. SMC determines whether to support enabling block replication based on the migration source disk partition status.
If the migration source does not support block replication for partitions, the Enable Block Replication switch cannot be turned on, and default file replication method is used, allowing partition size modification.
If the migration source supports block replication for partitions, the Enable Block Replication switch is enabled by default to achieve partition-level disk migration.
NoteWhen the migration source is a Windows operating system, the block replication feature is enabled by default and cannot be disabled.
If LVM is enabled on the disk and the partition size is not an integer multiple of 4 MiB, block replication does not take effect, and file replication is used for data transfer.
Set partition size: When block replication is not enabled, you can set the partition size based on your needs, but the sum of partition sizes cannot exceed the size of the disk they belong to.
NoteIf the size of disks of the destination instance do not match that of the migration source disks, the migration task cannot be created. In this case, the system will automatically adjust the mount target positions to meet the disk size requirements. If the requirements cannot be met after the adjustment, handle the issue as prompted.
You can also manually drag and drop mount targets to meet disk size requirements. However, drag-and-drop is not supported for partitions of type boot or system. The specific operations are as follows:
Move your pointer over
 before the mount target.
Use your pointer to drag the mount target to another disk.
Keep the default setting
(Conditionally required) Click Expert Mode to configure advanced parameters such as Network Type and Compression Ratio. The following table describes the advanced parameters.
Parameter
Description
Example
Network Type
The type of network that is used to migrate data from the source server to the intermediate instance. By default, data is migrated over the Internet. During the migration, SMC creates an intermediate instance that connects to a vSwitch in a VPC. If you select Public Network, a public IP address is assigned to the intermediate instance.
Public Network (default value)
SMC migrates data to the intermediate instance over the Internet. If you select Public Network, make sure that the source server can access the Internet. You can determine whether to specify a VPC and a vSwitch based on your business requirements.
If you specify a VPC and a vSwitch, SMC creates an intermediate instance that connects to the specified VPC and vSwitch.
If you do not specify a VPC or vSwitch, SMC creates an intermediate instance that connects to the VPC and vSwitch automatically created by the system.
VPC
SMC migrates data to the intermediate instance over a VPC. If you select VPC, you must specify a VPC and a vSwitch and make sure that the source server can connect to the VPC.
NoteIf your server in a data center, your VM, or your third-party cloud server can connect to a VPC, we recommend that you select this network type to migrate data. Compared with migration over the Internet, migration over a VPC is more efficient and stable. You can use VPN Gateway, Express Connect, or SAG to connect a migration source to a VPC. For more information, see Connect a data center to a VPC.
Keep the default setting
Transmission Speed Limit
The maximum network transfer speed during the migration. Unit: Mbit/s. If you set the Compression Ratio parameter to a value greater than 0, the actual network transfer speed, which is the transfer speed of compressed data, is lower than the speed displayed in the Real-time Migration Status column.
Keep the default setting
Compression Ratio
The compression ratio of the data to be migrated. Set the compression ratio based on your business requirements.
If the bandwidth is limited, a high compression ratio improves the transmission efficiency.
If a high bandwidth is available, we recommend that you do not compress data. Data compression consumes CPU resources of the migration source.
Valid values: 0 to 10. Default value: 7. A value of 0 indicates that data is not compressed.
Keep the default setting
Checksum Verification
Specifies whether to verify data integrity by using a checksum. By default, this feature is disabled. If you enable this feature, data integrity is ensured, but transmission speed may be reduced.
Keep the default setting
Migration Job Tags
The tags that you specify for the migration job. Each tag contains a key and a value. You can use tags to query and manage migration jobs. For more information, see Use tags to manage migration sources and migration jobs and Use tags to implement fine-grained access control.
NoteYou can specify up to 20 tags for a migration job.
Keep the default setting
Intermediate Instance Type
The type of the intermediate instance. Select an intermediate instance type based on your business requirements. This parameter is available only if you set the Destination Type parameter to ECS Image.
If you specify an instance type, SMC creates an intermediate instance of the specified type. If the specified instance type is unavailable, you cannot create the migration job.
If you do not specify an instance type, SMC automatically creates an intermediate instance.
ImportantDo not stop, start, restart, or release the intermediate instance during the migration to prevent migration failures.
Keep the default setting
In the message that appears, read the migration notes and click Got It.
On the Migration Jobs page, view the status of the created job.
The amount of time required for data transmission is subject to factors such as the data size of the migration source and network bandwidth. Wait until the migration job is complete.
NoteWhen the migration job is in the Synchronizing state, the Speed and Time Remaining for Synchronization parameters are displayed in the Real-time Migration Status column:
Speed: the amount of data that is migrated per second, which indicates the transfer speed of uncompressed data. If you set the Compression Ratio parameter to a value greater than 0, the actual network transfer speed, which is the transfer speed of compressed data, is lower than the displayed speed.
Time Remaining for Synchronization: the remaining synchronization time calculated based on the current speed by using the following formula: Time remaining for synchronization = (Total data size - Transferred data size)/Speed.

When the migration job is in the Synchronizing state, you can perform the following operations based on your business requirements:
Modify the migration job: In the Actions column, click Modify Job to modify the Transmission Speed Limit, Compression Ratio, and Checksum Verification parameters.
Pause the migration job: In the Actions column, click Pause.
Optional. To view details about the migration, perform the following steps:
Find the migration job whose details you want to view and click the migration source ID or name in the Migration Source ID /Name column.
On the job details page, view the job details in the Migration Jobs section.
Verify the migration result
The migration is successful if the migration job enters the Completed state.

After the migration is successful, an Alibaba Cloud container image is generated. You can use the container image to deploy container applications by performing the following steps:
Create an ACK cluster. For more information, see Create an ACK dedicated cluster.
In the Actions column of the migration source, click Deploy Application. The application creation page appears.
Create an application. For more information, see Create a stateless application by using a Deployment.
After the server is migrated, you must verify the data to ensure data integrity and correctness. For more information, see the "How do I check my system after I migrate a Linux server?" section of the FAQ topic.
NoteIf a domain name has been bound to the source server, the public IP address of the server is changed after the migration. In this case, you must resolve the domain name to the new public IP address of the server For more information, see Add an A record for a website domain name.
The migration failed if the migration job enters the Error state. In this case, you need to perform the following steps:
Click Troubleshoot Errors in the Actions column and fix the failure based on the error code and error message. For more information, see FAQ about Server Migration Center (SMC) and Troubleshooting.
On the Migration Jobs page, click Retry Migration Job.
The migration job resumes from the point at which it was stopped.
ImportantIf the intermediate instance is released, you must create another migration job. For more information, see the "What do I do if I release an intermediate instance by accident?" section of the FAQ topic.
Clear resources
During the migration, SMC creates a temporary pay-as-you-go intermediate instance named No_Delete_SMC_Transition_Instance within the destination Alibaba Cloud account. The method to clear resources depends on whether the migration is successful.
If the migration is successful, the intermediate instance is automatically released. No manual operation is required.
If the migration failed, the intermediate instance is not automatically released and incurs fees as long as the migration job exists. You can release the intermediate instance in one of the following ways to reduce costs:
If you no longer need the migration job, choose
 > Delete in the Actions column to delete the migration job and release the intermediate instance at a time.
 Manually release the intermediate instance. For more information, see Release an instance.