When your cluster lacks sufficient resources to schedule application pods, you can enable node autoscaling in ACK One registered clusters. This feature automatically scales out nodes to provide the additional resources your workloads need. Two scaling solutions are available:
Node autoscaling -- Standard automatic node scaling.
Node instant scaling -- Offers faster scaling, higher delivery efficiency, and lower operational complexity.
Prerequisites
You have created a node pool.
You have read node scaling to understand its working principles and features.
Step 1: Configure RAM Permissions
Create a RAM user and grant the following custom policy to the user. For more information, see Use RAM to authorize access to clusters and cloud resources.
Log on to the ACK console. In the left-side navigation pane, click Clusters.
On the Clusters page, click the name of the cluster you want to configure. In the left-side navigation pane, choose Configurations > Secrets.
On the Secrets page, click Create from YAML. Use the following YAML to create a Secret named
alibaba-addon-secret.Components access cloud services by using the stored AccessKeyID and AccessKeySecret. If an
alibaba-addon-secretSecret already exists, skip this step.apiVersion: v1 kind: Secret metadata: name: alibaba-addon-secret namespace: kube-system type: Opaque stringData: access-key-id: <AccessKeyID of the RAM user> access-key-secret: <AccessKeySecret of the RAM user>
Step 2: Configure the Node Scaling Solution
Log on to the ACK console. In the left-side navigation pane, click Clusters.
On the Clusters page, find the cluster you want to manage and click its name. In the left-side navigation pane, choose Nodes > Node Pools.
On the Node Pools page, click Enable next to Node Scaling.

If this is the first time you use node autoscaling, follow the on-screen instructions to activate the service and complete authorization. Otherwise, skip this step.
ACK managed cluster: Authorize ACK to use the AliyunCSManagedAutoScalerRole to access your cloud resources.
ACK dedicated cluster: Authorize ACK to use the KubernetesWorkerRole and AliyunCSManagedAutoScalerRolePolicy for scaling management. The following figure shows the authorization page that appears when you enable Node Scaling.
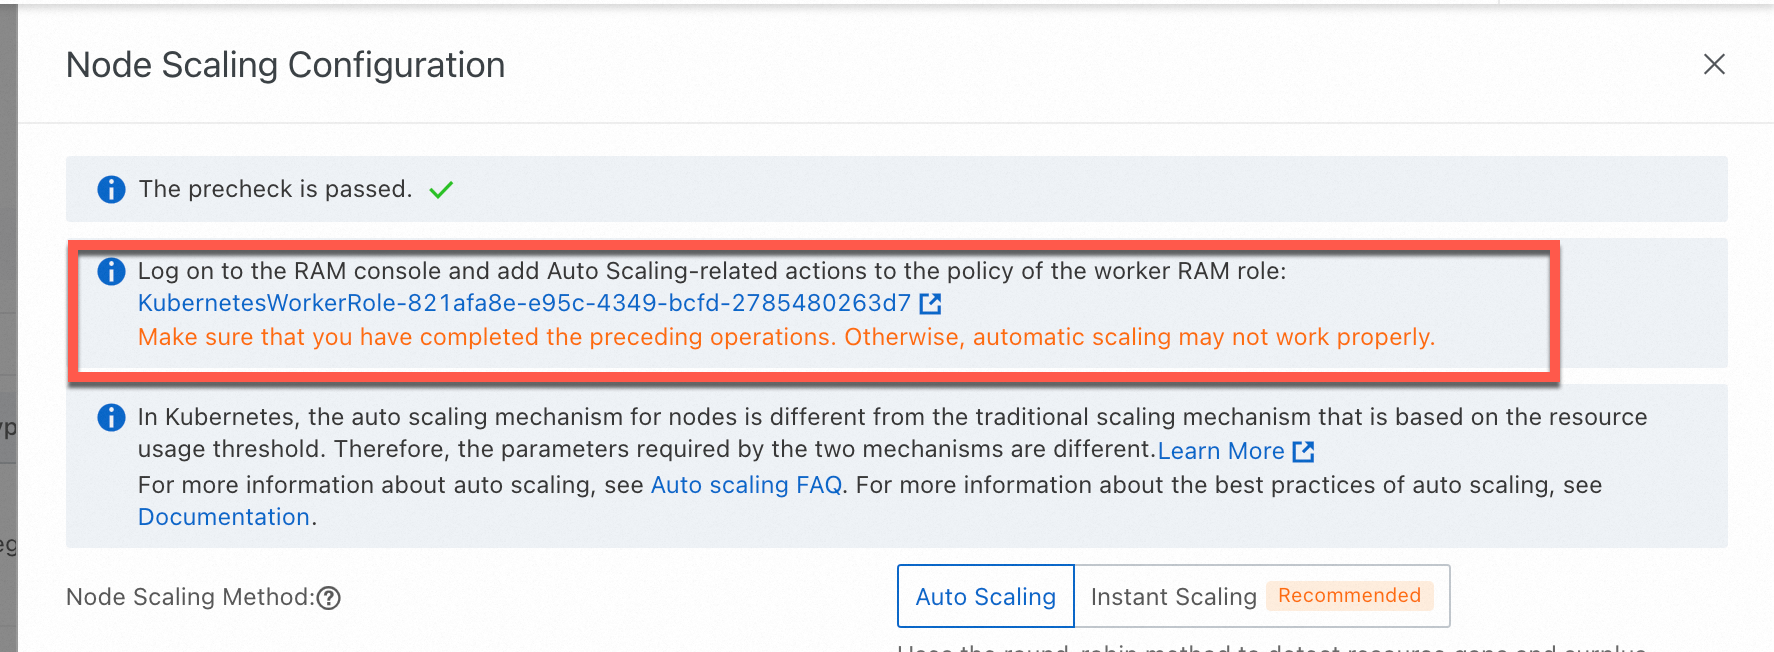
In the Node Scaling Configuration panel, set Node Scaling Method to one of the following options, configure the scaling parameters, and then click OK.
Auto Scaling: Standard automatic node scaling.
Instant Scaling: Offers faster scaling, higher delivery efficiency, and lower operational complexity.
When node autoscaling is active, the scaling component automatically triggers a scale-out based on the scheduling status.
You can switch the node scaling solution after it is configured. To switch, change to Node Autoscaling. Read the on-screen messages carefully and follow the instructions. This feature is available only to users on the whitelist. To use this feature, submit a ticket.
Scaling configuration parameters
The following table describes the basic scaling configuration parameters.
| Configuration item | Description |
|---|---|
| Scale-in Threshold | The ratio of requested resources to the resource capacity of a node in a node pool that has node autoscaling enabled. A node can be scaled in only when this ratio falls below the configured threshold, meaning the CPU and memory utilization of the node is lower than the Scale-in Threshold. |
| GPU Scale-in Threshold | The scale-in threshold for GPU-accelerated instances. A GPU-accelerated node can be scaled in only when its CPU, memory, and GPU resource utilization are all lower than the GPU Scale-in Threshold. |
| Defer Scale-in For | The waiting period between when a scale-in condition is met and when the scale-in is performed. Unit: minutes. Default value: 10 minutes. Important The scaling component performs a scale-in only after the conditions specified by both Scale-in Threshold and Defer Scale-in For are met. |
Advanced configuration parameters
The following table describes the advanced configuration parameters.
| Configuration item | Description |
|---|---|
| Pod Termination Timeout | The maximum amount of time to wait for pods on a node to terminate during a scale-in. Unit: seconds. |
| Minimum Number of Replicated Pods | The minimum number of pods allowed in each ReplicaSet before a scale-in is performed. If the actual number of replicas in a pod's ReplicaSet is smaller than this value, the node is not scaled in. |
| Evict DaemonSet Pods | When enabled, DaemonSet pods on a node are evicted when the node is scaled in. |
| Skip Nodes Hosting Kube-system Pods | When enabled, the system skips nodes that run pods in the kube-system namespace during a scale-in, ensuring those nodes are not affected. Note This does not apply to DaemonSet pods or mirror pods. |
Step 3: Configure a Node Pool with Auto Scaling Enabled
You can either modify existing node pools by setting their Scaling Mode to Auto, or create new node pools with auto scaling enabled.
Scaling mode and instance count
| Parameter | Description |
|---|---|
| Scaling Mode | Select the scaling mode for the node pool. Two modes are available:
|
| Instances | The Min. Instances and Max. Instances values exclude your existing instances. Note
|
Instance types and operating system
| Parameter | Description |
|---|---|
| Instance-related parameters | Select the ECS instance types for the worker node pool based on instance types or attributes. You can filter instance families by attributes such as vCPU, memory, instance family, and architecture. For more information about the instance specifications not supported by ACK and how to configure nodes, see ECS instance type recommendations. When the node pool scales out, ECS instances of the selected types are created. The scaling policy of the node pool determines which instance types are used to create new nodes during scale-out activities. Select multiple instance types to improve the success rate of scale-out operations. If you select only one instance type, fluctuations in ECS instance stock may affect the scaling success rate. |
| Operating System | When you enable auto scaling, you can select an image based on Alibaba Cloud Linux, Windows, or Windows Core. If you select Windows or Windows Core, the system automatically adds the { effect: 'NoSchedule', key: 'os', value: 'windows' } taint to nodes in the node pool. |
Scaling policy
| Parameter | Description |
|---|---|
| Scaling Policy | Select the scaling policy for the node pool:
|
| Scaling Mode | Requires Node Scaling to be enabled on the Node Pools page with the node pool's Scaling Mode set to Auto.
|
Spot and preemptible instance options
| Parameter | Description |
|---|---|
| Use Pay-as-you-go Instances When Preemptible Instances Are Insufficient | Requires Billing Method to be set to Preemptible Instance. When enabled, if sufficient preemptible instances cannot be created due to price or inventory constraints, ACK automatically creates pay-as-you-go instances to meet the required number of ECS instances. |
| Enable Supplemental Spot Instances | Requires Billing Method to be set to Spot Instance. When enabled, if the system receives a reclamation warning for spot instances (5 minutes before reclamation), ACK attempts to scale out new instances as compensation.
To improve the compensation success rate, we recommend also enabling Use Pay-as-you-go Instances When Spot Instances Are Insufficient. |
Labels and taints
| Parameter | Description |
|---|---|
| Node Labels | Node labels are automatically added to nodes created by scale-out activities. Important Auto scaling can recognize node labels and taints only after they are mapped to node pool tags. Because a node pool has a limited number of tags, keep the total number of ECS tags, taints, and node labels to less than 12 for node pools with auto scaling enabled. |
| Taints | After you add taints to a node, ACK does not schedule pods to it. |
Step 4: (Optional) Verify the Result
After you complete the preceding steps, node autoscaling is ready to use. The node pool shows that auto scaling has started, and the cluster-autoscaler component is automatically installed in the cluster.
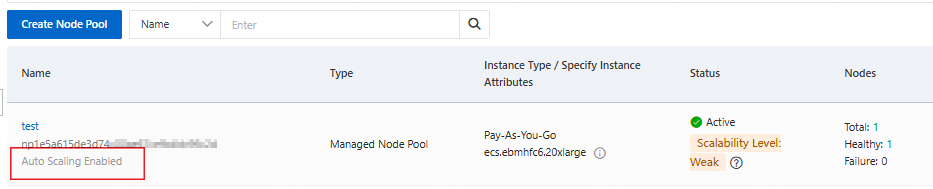
Auto scaling is enabled for the node pool
On the Node Pools page, node pools with auto scaling enabled appear in the node pool list.
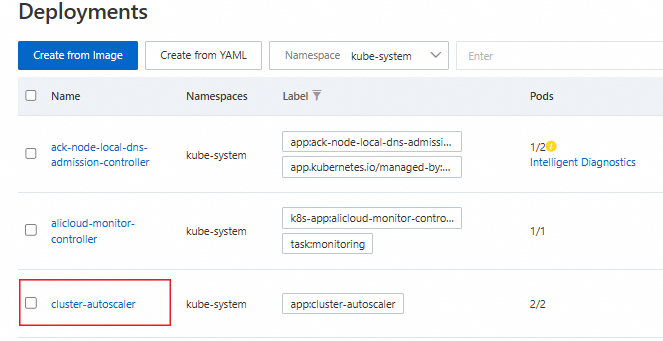
The cluster-autoscaler component is installed
In the left-side navigation pane of the cluster details page, choose Workloads > Deployments.
Select the kube-system namespace to view the cluster-autoscaler component.