To monitor Python applications deployed in Container Service for Kubernetes (ACK) and Container Compute Service (ACS), you must install the ack-onepilot application monitoring component and modify the corresponding Dockerfile. You can then view monitoring data, such as application topology, API calls, and call chain analysis, in Cloud Monitor 2.0. This topic describes how to install the agent for Python applications deployed in Container Service for Kubernetes (ACK) and Container Compute Service (ACS).
About the ack-onepilot component
The Application Monitoring agent installation assistant, ack-onepilot, is a key component for installing agents for different languages. It automatically prepares the Application Monitoring agent package and configures the agent's reporting environment within a container. For more information about the basic principles of ack-onepilot, see Basic principles of the ack-onepilot component.
After the agent is installed, ack-onepilot automatically upgrades the agent to the latest version when the application is restarted and a new version of the agent is available. If you do not want the agent to be automatically updated with each new release, you can control the agent version. For more information, see Control the agent version.
Prerequisites
An ACK or ACS cluster is created.
For ACK clusters: Create an ACK dedicated cluster (new creations are discontinued), Create an ACK managed cluster, or Create an ACK Serverless cluster.
For ACS clusters: Create an ACS cluster.
A namespace is created. For more information, see Manage namespaces and quotas. This topic uses arms-demo as an example namespace name.
Your Python and framework versions are supported. For more information, see Python libraries supported by Application Monitoring.
Notes
If your application starts with uvicorn, choose one of the following configuration methods.
Method 1: Add the following statement to the first line of the uvicorn entry file to import the Python agent.
from aliyun.opentelemetry.instrumentation.auto_instrumentation import sitecustomizeMethod 2: Replace uvicorn with gunicorn and add the
aliyun-instrumentprefix to the gunicorn command.Example:
uvicorn app:app --workers 4 --port=9090 --host 0.0.0.0Change the command to:
aliyun-instrument gunicorn -w 4 -k uvicorn.workers.UvicornWorker -b 0.0.0.0:8000 app:appNoteThe aliyun-instrument instruction handles the initialization and non-intrusive instrumentation of the ARMS Python agent.
If your application starts with uWSGI, see Install the Python agent for a Django or Flask project that starts with uWSGI.
If you use gevent coroutines, you must set the
GEVENT_ENABLE=trueenvironment variable.For example, if your program contains the following code:
from gevent import monkey
monkey.patch_all()
You must set the environment variable as follows:
GEVENT_ENABLE=true
Step 1: Install the agent installation assistant (ack-onepilot)
Log on to the ACK console. On the Clusters page, click the name of the cluster.
In the left navigation pane, click add-ons, and then in the upper-right corner, search for ack-onepilot.
Click Install on the ack-onepilot card.
NoteBy default, the ack-onepilot component supports 1,000 pods. For every additional 1,000 pods in the cluster, you must add 0.5 CPU cores and 512 MB memory for the component.
In the dialog box that appears, configure the parameters and click OK. We recommend that you use the default values.
NoteAfter you install ack-onepilot, you can upgrade, configure, or uninstall it on the Add-ons page.
(Optional) Step 2: Modify the Dockerfile
For ack-onepilot component version 5.1.0 and later, the component automatically downloads and injects the Python agent package when you enable monitoring for an application. This provides a non-intrusive monitoring experience that does not require you to manually modify the startup command.
Download the agent installer from the Python Package Index (PyPI) repository.
pip3 install aliyun-bootstrapUse aliyun-bootstrap to install the agent.
# The region ID of the Alibaba Cloud account. ARMS_REGION_ID=xxx aliyun-bootstrap -a installNoteTo install a specific version of the Python agent, run the following command:
# Replace ${version} with the actual version number.
aliyun-bootstrap -a install -v ${version}
For more information about all released versions of the Python agent, see Python agent release notes.
Start the application using the ARMS Python agent.
aliyun-instrument python app.pyBuild the image.
The following code provides a complete Dockerfile example:
Step 3: Grant access permissions to ARMS resources
ACK managed clusters
If an ARMS Addon Token does not exist in the ACK managed cluster, manually grant permissions to access ARMS resources. If an ARMS Addon Token already exists, skip to Step 4.
If a cluster has ARMS Addon Token, ARMS performs password-free authorization on the cluster. ARMS Addon Token may not exist in some ACK managed clusters. We recommend that you check whether an ACK managed cluster has ARMS Addon Token before you use ARMS to monitor applications in the cluster. If the cluster has no ARMS Addon Token, you must authorize the cluster to access ARMS.
ACK dedicated cluster/registered cluster
To monitor an application deployed in an ACK dedicated cluster or registered cluster, make sure that the AliyunARMSFullAccess and AliyunSTSAssumeRoleAccess permissions are granted to your Resouce Access Management (RAM) user.
After installing the ack-onepilot component, enter the AccessKey ID and AccessKey Secret of the account in the configuration file of ack-onepilot.
Method 1: Input in Hem
Log on to the ACK console. In the left navigation pane, click Clusters.
On the Clusters page, click the cluster you want to manage. In the left-side navigation pane of the page that appears, choose . Then, click Update next to ack-onepilot.
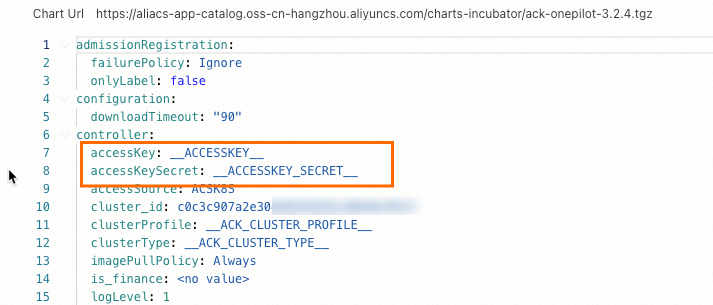
Replace
accessKeyandaccessKeySecretwith the AccessKey ID and AccessKey secret of the account and click OK.NoteThe AccessKey Secret is only visible during initial creation of an Alibaba Cloud AccessKey pair and cannot be retrieved afterward. This design mitigates leakage risks. Securely store the Secret immediately.
Restart the Deployment.
Method 2: Import through Kubernetes Secrets
Log on to the ACK console. In the left-side navigation pane, click Clusters.
On the Clusters page, click the cluster you want to manage. In the left-side navigation pane of the page that appears, choose .
Click Create. In the panel that appears, click Add and add the AccessKey ID and AccessKey Secret for ack-onepilot.
NoteThe AccessKey Secret is only visible during initial creation of an Alibaba Cloud AccessKey pair and cannot be retrieved afterward. This design mitigates leakage risks. Securely store the Secret immediately.

In the left-side navigation pane, choose . On the page that appears, click the ack-onepilot component. Generally, it is named ack-onepilot-ack-onepilot in the ack-onepilot namespace.
In the upper-right corner of the page that appears, click Edit.
Scroll down until you see the Environments section. Click Add, add the environment variables
ONE_PILOT_ACCESSKEYandONE_PILOT_ACCESSKEY_SECRET, reference the Secrets in Kubernetes Secrets, and click OK.
ASK/ECI cluster
To monitor applications in an ACK Serverless (ASK) cluster or applications in a Kubernetes cluster connected to Elastic Container Instance, you must first authorize the cluster to access ARMS on the Cloud Resource Access Authorization page. Then, restart all pods on which the ack-onepilot component is deployed.
Step 4: Enable Application Monitoring for the Python application
The Python agent package is downloaded and injected by an init container. With the default resource settings, the init container may take about 10 seconds to run. By default, the init container consumes 0.5 cores and 250 MB of resources, which are released after initialization. You can adjust the resource quota of the init container to change its execution speed using the following environment variables:
PYTHON_INIT_RESOURCE_REQUESTS_CPU: The CPU request for the Python application's init container. Example: 500m.
PYTHON_INIT_RESOURCE_REQUESTS_MEM: The memory request for the Python application's init container. Example: 250Mi.
PYTHON_INIT_RESOURCE_LIMIT_CPU: The CPU limit for the Python application's init container. Example: 1000m.
PYTHON_INIT_RESOURCE_LIMIT_MEM: The memory limit for the Python application's init container. Example: 500Mi.
The following is a complete sample YAML template for creating a stateless (deployment) application and enabling Application Monitoring:
Log on to the ACK console. In the left navigation pane, click Clusters.
On the Clusters page, find the cluster you want to manage and click its name. In the left navigation pane, choose .
On the Stateless page, find the target application and choose
 > YAML Edit in the Actions column.
To create a new application, click Create from YAML.
In the YAML file, add the following
labelsunder the spec.template.metadata level.labels: aliyun.com/app-language: python # Required for Python applications. Indicates that this is a Python application. armsPilotAutoEnable: 'on' armsPilotCreateAppName: "deployment-name" # The display name of the application in ARMS. armsPilotAppWorkspace: "workspace" # Replace with your workspace name.ImportantIf you do not want to use the non-intrusive injection capability for Python, you can disable it with the following label:
labels:
  armsAutoInstrumentationEnable: "off"  # Disables the non-intrusive injection capability for Python applications.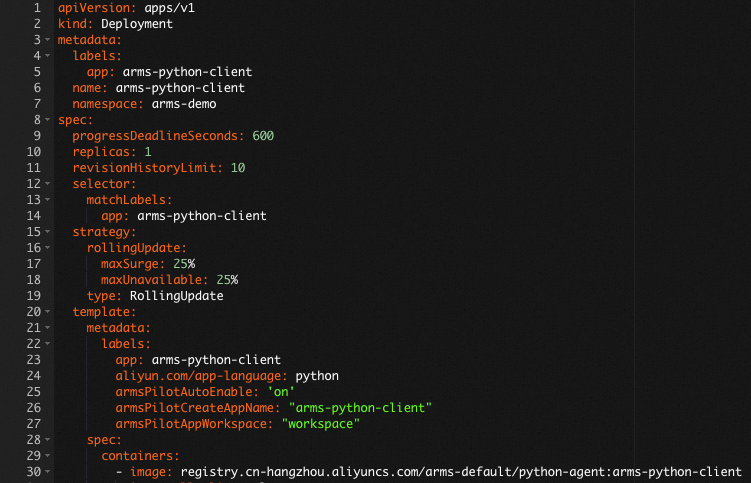
Click Update.
View monitoring details
Log on to the Cloud Monitor 2.0 console, and select a workspace. In the left navigation pane, choose .
On the Application List page, click an application name to view its detailed monitoring data.