Framework overview
AgentScope is an open-source, multi-agent application development framework from Alibaba. It provides various agent types, such as ReActAgent, includes built-in model adapters for DashScope and OpenAI, and supports tool calling, memory management, and multi-agent collaboration.
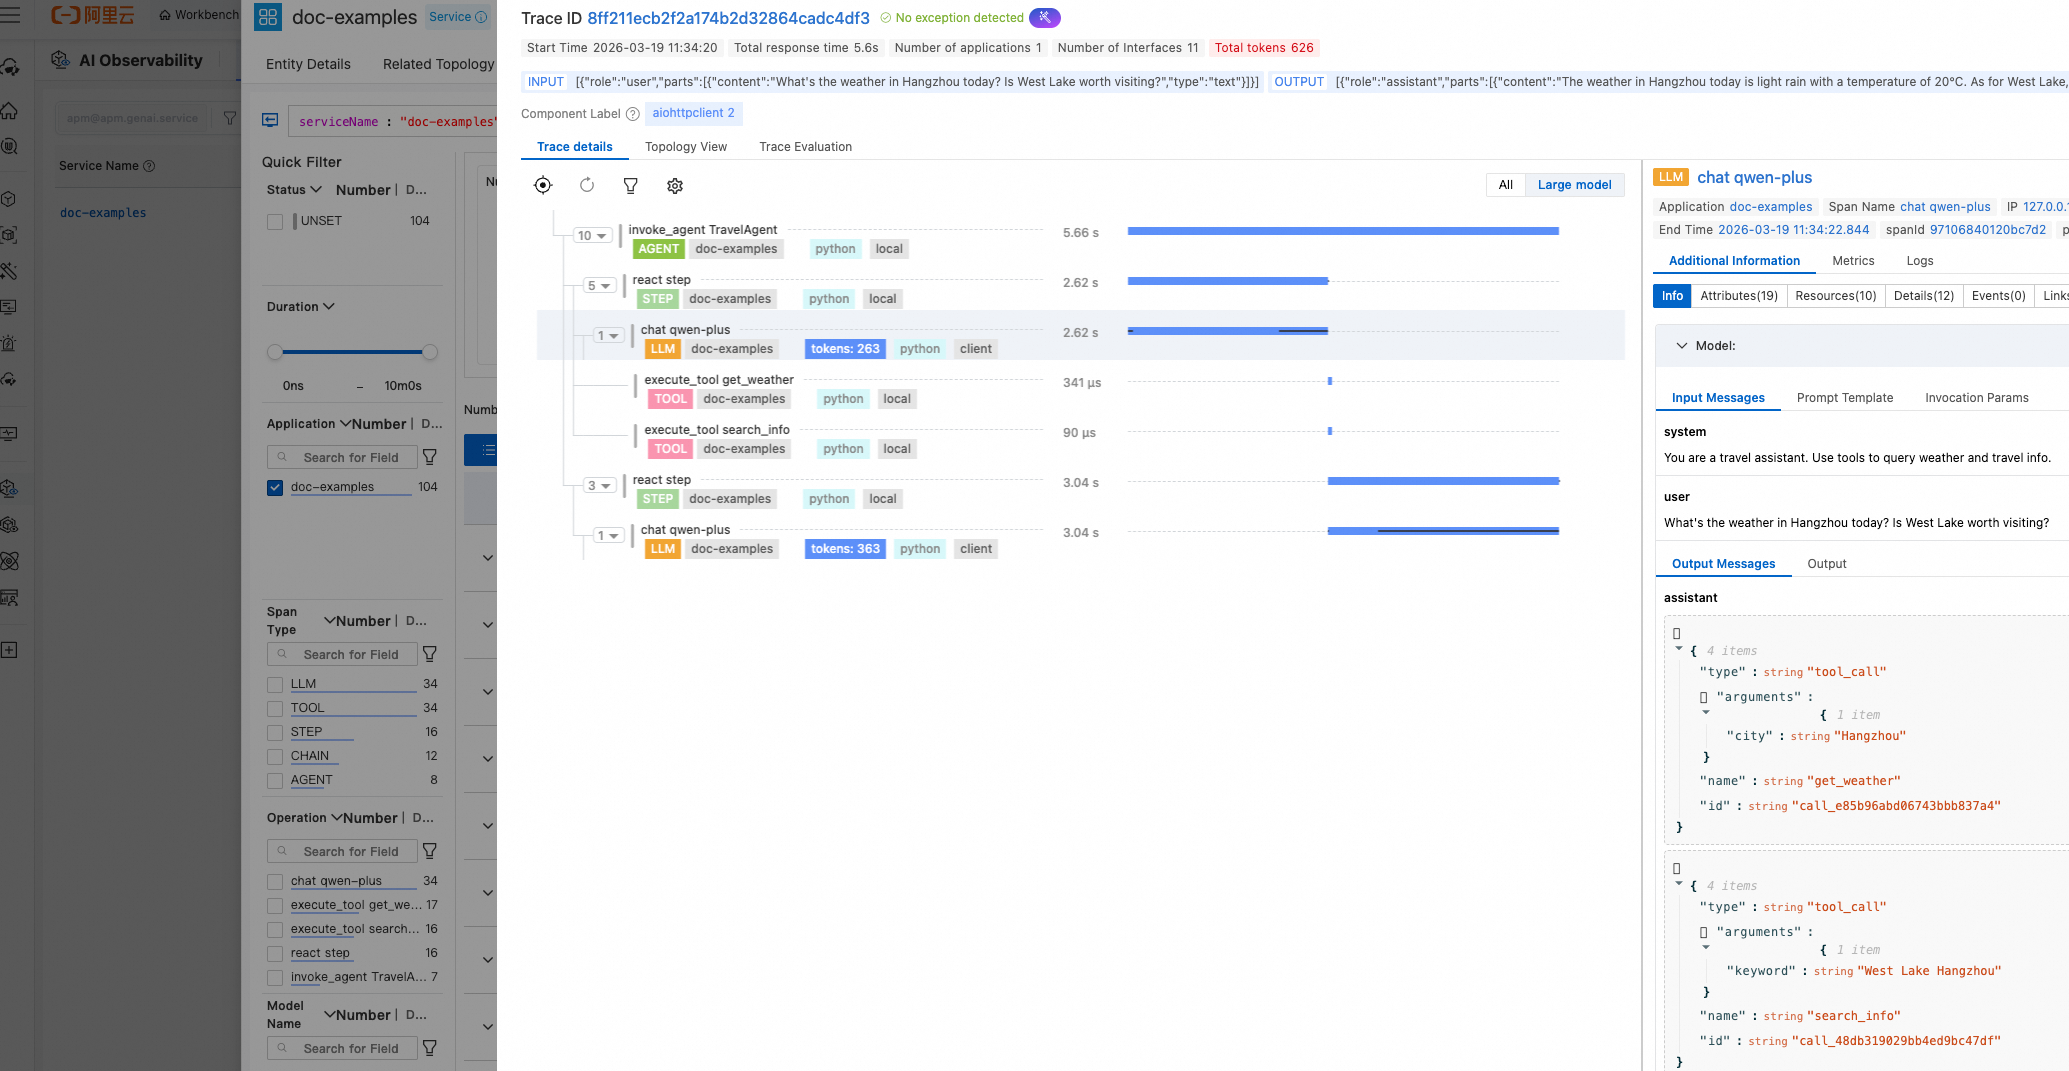
After you instrument the application, the following capabilities are automatically monitored:
agent execution trace
LLM calls (including token usage and input/output content)
tool call trace (including details of each tool call in the toolkit)
ReAct steps (actions and observations for each iteration)
Integration methods
ACK and ACS
Step 1: Install ack-onepilot
-
Log on to the ACK console. On the Clusters page, click the name of the cluster.
-
In the left-side navigation pane, click Add-ons, and then search for ack-onepilot in the upper-right corner.
-
On the ack-onepilot card, click Install. Configure the parameters—we recommend using the defaults—and then click OK.
NoteEnsure the ack-onepilot component is version 5.1.1 or later. The version is displayed on the component card before installation. If you have an earlier version installed, click Upgrade instead of Install.
Step 2: Modify configurations for AI observability
-
Log on to the Container Service for Kubernetes (ACK) console. In the left-side navigation pane, click Clusters.
-
On the Clusters page, click the name of the target cluster. In the left-side navigation pane, choose . The same procedure applies to StatefulSets and DaemonSets.
-
Navigate to your target workload's namespace. Find the workload, click the More icon
 in the Actions column, and then select Edit YAML.
 -
In the YAML file, add the following
labelsunder thespec > template > metadatalevel. After adding the labels, click Update.labels: aliyun.com/app-language: python # Required for Python applications. Specifies that this is a Python application. armsPilotAutoEnable: 'on' armsPilotCreateAppName: "deployment-name" # The display name of the application in ARMS. armsPilotAppWorkspace: "workspace" # Replace with the current workspace name. If not specified, the default workspace is used.apiVersion: apps/v1 kind: Deployment metadata: labels: app: arms-python-client name: arms-python-client namespace: arms-demo spec: progressDeadlineSeconds: 600 replicas: 1 revisionHistoryLimit: 10 selector: matchLabels: app: arms-python-client strategy: rollingUpdate: maxSurge: 25% maxUnavailable: 25% type: RollingUpdate template: metadata: labels: app: arms-python-client aliyun.com/app-language: python armsPilotAutoEnable: 'on' armsPilotCreateAppName: "arms-python-client" armsPilotAppWorkspace: "workspace" spec: containers: - image: registry.cn-hangzhou.aliyuncs.com/arms-default/python-agent:arms-python-client
Manual integration
Step 1: Download the aliyun-bootstrap probe installer
Download the probe installer from PyPI.
pip3 install aliyun-bootstrapStep 2: Configure environment variables
You must manually add the following environment variables for your Python application:
# Method 1: Add environment variables for all processes in the current shell.
export ARMS_APP_NAME=<your-app-name>        # Specifies a custom name for your application.
export ARMS_WORKSPACE=<your-workspace-name> # Specifies the workspace to which data is reported.
export ARMS_REGION_ID=<your-region-id>      # Specifies the Region ID of your workspace.
export ARMS_LICENSE_KEY=<your-license-key>  # Specifies the license key for authentication.
# Method 2: Add environment variables for a specific process.
ARMS_APP_NAME=<your-app-name> ARMS_WORKSPACE=<your-workspace-name> ARMS_REGION_ID=<your-region-id> ARMS_LICENSE_KEY=<your-license-key> aliyun-instrument <your-app-file>.pyYou can obtain the license key by calling an API operation. For more information, see the authToken field in the response of the GetApplicationObservability operation.
Optional: Docker installation
For Docker environments, modify your Dockerfile based on the following example.
# Add environment variables
ENV ARMS_APP_NAME={your-app-name}
ENV ARMS_REGION_ID={your-region-id}
ENV ARMS_LICENSE_KEY={your-license-key}
ENV ARMS_WORKSPACE={your-workspace-name}

## Add your original Dockerfile commands here
Step 3: Install the Python agent
-
To speed up the installation, set the mirror repository by running the following command:
pip config set global.index-url https://mirrors.aliyun.com/pypi/simple/ && pip config set install.trusted-host mirrors.aliyun.com -
Install the agent.
aliyun-bootstrap -a install
Step 4: Start the application
Start with the ARMS Python agent
aliyun-instrument python app.pySample code
import asyncio
import os
from agentscope.agent import ReActAgent
from agentscope.formatter import DashScopeChatFormatter
from agentscope.message import Msg, TextBlock
from agentscope.model import DashScopeChatModel
from agentscope.tool import Toolkit, ToolResponse

def get_weather(city: str) -> ToolResponse:
    weather_data = {
        "Beijing": "Sunny 25°C",
        "Shanghai": "Cloudy 22°C",
        "Hangzhou": "Light rain 20°C",
    }
    result = weather_data.get(city, f"{city}: No weather data available")
    return ToolResponse(content=[TextBlock(type="text", text=result)])

def search_info(keyword: str) -> ToolResponse:
    info = {
        "West Lake": "West Lake in Hangzhou is a famous freshwater lake, UNESCO World Heritage",
        "Great Wall": "Ancient Chinese defensive structure, UNESCO World Heritage",
    }
    result = info.get(keyword, f"No information found for '{keyword}'")
    return ToolResponse(content=[TextBlock(type="text", text=result)])

async def main():
    model = DashScopeChatModel(
        model_name=os.environ.get("MODEL_NAME", "qwen-plus"),
        api_key=os.environ.get("DASHSCOPE_API_KEY"),
    )
    toolkit = Toolkit()
    toolkit.register_tool_function(get_weather)
    toolkit.register_tool_function(search_info)
    agent = ReActAgent(
        name="TravelAgent",
        sys_prompt="You are a travel assistant. Use tools to query weather and travel info.",
        model=model,
        formatter=DashScopeChatFormatter(),
        toolkit=toolkit,
        max_iters=5,
    )
    msg = Msg(
        name="user",
        content="What's the weather in Hangzhou today? Is West Lake worth visiting?",
        role="user",
    )
    result = await agent(msg)
    print(result.content)

asyncio.run(main())
View monitoring details in CloudMonitor
Log on to the CloudMonitor console. Select your target workspace, and in the left-side navigation pane, choose .
On the AI Application List page, you can see your instrumented applications. Click an application name to view its detailed monitoring data.