Learn how to survey resources using Cloud Migration Hub (CMH) through online collection, offline tools, or manual import.
Online survey — Alibaba Cloud survey
Video tutorial
The latest version no longer requires the Confirm Resource operation. The system automatically confirms and imports resources into the resource list.
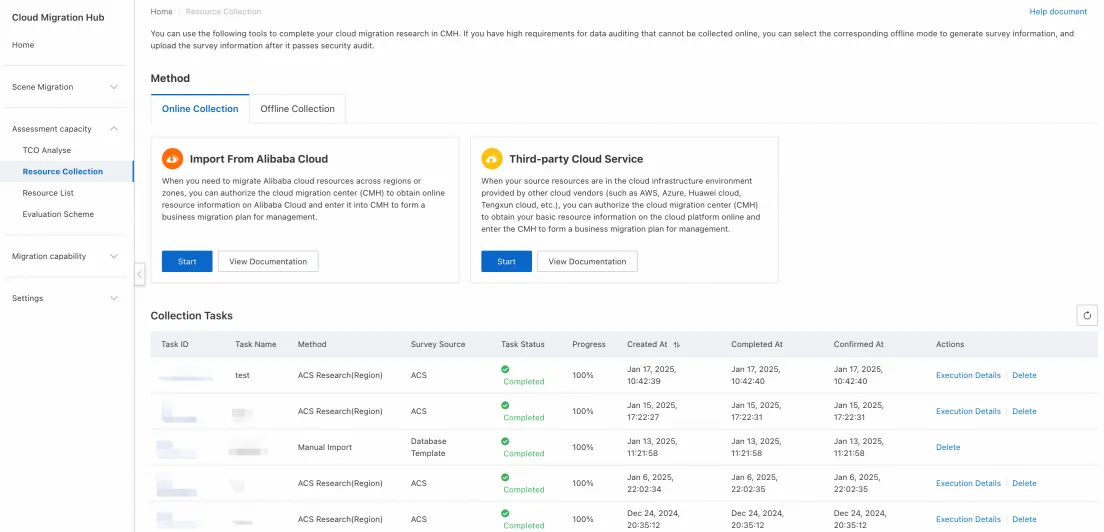
Start collection
Navigate to Console > Assessment Capabilities > Resource Survey > Alibaba Cloud Survey > Start. Select the zones and resource types to survey. CMH calls CloudConfig in the background to collect product information.
Select a survey type
1. Region resource survey: Select this type, choose the target regions and resource types, and click OK to start the task.
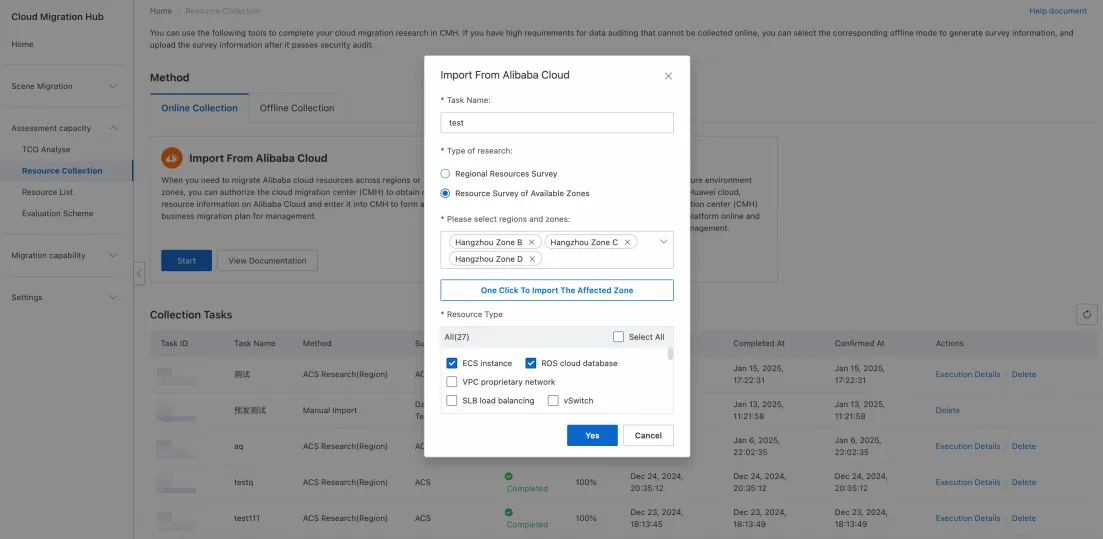
2. Zone resource survey: Select this type, choose the target zones and resource types, and click OK to start the task.

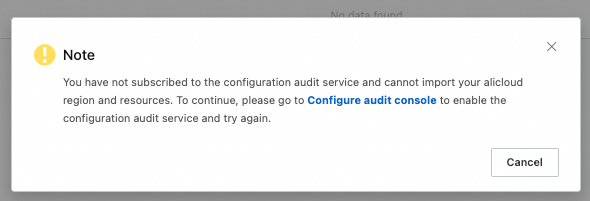
The first Alibaba Cloud survey automatically creates a service-linked role for Cloud Migration Hub. If CloudConfig is not enabled, you are prompted to enable it. Click the link to open the CloudConfig console and enable the service.
View results
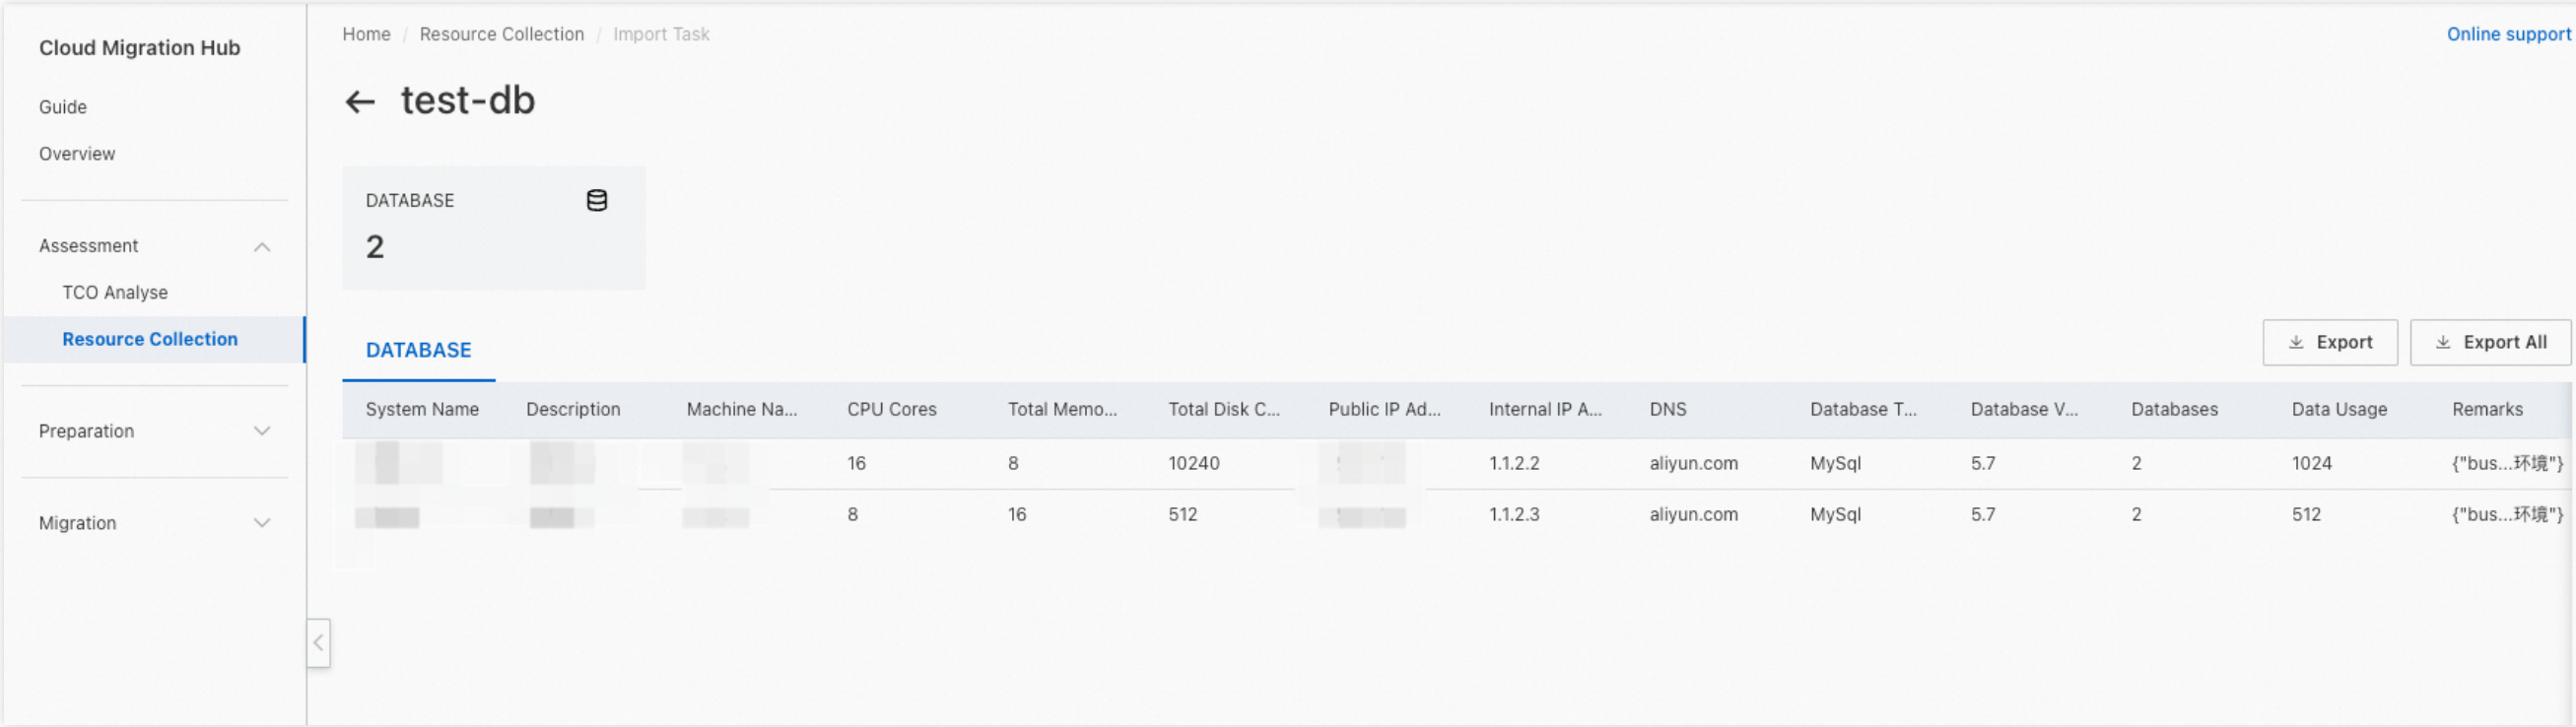
After the task completes, click the task ID to view details and survey results. You can also export results for local analysis.
Resources are classified as zone or region resources based on instance type. Some region resource configurations may relate to zone resources and appear in zone results. To view only instances in a specific zone, select the Zone Resources tab.
Online survey — Other cloud survey
Video tutorial
Prepare permissions
1. To survey AWS resources online, provide an AWS account with read permissions on all cloud resources. Use the AWS read-only system policy:
arn:aws:iam::aws:policy/ReadOnlyAccessSupported resource types and APIs are listed in AWS collection field details. For a least-privilege policy, use AWS read-only permission masking.
2. To survey Tencent Cloud resources online, provide a Tencent Cloud account with read permissions on all cloud resources. Configure the authorization policy in Cloud Access Management (CAM) in the Tencent Cloud console.
3. To survey Huawei Cloud resources online, provide a Huawei Cloud account with read permissions on all cloud resources. Configure the authorization policy in Identity and Access Management (IAM) in the Huawei Cloud console.
4. To survey Azure resources online, provide an Azure account with read permissions on all cloud resources. Based on the permission scope, navigate to the corresponding subscription or resource group in the Azure console, then configure access in Access control (IAM).
Console operations
Start collection
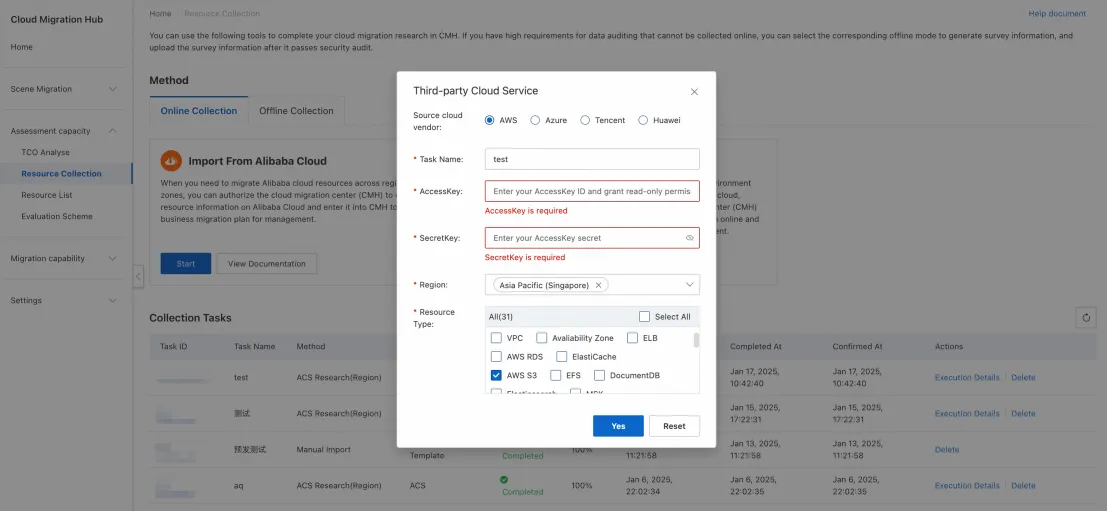
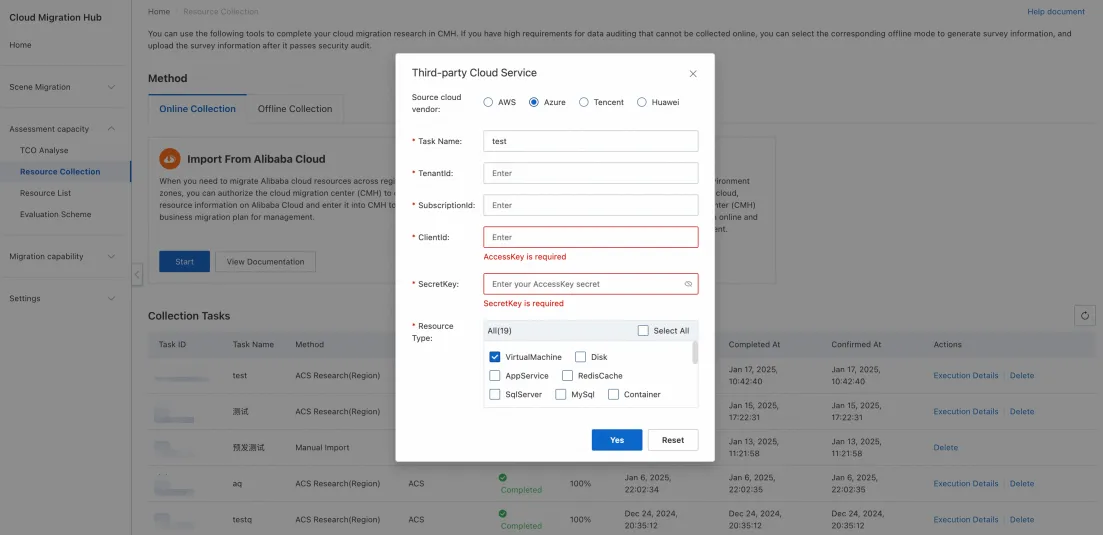
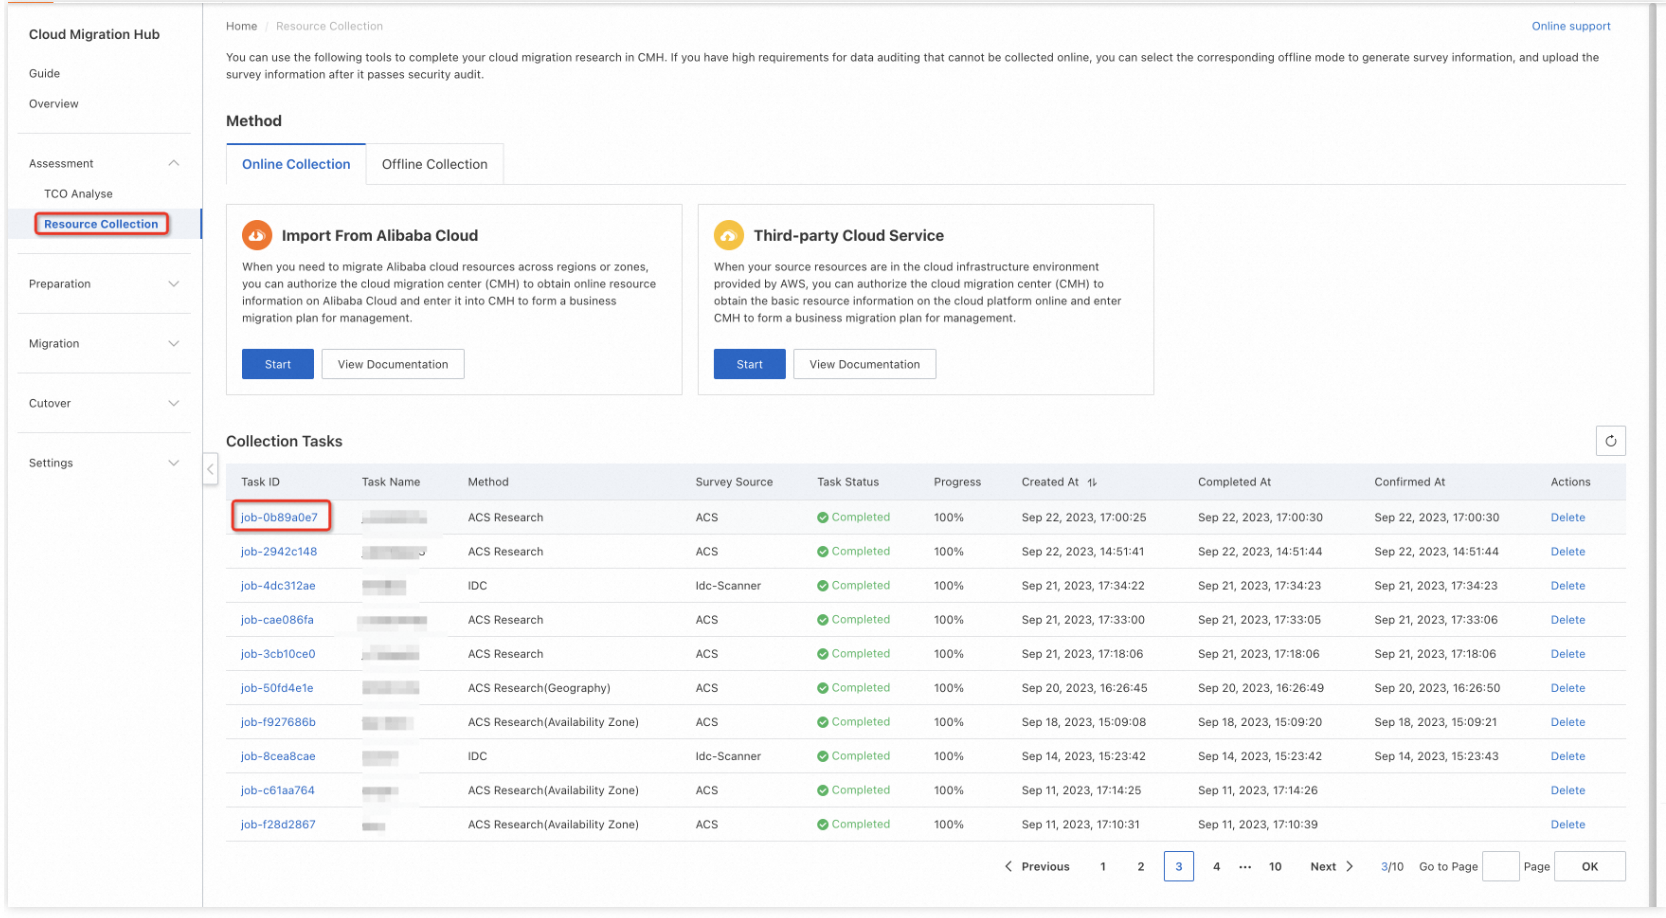
Navigate to Console > Assessment > Resource Survey > Other Cloud Collection > Start. Complete the form. CMH starts the resource survey as a background task.
-
For AWS, Tencent Cloud, and Huawei Cloud: Enter a task name and AccessKey/SecretKey. Select regions and resource types, then click OK.
-
For Azure: Enter a task name, TenantId, SubscriptionId, ClientId, and SecretKey. Select resource types, then click OK.
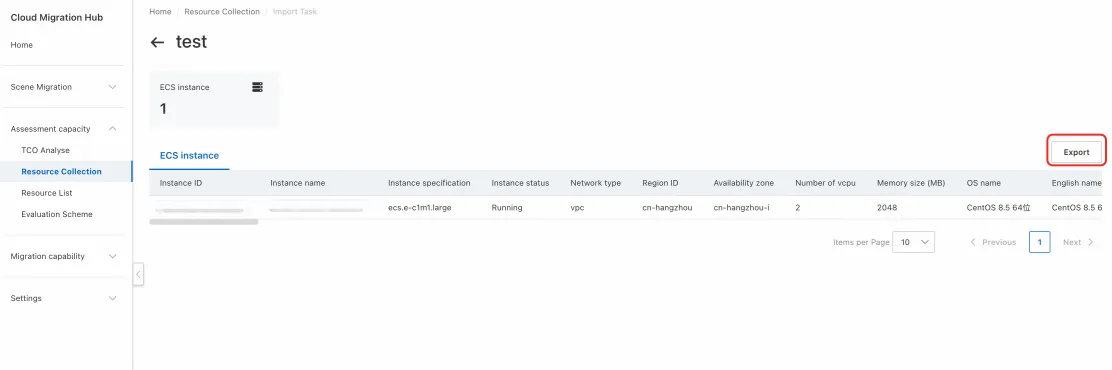
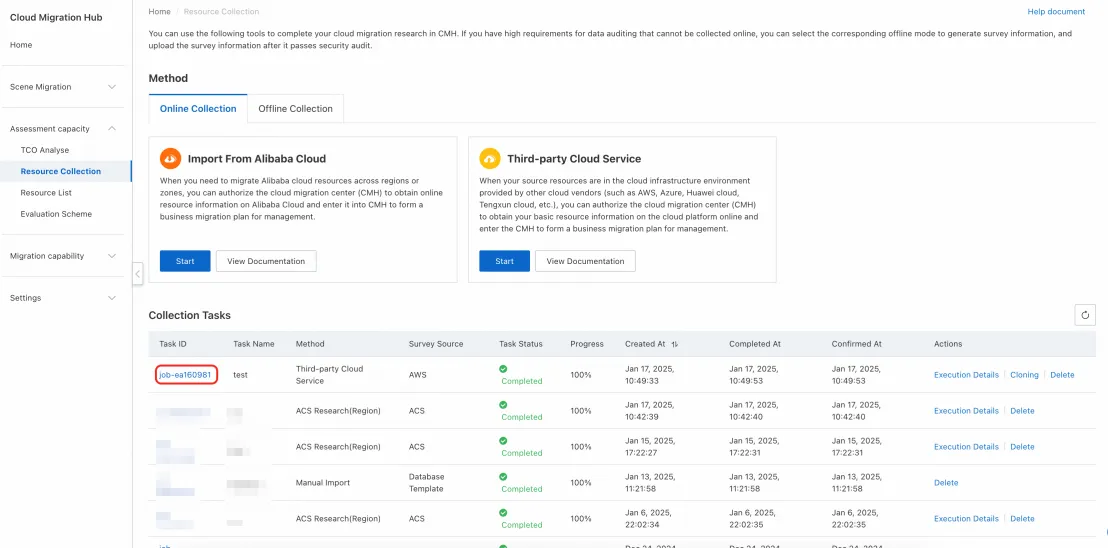
Confirm resources
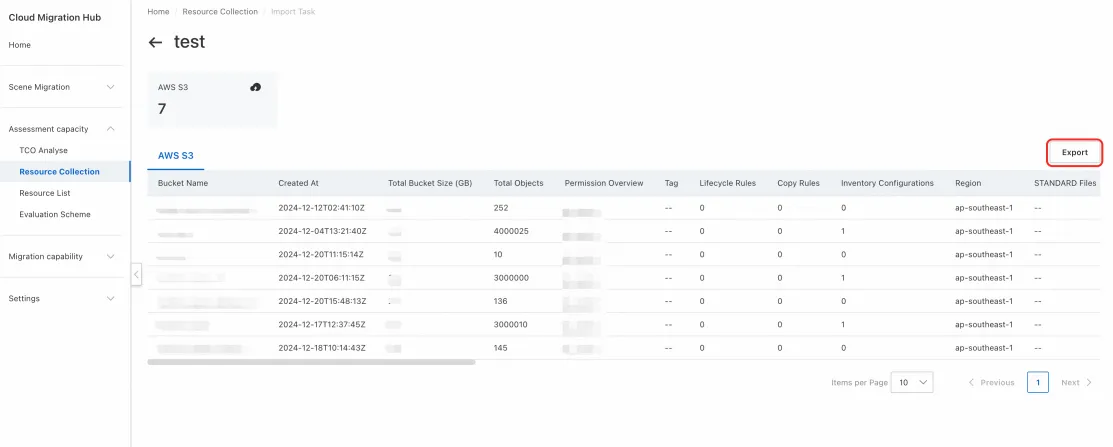
After the task completes, click the task ID to view collected resources.
Click Export to download results for local analysis.
Offline collection — IDC resources (Linux)
Video tutorial
Preparations
The surveyed machines must run a Unix-like operating system. Supported list.
Prepare the runtime environment
Select a server
Install and run the IDC resource survey tool (idc-scanner) on a tool server that can connect to surveyed servers through SSH. A jump server from an existing O&M system is ideal.
Specifications and system
Minimum: 2 CPU cores, 4 GB memory, mainstream Linux distribution (CentOS 7 recommended).
Software dependencies
If the tool server uses password-based SSH authentication (no mutual trust), install sshpass before running idc-scanner.
Download sshpass from a yum source or the Internet.
Yum Installation
If yum is configured, install sshpass with: yum install sshpass
Manual Installation
To install from source, download the sshpass distribution from the official website and run:
tar -zxvf sshpass-1.06.tar.gz
cd sshpass-1.06
./configure
make
make install
Prepare an access user
idc-scanner requires only a logon user on each surveyed server. No extra file permissions are needed.
Download the installation file
Download the executable and upload it to the jump server, then decompress it.
|
System |
Package |
|
Linux (x86) |
Cloud Migration Hub -> Resource Survey -> Offline Collection -> IDC Collection -> Get Tool -> Download Linux Version |
Decompression command: tar -zxvf idc-scanner.tar.gz
Initialize and generate configuration file templates
After decompression, run the following command to generate configuration file templates:
./cmh-scanner initializeThis generates two files in the current directory: `machines` (server list) and `config.yaml` (scan configuration).
Prepare parameter files
Add the IP addresses, usernames, passwords, and SSH ports of surveyed servers to the `machines` file in the following format.
Format:
username1:password1:ip1:ssh_port
username2:password2:ip2:ssh_port
...
Example:
>> cat list
userA:XXXX:39.105.XXX.23:22
userA:XXXX:123.56.XXX.29:22
userA:XXXX:47.94.XXX.252:22
If SSH mutual trust is configured, leave the password field empty:
>> cat list
userA::39.105.XXX.23:9922
userA::123.56.XXX.29:9922
userA::47.94.XXX.252:9922
In `config.yaml`, configure periodic scan settings and MySQL/Redis connection details for table schema detection.
# Periodic execution configuration. 'interval' specifies the execution interval, for example, 5s here. 'count' specifies the total number of executions.
periodicTask:
  enable: true
  interval: 5s
  count: 3
# MySQL information for table schema detection. Note: The host must exist in the IP list of the machines text file.
mysql:
  - host: 127.0.0.1
    password: password
    port: 3306
    username: username
# Redis information for table schema detection. If no username or password is needed, leave them empty. Note: The host must exist in the IP list of the machines text file.
redis:
  - host: 127.0.0.1
    password: password
    port: 6379
    username: username
Tool Execution
Run idc-scanner to start the survey:
./cmh-scanner runLocal analysis
After completion, the following files are generated in the `output` directory.
index.html # Survey homepage
10.xx.xx.106.html # Survey details page
10.xx.xx.139.html # Survey details page
10.xx.xx.101.html # Survey details page
10.xx.xx.108.html # Survey details page
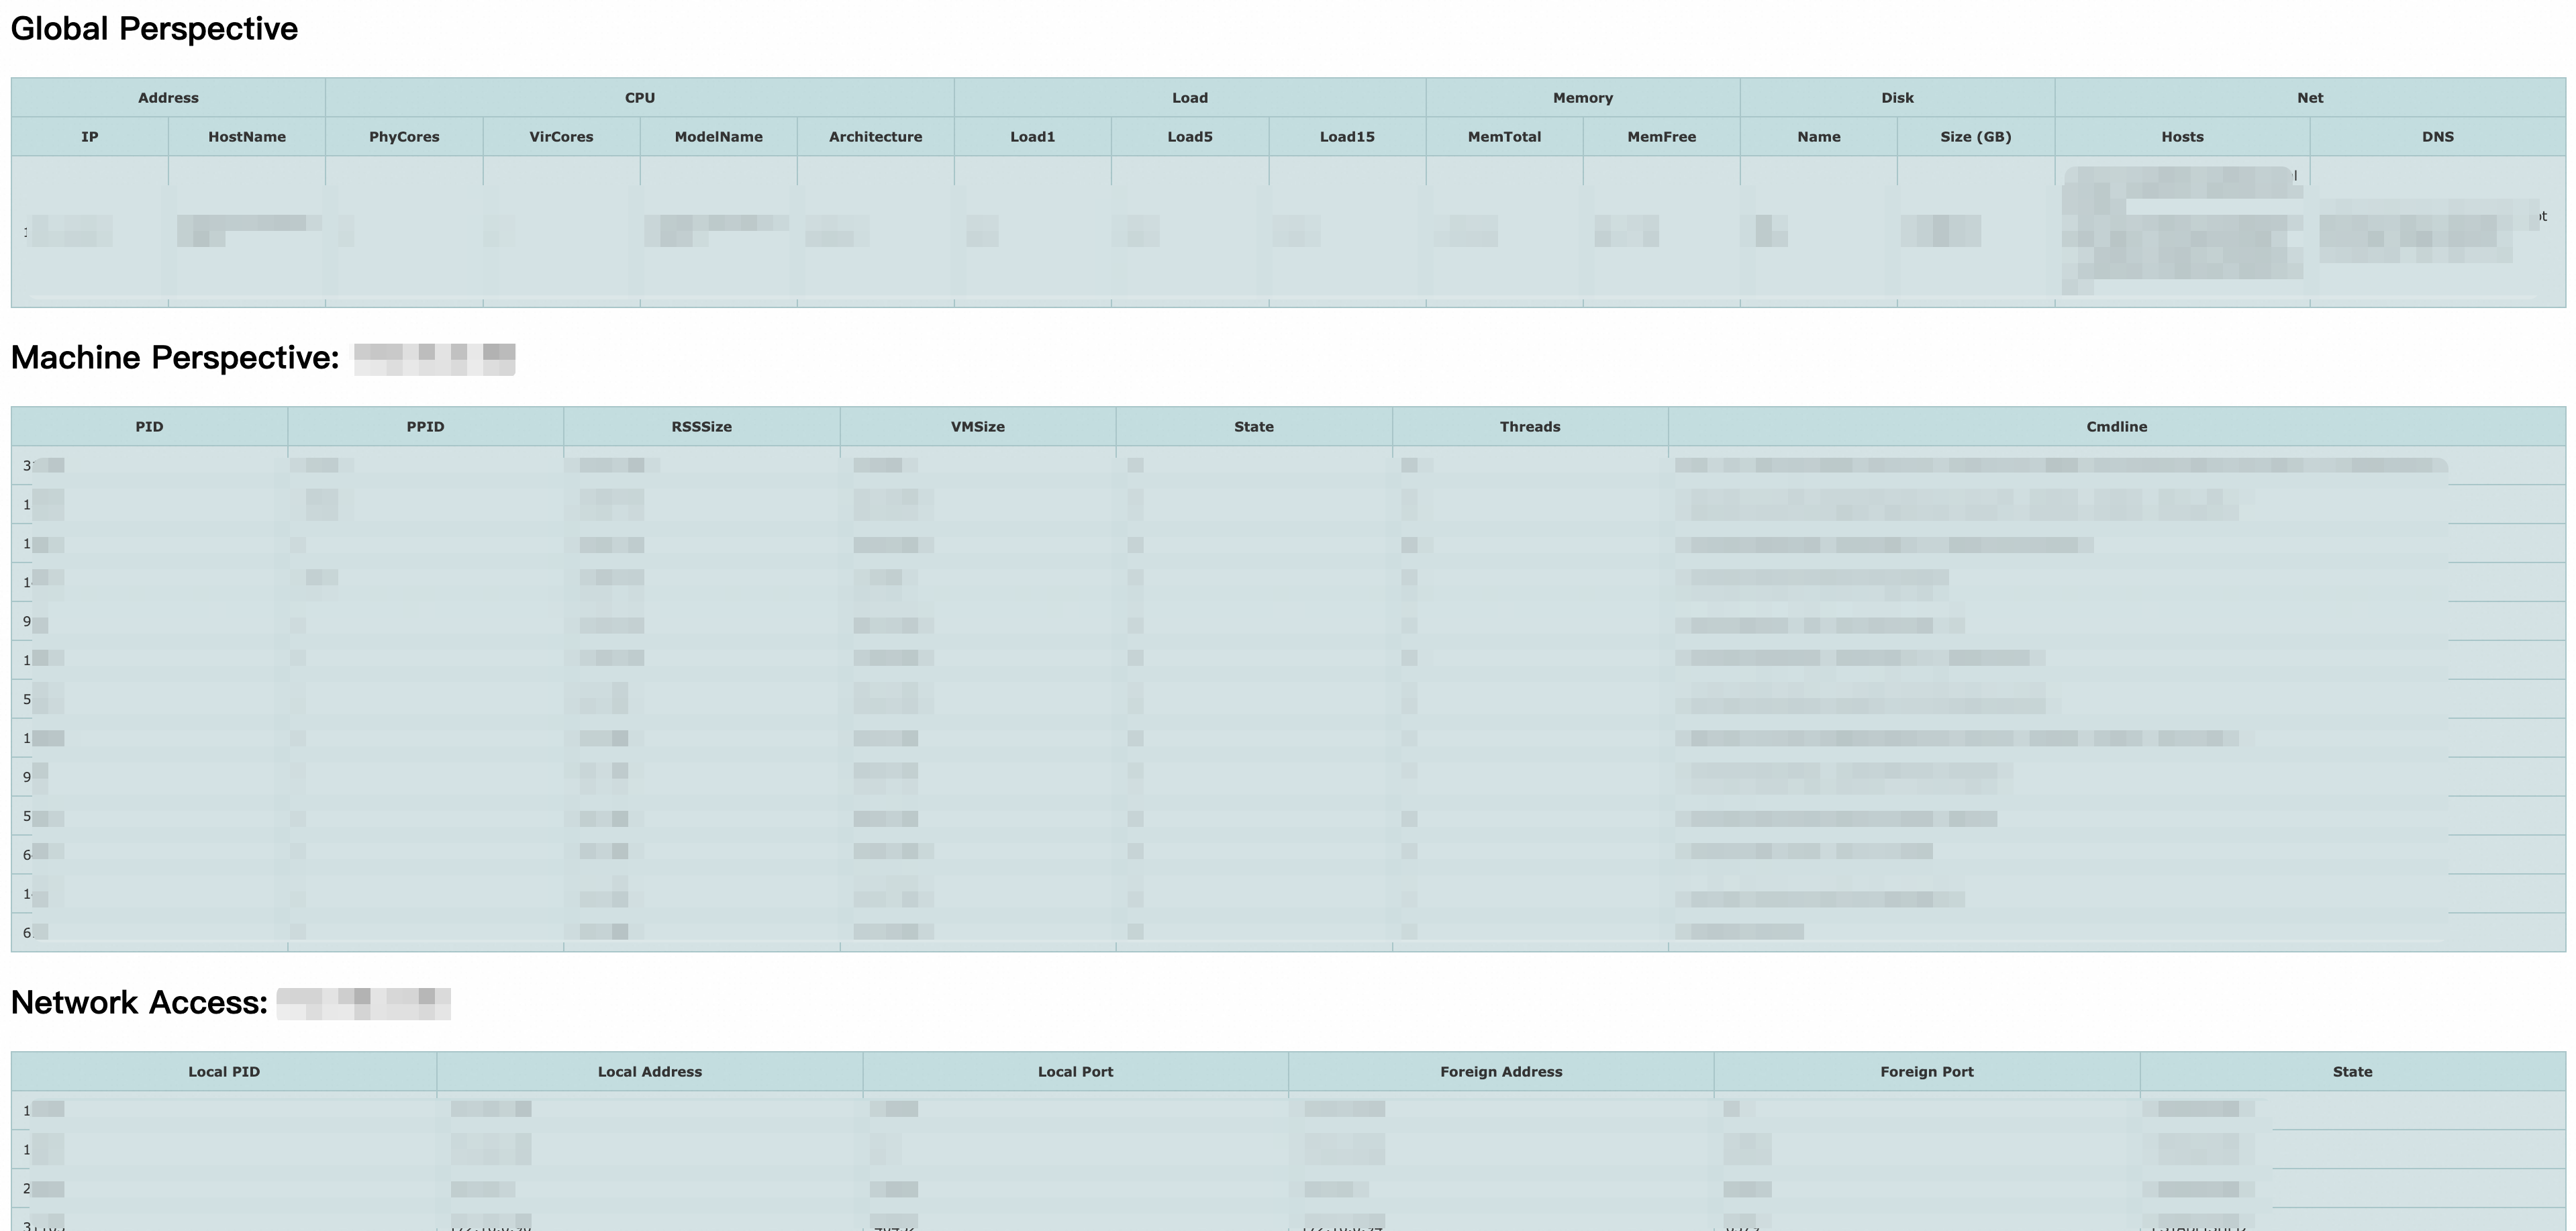
result.json # Serialized file (to be uploaded) Open the HTML files to view and analyze data locally.
Upload analysis
Upload the serialized file `result.json` to the CMH console.
Path: Console > Assessment Capabilities > Resource Survey > Offline Collection > IDC Collection > Upload () (Portal)
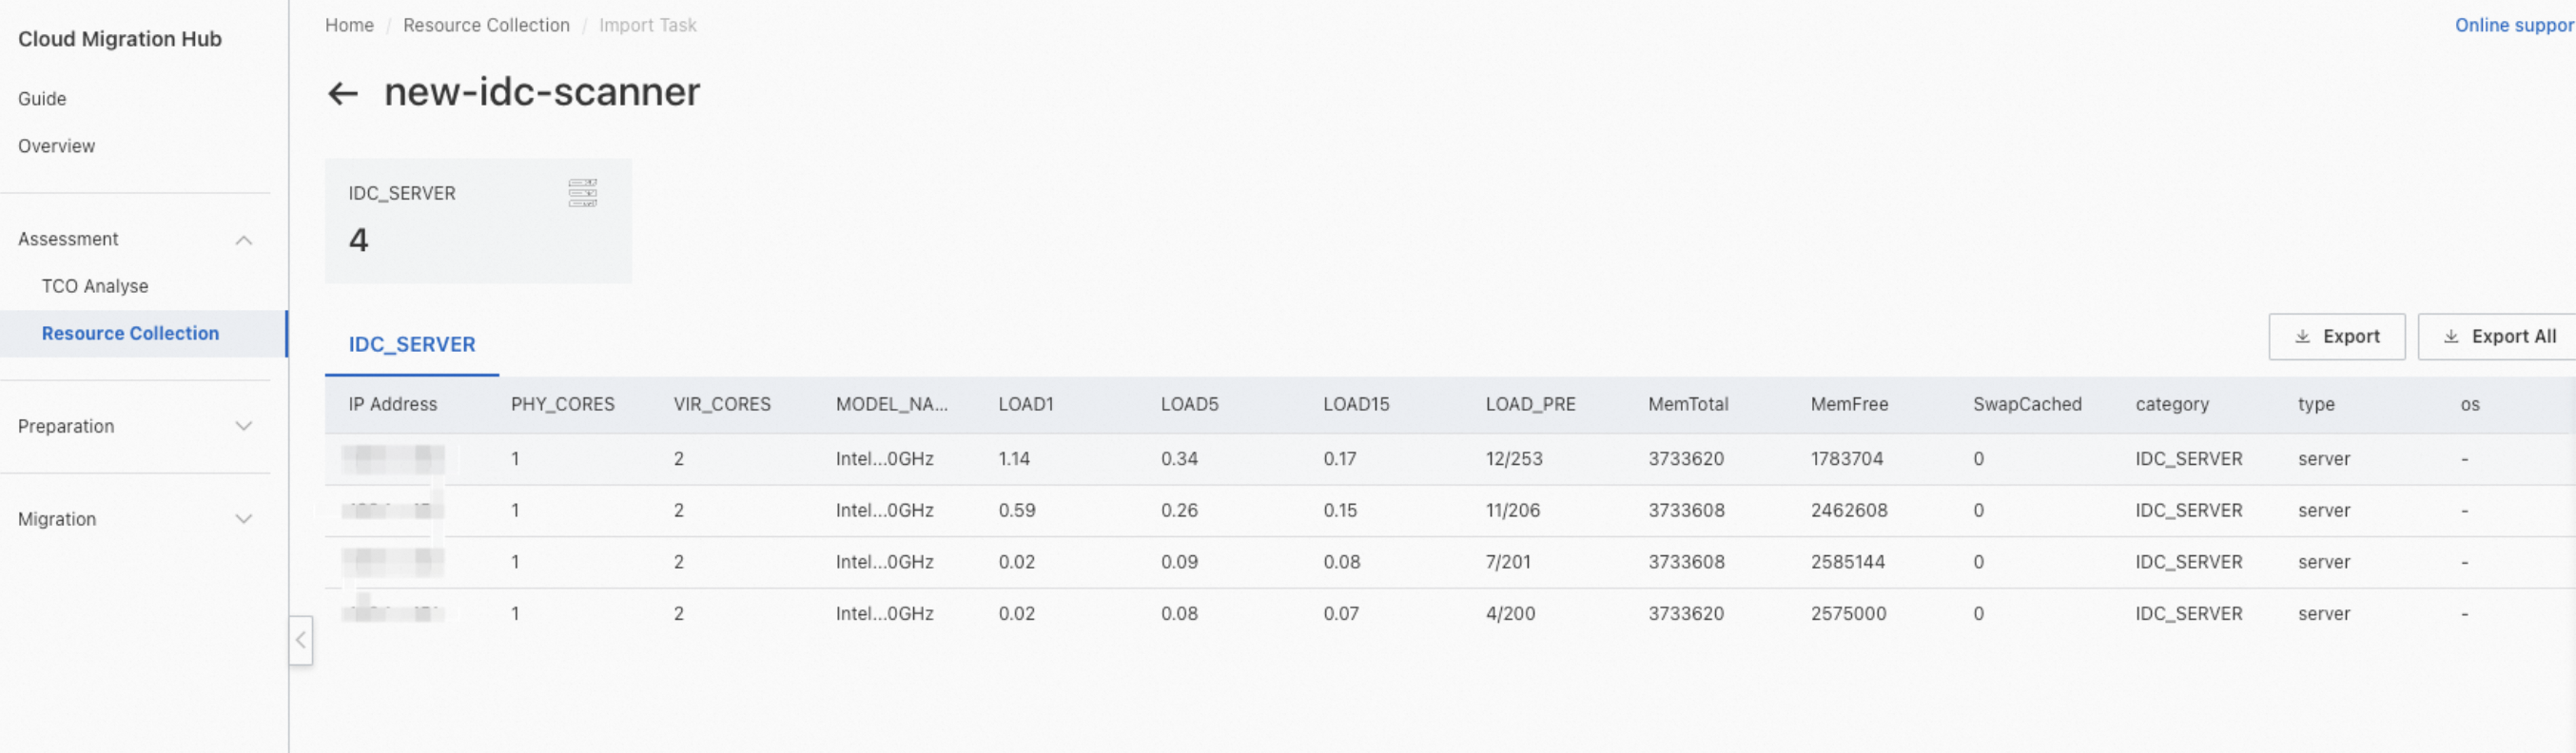
After the import completes, click the task ID to view imported resources online. Surveyed resources are auto imported into the CMH resource list.
Offline collection — IDC resources (Windows)
Preparations
The surveyed machines must run a mainstream Windows-like operating system. Supported list.
Prepare the runtime environment
Install and run win-scanner on a tool server in the same network domain as the surveyed servers. A jump server from an existing O&M system is ideal.
The tool server must run a mainstream Windows Server distribution.
Prepare the surveyed servers
win-scanner requires the surveyed servers to meet the following requirements:
-
Provide the domain account name and password (non-empty) for a user in the administrator group.
-
Configure DCOM to allow WMI connections. Allow administrator group members to connect remotely. Open port 135.
Download the installation file
Download the executable and upload it to the jump server, then decompress WinScanner.zip.
|
System |
Package |
|
Mainstream Windows Server distributions |
Cloud Migration Hub -> Resource Survey -> Offline Collection -> IDC Collection -> Get Tool -> Download Windows Version |
Prepare the parameter file
Add the IP addresses, usernames, and passwords of surveyed servers to `list.txt` in the following format.
Format:
ip1:username1:password1
ip2:username2:password2
...
Example:
39.105.XXX.23:userA:XXXX
123.56.XXX.29:userB:XXXX
47.94.XXX.252:userC:XXXX
Prepare the working directory
Prepare the following working directory. `list.txt` stores server credentials. You do not need to create the `CMHScannerOutput` directory, but ensure no folder with the same name exists in the runtime environment.
.
└── win-scanner/
               ├── WinScanner.exe
               ├── list.txt
               └── CMHScannerOutput/
Run the tool
Double-click `WinScaner.exe` to start the survey. The following output is displayed:
[01][192.168.x.xx1] Connecting to 192.168.x.xx1...
[02][192.168.x.xx2] Connecting to 192.168.x.xx2...
[03][192.168.x.xx3] Connecting to 192.168.x.xx3...
...
[01][192.168.x.xx1] Connected successfully!
[01][192.168.x.xx1] Scanning...
[02][192.168.x.xx2] Connected successfully!
[02][192.168.x.xx2] Scanning...
[03][192.168.x.xx3] Connected successfully!
[03][192.168.x.xx3] Scanning...
...
[01][192.168.x.xx1] Monitoring...
[02][192.168.x.xx2] Monitoring...
[03][192.168.x.xx3] Monitoring...
...
[01][192.168.x.xx1] Finished!
[02][192.168.x.xx2] Finished!
[03][192.168.x.xx3] Finished!
...
[Finish] Output Files Finished!
[Finish] Please press any key to exit ...
[Finish] Press any key to exit ...
Local Analysis
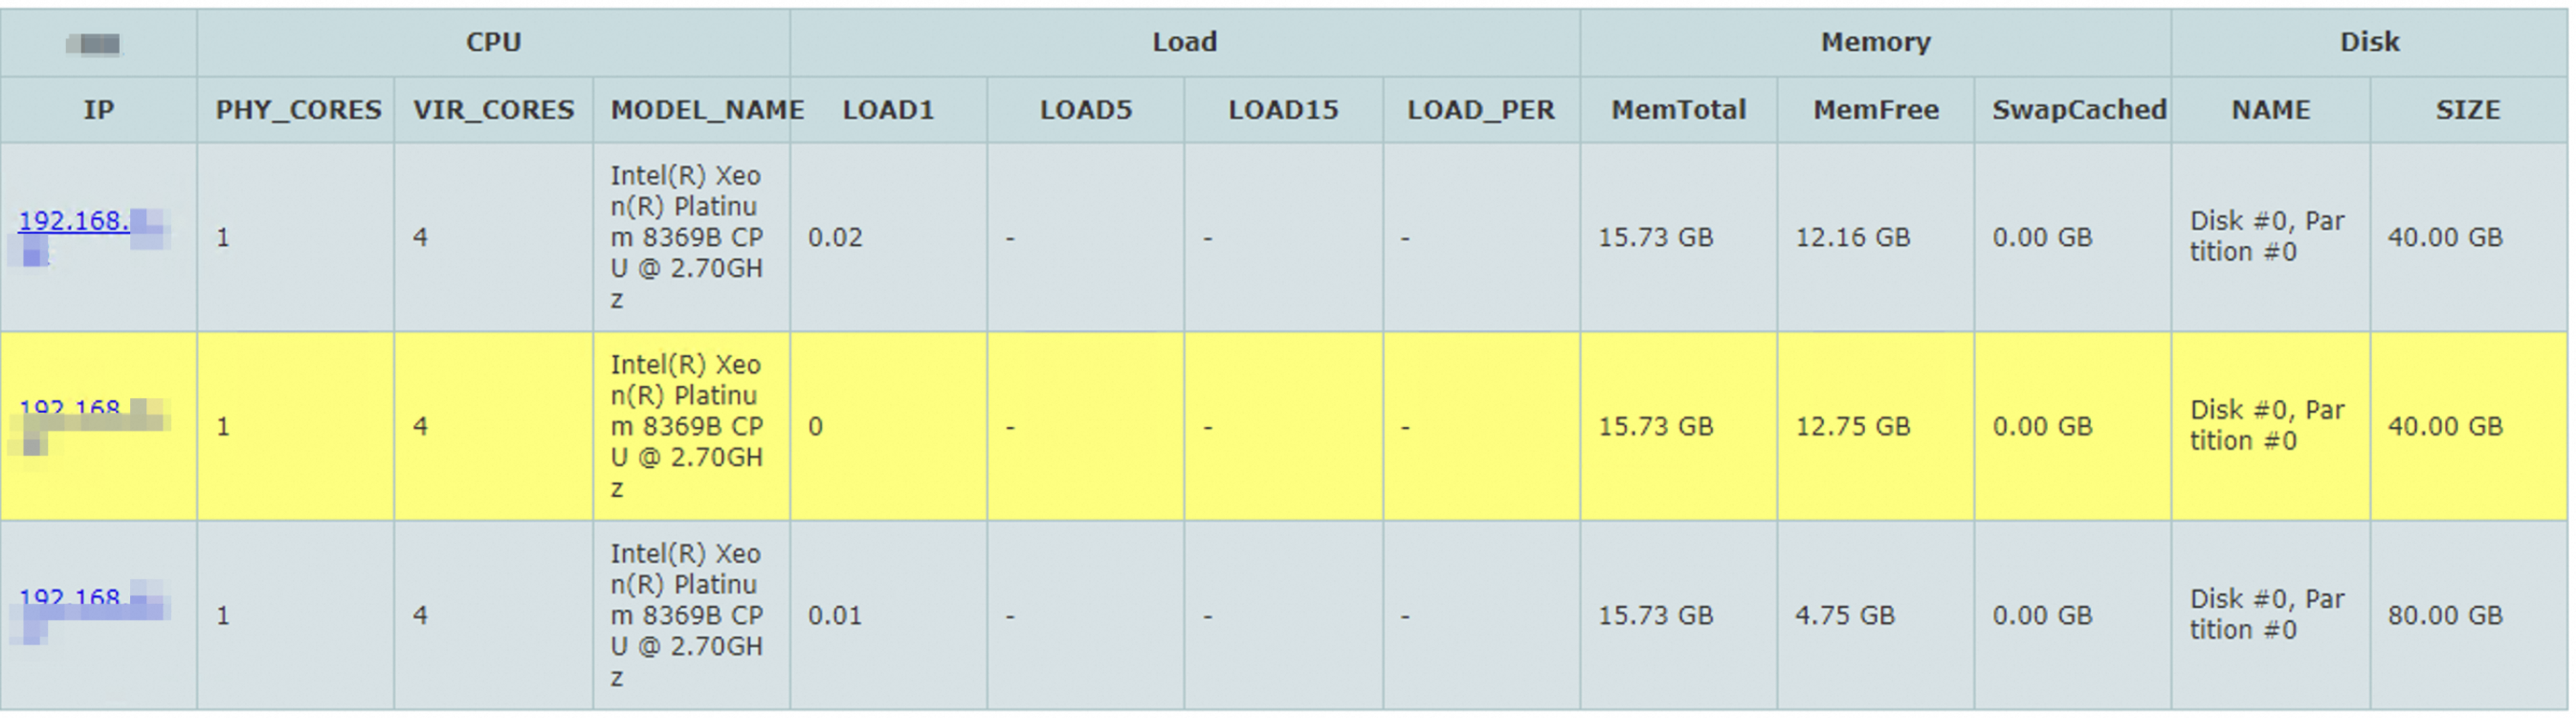
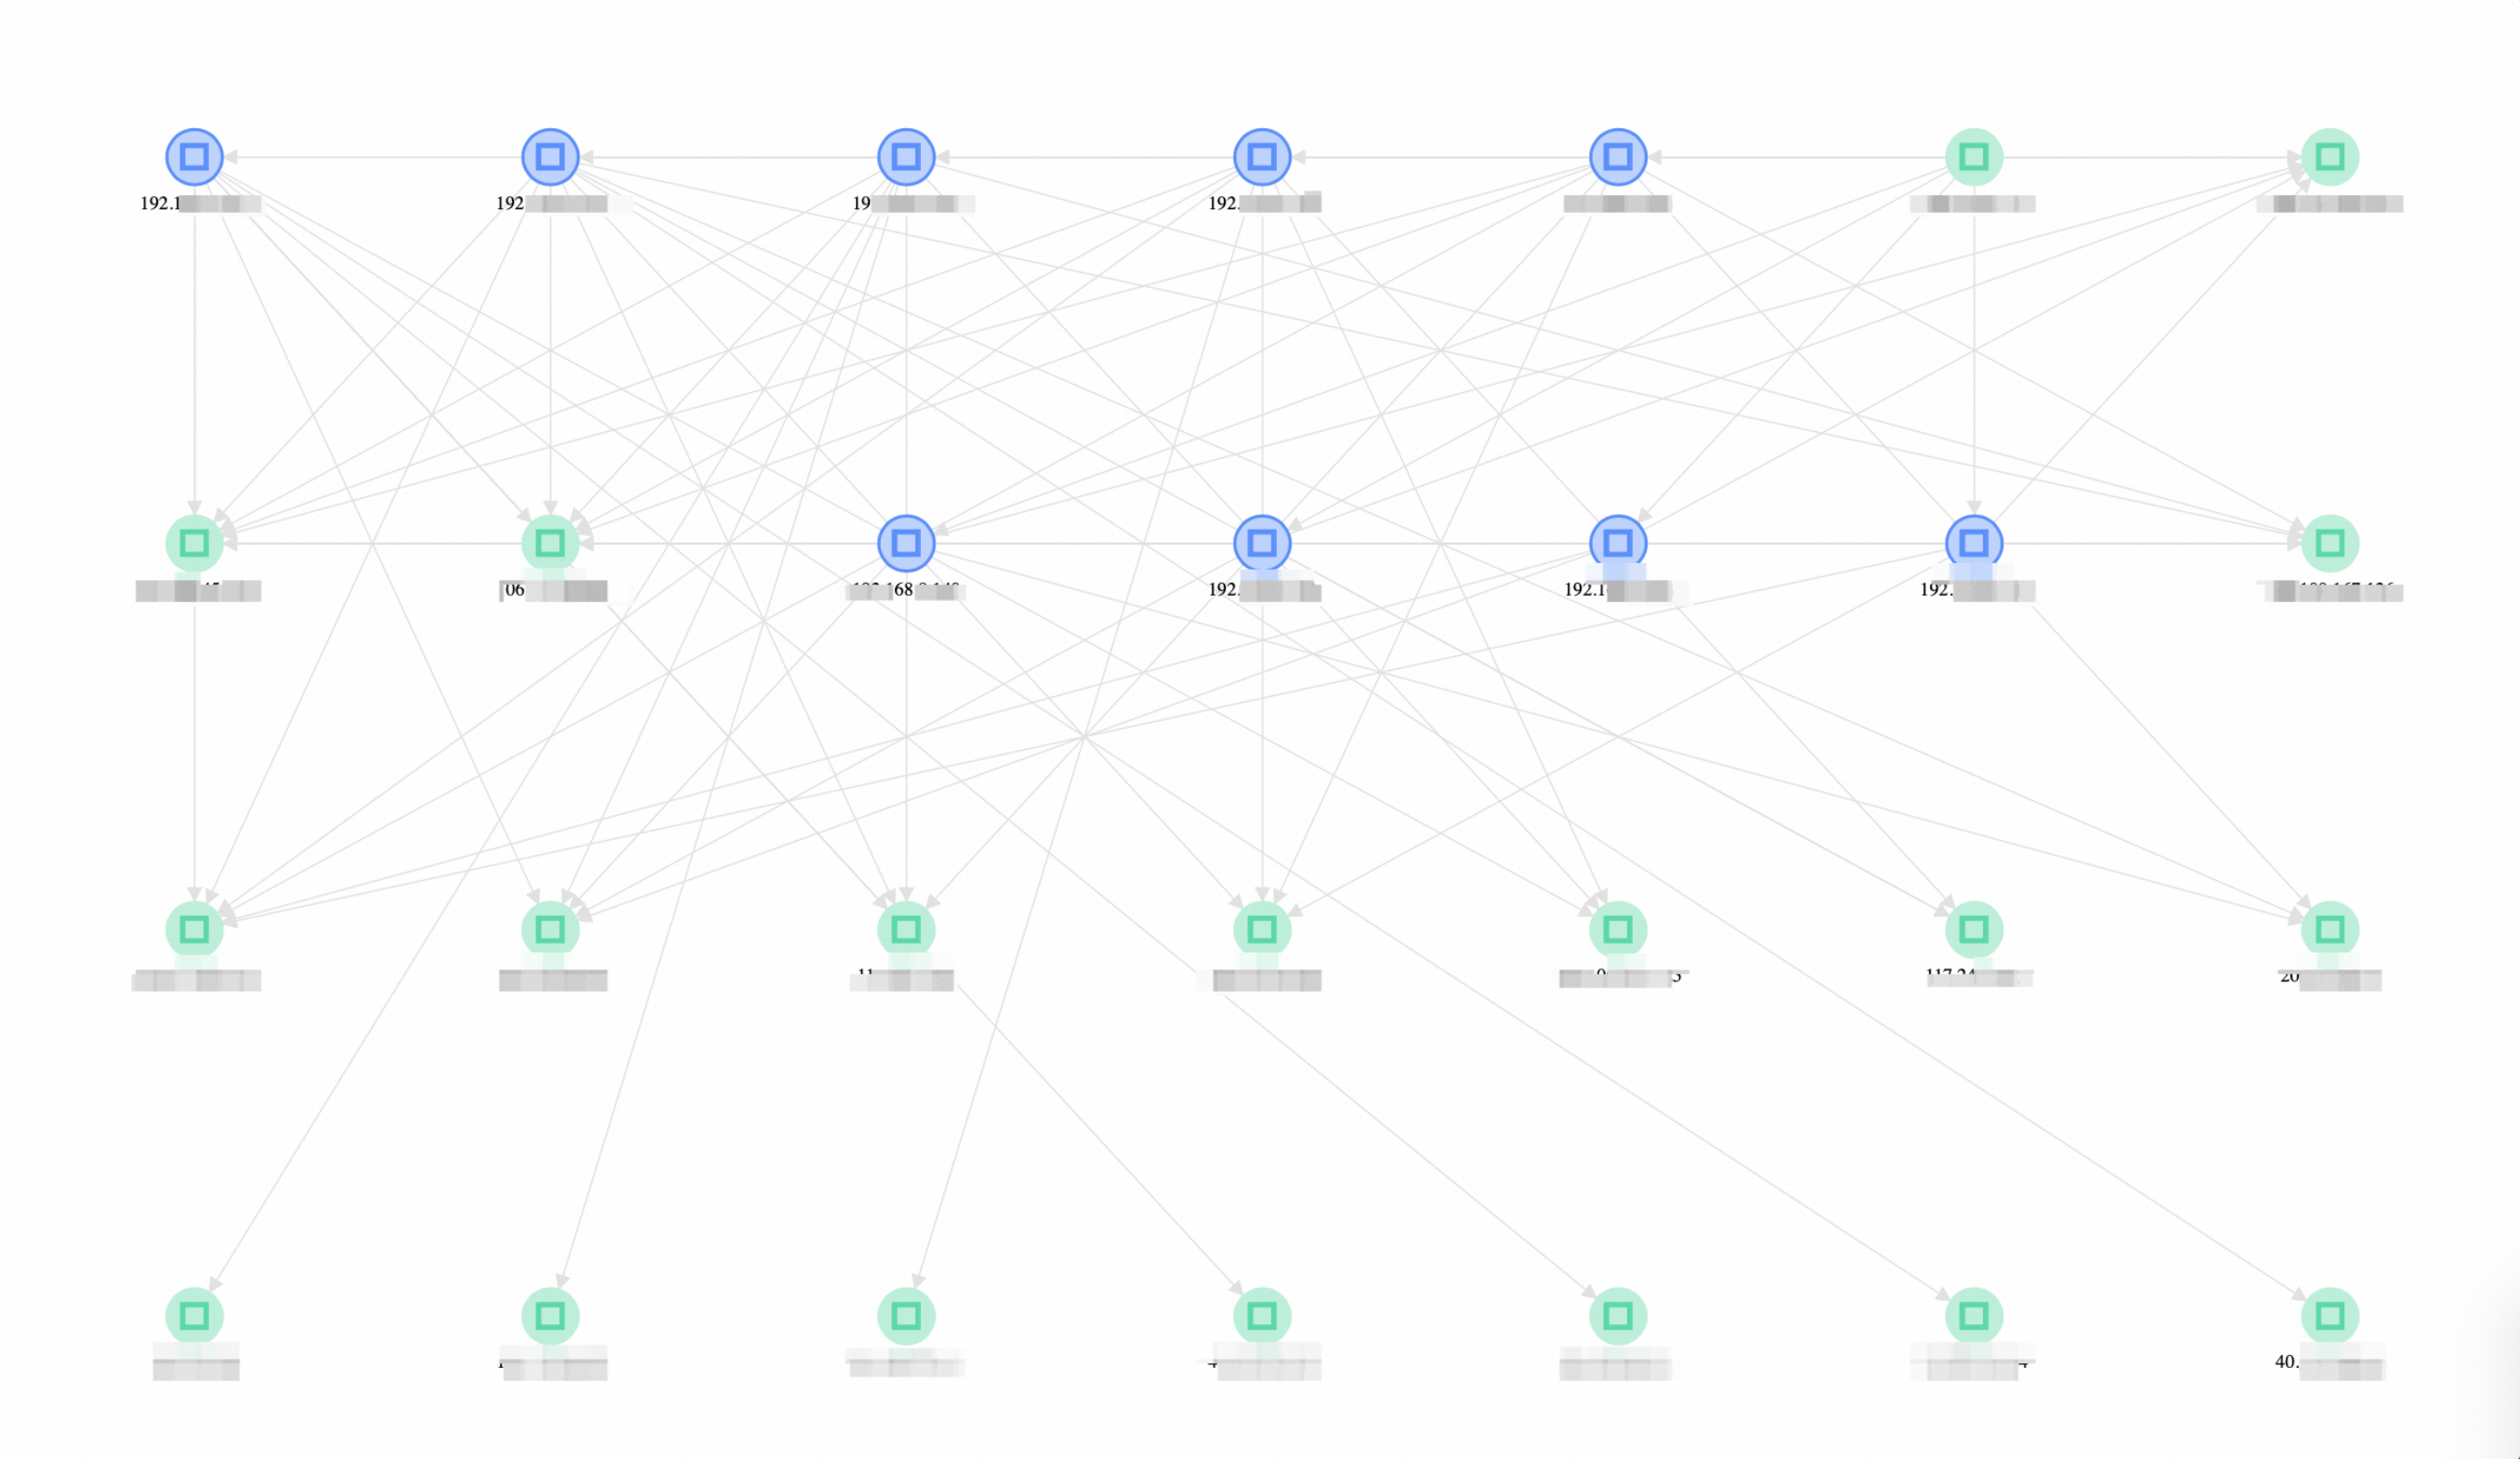
After you run win-scanner, the following files are generated in the `CMHScannerOutput` directory:
topo.html           # Network topology
index.html          # Survey homepage
iconfont.css        # Style file
iconfont.ttf        # Style file
192.168.x.xx1.html  # Survey details page
192.168.x.xx3.html  # Survey details page
192.168.x.xx4.html  # Survey details page
machines.json       # Serialized file (to be uploaded)
The tool collects some system information. Open the HTML files to view and analyze data locally.
Upload and analyze
Upload the serialized file to the CMH console.
Path: Console > Assessment > Resource Survey > Offline Collection > IDC Collection > Upload () (Portal)
After the import completes, click the task ID to view imported resources online. Surveyed resources are auto imported into the CMH resource list.
Offline collection — AWS resources
Preparations
User authorization
The AWS resource survey tool requires an AWS account with read permissions on all AWS cloud resources. Use the AWS read-only system policy:
arn:aws:iam::aws:policy/ReadOnlyAccessFor a least-privilege policy, use AWS read-only permission masking.
Prepare the runtime environment
-
Select a server: Install and run the tool on a server that can connect to AWS endpoints over the Internet.
-
Specifications: Minimum 2 CPU cores and 4 GB memory. No operating system dependency.
-
Dependencies: Java 8 runtime required. Run
java -versionto verify.
Download the runtime file
Download the executable and upload it to the jump server, then decompress it.
|
System |
Package |
|
Linux (x86) / Windows (x86) |
Cloud Migration Hub -> Resource Survey -> Offline Collection -> Get Tool |
Decompression command: tar zxvf aws-scanner-x.x.tar.gz
Prepare the working directory
Prepare an empty working directory:
|-aws-scanner/
            |-aws-scanner-x.x.jar
Tool execution
Run the following command to start the survey: java -jar aws-scanner.jar ak sk region_id result_path product_code
# Parameter description
# 1. Access key ID of the AWS user
# 2. Secret access key of the AWS user
# 3. Region ID of the AWS user
# 4. Path to export the results
# 5. Code of the AWS product to survey. Use 'all' for all products. For others, see the documentation:

Supported list


#e.g. "java -jar aws-scanner.jar  akxxxx  skxxx cn-north-1 ./ all"
Successful output:
java -jar aws-scanner.jar  akxxx  skxxx cn-north-1 ./ all
AK :akxxx;
SK :skxxx;
Region :cn-north-1;
path :./;
type :all;
Call SDK to get resource data, ak:akxxx,sk:skxxx,region:cn-north-1,resourceType:aws_ec2
Number of resource data entries obtained: 473
Call SDK to get resource data, ak:akxxx,sk:skxxx,region:cn-north-1,resourceType:aws_nat
Number of resource data entries obtained: 3
Call SDK to get resource data, ak:akxxx,sk:skxxx,region:cn-north-1,resourceType:aws_security_group
Number of resource data entries obtained: 71
Call SDK to get resource data, ak:akxxx,sk:skxxx,region:cn-north-1,resourceType:aws_vpc
Number of resource data entries obtained: 4
Call SDK to get resource data, ak:akxxx,sk:skxxx,region:cn-north-1,resourceType:aws_avaliability_zone
Number of resource data entries obtained: 3
Call SDK to get resource data, ak:akxxx,sk:skxxx,region:cn-north-1,resourceType:aws_elb
Number of resource data entries obtained: 70
Call SDK to get resource data, ak:akxxx,sk:skxxx,region:cn-north-1,resourceType:aws_rds
Number of resource data entries obtained: 25
Call SDK to get resource data, ak:akxxx,sk:skxxx,region:cn-north-1,resourceType:aws_elasticcache
Number of resource data entries obtained: 37
Call SDK to get resource data, ak:akxxx,sk:skxxx,region:cn-north-1,resourceType::aws_s3
Number of resource data entries obtained: 17
JSON file generated successfully. Go to the following path to view it: ./
Analyze locally
After completion, the following files are generated in the output directory: 
Open xxxindex.html for an overview of all cloud resources. Click More to view all resources on the details page: 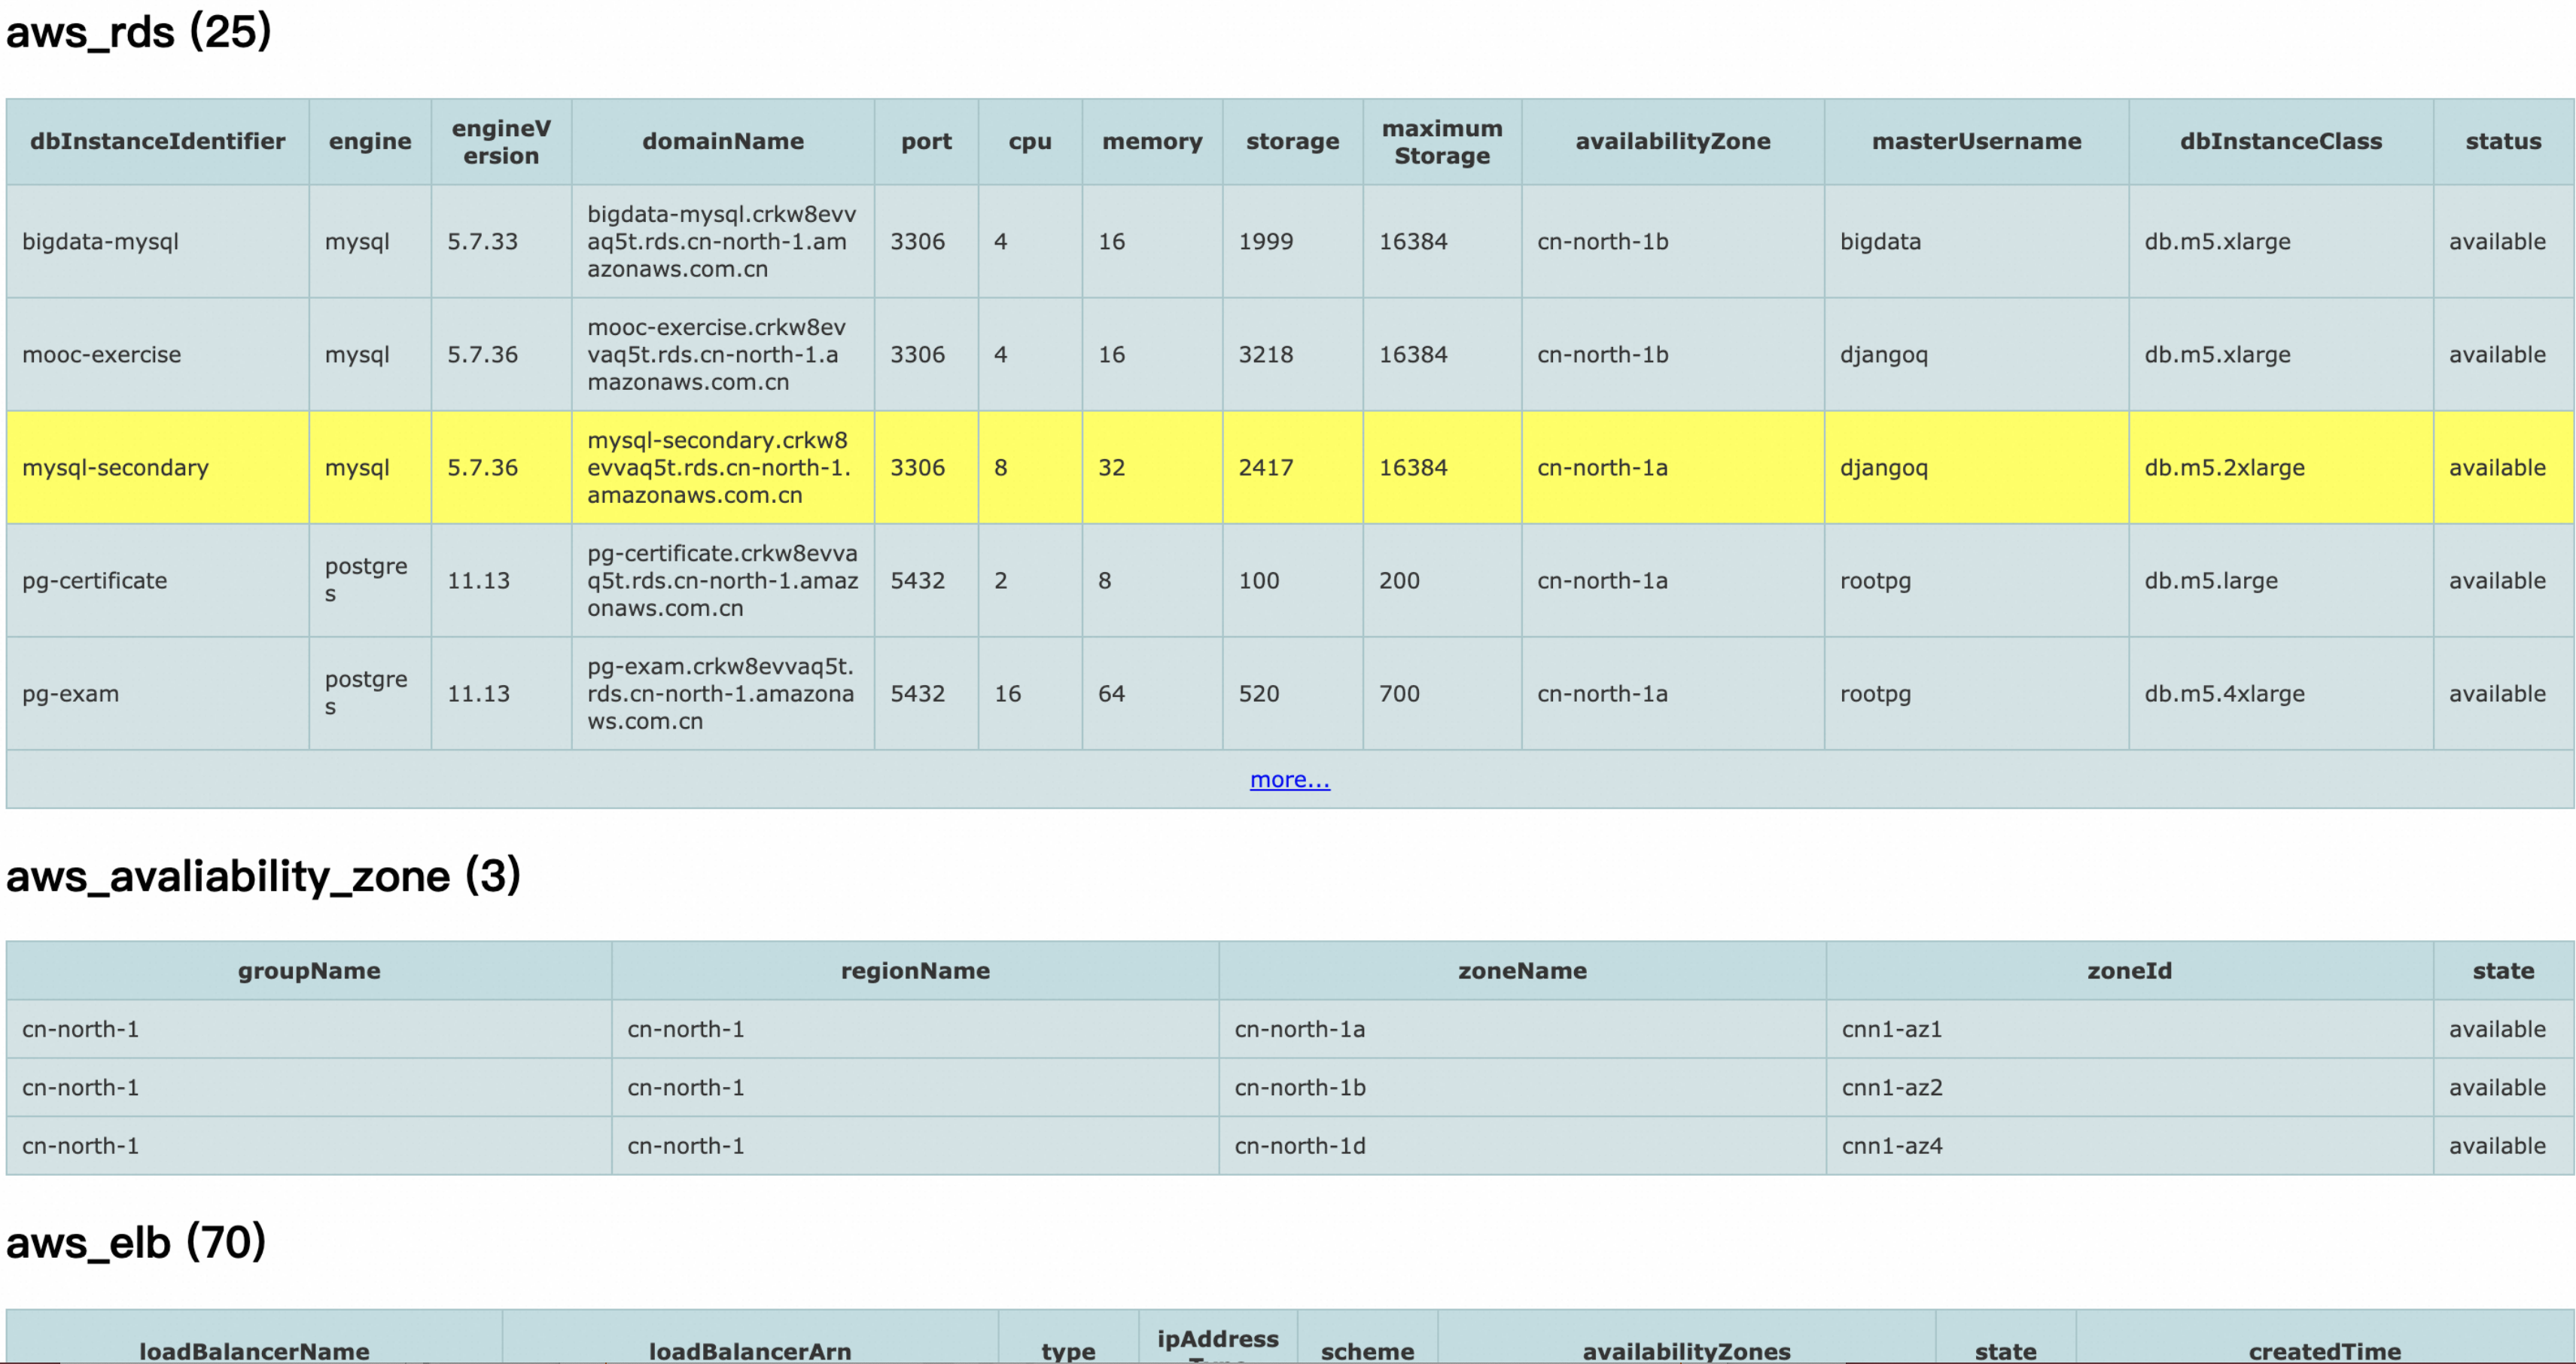
Upload and analyze
Upload the serialized file to the CMH console.
Path: Console > Assessment > Resource Survey > Offline Collection > AWS Collection > Upload () (Portal)
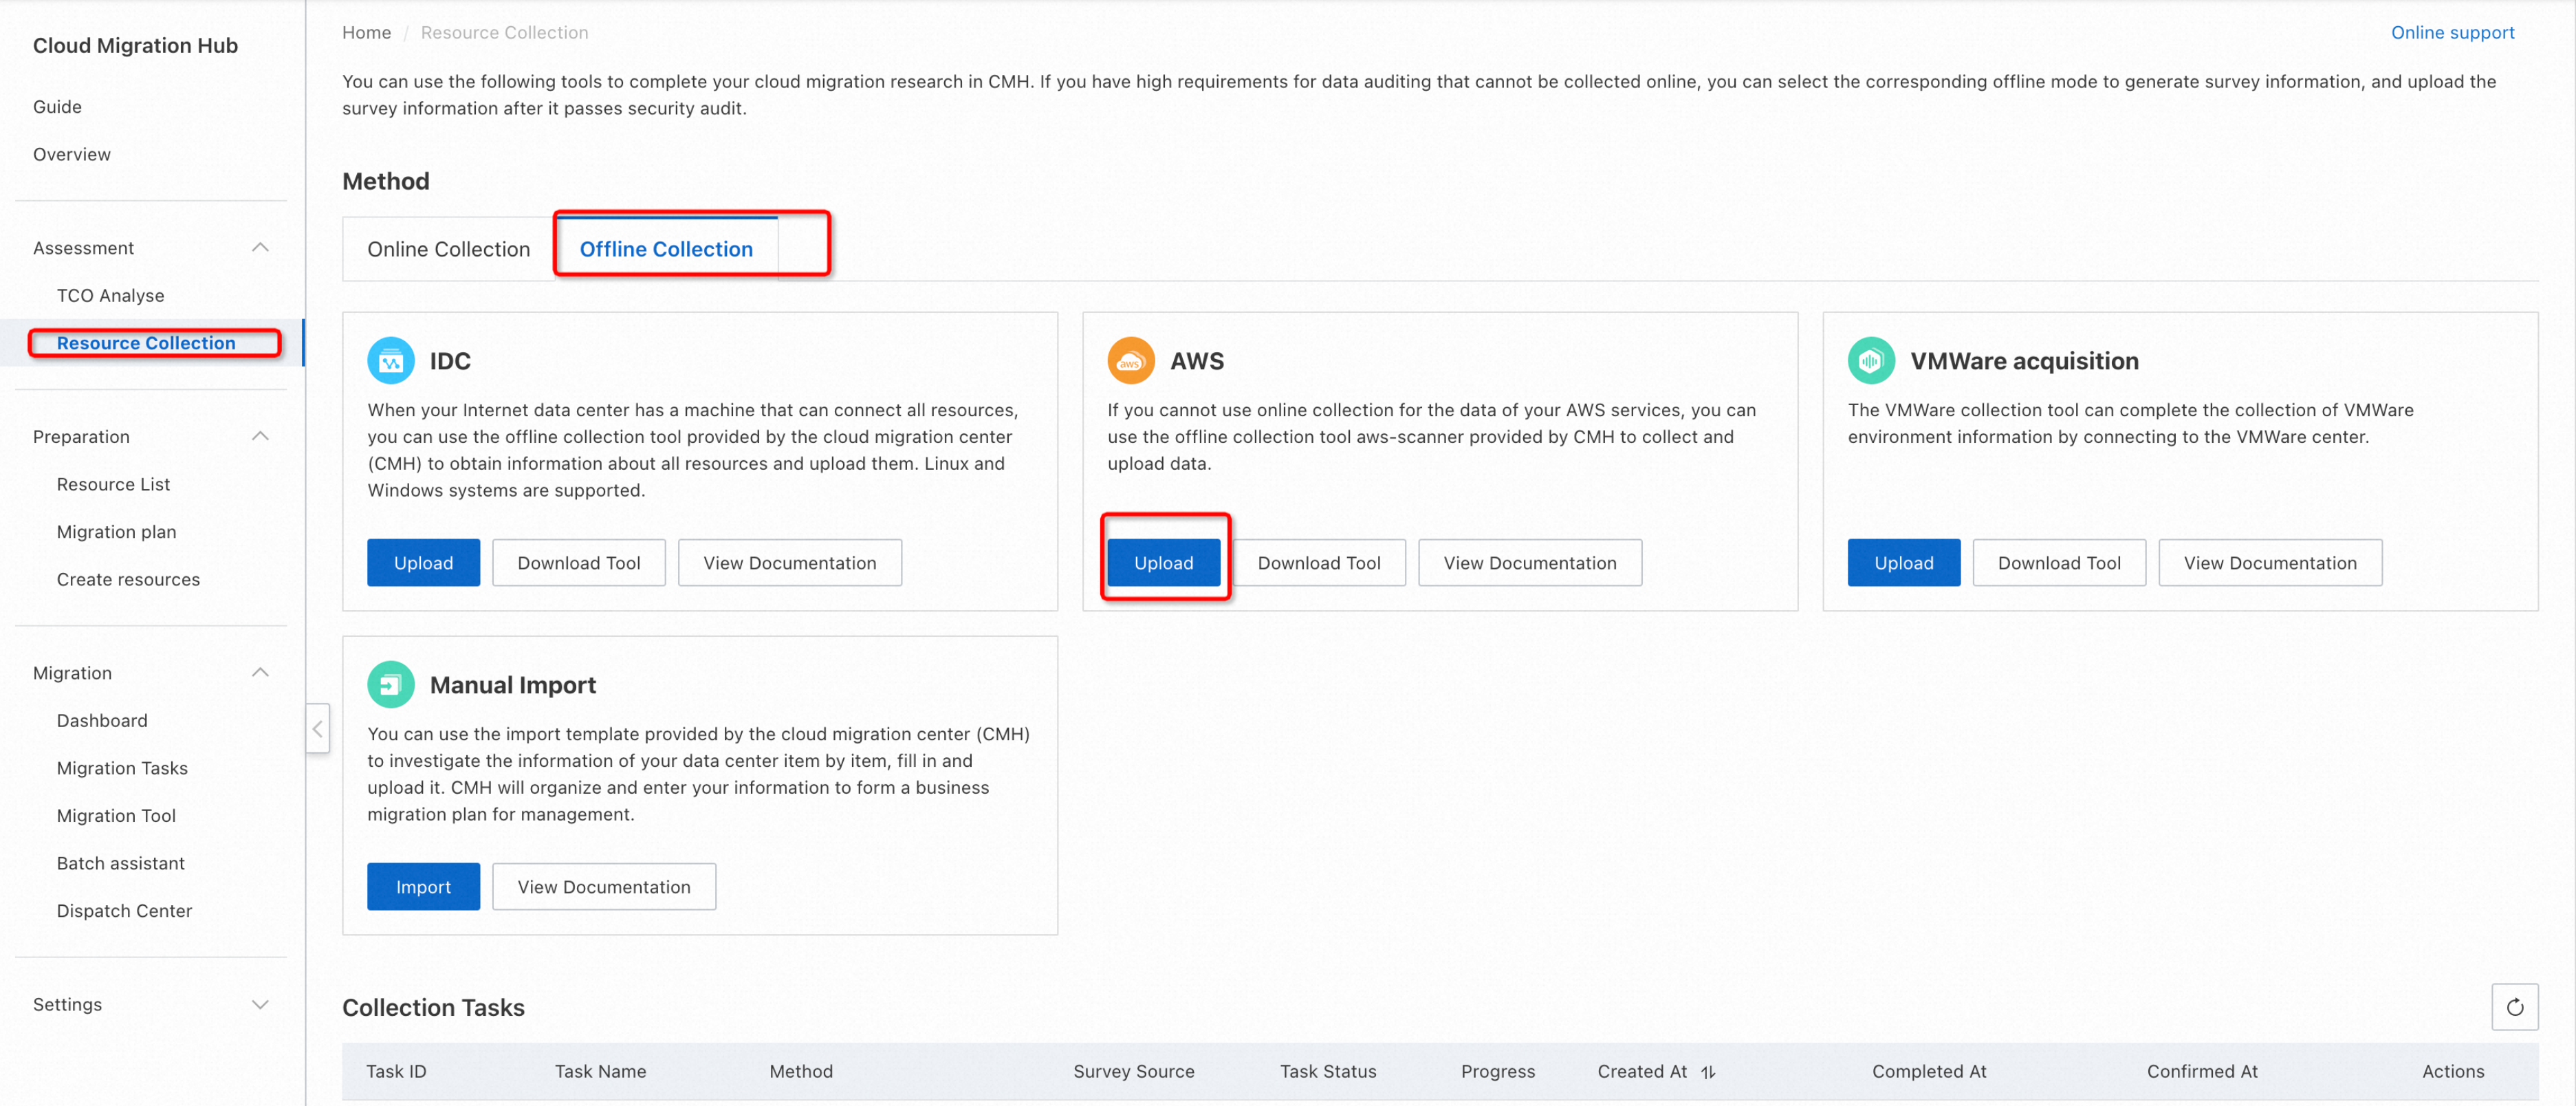
After the upload completes, click the task ID to view collected resources. Surveyed resources are auto imported into the CMH resource list.
Offline collection — VMWare resources
Preparations
Prepare the runtime environment
Select a server
Install and run vmware-scanner on a tool server. It connects to vCenter Server through TCP port 443 to collect configuration and performance metadata.
Specifications and system
Minimum: 2 CPU cores, 4 GB memory, mainstream Linux distribution (CentOS 7 recommended).
Limits
Scans VMs, DataCenters, Hosts, and Clusters in a VMware environment. Requires vCenter 6.5 or later.
Prepare a vCenter Server access user
Set up a read-only vCenter Server account in the VMware vSphere Web Client:
-
In the vSphere Web Client with an account that has administrator permissions, select Administration from the Home menu.
-
Under Single Sign-On, select Users and Groups.
-
On the Users tab, select New User.
-
Enter the account details and select OK.
-
Under the Administration menu, go to Access Control and select Global Permissions.
-
Select the user account, and then select Read-only to assign the role to the account. Select OK.
-
To discover installed applications and perform agentless dependency analysis: go to Access Control > Roles, select Read-only, and enable Guest operations under Privileges. Select Propagate to children to apply permissions to all vCenter Server objects.
Download the installation file
Download the executable and upload it to the jump server, then decompress it.
|
System |
Package |
|
Linux (x86) |
Cloud Migration Hub -> Resource Survey -> Offline Collection -> Get Tool |
|
Windows (x86) |
Not supported |
|
Linux (ARM) |
Not supported |
|
Windows (ARM) |
Not supported |
Decompression command: tar zxvf vmware-scanner.tar.gz
Prepare the working directory
Prepare the following working directory. The `output` directory stores output files.
|-vmware-scanner/
             |-vmware-scanner
             |-output/
                       |-VMware_scanner_index.html
                       |-VMware_scanner_index.json
Tool execution
Prepare the vCenter Server IP address, username, password, and proxy address (if applicable).
Run the tool:
Format: ./vmware-scanner -s SERVER -u USERNAME -p PASSWORD [--proxy PROXY]
Example:
# Access without a proxy
./vmware-scanner -s 39.105.XXX.23 -u username -p 123****
# Access with a proxy
./vmware-scanner -s 39.105.XXX.23 -u username -p 123****  --proxy 100.**.***.132:50702
Local analysis
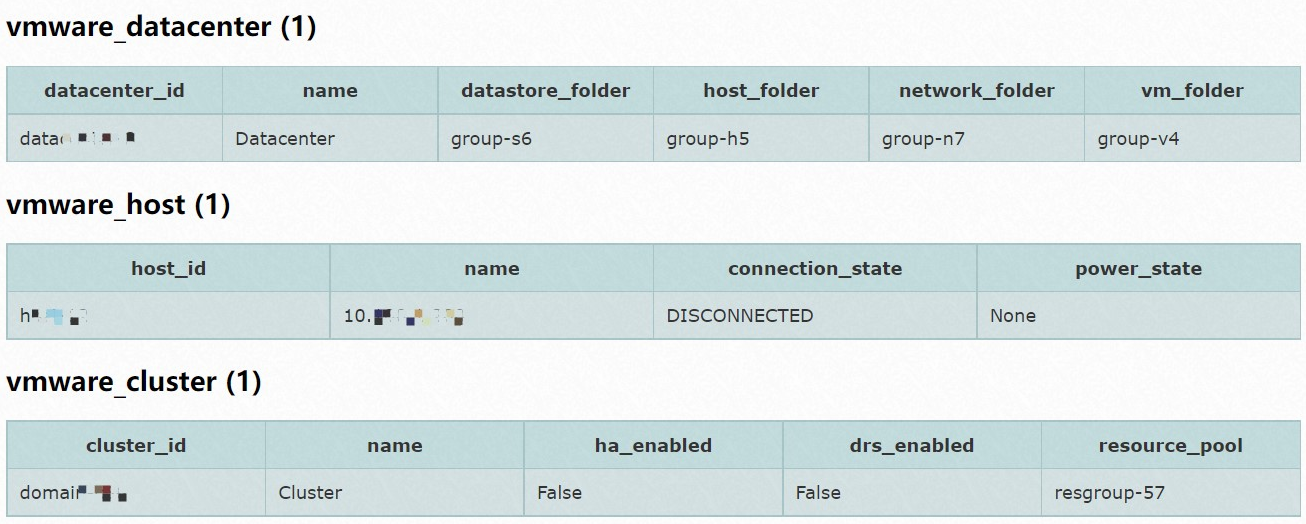
After completion, the following files are generated in the `output` directory:
VMware_scanner_index.html        # Survey resource HTML
VMware_scanner_index.json       # Serialized file (to be uploaded)
Open the HTML file to view and analyze data locally.
Upload and analyze
Upload the serialized file to the CMH console.
Path: Console > Assessment > Resource Survey > Offline Collection > VMWare Collection > Upload () (Portal)
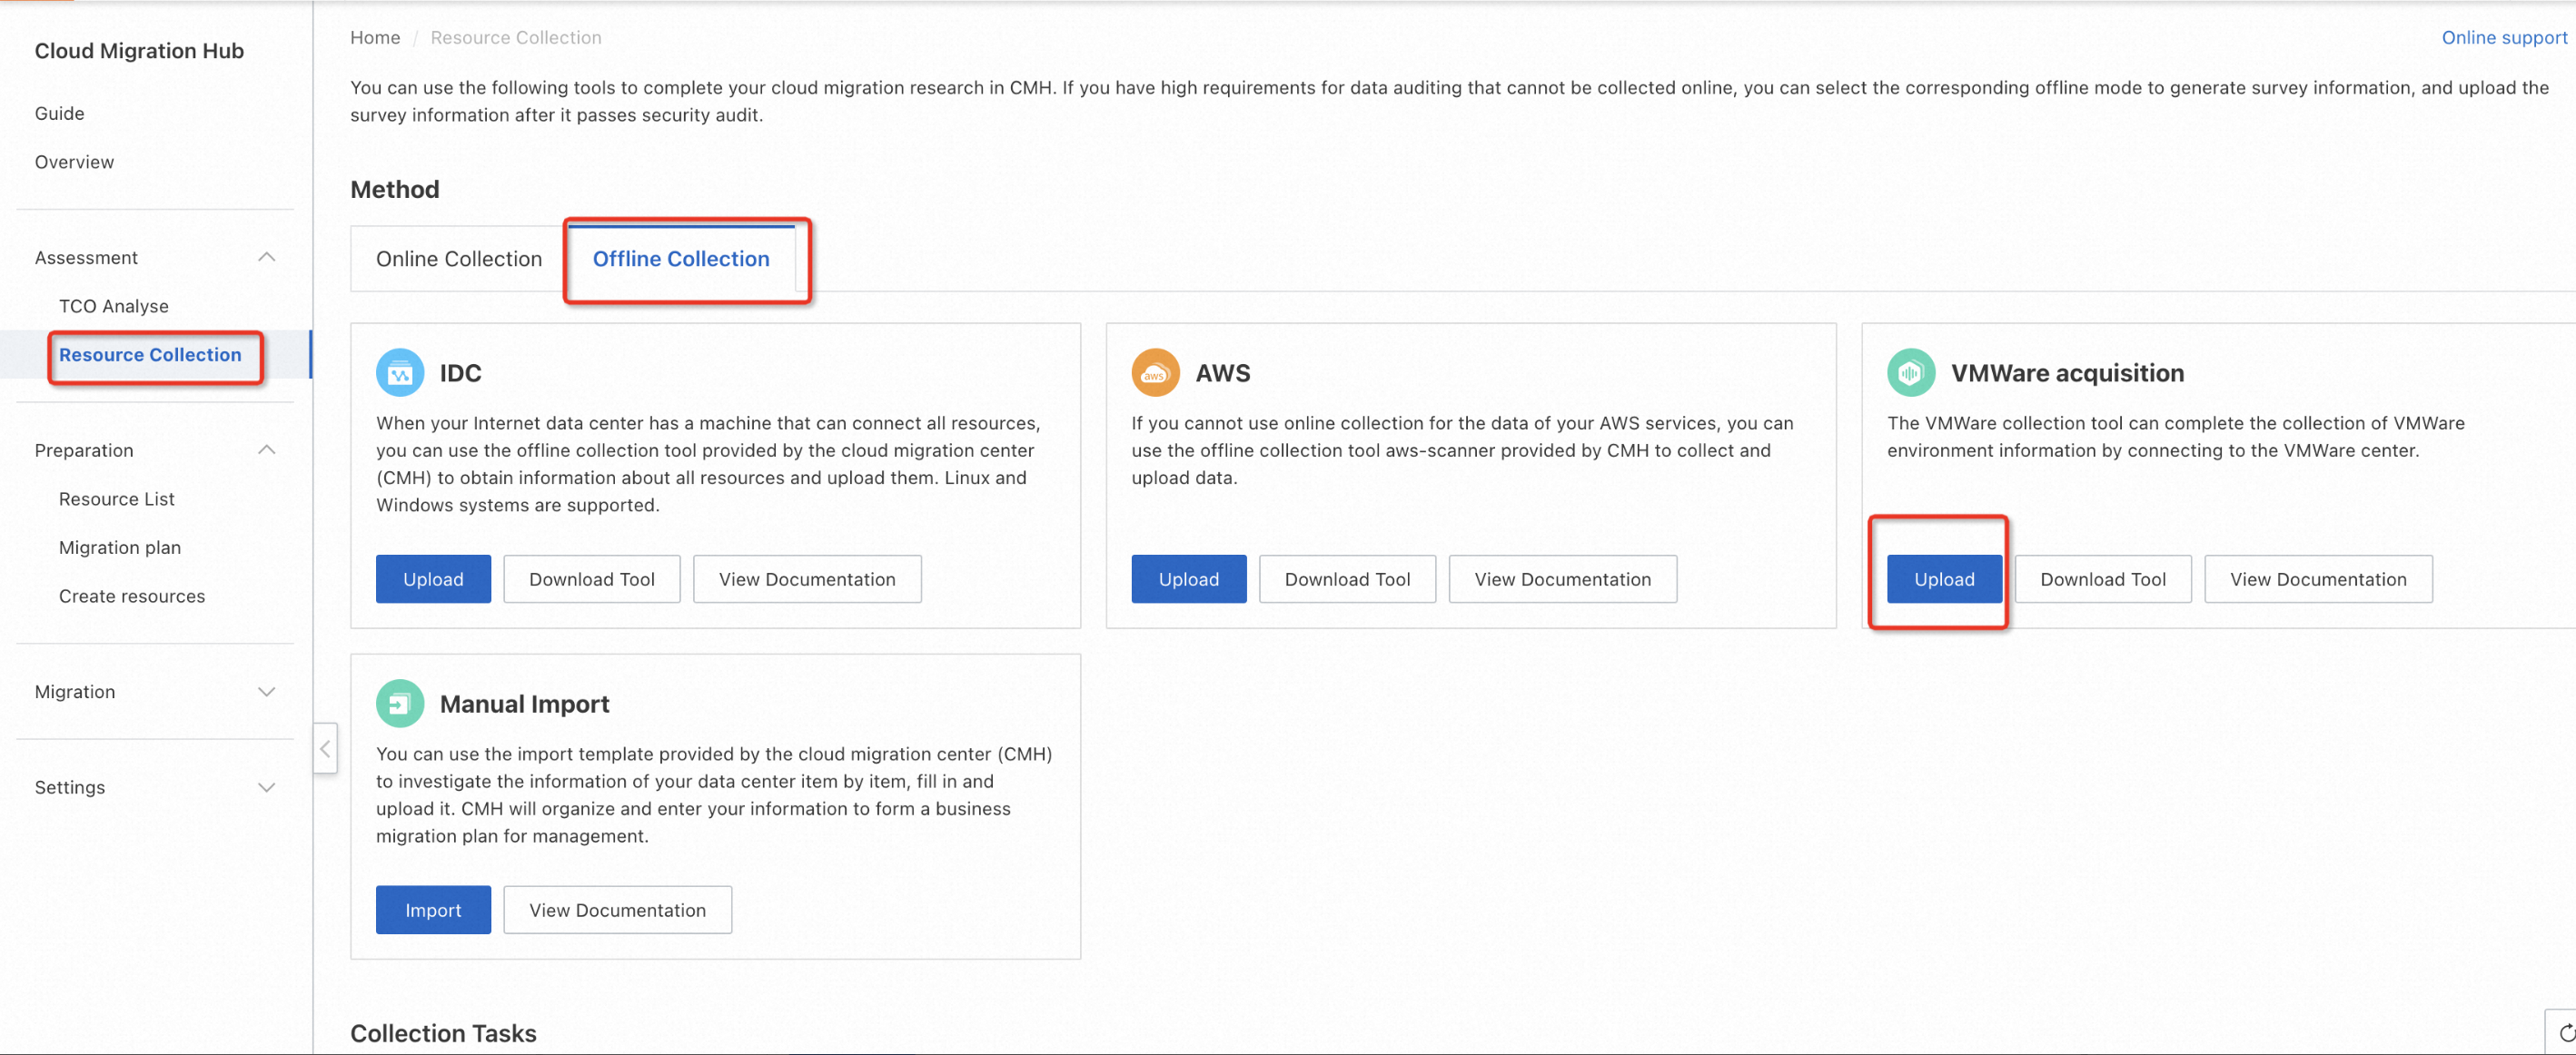
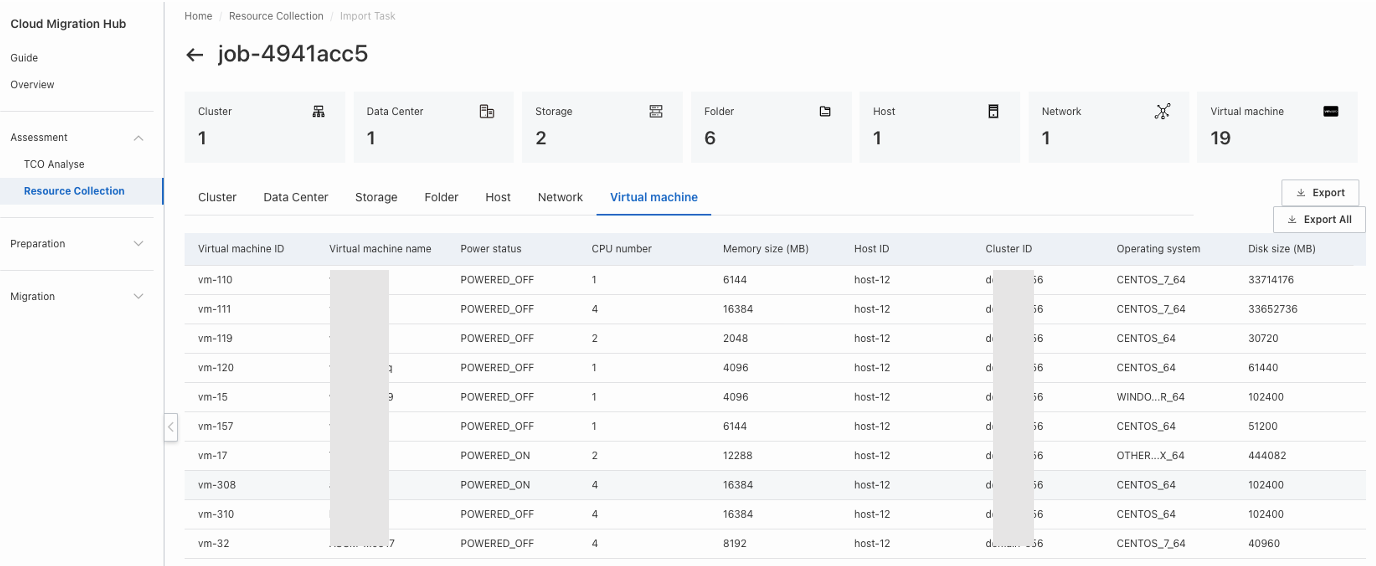
After the import completes, click the task ID to view imported resources online. Surveyed resources are auto imported into the CMH resource list.
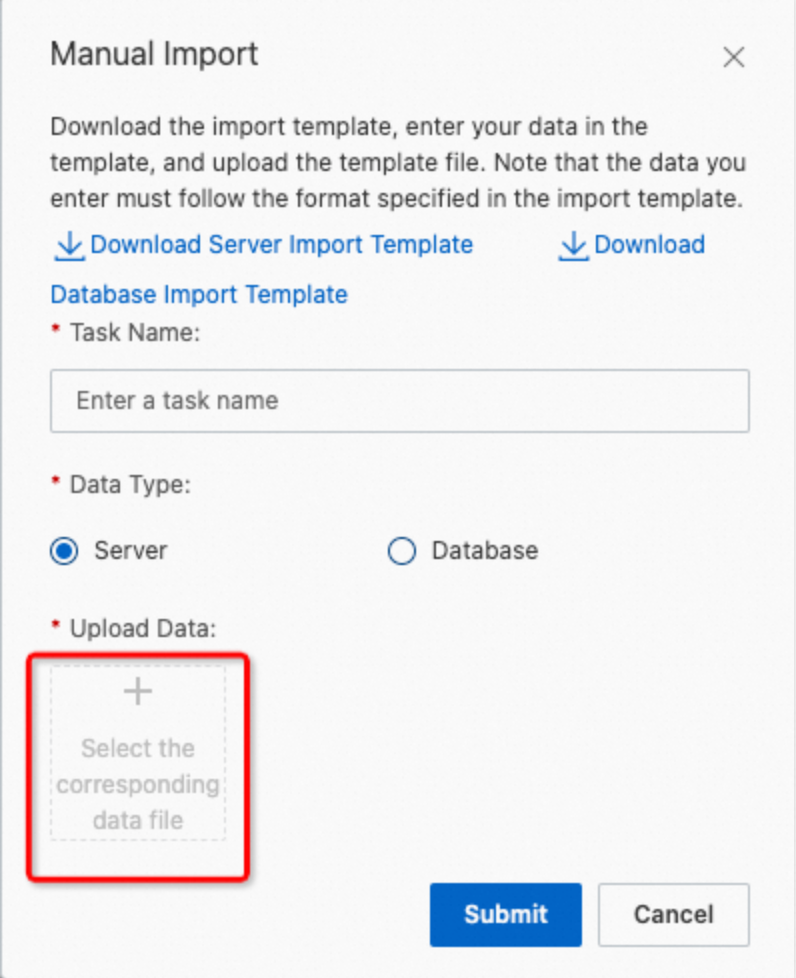
Manually import resources
Download a template
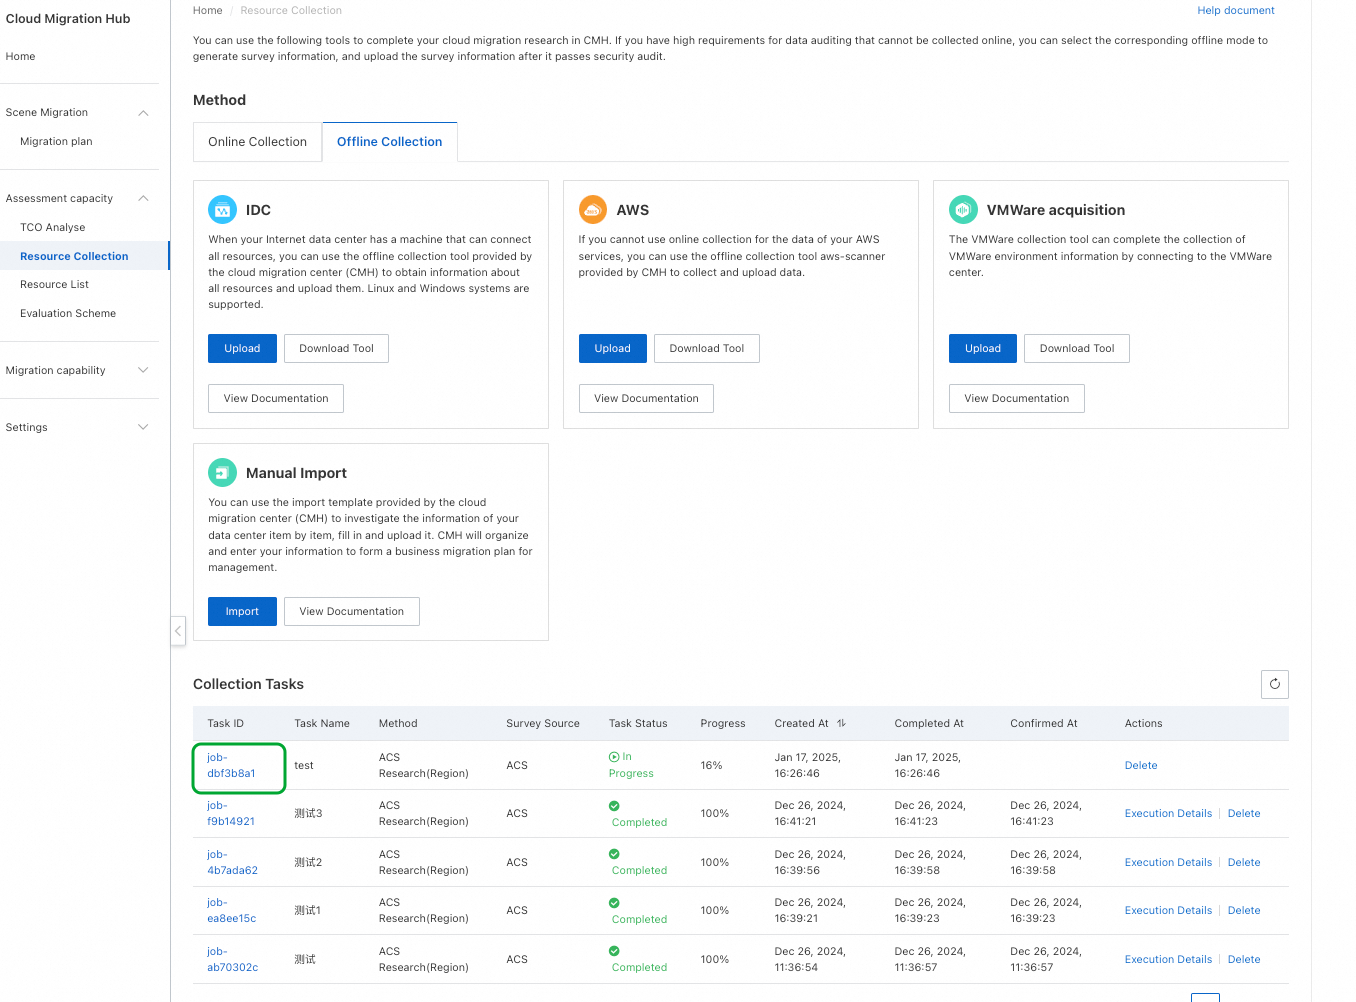
CMH provides templates for manual offline resource discovery. Download templates from:
Console > Assessment > Offline Collection > Manual Import > Import
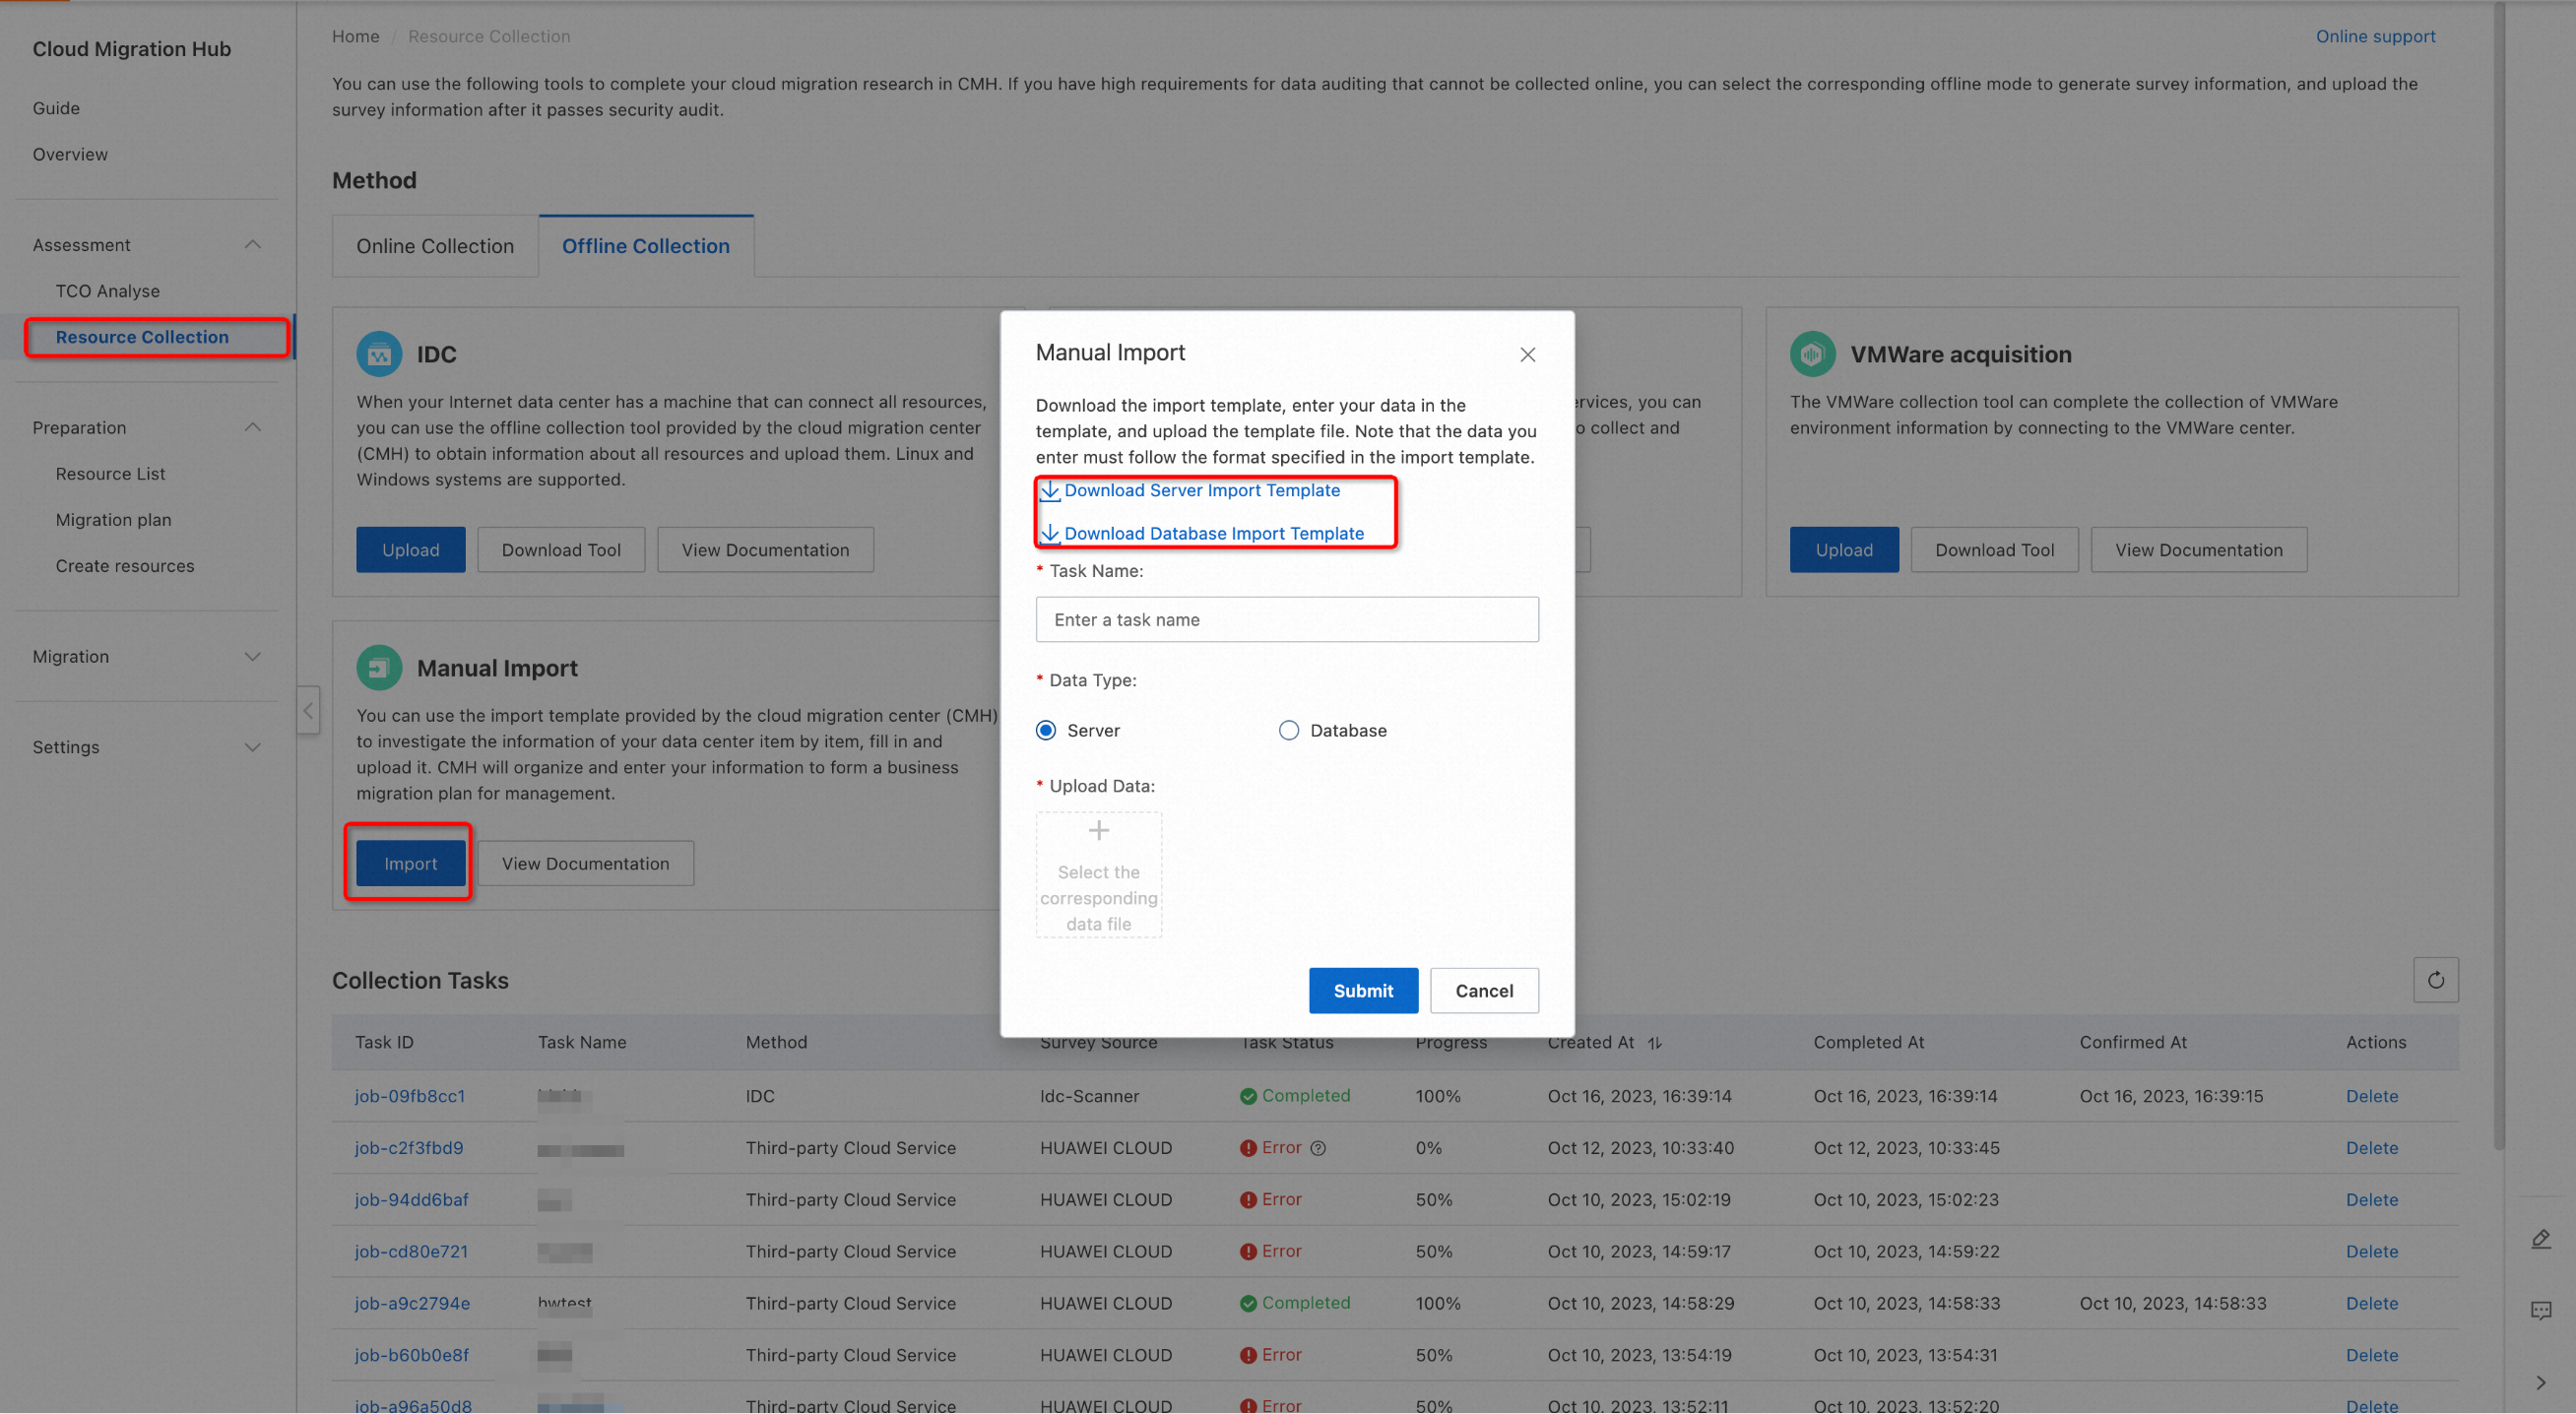
Enter resources
Upload the template
Complete the Excel template and upload it. CMH starts a background task to identify your resources.
View resources
After the task completes, click the task name to view entered resources. Surveyed resources are auto imported into the CMH resource list.