Cloud Firewall provides the multi-account management feature that allows you to centrally manage security policies for an enterprise. The feature helps reduce the number of security events that are caused due to management omission and provides centralized defense. This way, your services can be protected in a more efficient manner. This topic describes how to use Cloud Firewall to share virtual private cloud (VPC) resources and implement secure access across multiple accounts. In this topic, VPCs that belong to two Alibaba Cloud accounts and are deployed in the same region are used as an example.
Background information
An increasing number of enterprises are migrating their business to the cloud. After enterprises purchase a large number of cloud resources, the management of resources, projects, personnel, and permissions can become complicated. Single accounts cannot be used to meet the requirements. In this case, a multi-account system is required to migrate business to the cloud. Enterprise users have requirements for centralized management of cloud resources across multiple accounts. The cloud resources include security, compliance audit, network, and O&M products.
To meet the enterprise requirements, Cloud Firewall allows you to manage multiple Alibaba Cloud accounts in a resource directory based on the trusted services of Alibaba Cloud Resource Directory. Each Alibaba Cloud account in a resource directory is a member. You can specify a member as a delegated administrator account to access the resources of all members in the resource directory. This way, you can use the features of Cloud Firewall to manage the Internet assets and VPC assets across multiple Alibaba Cloud accounts in a centralized manner. The features include access control, policy configuration, traffic analysis, intrusion prevention, attack prevention, breach awareness, and log audit and analysis.
The following table describes the information about accounts. Before you use multi-account management, we recommend that you read the information.
Account type | Description | Permission on the Resource Directory side | Permission on the Cloud Firewall side |
Management account | A management account can be used to invite the Alibaba Cloud accounts that do not belong to a resource directory to join the resource directory for centralized management. | The account can be used to manage all assets of the enterprise. | The account can be used to manage all assets that are protected by Cloud Firewall. |
Delegated administrator account | The management account of a resource directory can be used to specify a member in the resource directory as a delegated administrator account of a trusted service. After a member is specified as a delegated administrator account of a trusted service, the member can be used to access the information about the resource directory in the trusted service. The information includes the structure and members of the resource directory. The member can also be used to manage business within the resource directory. Note Delegated administrator accounts allow you to separate organization management tasks from business management tasks. The management account of a resource directory is used to perform the organization management tasks of the resource directory. Delegated administrator accounts are used to perform the business management tasks of the related trusted services. | The account can be used to manage all assets of the enterprise. | The account can be used to manage all assets that are protected by Cloud Firewall. |
Member | After an account is invited by the management account of a resource directory to join the resource directory, the account is a member of the resource directory. | The member can be used to manage only the assets that belong to the member. | The member cannot be used to purchase Cloud Firewall. |
For more information about the protection scope of VPC firewalls, see Overview.
In this topic, VPCs connected by using a VPC peering connection are used as an example.
Sample scenario
Network deployment
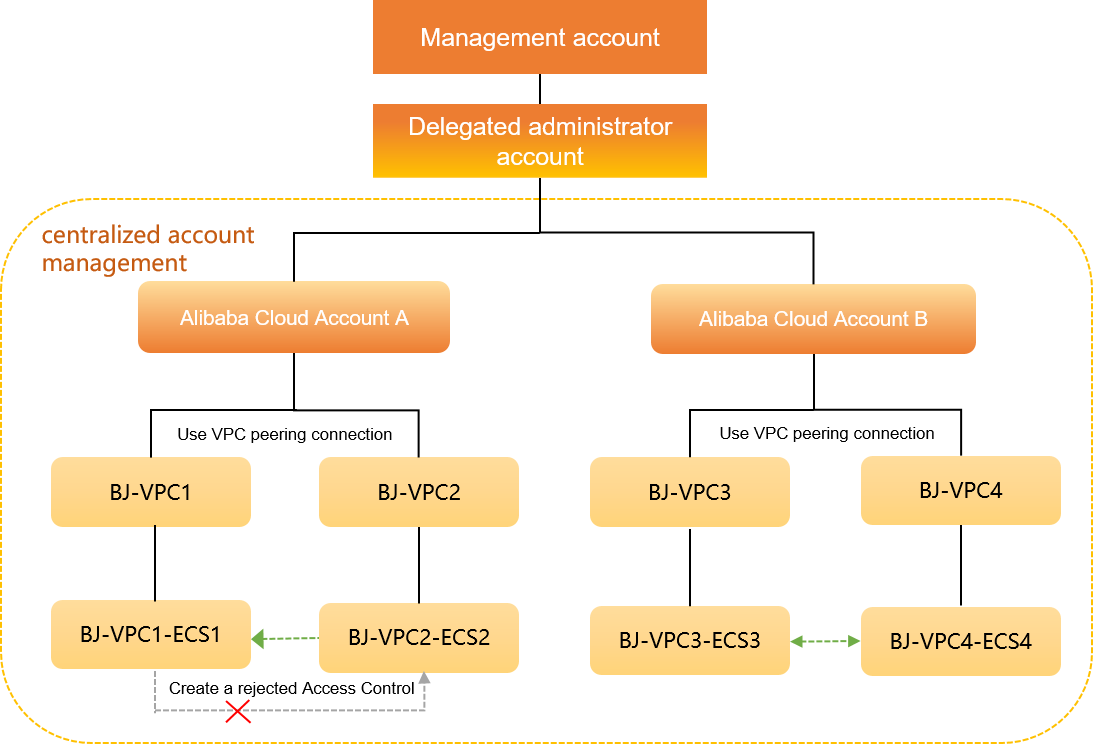
Alibaba Cloud Account A of an enterprise is used to deploy the following VPCs in the China (Beijing) region: BJ-VPC1 and BJ-VPC2. An ECS instance named BJ-VPC1-ECS1 resides in BJ-VPC1, and an ECS instance named BJ-VPC2-ECS2 resides in BJ-VPC2. Alibaba Cloud Account B of the enterprise is used to deploy the following VPCs in the China (Beijing) region: BJ-VPC3 and BJ-VPC4. An ECS instance named BJ-VPC3-ECS3 resides in BJ-VPC3, and an ECS instance named BJ-VPC4-ECS4 resides in BJ-VPC4. BJ-VPC1 and BJ-VPC2 are connected by using a VPC peering connection. BJ-VPC3 and BJ-VPC4 are connected by using a VPC peering connection. The connected VPCs can communicate with each other.
Requirements and solutions
The enterprise wants to purchase Cloud Firewall only for Alibaba Cloud Account A. The enterprise also wants to check traffic between BJ-VPC1 and BJ-VPC2, check traffic between BJ-VPC3 and BJ-VPC4, and ensure the security of traffic between the VPCs. In addition, the enterprise expects that BJ-VPC1-ECS1 cannot access BJ-VPC2-ECS2. To meet the preceding requirements, the enterprise can use the following features of Cloud Firewall: multi-account management, VPC Firewall, and access control.
In this topic, Alibaba Cloud Account A is specified as a delegated administrator account. In actual business scenarios, you can specify a delegated administrator account based on your business requirements.
The following figure shows the sample scenario.
Prerequisites
A resource directory is enabled for your management account. For more information, see Enable a resource directory.
Cloud Firewall Premium Edition, Enterprise Edition, Ultimate Edition, or Cloud Firewall that uses the pay-as-you-go billing method is purchased for Alibaba Cloud Account A. For more information, see Subscription.
NoteIf you want to add more than one member, upgrade the specifications of your Cloud Firewall by reconfiguring the Multi-account Centralized Management parameter.
Two VPCs for both Alibaba Cloud Account A and Alibaba Cloud Account B are deployed within the same region. For more information, see Create and manage a VPC.
Two ECS instances are deployed in the two VPCs of both Alibaba Cloud Account A and Alibaba Cloud Account B. For more information, see Create and manage a vSwitch.
Two VPCs for both Alibaba Cloud Account A and Alibaba Cloud Account B are connected by using a VPC peering connection. For more information, see Create and manage a VPC peering connection.
The following table describes the network planning.
Resource | Alibaba Cloud Account A | Alibaba Cloud Account B |
Account ID | 135809047715**** | 166032244439**** |
VPC | BJ-VPC1
BJ-VPC2
| BJ-VPC3
BJ-VPC4
|
ECS | BJ-VPC1-ECS1
BJ-VPC2-ECS2
| BJ-VPC3-ECS3
BJ-VPC4-ECS4
|
Procedure

Step 1: Invite an account to join a resource directory as a member
A management account can be used to invite the Alibaba Cloud accounts that do not belong to a resource directory to join the resource directory for centralized management.
Log on to the Resource Management console by using a management account.
In the left-side navigation pane, choose .
On the page that appears, click Invite Member.

In the Invite Member panel, enter the ID of Alibaba Cloud Account A (135809047715****) and the ID of Alibaba Cloud Account B (166032244439****) for Account ID or Logon Email Address. Then, read and select the agreement.
NoteIf you want to enter the email address of an Alibaba Cloud account, you must enter the email address that you specified when you created the account. You can enter multiple account IDs or email addresses. Separate the account IDs or email addresses with commas (,).
Click OK.
Step 2: Specify a member in the resource directory as a delegated administrator account
Delegated administrator accounts allow you to separate organization management tasks from business management tasks. The enterprise management account of a resource directory is used to perform the organization management tasks of the resource directory. Delegated administrator accounts are used to perform the business management tasks of the related trusted services. In this topic, Alibaba Cloud Account A is specified as a delegated administrator account.
You can specify up to five delegated administrator accounts for your Cloud Firewall.
Log on to the Resource Management console by using a management account.
In the left-side navigation pane, choose .
On the Trusted Services page, find the trusted service for which you want to add a delegated administrator account, and click Manage in the Actions column.
In the Delegated Administrator Accounts section of the page that appears, click Add.
In the Add Delegated Administrator Account panel, find Alibaba Cloud Account A whose ID is 135809047715**** and select the account.
Click OK.
Then, you can use the delegated administrator account to access the multi-account management module of the trusted service and perform administrative operations within the resource directory.
Step 3: Add members to Cloud Firewall
Cloud Firewall allows you to manage multiple Alibaba Cloud accounts in a resource directory based on the trusted services of Alibaba Cloud Resource Directory. Each Alibaba Cloud account in a resource directory is a member. This way, all members in the resource directory can share resources.
Log on to the Cloud Firewall console by using Alibaba Cloud Account A.
In the left-side navigation pane, choose .
On the Multi-account Management page, click Add Member.
In the Add Member dialog box, add Alibaba Cloud Account B whose ID is 166032244439**** to the Selected Members section.
In the Selected Members section, select the ID of Alibaba Cloud Account B and click OK.
Alibaba Cloud Account B (166032244439****) is added as a member by using Alibaba Cloud Account A (135809047715****).
After you add a member, Cloud Firewall can access the resources of the member by default. If a VPC firewall protects the VPCs that are attached to a Cloud Enterprise Network (CEN) instance and the VPCs are created by different Alibaba Cloud accounts, you must manually authorize Cloud Firewall to access the cloud resources within the Alibaba Cloud accounts to which the VPCs belong. For more information, see Authorize Cloud Firewall to access other cloud resources.
Step 4: Create a VPC firewall
If two VPCs are connected by using a VPC peering connection, you can create a VPC firewall to check traffic between the VPCs.
When you enable a VPC firewall, a transient connection error may occur on cross-VPC traffic due to a route switchover. We recommend that you enable a VPC firewall during off-peak hours.
Log on to the Cloud Firewall console by using Alibaba Cloud Account A. In the left-side navigation pane, click Firewall Settings.
On the Firewall Settings page, click the VPC Firewall tab.
On the Express Connect tab, find a row in which the value of the VPC parameter is BJ-VPC1 and the value of the Peer VPC parameter is BJ-VPC2 and click Create in the Actions column.
Cloud Firewall automatically synchronizes resources every 30 minutes. If you just created resources, you must wait for 30 minutes before you can find the resources.
In the Create VPC Firewall dialog box, configure the following parameters and click Submit.
Parameter
Description
Example
Instance Name
The name of the VPC firewall. We recommend that you enter a unique name to help you identify the VPC firewall based on your business requirements.
Multi-account management test
Connection Type
The type of the connection between VPCs or between a VPC and a data center. In this example, the value is fixed as Express Connect.
Express Connect
Confirm VPC-related Information
The region and the name of the VPC. Confirm the information and configure the Route table and Destination CIDR Block parameters.
VPC:
Region: China (Beijing)
VPC: vpc-2zekde0udtz2s1hn9****-BJ-VPC1
Firewall IP Address/NIC: 10.33.33.15-eni-2zeau3rre2q3llavidw0
Route table: vtb-2zeo25fbkcvc2lx7j****
Destination CIDR Block: 10.66.66.0/24
Peer VPC:
Peer Region: China (Beijing)
Peer VPC: vpc-2zey3h1i556yn5orn****-BJ-VPC2
Peer Firewall IP Address/NIC: 10.66.66.92-eni-2zeau3rre2q3llavidw0
Peer Route Table: vtb-2zeo25****
Peer Destination CIDR Block: 10.33.33.0/24
Intrusion Prevention
Cloud Firewall provides an intrusion prevention system (IPS) to defend against intrusions in real time by checking north-south and east-west traffic.
IPS Mode: Block Mode
IPS Capabilities: Basic Rules and Virtual Patching
Enable VPC Firewall
After you turn on Enable VPC Firewall, a VPC firewall is automatically enabled after you create the firewall. By default, the switch is turned off.
Enable VPC Firewall: on
On the Express Connect tab, find a row in which the value of the VPC parameter is BJ-VPC3 and the value of the Peer VPC parameter is BJ-VPC4, and click Create in the Actions column.
In the Create VPC Firewall dialog box, configure the following parameters and click Submit.
Parameter
Description
Example
Instance Name
The name of the VPC firewall. We recommend that you enter a unique name to help you identify the VPC firewall based on your business requirements.
Multi-account management test02
Connection Type
The type of the connection between VPCs or between a VPC and a data center. In this example, the value is fixed as Express Connect.
Express Connect
Confirm VPC-related Information
The region and the name of the VPC. Confirm the information and configure the Route table and Destination CIDR Block parameters.
VPC:
Region: China (Beijing)
VPC: vpc-2ze9epancaw8t4sha****-VPC3-ECS3
Firewall IP Address/NIC: 10.10.10.46-eni-2ze0if806m1f08w5****
Route table: vtb-2zekhldj6y24xm6vi****
Destination CIDR Block: 10.10.11.0/24
Peer VPC:
Peer Region: China (Beijing)
Peer VPC: vpc-2ze3rb2rf1rqo3peo****-BJ-VPC4
Peer Firewall IP Address/NIC: 10.10.11.116-eni-2ze24sw34yq9n8ae****
Peer Route Table: vtb-2zestg1kxe9it54yu****
Peer Destination CIDR Block: 10.10.10.0/24
Intrusion Prevention
Cloud Firewall provides an IPS to defend against intrusions in real time by checking north-south and east-west traffic.
IPS Mode: Block Mode
IPS Capabilities: Basic Rules and Virtual Patching
Enable VPC Firewall
After you turn on Enable VPC Firewall, a VPC firewall is automatically enabled after you create the firewall. By default, the switch is turned off.
Enable VPC Firewall: on
Step 5: Create an access control policy
A VPC firewall can be used to check traffic between VPCs. After you create a VPC firewall, the traffic between VPCs is allowed by default. You can create an access control policy for the VPC firewall to manage the assets within the VPCs in a fine-grained manner. In this example, create an access control policy to deny access from BJ-VPC1-ECS1 to BJ-VPC2-ECS2. The ECS instances belong to Alibaba Cloud Account A.
Log on to the Cloud Firewall console by using Alibaba Cloud Account A.
In the left-side navigation pane, choose .
On the VPC Border page, click Create Policy.
In the Create Policy - VPC Border panel, configure the following parameters.
Parameter
Description
Example
Source Type
The type of the traffic source.
IP
Source
The address of the traffic source.
10.33.33.17/32
Destination Type
The type of the traffic destination.
IP
Destination
The address of the traffic destination.
10.66.66.94/32
Protocol
The protocol of the traffic.
TCP
Port Type
The type of the port.
Port
Port
The ports on which you want to control traffic. If you set Port Type to Port, enter a port range. If you set Port Type to Address Book, find the required Port Address Book and click Select in the Actions column.
80
Application
The type of the application.
ANY
Action
The action on the traffic that reaches the VPC firewall.
Deny
Description
The description of the policy. Enter a description that can help identify the policy.
Deny policy for multi-account management
Priority
The priority of the policy. Default value: Lowest.
Lowest
Click OK.
Step 6: View traffic logs and the information about intrusion prevention
When you access assets, you can view the information about traffic between VPCs on the VPC Access page. This way, you can identify suspicious traffic and troubleshoot attacks in an efficient manner. For more information, see VPC Access. You can also view traffic logs of VPCs and the information about intrusion prevention to ensure that your configurations are correct. You can check whether suspicious traffic exists based on query results. If suspicious traffic exists, the configurations do not meet your business requirements. In this case, you can create another access control policy or modify the configurations of intrusion prevention.
View traffic logs of VPCs
Log on to the Cloud Firewall console by using Alibaba Cloud Account A.
In the left-side navigation pane, choose .
On the Log Audit page, click the Traffic Logs tab and then the VPC Border tab.
On the VPC Border tab, query the logs of traffic between the VPCs that belong to Alibaba Cloud Account A or Alibaba Cloud Account B.
To query the logs of traffic from BJ-VPC2-ECS2 to BJ-VPC1-ECS1, specify the IP address of BJ-VPC2-ECS2 (10.66.66.94) as the source IP address and the IP address of BJ-VPC1-ECS1 (10.33.33.17) as the destination IP address.
Successful access from BJ-VPC2-ECS2 to BJ-VPC1-ECS1 indicates that traffic between the two VPCs within Alibaba Cloud Account A is redirected to Cloud Firewall.
To query logs of access traffic from BJ-VPC3-ECS3 to BJ-VPC4-ECS4, specify the IP address of BJ-VPC3-ECS3 (10.10.10.44) as the source IP address and the IP address of BJ-VPC4-ECS4 (10.10.11.115) as the destination IP address.
Successful access from BJ-VPC3-ECS3 to BJ-VPC4-ECS4 indicates that traffic between the two VPCs within Alibaba Cloud Account B is redirected to Cloud Firewall.
On the VPC Border tab, specify the IP address of BJ-VPC1-ECS1 (10.33.33.17) as the source IP address and the IP address of BJ-VPC2-ECS2 (10.66.66.94) as the destination IP address to query the logs of denied access from BJ-VPC1-ECS1 to BJ-VPC2-ECS2.
Logs of denied access from BJ-VPC1-ECS1 to BJ-VPC2-ECS2 indicate that the configured access control policy is in effect. Access from BJ-VPC1-ECS1 to BJ-VPC2-ECS2 is denied. The enterprise assets are securely isolated.
View the information about intrusion prevention for VPCs
Log on to the Cloud Firewall console by using Alibaba Cloud Account A.
In the left-side navigation pane, choose .
On the Intrusion Prevention page, click the VPC Protection tab, specify search conditions, and then click Search to query the information about intrusion events.
The returned intrusion events between BJ-VPC1-ECS1 and BJ-VPC2-ECS2 that belong to Alibaba Cloud Account A indicate that Cloud Firewall detected insecure communication between the ECS instances. The enterprise assets are protected from intrusions.
NoteThe access traffic from BJ-VPC1-ECS1 to BJ-VPC2-ECS2 is not displayed because the traffic matches the Deny access control policy that you created and is blocked.
Find an intrusion event and click Details in the Action column. In the Basic Information panel, view the details of the intrusion event.
References
Use the multi-account management feature