When you evaluate the compliance of cloud resources, you may be unable to unify multiple compliance standards. For example, the requirements for resources in the production environment are different from the requirements for resources in the test environment, the specification requirements for resources in a department are different from the specification requirements for resources in another department, and the auditing standard for a resource varies based on the regulations. When you evaluate the compliance of resources, you can use the managed rules of Cloud Config to configure different compliance policies for different scenarios.
Use resource tags
Prerequisites: Tags are attached to the resources that you want to evaluate. For more information, see Add a custom tag.
This section describes how to evaluate resources in different development environments by tag. In this section, the development environments include a production environment and a test environment. Assume that the Env:Prod tag is attached to all resources in the production environment, and the Env:Test tag is attached to all resources in the test environment. You can specify custom tags to identify resources in different development environments.
Scope: single-account scenarios and multi-account scenarios. In this section, a single-account scenario is used.
Log on to the Cloud Config console.
In the left-side navigation pane, choose .
On the Rules page, click Create Rule.
In the Properties step, use the default values for the Rule Name, Risk Level, and Trigger Type parameters, and click Next.
In the Assess Resource Scope step, use the default resource type and select Set Effective Tag, set the Key parameter to Env and the Value parameter to Prod, and then click Next.
You can use the new rule to evaluate only resources to which the
Env:Prodtag is attached.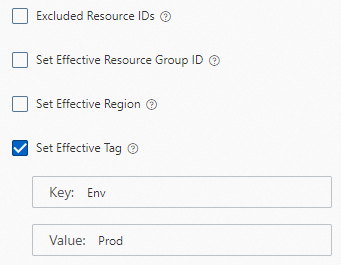
In the Parameters step, click Next.
In the Modify step, click Next.
In the Preview and Save step, confirm the configurations and click Submit.
Click Return to Rule List.
On the Rules page, view the evaluation result in the Compliance column of the new rule.
Use resource groups
Prerequisites: The resources that you want to evaluate are added to the required resource groups. For more information, see Create a resource group.
This section describes how to evaluate resources in different development environments by resource group. In this section, the development environments include a production environment and a test environment. In this section, all resources in the production environment are added to a resource group named ProEn and all resources in the test environment are added to a resource group named TestEn.
Scope: single-account scenarios and multi-account scenarios. In this section, a single-account scenario is used.
Log on to the Cloud Config console.
In the left-side navigation pane, choose .
On the Rules page, click Create Rule.
In the Properties step, use the default values for the Rule Name, Risk Level, and Trigger Type parameters, and click Next.
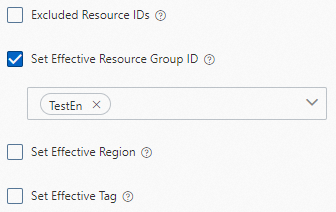
In the Assess Resource Scope step, use the default resource type, select Set Effective Resource Group ID, select TestEn from the drop-down list, and then click Next.
You can use the new rule to evaluate only resources in the test environment.
In the Parameters step, click Next.
In the Modify step, click Next.
In the Preview and Save step, confirm the configurations and click Submit.
Click Return to Rule List.
On the Rules page, view the evaluation result in the Compliance column of the new rule.
Use account groups
Prerequisites: A resource directory is enabled and the members to which the resources that you want to evaluate are added to the resource directory. For more information, see Enable a resource directory.
This section describes how to evaluate resources in different development environments by account group. In this section, the development environments include a production environment and a test environment. Alibaba Cloud accounts whose resources reside in the production environment and Alibaba Cloud accounts whose resources reside in the test environment are added to the resource directory. In this section, only the resources of all Alibaba Cloud account in the production environment are evaluated.
Scope: multi-account scenarios.
Create an account group named ProEnv for the production environment.
Log on to the Cloud Config console with a management account or a delegated administrator account.
In the left-side navigation pane, click .
On the Account Group page, click Create.
On the Create page, set the Account Group Name parameter to ProEnv, set the Description parameter to All member accounts in the production environment., and then click Add Member.
In the panel that appears, select all members in the production environment and click OK.
Click Submit.
If the account group is created as expected after you click Submit, you are redirected to the Account Group page. The new account group appears on the page.
Create a rule based on a managed rule
If you create a rule for the ProEnv account group, the rule can be used to evaluate the resources of all Alibaba Cloud accounts of the account group.
In the left-side navigation pane, choose .
On the Rules page, click Create Rule.
On the Create Rule page, search for a managed rule by rule name, tag, evaluation logic, or risk level and click Apply Rule.
In the Properties step, use the default values for the Rule Name, Risk Level, and Trigger Type parameters and click Next.
In the Assess Resource Scope step, use the default resource type and click Next.
In the Parameters step, click Next.
In the Modify step, click Next.
In the Preview and Save step, confirm the configurations and click Submit.
Click Return to Rule List.
On the Rules page, view the evaluation result in the Compliance column of the new rule.