Use Cloud Backup to synchronize data from File Storage NAS (NAS), Hadoop Distributed File System (HDFS), and Amazon Simple Storage Service (Amazon S3) to an Alibaba Cloud destination. Before you synchronize data, authorize Cloud Backup and install and activate a Cloud Backup client.
(Recommended) Create an AccessKey pair for a RAM user
Resource Access Management (RAM) is Alibaba Cloud's identity and access management service. It lets you create multiple identities under one Alibaba Cloud account and grant different permissions to users or groups, so each identity can access only the resources it needs.
A Cloud Backup client requires an AccessKey pair for activation. If you use the AccessKey pair of your Alibaba Cloud account and the key is leaked, all resources in the account may be exposed to security risks. To reduce risk, use a RAM user's AccessKey pair when you activate Cloud Backup clients. For more information, see Create a RAM user and Create an AccessKey pair.
Before you install and uninstall a Cloud Backup client, check the client installation path:
-
If a NAS file system is mounted to the installation path, run the
umountcommand to unmount the NAS file system. This prevents the file system from being accidentally deleted. -
If other important directories and files exist in the installation path, move them to another path. This prevents these directories and files from being accidentally deleted.
Download and activate a Cloud Backup client for Windows
Log on to the Cloud Backup console.
-
In the left-side navigation pane, choose Synchronization > Data Synchronization.
In the top navigation bar, select a region.
-
On the Data Source List tab of the Data Synchronization page, click Add Client.
-
Download the Cloud Backup client for Windows.
Download the installation package of the Cloud Backup client for Windows (64-bit) or Windows (32-bit). Record the activation code. The activation code is required to install and activate the Cloud Backup client.
-
Install and activate the Cloud Backup client for Windows.
-
Double-click the installation package of the Cloud Backup client and select the language that you want to use.
-
Select the path in which you want to install the Cloud Backup client, and click Next.
-
Select Local client connecting to Alibaba Cloud and click Next.
For more information, see How do I select a component and account when I install a Cloud Backup client?
-
Configure the logon identity.
If the source directory contains files that are shared over a network, select This user. The user must meet the following requirements:
-
The user has the permissions of the local administrator.
-
The user has the permissions to log on as a service.
To configure the logon user, perform the following steps:
-
Open the Control Panel. In the window that appears, click Administrative Tools.
-
Open Local Security Policy and choose .
-
Turn on Log on as a service. In the dialog box that appears, add a user.
-
-
The user has the permissions to access files that are shared over a network.
For more information, see How do I select a component and account when I install a Cloud Backup client?
-
-
If you want to use a proxy server, enter the IP address of the proxy server. Click Next.
-
Enter the activation code that you recorded in the Activation token field. Then, click Next.
-
Click Install.
-
Download and activate a Cloud Backup client for Linux
Log on to the Cloud Backup console.
-
In the left-side navigation pane, choose Synchronization > Data Synchronization.
In the top navigation bar, select a region.
-
On the Data Source List tab of the Data Synchronization page, click Add Client.
-
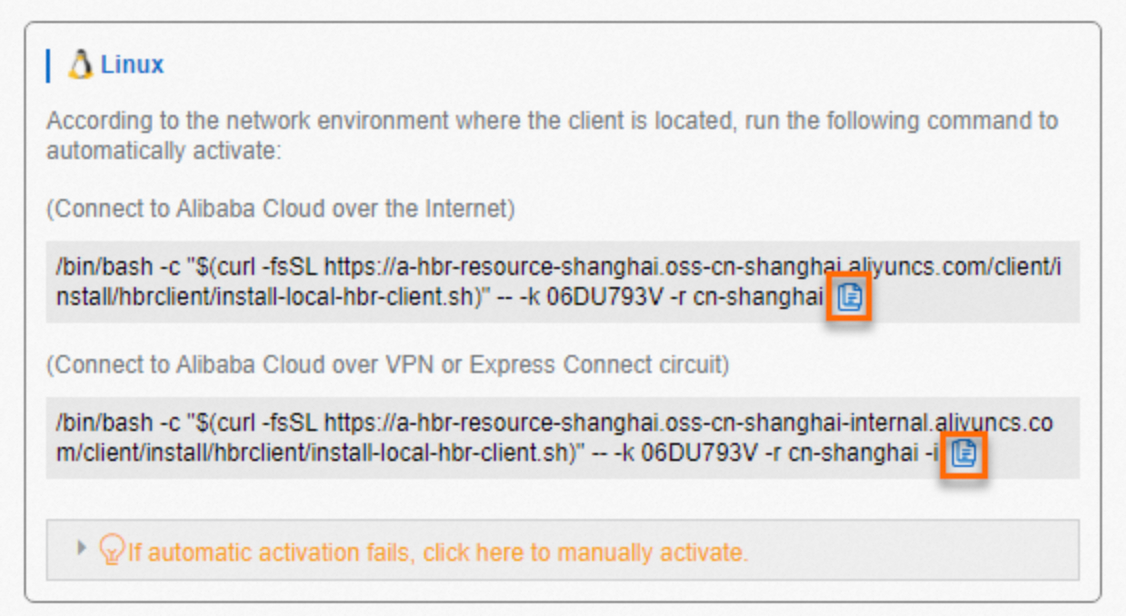
Activate the Cloud Backup client for Linux automatically.
Copy one of the commands based on your network, and then paste and run it on the Linux client to activate the client.
-
Run one of the following commands to install the tool that is required to back up and restore on-premises NAS file systems.
The Network File System (NFS) and Server Message Block (SMB) protocols are supported. Select a tool based on the protocol of your NAS file system.
-
NFS tool
-
CentOS
sudo yum install nfs-utils -
Ubuntu
sudo apt-get install nfs-common
-
-
SMB tool
-
CentOS
sudo yum install cifs-utils -
Ubuntu
sudo apt-get install cifs-utils -
openSUSE
sudo zypper install cifs-utils
-
-