To customize scale-in policies for Elastic Compute Service (ECS) instances, such as prioritizing those with the lowest CPU utilization, you can use Function Compute. During scale-in events, Auto Scaling will automatically remove ECS instances that meet your specified conditions from the scaling group.
Background information
Auto Scaling supports multiple scale-in policies. When scaling in, it removes instances from scaling groups based on criteria like instance creation time and scaling configuration. For more information, see Combine scaling policies and scale-in policies.
For businesses with high scaling demands, you can create custom scale-in policies tailored to your needs. We recommend using Function Compute with Auto Scaling in the following scenarios to implement custom scale-in policies:
Scenario 1: Scale in instances with the lowest CPU load first to reduce business impact.
Scenario 2: Scale in idle instances based on scheduling first to maintain service continuity while optimizing costs and resource usage.
Prerequisites
Function Compute is activated, and the relevant authorization is complete. For more information, see Step 1: Activate Function Compute.
Simple Log Service is activated, and the relevant authorization is completed. For more information, see Getting Started.
Procedure
Step 1: Create a function
Alibaba Cloud offers both Function Compute 2.0 and 3.0. This topic explains how to create a custom scale-in policy by using Function Compute 2.0.
Log on to the Function Compute console.
If Function Compute 3.0 is displayed, you can click Back to Function Compute 2.0.

In the left-side navigation pane, click Services & Functions.
In the top navigation bar, select a region.
Create a service.
On the Services page, click Create Service.
In the Create Service panel, configure the Name, Description, and Logging parameters based on your business requirements and click OK.
The following table describes the parameter settings used in this example. For parameters that are not described in this table, use the default values. For more information, see Create a service.
Parameter
Description
Description
Name
test-service
Enter a name for the Function Compute service. The name must follow the format requirements displayed on the UI.
Description
test
Enter a description for the Function Compute service.
Logging
Enable
Specify whether to enable the logging feature. If you enable the logging feature, Function Compute sends function execution logs to Simple Log Service for persistent storage. You can debug code, analyze failures, and analyze data based on the logs.
Create a function.
Click the name of the service that is created to go to the service details page. Then, click Functions in the left-side navigation pane.
Click Create Function.
On the Create Function page, configure parameters to complete function creation and click Create.
In this example, the Use Built-in Runtime method is selected to create a function. The following table describes the parameter settings used in this example. For parameters that are not described in this table, use the default values. For more information, see Create a function.
Parameter
Example
Description
Basic Settings
Function Name
test-fc
Enter a name for the function. The name must follow the format requirements displayed on the UI.
Handler Type
Event Handler
Valid values:
Event Handler: The function processes event requests.
HTTP Handler: The function processes HTTP or WebSocket requests.
Code
Runtime
Python 3.9
Select the runtime environment of the code.
Code Upload Method
Hello, world!
Select a method to upload the function code to Function Compute.
Compile and deploy the function code.
Click the function name to go to the function details page.
On the Code tab, create a file named index.py in the code editor and click Deploy.
In the function code, you can set custom removal conditions based on your business needs, such as low vCPU utilization or scheduling system requirements.
This example uses the number of ECS instances (Capacity) and the specified instance ID order (InstanceId) as scale-in conditions. Sample code:
# -*- coding: utf-8 -*-
import logging
import json


def handler(event, context):
    evt = json.loads(event)
    logger = logging.getLogger()
    logger.info(evt)
    removeCount = 0
    if "CapacityToRemove" in evt:
        for cp in evt["CapacityToRemove"]:
            logger.info(cp["Capacity"])
            removeCount += int(cp["Capacity"])
    instances_to_terminate = []
    if "Instances" in evt:
        for i in evt["Instances"]:
            instances_to_terminate.append(i["InstanceId"])
    response = {
        'InstanceIds': instances_to_terminate[:removeCount]
    }
    logger.info(response)
    return response
(Optional) Test the function.
On the Code tab, click the
 icon next to Test Function and select Configure Test Parameters from the drop-down list.
 Enter the test code and click OK.
In this example, the following code is tested. In the code,
ScalingGroupIdspecifies the ID of the scaling group that you want to manage.CapacityToRemovespecifies that Auto Scaling removes one ECS instance from thecn-beijing-gzone.Instancesspecifies the IDs of the ECS instances that can be scaled in.{ "ScalingGroupARN": "acs:ess:cn-beijing:160998252992****.scalinggroup/asg-2zei8mzn72rb115k****", "ScalingGroupId": "asg-2zei8mzn72rb115k****", "CapacityToRemove": [{ "ZoneId": "cn-beijing-g", "Capacity": 1 }], "Instances": [{ "InstanceId": "i-2zeinb37ovdsx6l0****", "ZoneId": "cn-beijing-g", "InstanceType": "ecs.g7.xlarge", "ChargeType": "PostPaid" }, { "InstanceId": "i-2zeinb37ovdsx6l0****", "ZoneId": "cn-beijing-g", "InstanceType": "ecs.g7.xlarge", "ChargeType": "PostPaid" }, { "InstanceId": "i-2zeinb37ovdsx6l0****", "ZoneId": "cn-beijing-g", "InstanceType": "ecs.g7.xlarge", "ChargeType": "PostPaid" } ], "AdjustmentType": "SystemScaleIn" }Click Test Function on the Code tab.
On the Result tab, view the test results.
If the output is similar to the following code, Auto Scaling removes the ECS instance whose ID ranks first during a scale-in event.
{
    "InstanceIds": [
        "i-2zeinb37ovdsx6l0****"
    ]
}
In the upper part of the page that appears, click Publish Version, and then click OK.
Step 2: Configure an instance removal policy
This section explains how to configure an instance removal policy when creating a scaling group. For existing scaling groups, you can modify the policy as needed.
Log on to the Auto Scaling console.
Create a scaling group.
On the Scaling Groups page, click Create Scaling Group.
Configure parameters to complete the group creation and click Create.
The following table describes the parameter settings used in this example. For parameters that are not described in this table, use the default values. For more information, see Manage scaling groups.
Parameter
Example
Description
Scaling Group Name
test
Enter a name for the scaling group. The name must follow the format requirements displayed on the UI.
Type
ECS
Specify the type of instances managed by the scaling group.
In the example, this parameter is set to ECS.
Instance Configuration Source
Create from Scratch
Select a template based on which Auto Scaling can create ECS instances.
In this example, this parameter is set to Create from Scratch. This value indicates that no template is specified when you create the scaling group. After you create the scaling group, create a scaling configuration.
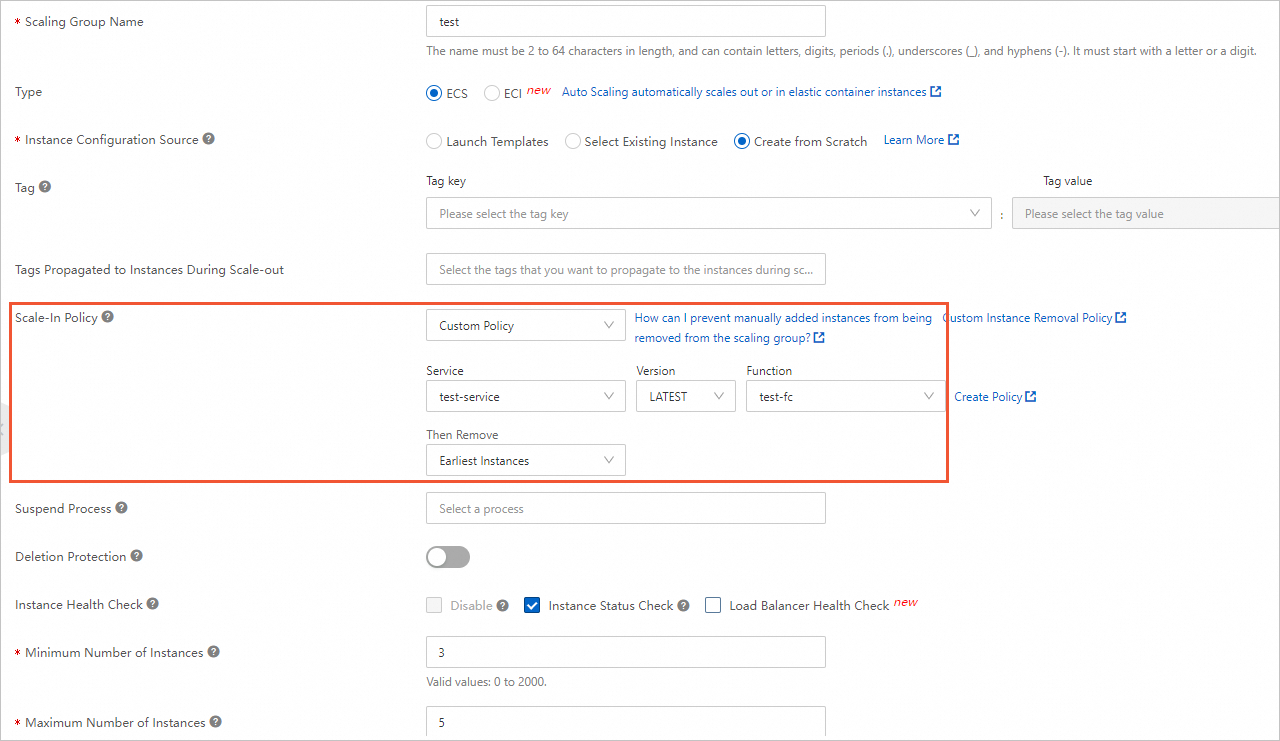
Scale-In Policy
Custom Policy
Service: test-service
Version: LATEST
Function: test-fc
Specify an instance scale-in policy.
In this example, select Custom Policy and then select the created function.
Minimum Number of Instances
0
Specify the minimum instance limit. If the number of instances in the scaling group is less than the value of this parameter, Auto Scaling adds ECS instances to the scaling group until the number of ECS instances in the scaling group reaches the minimum limit.
Maximum Number of Instances
5
Specify the maximum instance limit. If the number of instances in the scaling group is greater than the value of this parameter, Auto Scaling removes ECS instances from the scaling group until the number of ECS instances in the scaling group decreases to the maximum limit.
Enable Expected Number of Instances and Expected Number of Instances
Enable and 3
Enable the Expected Number of Instances feature and specify an expected number of instances. Auto Scaling automatically maintains the expected number of ECS instances in the scaling group.
Create a scaling configuration. For more information, see Create a scaling configuration of the ECS type.
Enable the scaling group. For more information, see Enable or disable scaling groups.
In this example, the value of Expected Number of Instances is 3. Therefore, Auto Scaling automatically creates three ECS instances in the scaling group.
Step 3: Check the scale-in effect
Trigger a scale-in event and check information about the scaled-in ECS instance.
Modify the Expected Number of Instances parameter to trigger a scale-in event. For more information, see View or modify scaling groups.
ImportantYou can trigger a scale-in event through scheduled tasks, event-triggered tasks, or manual execution of scaling rules. However, when scaling in by modifying the Minimum Number of Instances and Maximum Number of Instances parameters, any custom scale-in policy created via Function Compute won't take effect.
In this example, the Expected Number of Instances parameter is set to 2 to test the custom scale-in effect. Since the scaling group initially had three ECS instances, this adjustment triggers a scale-in event, removing one instance.
View the details of the scale-in event and check information about the scaled-in ECS instance. For more information, see View the details of a scaling activity.
In this example, the ID of the scaled-in ECS instance is
i-2ze2qdthrkpf****tldq.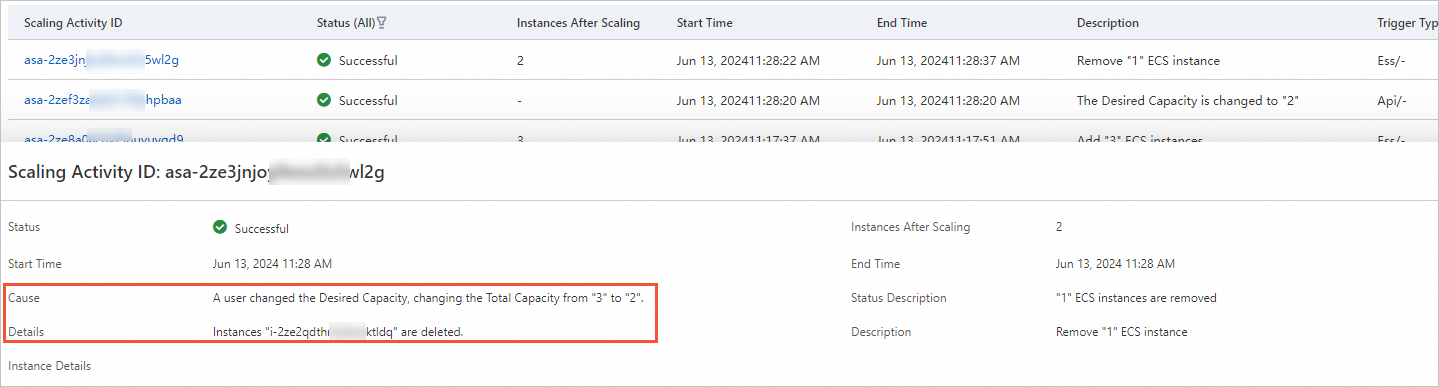
View the invocation logs of the function to check the records of function invocation.
On the Services page in the Function Compute console, click the name of your service.
On the Functions page, click the name of your function.
On the function details page, click the Logs tab.
On the Requests List tab of the Requests tab, find the request that triggered the scale-in event and click the request ID.
On the request details page, click Log Details to view the logs of function invocation triggered by the scale-in event.
The figure illustrates how Auto Scaling provides Function Compute with the target number of ECS instances to scale in, along with their IDs. Function Compute then executes your function, which returns the ID of the scaled-in instance. In this example, the returned ID (i-2ze2qdthrkpf****tldq) matches the actual scaled-in instance.
