When multiple clusters share an ASM instance, each cluster needs the same TLS certificates for secure gateway traffic. Manually distributing certificates across clusters is error-prone and hard to audit. ASM certificate management solves this by providing a single Certificate Management page where you upload certificates once, and ASM automatically synchronizes them to every cluster in the instance. You can also monitor certificate expiration and bind certificates to Istio gateways from the same page.
How it works
ASM certificate management follows a trust chain model:
Root CA  ──issues──>  Server certificate + Private key
                              │
                      Upload to ASM console
                              │
                      ASM synchronizes to all clusters
                              │
                      Istio gateway references by credentialName
A root certificate authority (CA) issues server certificates.
You upload the server certificates and private keys to the Certificate Management page in the ASM console.
ASM synchronizes the certificates to all clusters in the instance.
Istio gateways reference the certificates by name through the
credentialNamefield or the console GUI.
Prerequisites
Before you begin, make sure that you have:
An ASM instance running version 1.17 or later with at least one cluster added. For more information, see Add a cluster to an ASM instance
OpenSSL installed on your local machine
Create server certificates and private keys
Generate a root CA, then use it to sign server certificates. The following steps create two certificates: one with a standard validity period for normal use, and one that expires in one day for testing expiration alerts.
The following commands generate self-signed certificates for demonstration purposes. For production environments, use certificates issued by a trusted CA or a dedicated certificate management service.
Create a root CA
Run the following command to generate a self-signed root certificate and private key:
openssl req -x509 -sha256 -nodes -days 365 -newkey rsa:2048 -subj '/O=myexample Inc./CN=aliyun.com' -keyout aliyun.root.key -out aliyun.root.crtThis command generates the following files:
| File | Description |
|---|---|
aliyun.root.key | Root CA private key. Store this file securely and do not share it. |
aliyun.root.crt | Root CA certificate, valid for 365 days |
Create a standard server certificate
Run the following commands to generate a server certificate valid for 365 days:
openssl req -out aliyun.com.csr -newkey rsa:2048 -nodes -keyout aliyun.com.key -subj "/CN=aliyun.com/O=myexample organization"
openssl x509 -req -days 365 -CA aliyun.root.crt -CAkey aliyun.root.key -set_serial 0 -in aliyun.com.csr -out aliyun.com.crt
These commands generate the following files:
| File | Description |
|---|---|
aliyun.com.csr | Certificate signing request |
aliyun.com.key | Server private key |
aliyun.com.crt | Server certificate signed by the root CA, valid for 365 days |
Create an expiring test certificate
To test the expiration alerting feature, run the following commands to generate a server certificate valid for only 1 day:
openssl req -out expiring.aliyun.com.csr -newkey rsa:2048 -nodes -keyout expiring.aliyun.com.key -subj "/CN=aliyun.com/O=myexample organization"
openssl x509 -req -days 1 -CA aliyun.root.crt -CAkey aliyun.root.key -set_serial 0 -in expiring.aliyun.com.csr -out expiring.aliyun.com.crt
These commands generate the following files:
| File | Description |
|---|---|
expiring.aliyun.com.csr | Certificate signing request |
expiring.aliyun.com.key | Server private key |
expiring.aliyun.com.crt | Server certificate signed by the root CA, valid for 1 day |
Upload certificates to the ASM console
Upload the generated certificates to the Certificate Management page in the ASM console.
Upload the standard certificate
Log on to the ASM console. In the left-side navigation pane, choose Service Mesh > Mesh Management.
On the Mesh Management page, click the name of the ASM instance. In the left-side navigation pane, choose ASM Gateways > Certificate Management.
On the Certificate Management page, click Create. In the Certificate Information panel, configure the following parameters and click OK.
Parameter Description Name A name for the certificate Namespace The namespace for the certificate. Default: istio-systemPublic Key Certificate The content of the aliyun.com.crtfile generated in Create a standard server certificatePrivate Key The content of the aliyun.com.keyfile generated in Create a standard server certificateEnable mTLS Turn on this switch to create a certificate for mutual TLS (mTLS) communication. Paste the CA certificate content into the CA Certificate field
Upload the expiring test certificate
Repeat the steps above. For Public Key Certificate and Private Key, paste the content of the expiring.aliyun.com.crt and expiring.aliyun.com.key files generated in Create an expiring test certificate.
After both certificates are created, they appear on the Certificate Management page. Click Details in the Operation column to view certificate details, or click Edit to modify the certificate content.

Use the certificates
After you upload certificates to the Certificate Management page, you can reference them in the following scenarios:
| Scenario | How to reference | More information |
|---|---|---|
| YAML template | Set the credentialName field to the certificate name when you create or modify an Istio gateway | Manage Istio gateways |
| Console GUI | Select the certificate directly when you create an Istio gateway through the ASM console | Manage Istio gateways |
| Domain binding | Select the certificate for the credential parameter when you create a domain on the Gateway overview > Domain/Certificate page with the protocol set to TLS | Bind a certificate to a domain name |
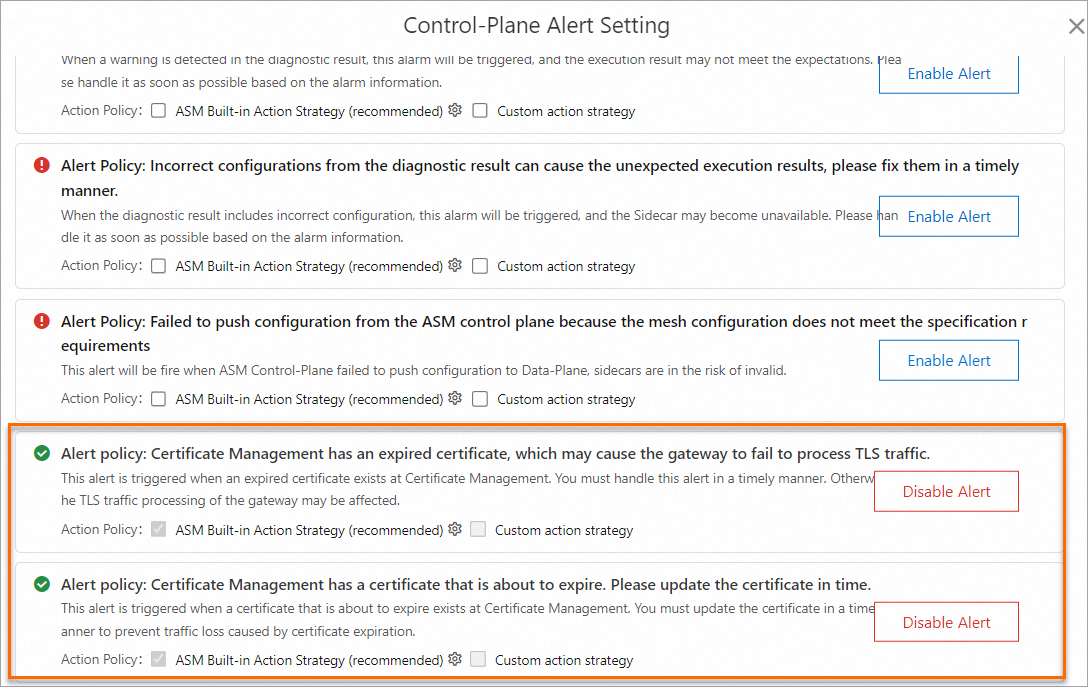
(Optional) Enable certificate expiration alerting
ASM supports two types of certificate alerts:
| Alert type | Trigger condition |
|---|---|
| Expiration alert | The certificate has expired |
| About-to-expire alert | The certificate's remaining validity is less than 30 days |
To receive these alerts, enable control-plane log collection. The setup steps depend on your ASM instance version:
| ASM instance version | Setup instructions |
|---|---|
| Earlier than 1.17.2.35 | Enable control-plane log collection and log-based alerting |
| 1.17.2.35 or later | Enable control-plane log collection and log-based alerting in an ASM instance of version 1.17.2.35 or later |
View certificate alert logs
After enabling control-plane log collection, check the alert logs to verify that expiration alerts are working.
ASM checks certificate expiration alerts every 6 hours. If no alert logs appear, wait and check again after 6 hours.
ASM version earlier than 1.17.2.35
Log on to the ASM console. In the left-side navigation pane, choose Service Mesh > Mesh Management.
On the Mesh Management page, click the name of the ASM instance. In the left-side navigation pane, choose ASM Instance > Base Information.
Click View log next to Control-plane log collection. In the left-side Logstore section, click internal-alert-history. On the internal-alert-history page, search for certificate to view the alert logs.

ASM version 1.17.2.35 or later
Log on to the ASM console. In the left-side navigation pane, choose Service Mesh > Mesh Management.
On the Mesh Management page, click the name of the ASM instance. In the left-side navigation pane, choose Observability Management Center > Log Center.
On the Log Center page, click the Control-Plane Logs tab. Enter Certificate in the search field, and then click Query &Analyze to view the certificate alert logs.
Migrate certificates from the Domain/Certificate page
If you previously created certificates on the Gateway overview > Domain/Certificate page, migrate them to the Certificate Management page for centralized management.
To migrate a certificate:
On the Certificate Management page (accessible via ASM Gateways > Certificate Management), click Create.
Set the certificate name to exactly match the name of the certificate on the Domain/Certificate page.
Copy the certificate content (public key and private key) from the Domain/Certificate page and paste it into the corresponding fields on the Certificate Management page.
Click OK. The certificate is now managed on the Certificate Management page.