When a frontend application sends requests to a backend service on a different origin (domain, protocol, or port), the browser blocks the response unless the server explicitly allows cross-origin access. Cross-origin resource sharing (CORS) is the standard mechanism that lets servers declare which origins can access their resources.
In Service Mesh (ASM), you configure CORS by adding a corsPolicy field to a VirtualService. The ASM sidecar proxy handles CORS headers automatically -- your backend application code does not need to manage CORS itself.
How CORS works
A browser applies CORS rules whenever a script makes a request to an origin different from the page's own origin. The flow depends on whether the request is classified as simple or preflight.
Simple requests go directly to the server with an Origin header. The server responds with Access-Control-Allow-Origin and Access-Control-Allow-Methods headers to indicate whether access is permitted:
# Successful cross-origin request
GET /api/data HTTP/1.1
Host: api.example.com
Origin: https://app.example.com

HTTP/1.1 200 OK
Access-Control-Allow-Origin: https://app.example.com

# Denied cross-origin request (browser blocks the response)
GET /api/data HTTP/1.1
Host: api.example.com
Origin: https://app.example.com

HTTP/1.1 200 OK
Access-Control-Allow-Origin: https://other.example.com
A request qualifies as simple when it meets all three conditions:
Uses
GET,HEAD, orPOSTSets
Content-Typetotext/plain,application/x-www-form-urlencoded, ormultipart/form-dataUses only CORS-safelisted headers:
Accept,Accept-Language,Content-Language, andContent-Type(restricted to the values above)
Preflight requests apply to everything else. The browser first sends an OPTIONS request to check whether the actual request is allowed:
# Preflight request
OPTIONS /api/data HTTP/1.1
Host: api.example.com
Origin: https://app.example.com
Access-Control-Request-Method: PUT
Access-Control-Request-Headers: X-Custom-Header

# Preflight response (allowed)
HTTP/1.1 204 No Content
Access-Control-Allow-Origin: https://app.example.com
Access-Control-Allow-Methods: GET, PUT, POST
Access-Control-Allow-Headers: X-Custom-Header
Access-Control-Max-Age: 86400
If the preflight response permits the request, the browser sends the actual request. Otherwise, the browser blocks it.
Configure a CORS policy in a VirtualService
Add a corsPolicy block under the http route in your VirtualService. The sidecar proxy reads this configuration and adds the appropriate Access-Control-* response headers automatically.
corsPolicy parameter reference
| Parameter | Type | Maps to HTTP header | Description |
|---|---|---|---|
allowOrigins | StringMatch[] | Access-Control-Allow-Origin | Origins allowed to access the service. Supports exact, prefix, and regex match types. Set to wildcard (*) to allow all origins for requests without credentials. |
allowMethods | string[] | Access-Control-Allow-Methods | HTTP methods allowed for cross-origin requests. |
allowHeaders | string[] | Access-Control-Allow-Headers | HTTP headers that can be used in cross-origin requests. |
exposeHeaders | string[] | Access-Control-Expose-Headers | Response headers that browsers are allowed to access. |
maxAge | Duration | Access-Control-Max-Age | How long browsers can cache the preflight response. |
allowCredentials | bool | Access-Control-Allow-Credentials | Whether cross-origin requests can include credentials (cookies, HTTP authentication). |
Tutorial: Enable CORS for a cross-origin demo
This walkthrough deploys a frontend and backend application on separate ingress gateways, demonstrates the CORS error, then resolves it by adding a corsPolicy to the backend's VirtualService.
Before you begin
Add a cluster to your ASM instance. For more information, see Add a cluster to an ASM instance.
Create the
defaultandfoonamespaces, and enable automatic sidecar proxy injection for both. For more information, see Manage global namespaces.
Step 1: Deploy the applications
Deploy the backend (details service)
Connect to the cluster with kubectl. For more information, see Obtain the kubeconfig file of a cluster and use kubectl to connect to the cluster.
Save the following YAML as
details.yaml:Deploy the details application in the
defaultnamespace:kubectl apply -f details.yaml -n default
Deploy the frontend (istio-cors-demo)
Save the following YAML as
istio-cors-demo.yaml:Deploy the istio-cors-demo application in the
foonamespace:kubectl apply -f istio-cors-demo.yaml -n foo
Step 2: Create two ingress gateways
Create two separate ingress gateways so the frontend and backend are exposed on different IP addresses, simulating a cross-origin scenario.
Log on to the ASM console. In the left-side navigation pane, choose Service Mesh > Mesh Management.
On the Mesh Management page, click the name of the ASM instance. In the left-side navigation pane, choose ASM Gateways > Ingress Gateway.
On the Ingress Gateway page, click Create.
On the Create page, set Name to
ingressgateway. Select a cluster from the Cluster drop-down list. Select Internet Access for CLB Instance Type. Select a Classic Load Balancer (CLB) instance type below Create a CLB Instance. Keep the default values for other parameters and click Create.Repeat steps 3 and 4 to create a second ingress gateway named
ingressgateway2.
Step 3: Set up routing rules
Route traffic to the backend
Create an Istio gateway to associate the details service with
ingressgateway.In the left-side navigation pane of the ASM instance, choose ASM Gateways > Gateway.
On the Gateway page, click Create from YAML.
Select default from the Namespace drop-down list, paste the following YAML, and click Create:
apiVersion: networking.istio.io/v1beta1
kind: Gateway
metadata:
  name: bookinfo-gateway
  namespace: default
spec:
  selector:
    istio: ingressgateway
  servers:
    - hosts:
        - '*'
      port:
        name: http
        number: 80
        protocol: HTTP
Create a VirtualService to route
/detailsrequests to the details service.In the left-side navigation pane, choose Traffic Management Center > VirtualService. Click Create from YAML.
Select default from the Namespace drop-down list, paste the following YAML, and click Create:
apiVersion: networking.istio.io/v1beta1
kind: VirtualService
metadata:
  name: bookinfo
  namespace: default
spec:
  gateways:
    - bookinfo-gateway
  hosts:
    - '*'
  http:
    - match:
        - uri:
            prefix: /details
      route:
        - destination:
            host: details
            port:
              number: 9080
Verify the backend is accessible.
Get the IP address of
ingressgateway. For more information, see Create an ingress gateway.Open
http://<ingressgateway-ip>/details/2in a browser. A JSON response from the details service confirms the backend is working.
Route traffic to the frontend
Create an Istio gateway to associate the istio-cors-demo application with
ingressgateway2.In the left-side navigation pane, choose ASM Gateways > Gateway. Click Create from YAML.
Select foo from the Namespace drop-down list, paste the following YAML, and click Create:
apiVersion: networking.istio.io/v1beta1
kind: Gateway
metadata:
  name: istio-cors-demo-gateway
  namespace: foo
spec:
  selector:
    istio: ingressgateway2
  servers:
    - hosts:
        - '*'
      port:
        name: http
        number: 80
        protocol: HTTP
Create a VirtualService for the frontend.
In the left-side navigation pane, choose Traffic Management Center > VirtualService. Click Create from YAML.
Select foo from the Namespace drop-down list, paste the following YAML, and click Create:
apiVersion: networking.istio.io/v1beta1
kind: VirtualService
metadata:
  name: istio-cors-demo
  namespace: foo
spec:
  gateways:
    - istio-cors-demo-gateway
  hosts:
    - '*'
  http:
    - route:
        - destination:
            host: istio-cors-demo
            port:
              number: 8000
Confirm the cross-origin error
Get the IP address of
ingressgateway2. For more information, see Create an ingress gateway.Open
http://<ingressgateway2-ip>in Google Chrome.In the URL field on the page, enter
http://<ingressgateway-ip>/details/2and click Send.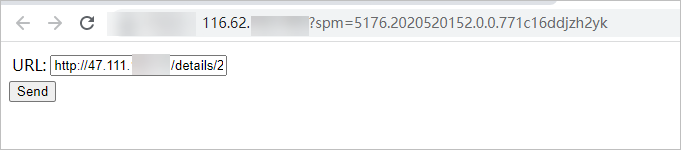
Open Chrome DevTools (press
F12or click the icon > More tools > Developer tools). The console shows a CORS error because the backend does not include an
 Access-Control-Allow-Originheader for the frontend's origin.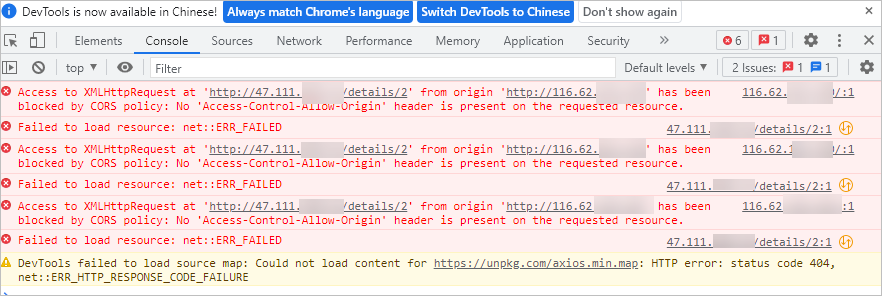
Step 4: Add a CORS policy to the backend VirtualService
Log on to the ASM console. In the left-side navigation pane, choose Service Mesh > Mesh Management.
Click the name of the ASM instance. In the left-side navigation pane, choose Traffic Management Center > VirtualService.
Find the bookinfo VirtualService and click YAML in the Actions column.
In the Edit dialog box, add the following
corsPolicyblock to thehttpfield, then click OK: Replace the following placeholder with the actual value:Placeholder Description Example <ingressgateway2-ip>IP address of the ingressgateway2gateway47.95.XX.XX corsPolicy: allowCredentials: false allowMethods: - POST - GET allowOrigins: - prefix: 'http://<ingressgateway2-ip>' maxAge: 24h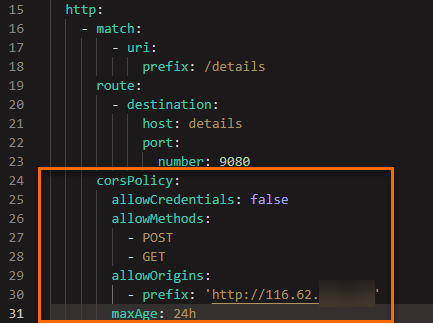
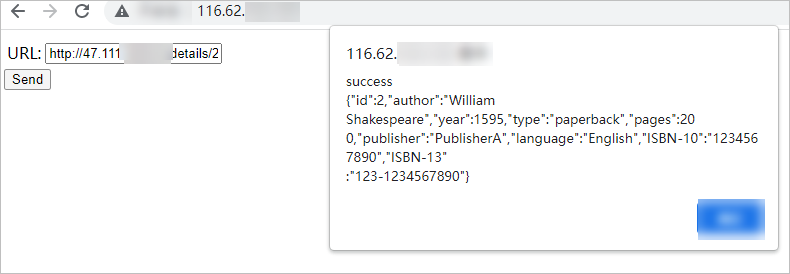
Step 5: Verify that CORS works
Open
http://<ingressgateway2-ip>in Google Chrome.In the URL field, enter
http://<ingressgateway-ip>/details/2and click Send.The page displays the JSON response from the details service, confirming that the cross-origin request succeeded.