Traffic lanes in strict mode allow you to isolate a specific version or certain features of an application into a separate runtime environment. This approach is useful when you want to perform canary release for all services in a call chain or when you want to isolate an application version. By routing only traffic that meets the specified rules to new service versions, this approach ensures that the release is both reliable and controllable.
Prerequisites
A Service Mesh (ASM) instance of Enterprise Edition or Ultimate Edition is created and the version of the instance is 1.18.2.111 or later. For more information, see Create an ASM instance or Upgrade an ASM instance.
NoteIf the version of your ASM instance is 1.17.2.22 or later but earlier than 1.18.2.111, see Use lanes to manage traffic for information about traffic management.
The cluster is added to the ASM instance. For more information, see Add a cluster to an ASM instance.
An ASM ingress gateway named ingressgateway is created. For more information, see Create an ingress gateway.
An Istio gateway named ingressgateway is created in the istio-system namespace. For more information, see Manage Istio gateways.
Examples
In this example, three lanes (s1, s2, and s3) are created and represent three versions of the mocka, mockb, and mockc services.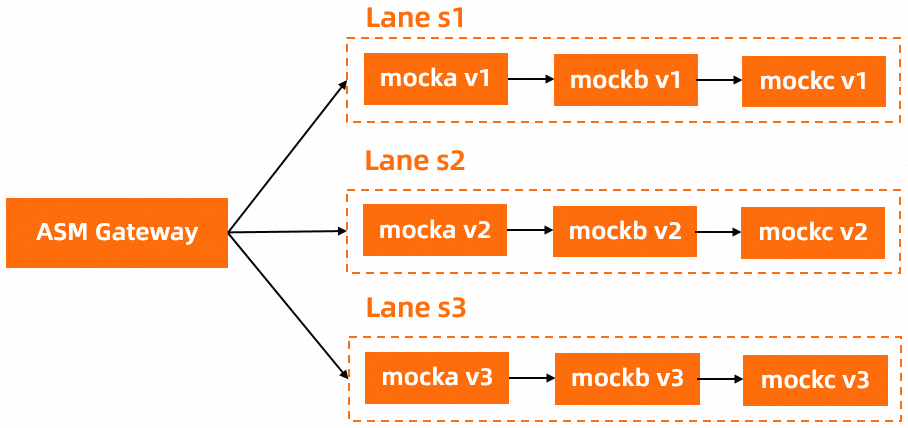
Step 1: Deploy sample services
Enable automatic sidecar proxy injection for the default namespace. For more information about the procedure, see Enable automatic sidecar proxy injection in the Manage global namespaces topic.
For more information about automatic sidecar proxy injection, see Configure sidecar proxy injection policies.
Run the following commands to deploy sample services in a Container Service for Kubernetes (ACK) cluster:
kubectl apply -f https://alibabacloudservicemesh.oss-cn-beijing.aliyuncs.com/asm-labs/swimlane/v1/mock-tracing-v1.yaml
kubectl apply -f https://alibabacloudservicemesh.oss-cn-beijing.aliyuncs.com/asm-labs/swimlane/v2/mock-tracing-v2.yaml
kubectl apply -f https://alibabacloudservicemesh.oss-cn-beijing.aliyuncs.com/asm-labs/swimlane/v3/mock-tracing-v3.yaml
Step 2: Create a lane group and lanes
Create a lane group.
Log on to the ASM console. In the left-side navigation pane, choose .
On the Mesh Management page, click the name of the ASM instance. In the left-side navigation pane, choose .
On the Traffic Lane page, click Create Swimlane Group. In the Create Swimlane Group panel, set the parameters and click OK.
Parameter
Description
Name of swim lane group
For this example, enter test.
Istio gateway for an ingress gateway
Select ingressgateway.
Lane Mode
Select Strict Mode.
Swimlane Services
Select the ACK cluster where you deployed sample services from the Kubernetes Clusters drop-down list and select default from the Namespace drop-down list. Then, select mocka, mockb, and mockc in the service list, and click the
 icon to add the services to the selected section.
Create s1, s2, and s3 lanes and bind the s1 lane to version 1 (v1) of the sample services, the s2 lane to version 2 (v2) of the sample services, and the s3 lane to version 3 (v3) of the sample services.
In the Traffic Rule Definition section of the Traffic Lane page, click Create swimlanes.
In the Create swimlanes dialog box, set the parameters and click OK.
Parameter
Description
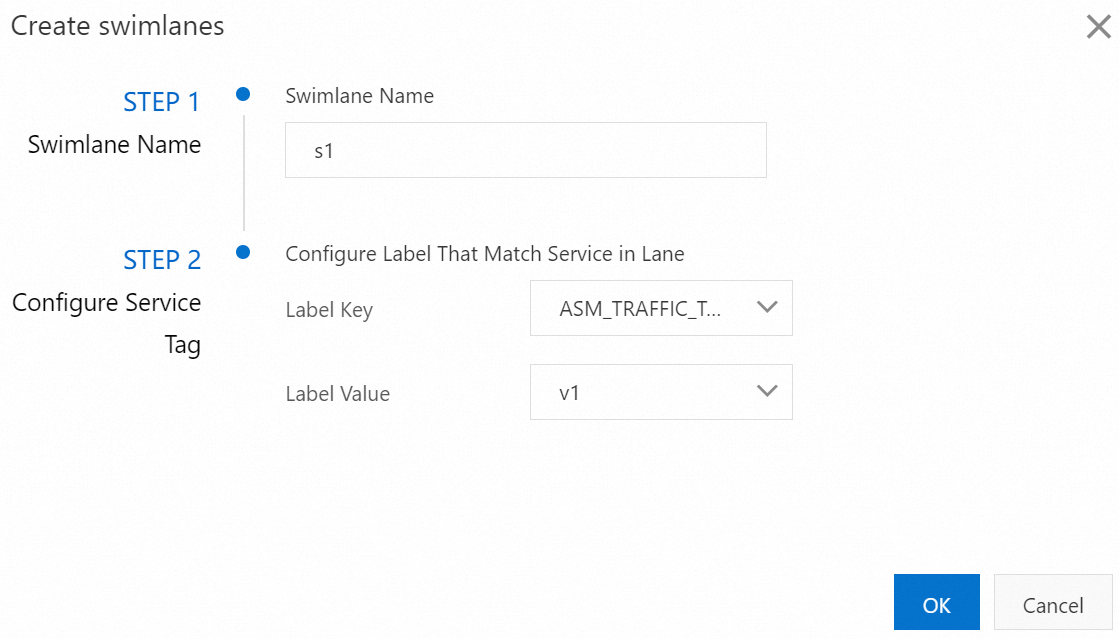
Swimlane Name
Name the three lanes as s1, s2, and s3 respectively.
Configure Service Tag
Label Key: Select ASM_TRAFFIC_TAG.
Label Value: Select v1 for the s1 lane, v2 for the s2 lane, and v3 for the s3 lane.
The following figure shows the configurations of the s1 lane.
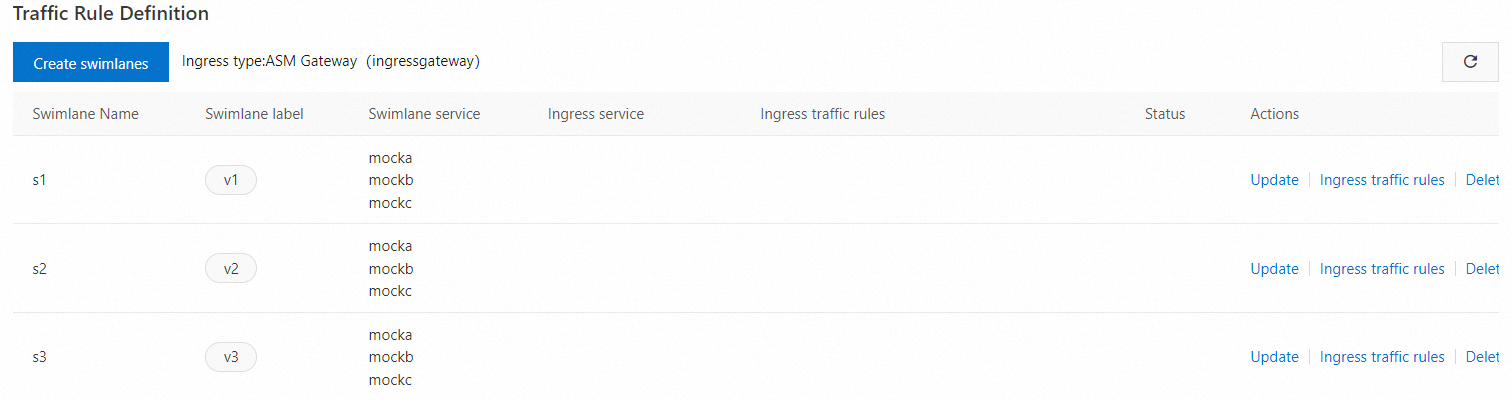
After the three lanes are created, you can view them in the Traffic Rule Definition section, as shown in the following figure.
A destination rule and a virtual service are automatically generated for each service in the lanes. You can choose or VirtualService in the left-side navigation pane to view the destination rule or virtual service. For example, the following destination rule and virtual service are automatically created for the mocka service.
Create a traffic routing rule for each lane.
In the Traffic Rule Definition section of the Traffic Lane page, find the lane for which you want to create a traffic routing rule, and click Ingress traffic rules in the Actions column.
In the Add drainage rule dialog box, set the parameters and click OK.
This example assumes that the inbound request path of all services in the lanes is
/mock, and the same traffic routing rule is configured for each lane.Parameter
Description
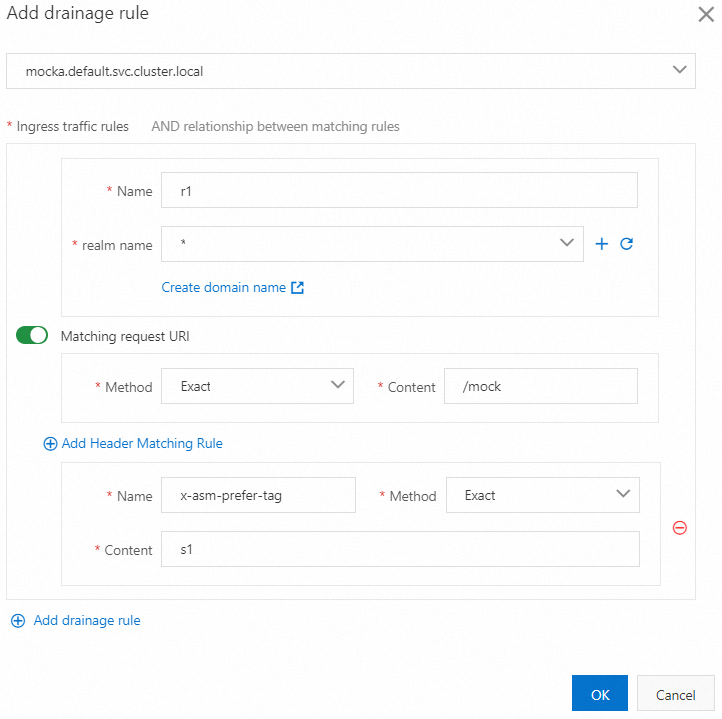
Ingress service
Select mocka.default.svc.cluster.local.
Ingress traffic rules
Set the Name parameter to r1 and the realm name parameter to *.
Matching request URI
Set the Method parameter to Exact and the Content parameter to /mock.
Add Header Matching Rule
Click Add Header Matching Rule. Set Name to x-asm-prefer-tag, Method to Exact, and Content to s1, s2, and s3 respectively.
The following figure shows the configurations of the traffic routing rule for the s1 lane.
After traffic routing rules are created, you can view them in the Traffic Rule Definition section, as shown in the following figure.

After a traffic routing rule is created, a virtual service is automatically generated for the lane. For example, the following virtual service is generated for the s1 lane.
Step 3: Verify that the end-to-end canary release feature takes effect
Obtain the public IP address of the ASM ingress gateway. For more information, see Step 2: Obtain the IP address of the ASM ingress gateway.
Run the following command to configure an environment variable.
xxx.xxx.xxx.xxxis the IP address obtained in substep 1.export ASM_GATEWAY_IP=xxx.xxx.xxx.xxxVerify that the end-to-end canary release feature takes effect.
Run the following command to access services in the s1 lane.
In the command, the value of
x-asm-prefer-tagiss1, which is the name of the s1 lane that you configured when you created the s1 lane in substep 2 of Step 2.for i in {1..100}; do curl -H 'x-asm-prefer-tag: s1' http://${ASM_GATEWAY_IP}/mock ; echo ''; sleep 1; done;Expected output:
-> mocka(version: v1, ip: 172.17.0.54)-> mockb(version: v1, ip: 172.17.0.129)-> mockc(version: v1, ip: 172.17.0.130)The output indicates that traffic specified by the HTTP header
x-asm-prefer-tag: s1flows to the relevant services in the s1 lane. This meets expectations.Run the following command to access services in the s2 lane.
In the command, the value of
x-asm-prefer-tagiss2, which is the name of the s2 lane that you configured when you created the s2 lane in substep 2 of Step 2.for i in {1..100}; do curl -H 'x-asm-prefer-tag: s2' http://${ASM_GATEWAY_IP}/mock ; echo ''; sleep 1; done;Expected output:
-> mocka(version: v2, ip: 172.17.0.9)-> mockb(version: v2, ip: 172.17.0.126)-> mockc(version: v2, ip: 172.17.0.128)The output indicates that traffic specified by the HTTP header
x-asm-prefer-tag: s2flows to the relevant services in the s2 lane. This meets expectations.Run the following command to access services in the s3 lane.
In the command, the value of
x-asm-prefer-tagiss3, which is the name of the s3 lane that you configured when you created the s3 lane in substep 2 of Step 2.for i in {1..100}; do curl -H 'x-asm-prefer-tag: s3' http://${ASM_GATEWAY_IP}/mock ; echo ''; sleep 1; done;Expected output:
-> mocka(version: v3, ip: 172.17.0.132)-> mockb(version: v3, ip: 172.17.0.127)-> mockc(version: v3, ip: 172.17.0.69)The output indicates that traffic specified by the HTTP header
x-asm-prefer-tag: s3flows to the relevant services in the s3 lane. This meets expectations.
Use custom virtual services to route traffic for traffic lanes in strict mode
The ASM console has a built-in request routing rule creation feature. After you create virtual services on the ASM ingress gateway corresponding to traffic lanes, request routing rules are created for traffic lanes. This way, the ASM ingress gateway can forward requests to different traffic lanes.
Request routing rules of traffic lanes include matching rules for request headers and request paths. You can create custom virtual services to define more complex matching rules or create custom request routes.
When you use a custom virtual service to route traffic of a traffic lane, we recommend that you do not use the built-in request routing rule creation feature to create request routing rules for the traffic lane. This is because the custom virtual service may conflict with the request routing rules created by using the built-in request routing rule creation feature. As a result, abnormal or unexpected traffic distribution may occur.
Create a custom virtual service on an ASM ingress gateway
The scenario in this topic is an example. In substep 3 Create traffic routing rules for the three lanes of Step 2, change the step of creating a traffic routing rule to the step of creating a virtual service by using the following content. For more information, see Manage virtual services.
apiVersion: networking.istio.io/v1beta1
kind: VirtualService
metadata:
  name: swimlane-ingress-vs-custom
  namespace: istio-system
spec:
  gateways:
    - istio-system/ingressgateway
  hosts:
    - '*'
  http:
    - match: # This matching rule exactly matches env: dev request headers.
        - headers:
            env:
              exact: dev
      name: dev-route
      route:
        - destination:
            host: mocka.default.svc.cluster.local # The destination service for traffic forwarding.
            subset: s2 # The name of a traffic lane.
          weight: 50
        - destination:
            host: mocka.default.svc.cluster.local # The destination service for traffic forwarding.
            subset: s3 # The name of a traffic lane.
          weight: 50
    - name: base-route
      route:
        - destination:
            host: mocka.default.svc.cluster.local # The destination service for traffic forwarding.
            subset: s1 # The name of a traffic lane.
Run the commands in Step 3: Verify that the end-to-end canary release feature takes effect. The following output is generated when you access services in the s1, s2, and s3 lanes:
-> mocka(version: v1, ip: 192.168.0.50)-> mockb(version: v1, ip: 192.168.0.46)-> mockc(version: v1, ip: 192.168.0.48)Run the following command to check the result when you access services in the s1 lane with an
env: devrequest header:for i in {1..100}; do curl -H 'x-asm-prefer-tag: s1' -H 'env: dev' http://${ASM_GATEWAY_IP}/mock ; echo ''; sleep 1; done;Expected output:
The output indicates that when you access services in the s1 lane with an
env: devrequest header, the traces that contain the V2 version of the services and the traces that contain the V3 version of the services are involved, and the ratio of requests in the two types of traces is about 50:50. That is, requests with theenv: devrequest headers are routed to the s2 and s3 lanes at a ratio of 50:50, and the remaining requests are forwarded to the s1 lane.
The preceding virtual service specifies a custom routing rule on the ASM gateway to forward traffic to different traffic lanes. When you create custom virtual services to route requests for traffic lanes in strict mode, If you want to route requests to a specific traffic lane, you need to only set the route.destination.subset field to the name of the traffic lane. After a request is routed to a traffic lane, other requests in the trace will be transmitted in the traffic lane.

Create custom virtual services on sidecar proxies
In addition to creating custom virtual services on an ASM ingress gateway, you can also specify request routing rules for applications in a cluster to access services in traffic lanes by creating virtual services on all sidecar proxies. Different from custom virtual services on an ASM ingress gateway, gateway fields are no longer required for virtual services on sidecar proxies. You need to specify the cluster domain of the mocka service in the hosts field. Sample YAML file:
apiVersion: networking.istio.io/v1beta1
kind: VirtualService
metadata:
  name: swimlane-ingress-vs-custom
  namespace: istio-system
spec:
  hosts:
    - mocka.default.svc.cluster.local
  http:
    - match: # This matching rule exactly matches env: dev request headers.
        - headers:
            env:
              exact: dev
      name: dev-route
      route:
        - destination:
            host: mocka.default.svc.cluster.local # The destination service for traffic forwarding.
            subset: s2 # The name of a traffic lane.
          weight: 50
        - destination:
            host: mocka.default.svc.cluster.local # The destination service for traffic forwarding.
            subset: s3 # The name of a traffic lane.
          weight: 50
    - name: base-route
      route:
        - destination:
            host: mocka.default.svc.cluster.local # The destination service for traffic forwarding.
            subset: s1 # The name of a traffic lane.
Run the following command to access the mocka service without an
env: devrequest header after you create custom virtual services on sidecar proxies:kubectl exec -it deploy/sleep -c sleep -- sh -c 'for i in $(seq 1 100); do curl http://mocka:8000; echo ""; sleep 1; done;'Expected output:
-> mocka(version: v1, ip: 192.168.0.50)-> mockb(version: v1, ip: 192.168.0.46)-> mockc(version: v1, ip: 192.168.0.48)The output indicates that when you access services in all lanes without an
env: devrequest header, the traces that contain the V1 version of the services are always involved. This indicates that all traffic is sent to the s1 lane.Run the following command to access the mocka service with an
env: devrequest header after you create custom virtual services on sidecar proxies:kubectl exec -it deploy/sleep -c sleep -- sh -c 'for i in $(seq 1 100); do curl -H "env: dev" http://mocka:8000; echo ""; sleep 1; done;'Expected output:
The output is the same as that in Create a custom virtual service on an ASM ingress gateway. When you access the mocka service with an
env: devrequest header, traffic is routed to the s2 and s3 lanes at a ratio of 50:50.
Similar to Create a custom virtual service on an ASM ingress gateway, when a service in a cluster calls the mocka service in a traffic lane, subsequent requests in the trace are always routed to the traffic lane.

References
Traffic lanes have two modes: strict and permissive. For more information about the two modes and differences between them, see Overview of traffic lanes.
Traffic lanes in permissive mode can be used in more scenarios when end-to-end pass-through request headers are used. For example, when only new versions of some services in a trace are released, you can use traffic lanes in permissive mode to test these new versions. For more information, see Use traffic lanes in permissive mode to manage end-to-end traffic.
You can configure traffic lanes by specifying virtual services and destination rules. You can also use these rules to configure traffic shifting, which routes traffic to a version with a lower priority or an application with specific characteristics when the destination version or application is unavailable. For more information, see Use traffic rules to configure traffic lanes and traffic shifting.