Service Mesh (ASM) allows you to connect an ingress gateway to a Web Application Firewall (WAF) instance. You can customize the fields of access logs to view the headers that are added by the WAF instance to back-to-origin requests. This facilitates online O&M. This topic describes how to connect an ingress gateway to a WAF instance and how to customize the fields of access logs for debugging.
Prerequisites
An ingress gateway is deployed. For more information, see Create an ingress gateway.
The cluster is added to the ASM instance. For more information, see Add a cluster to an ASM instance.
The HTTPBin application is deployed and exposed on port 80 of the gateway. For more information, see Deploy the httpbin application.
Introduction to WAF
WAF provides end-to-end security protection for your websites or apps. WAF identifies and filters out malicious web traffic, and then forwards normal traffic to your origin servers. This protects your origin servers against attacks and ensures data and service security.
Step 1: Connect an ingress gateway to a WAF instance
You can connect an ingress gateway to a WAF instance by using a Layer 4 Classic Load Balancer (CLB) instance or a CNAME based on your business requirements.
Layer 4 CLB instance: We recommend that you use this method. You can connect the CLB instance of the ingress gateway by using this method. A CLB instance was formerly known as a Server Load Balancer (SLB) instance. If you use a Layer 4 CLB instance, all traffic of the ingress gateway is directly routed to the WAF instance, and the WAF rule is executed for all the requests that reach the CLB instance of the ingress gateway.
CNAME: In this method, requests from specified domain names are routed to the WAF instance. You can use this method if the ingress gateway has multiple domain names and only some of the domain names require WAF protection.
NoteTo use a CNAME, you must modify the DNS resolution rule of the domain names. You must point your domain name to the WAF instance. Then, the WAF instance forwards the requests to the ingress gateway.
Method 1: Use a Layer 4 CLB instance
Log on to the Web Application Firewall console. Click Subscription or Pay-As-You-Go based on your business requirements. Confirm the region and other configuration items and click Buy Now to create a WAF 3.0 instance. If you have created a WAF instance, you can use the existing WAF instance.
In the left-side navigation pane, click Website Configuration. On the Website Configuration page, click the Cloud Native tab and click CLB(TCP). On the right side, click Add.
In the Configure Instance- Layer 4 CLB Instance panel, find the CLB instance that is associated with the gateway and click Add Port in the Actions column. Select the port that is used on the ingress gateway. After you configure the port, click OK.
In this example, HTTP port 80 is selected. If you want to select the HTTPS protocol, you must configure an HTTPS certificate.
NoteYou can log on to the ASM console and view the CLB instance of the ingress gateway on the gateway details page.
Select Enable Traffic Mark. Add three headers and click OK.
If a request carries these headers, the request is protected by WAF. In this example, the following three headers are added: Custom Header (customwaftag:customwaftagvalue), Originating IP Address (clientrealip), and Source Port (clientrealport).
Method 2: Use a CNAME
Log on to the Web Application Firewall console. Click Subscription or Pay-As-You-Go based on your business requirements. Confirm the region and other configuration items and click Buy Now to create a WAF 3.0 instance. If you have created a WAF instance, you can use the existing WAF instance.
In the left-side navigation pane, click Website Configuration. On the Website Configuration page, click the CNAME Record tab and click Add.
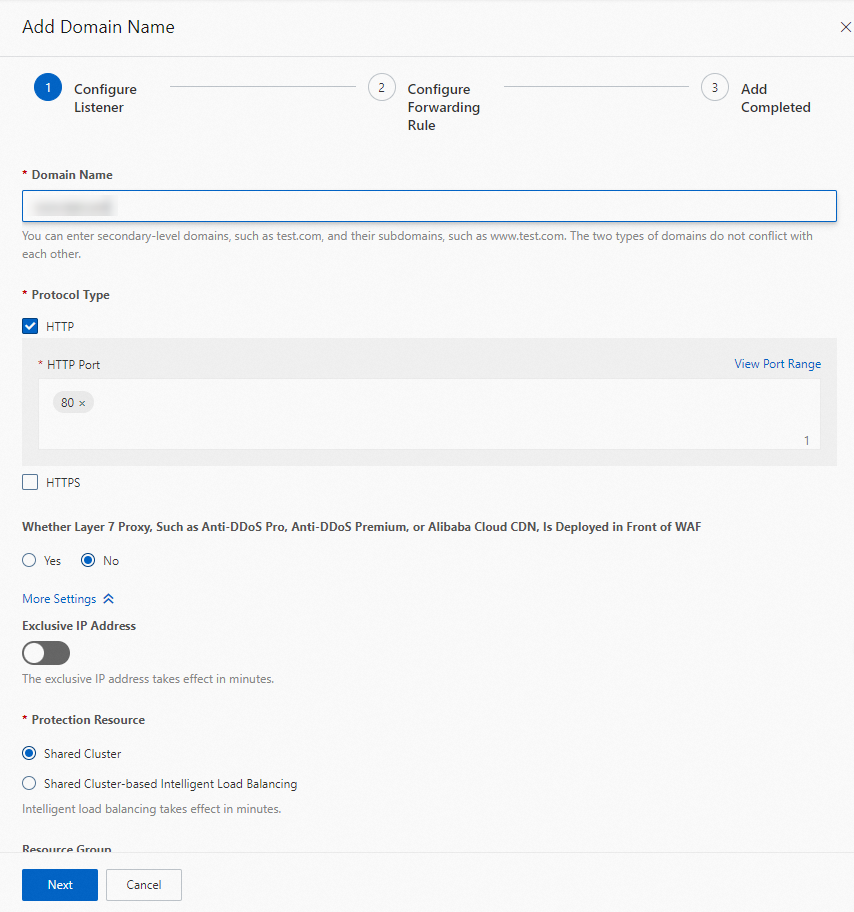
In the Configure Listener step, configure the parameters and click Next.
The following figure provides a configuration example.
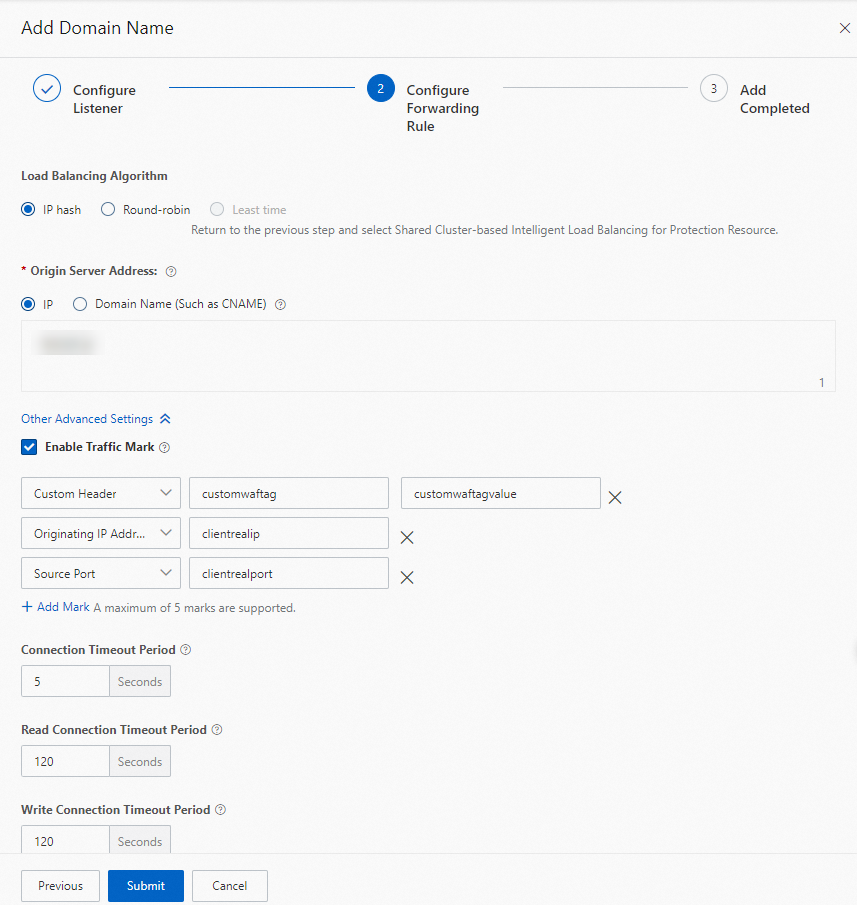
In the Configure Forwarding Rule step, set the Load Balancing Algorithm parameter to IP hash, set the Origin Server Address parameter to IP, and then enter the public IP address of the ingress gateway. Select Enable Traffic Mark, add three headers, keep the default configurations of other parameters, and then click Submit.
Then, the three headers are added to the requests that are sent to the ingress gateway through the WAF instance. In this example, the following three headers are added: Custom Header (customwaftag:customwaftagvalue), Originating IP Address (clientrealip), and Source Port (clientrealport).
In the Add Completed step, click Copy CNAME, record the CNAME provided by WAF, and then click Complete.
NoteTo use a CNAME, you must point the DNS record of the domain name configured here to the CNAME provided by WAF.
Step 2: (Optional) Customize the fields of access logs in the ASM console
Requests that are verified by WAF may carry some special headers. For example, a custom header, a header that indicates the source IP address, and a header that indicates the source port are added to requests in the Configure Forwarding Rule step in Step 1. If the traffic of an online application passes through the WAF instance and these headers are not carried in the access logs of the link, link debugging becomes difficult. In this case, you can use the observability capabilities of ASM to customize the fields of access logs. For more information, see Customize access logs on the data plane.
Step 3: Check whether the WAF instance is connected
Method 1: Use Layer 4 CLB instance
Use the Layer 4 CLB instance to connect to the WAF instance and directly access the IP address of the ingress gateway. Enter ${IP address of the ingress gateway}:80/status/418 in the address bar of a browser.
Expected output:
-=[ teapot ]=-

       _...._
     .'  _ _ `.
    | ."` ^ `". _,
    \_;`"---"`|//
      |       ;/
      \_     _/
        `"""`
Method 2: Use a CNAME
Use the CNAME provided by WAF and run the following command to access the /status/418 path of the HTTPBin application:
curl -HHost:${Domain name configured on WAF} "http://${CNAME provided by WAF}/status/418" -vExpected output:
*   Trying x.x.x.x:80...
* Connected to geszcfxxxxxxxxxxxxxxxxxxxxppbeiz.aliyunwaf1.com (x.x.x.x) port 80 (#0)
> GET /status/418 HTTP/1.1
> Host:xxxx
> User-Agent: curl/7.84.0
> Accept: */*
>
* Mark bundle as not supporting multiuse
< HTTP/1.1 418 Unknown
< Date: Wed, 22 Feb 2023 05:07:23 GMT
< Content-Length: 135
< Connection: keep-alive
< Set-Cookie: acw_tc=0bc1599a16770424432844282e82xxxxxxxxxxxxxxxxxxx1ad989e7e5245f;path=/;HttpOnly;Max-Age=1800
< server: istio-envoy
< x-more-info: http://tools.ietf.org/html/rfc2324
< access-control-allow-origin: *
< access-control-allow-credentials: true
< x-envoy-upstream-service-time: 1
<
-=[ teapot ]=-

       _...._
     .'  _ _ `.
    | ."` ^ `". _,
    \_;`"---"`|//
      |       ;/
      \_     _/
`"""`The true domain name is not used in this example. If you want to use the true domain name for access, modify the domain name resolution rule to replace the CNAME provided by WAF with the true domain name.
Step 4: View the values of the headers that are added by the WAF instance in the gateway logs
Log on to the ASM console. In the left-side navigation pane, choose .
On the Mesh Management page, click the name of the ASM instance. In the left-side navigation pane, choose .
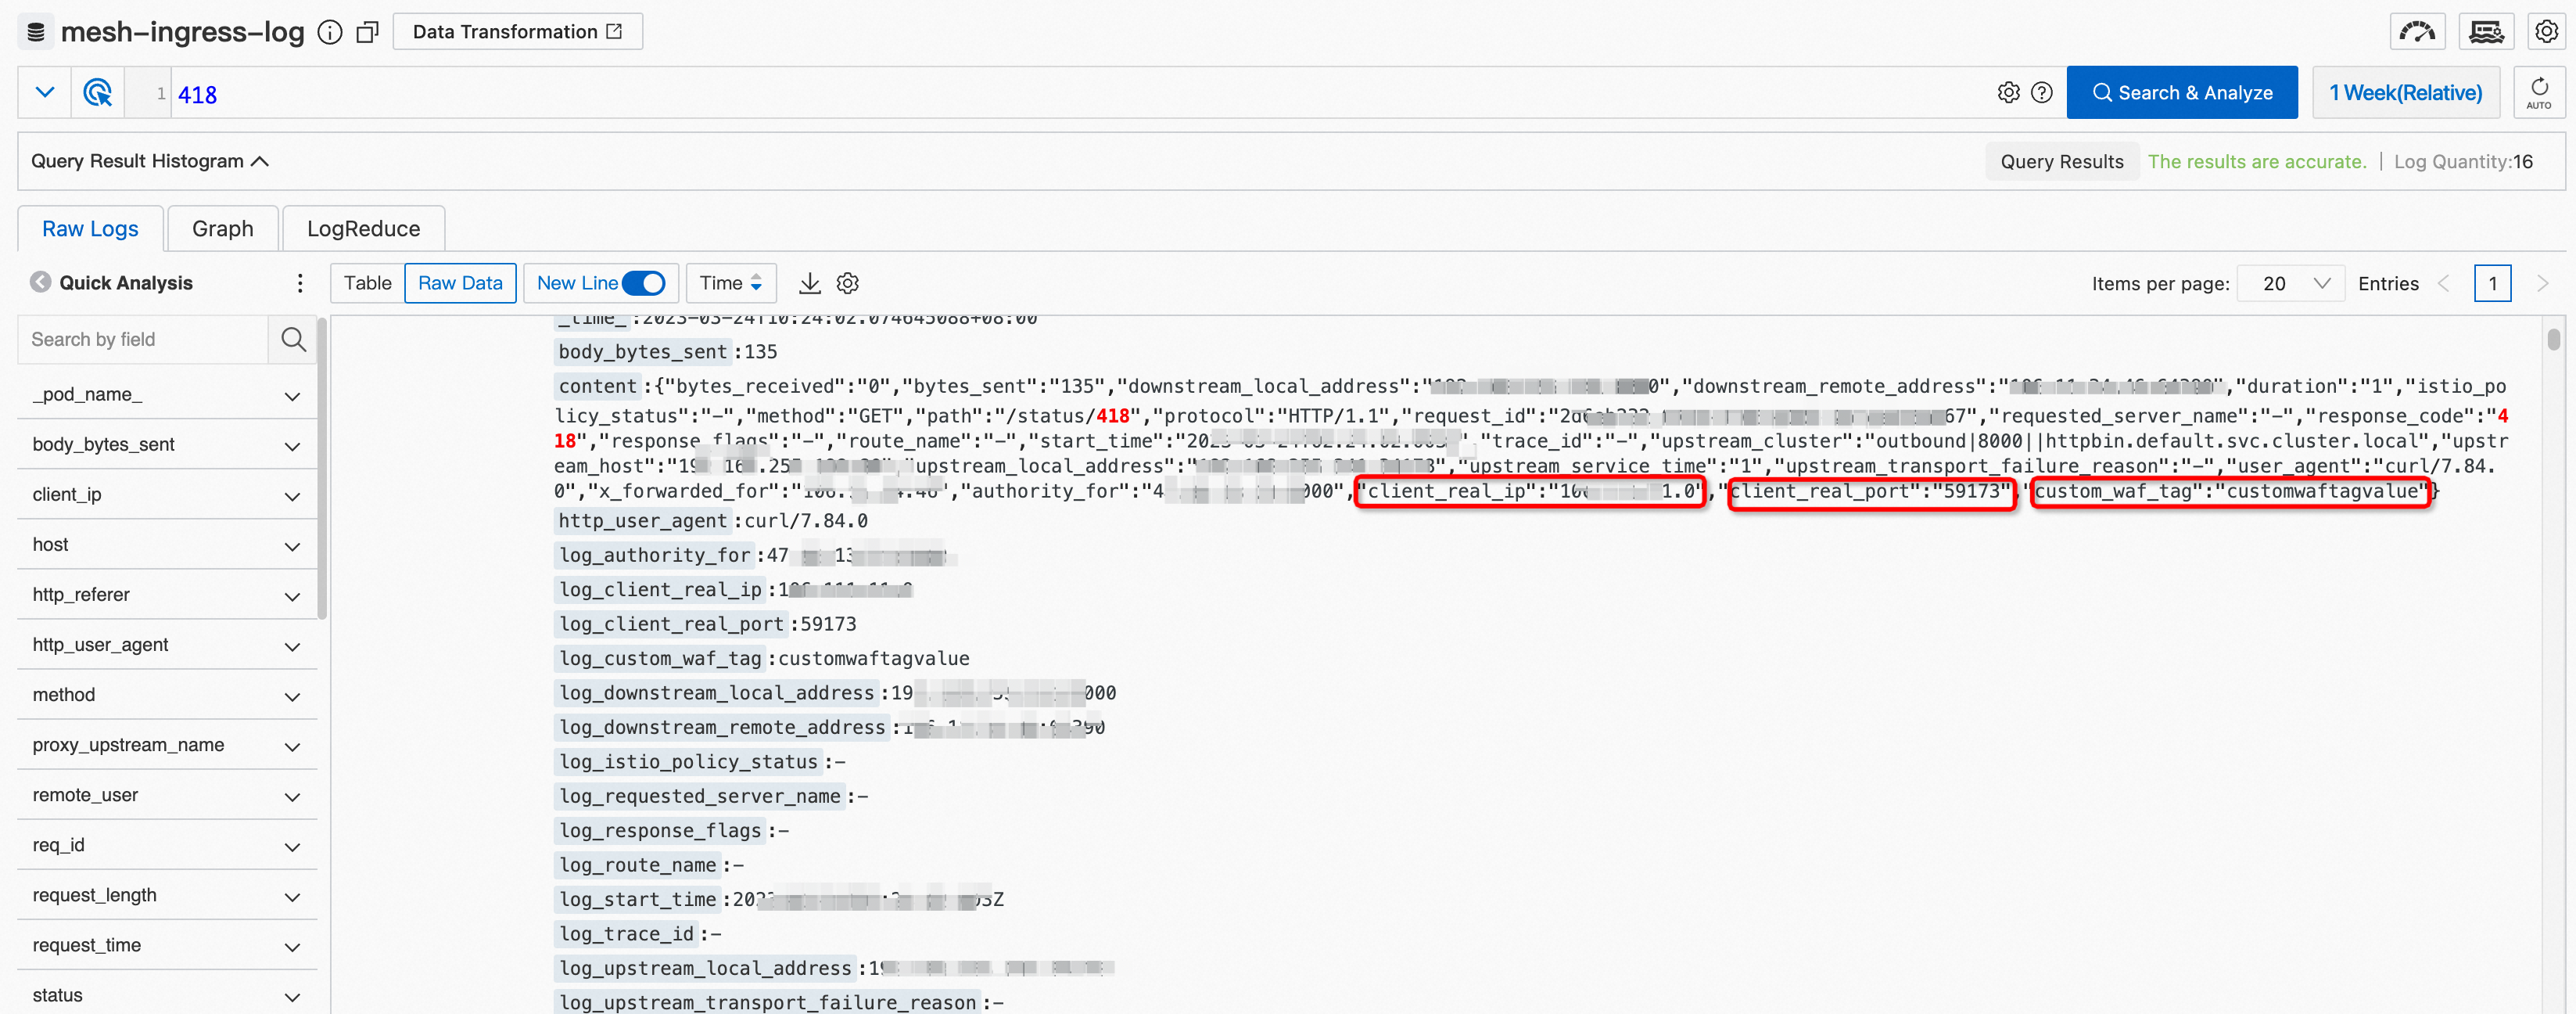
On the ASM Gateway Logs tab, enter 418 in the text box and click Search & Analyze.
The values of the headers that are added by the WAF instance are printed in the logs.
After you connect an ingress gateway to a WAF instance, you can log on to the WAF console to configure other advanced protection capabilities to protect your website from attacks. To monitor other custom headers on the link, perform Step 2 to configure the headers.