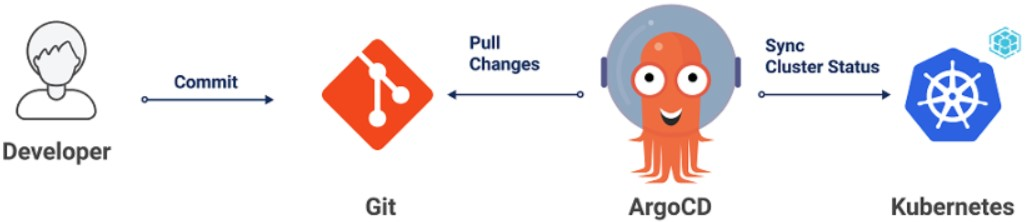
When you manage both application resources (Deployments, Services) and Istio traffic management resources (VirtualServices, Gateways, DestinationRules) across multiple clusters, tracking changes and maintaining consistency becomes difficult. Integrating Argo CD with Service Mesh (ASM) solves this by bringing all resources into a single GitOps workflow -- version-controlled, auditable, and automatically synchronized from Git to your cluster.
How it works
GitOps treats Git as the single source of truth for declarative infrastructure and application definitions. With Argo CD integrated into ASM:
You define application resources (Deployments, Services) and traffic management resources (VirtualServices, Gateways, DestinationRules) as YAML manifests and commit them to a Git repository.
Argo CD detects changes in the repository and compares them against the live cluster state.
Argo CD synchronizes the changes to the cluster, either automatically or through manual approval.
ASM runs a managed Istio-compatible control plane that is separate from the data plane where your Container Service for Kubernetes (ACK) cluster resides. Unlike self-managed Istio, the control plane and ACK cluster are not in the same Kubernetes cluster. Step 2 in this guide bridges that gap so Argo CD can manage Istio resources through the data plane's Kubernetes API.
Key Istio resource types
This guide uses the following Istio resource types. Understanding them helps you work with the GitOps workflow:
| Resource | Purpose |
|---|---|
| VirtualService | Defines routing rules for traffic (for example, route by header, weight, or URI match) |
| DestinationRule | Defines subsets of a service based on pod labels (for example, v1, v2) and applies traffic policies such as load balancing |
| Gateway | Configures a load balancer for HTTP/HTTPS traffic entering the mesh |
A VirtualService references subsets defined in a DestinationRule. For example, if a VirtualService routes traffic to subset: v2, the DestinationRule maps v2 to pods with the label version: v2.
Prerequisites
Before you begin, ensure that you have:
An ASM instance of version 1.12.4.50 or later. For more information, see Create an ASM instance
A cluster added to the ASM instance. For more information, see Add a cluster to an ASM instance
A Git repository for storing Kubernetes and Istio resource manifests
Tip: Argo CD best practices recommend using a separate Git repository for Kubernetes manifests rather than storing them alongside application source code. This provides cleaner audit logs, separation of access, and avoids CI pipeline loops. For details, see Argo CD Best Practices.
Step 1: Install Argo CD
Install Argo CD in your ACK cluster using one of the following methods:
Manual installation: Follow the Argo CD Getting Started guide to install Argo CD with kubectl.
ACK Application Center (built-in): ACK provides a built-in Argo CD feature through Application Center. This option requires no manual installation and supports Git repository and Helm chart-based deployments with version rollback. For more information, see Application Center overview.
Step 2: Enable data-plane Kubernetes API access for Istio resources
In a self-managed Istio installation, the control plane and workloads share the same Kubernetes cluster, so tools like Argo CD can access all Istio Custom Resource Definitions (CRDs) directly. ASM works differently: the managed control plane runs in a separate cluster from your ACK data-plane cluster. By default, Istio CRDs (VirtualService, Gateway, DestinationRule) are not available through the data-plane Kubernetes API. Enabling data-plane KubeAPI access registers these CRDs in your ACK cluster so Argo CD can manage Istio resources the same way it manages standard Kubernetes resources.
Log on to the ASM console. In the left-side navigation pane, choose Service Mesh > Mesh Management.
On the Mesh Management page, find the ASM instance that you want to configure. Click the name of the ASM instance or click Manage in the Actions column.
On the Base Information page, click Enable next to Enable Data-plane KubeAPI access.
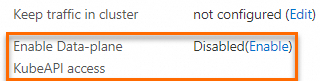
In the confirmation message, click OK.
Step 3: Deploy an ingress gateway
Create an ingress gateway to handle inbound traffic for applications managed by Argo CD.
Log on to the ASM console. In the left-side navigation pane, choose Service Mesh > Mesh Management.
On the Mesh Management page, click the name of the ASM instance. In the left-side navigation pane, choose ASM Gateways > Ingress Gateway.
On the Ingress Gateway page, click Create and configure the following parameters: For details on all available parameters, see Create an ingress gateway.
Parameter Value for this example Name ingressgatewayGateway types North-South IngressGateway Port Mapping Click Add Port and add the following entries:
- Protocol: HTTP, Service Port: 80
- Protocol: HTTPS, Service Port: 443Click Create to deploy the ingress gateway.
Step 4: Deploy the Bookinfo sample application with Argo CD
Use Argo CD to deploy the Istio Bookinfo sample application from a Git repository. This step creates the Deployments, Services, and Istio traffic management resources in your cluster.
Create the Argo CD application
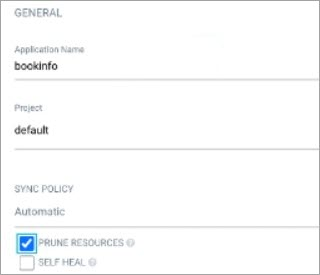
On the Argo CD UI, click NEW APP and configure the following sections:
GENERAL
Set Application Name to
bookinfo.Set Project to default.
Select PRUNE RESOURCES to allow Argo CD to delete resources from the cluster when they are removed from Git. This keeps the cluster state in sync with the repository.
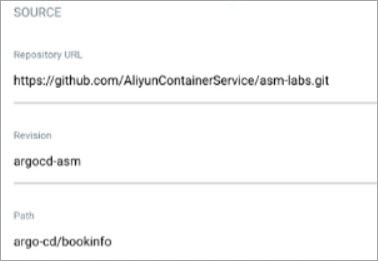
SOURCE
Set Repository URL to
https://github.com/AliyunContainerService/asm-labs.git.Set Revision to argocd-asm.
Set Path to
argo-cd/bookinfo.
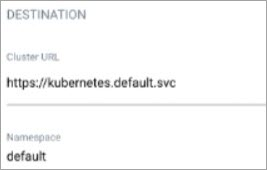
DESTINATION
Set Cluster URL to
https://kubernetes.default.svc.Set Namespace to default.
Click CREATE.
For a full reference of sync policy options (automated sync, self-heal, sync waves), see Argo CD Sync Options.
Verify the deployment
After the application is created, verify that resources are deployed correctly in three places:
Check status in Argo CD
The bookinfo application card on the Argo CD UI shows the sync status and health of all managed resources.

Click bookinfo to view each resource's status.

Check VirtualServices in the ASM console
Log on to the ASM console. In the left-side navigation pane, choose Service Mesh > Mesh Management.
On the Mesh Management page, click the name of the ASM instance. In the left-side navigation pane, choose Traffic Management Center > VirtualService.
On the VirtualService page, confirm that the Bookinfo VirtualService exists.
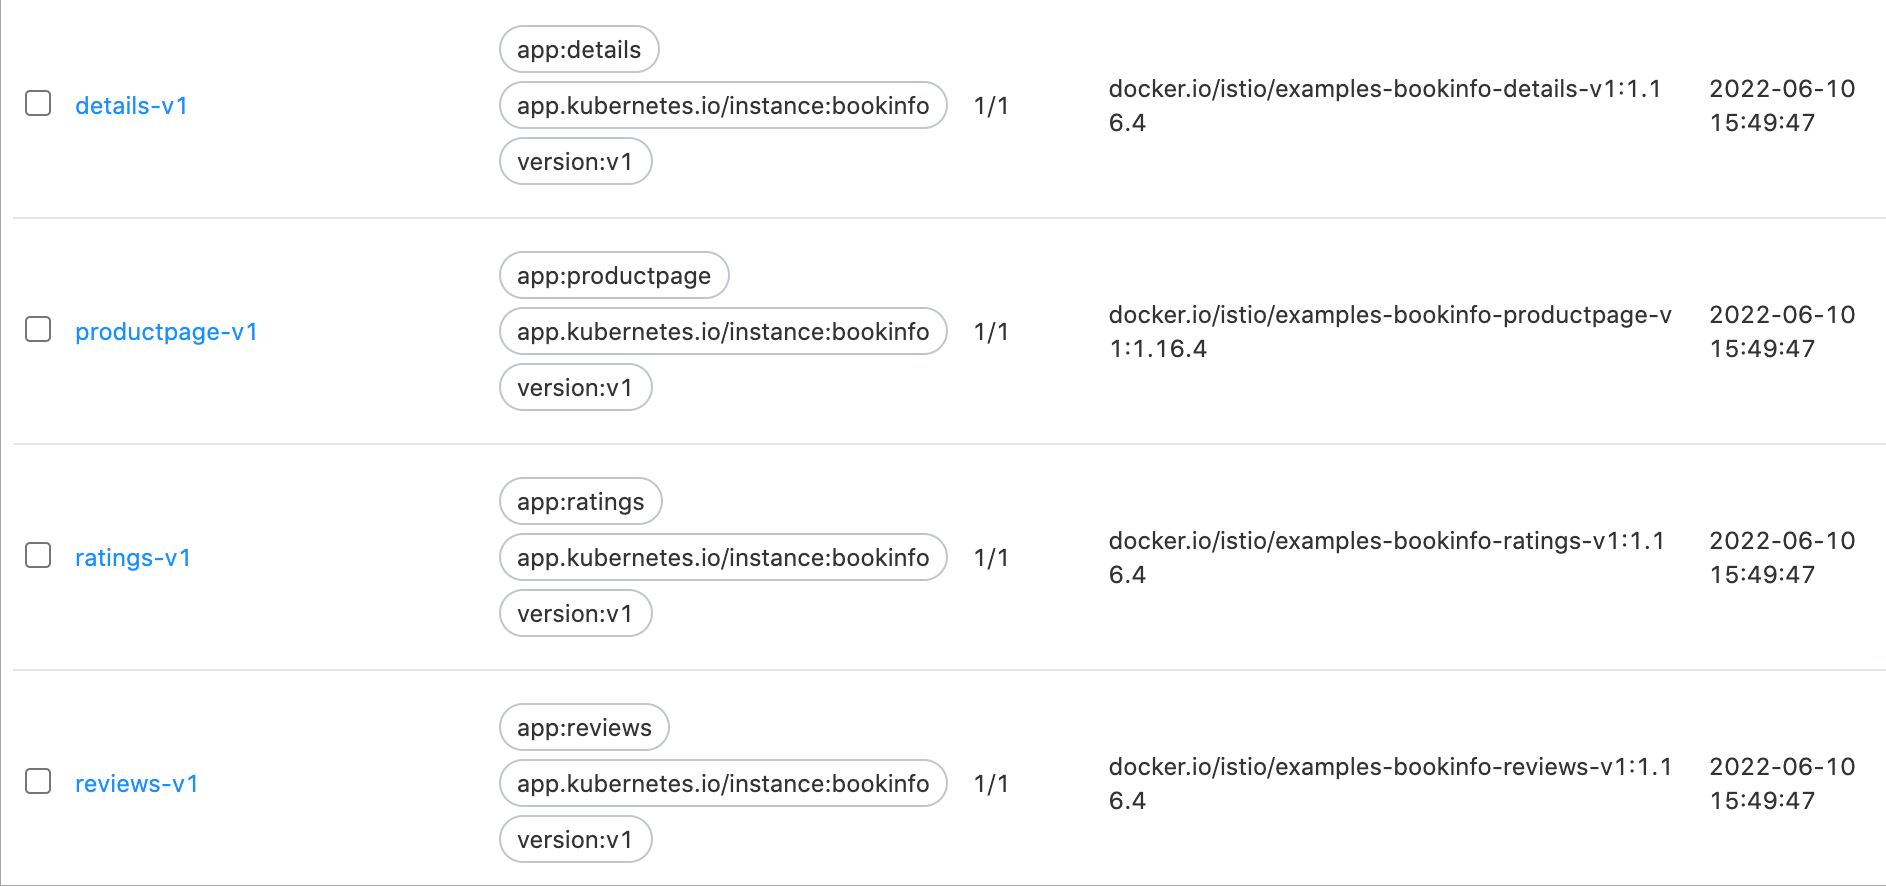
Check Deployments in the ACK console
Log on to the ACK console. In the left-side navigation pane, click Clusters.
On the Clusters page, click the name of the cluster. In the left-side navigation pane, choose Workloads > Deployments.
Confirm that the Bookinfo Deployments are running.
Access the application through the ingress gateway
Get the IP address of the ingress gateway:
Log on to the ASM console. In the left-side navigation pane, choose Service Mesh > Mesh Management.
On the Mesh Management page, click the name of the ASM instance. In the left-side navigation pane, choose ASM Gateways > Ingress Gateway.
On the Ingress Gateway page, note the Service address of the ingress gateway.
Open
http://<ingress-gateway-ip>/productpagein a browser. The Bookinfo product page loads. The reviews section on the right side of the page displays different data each time you refresh, because the reviews Deployment has three versions (v1, v2, v3) and no routing rule is configured yet.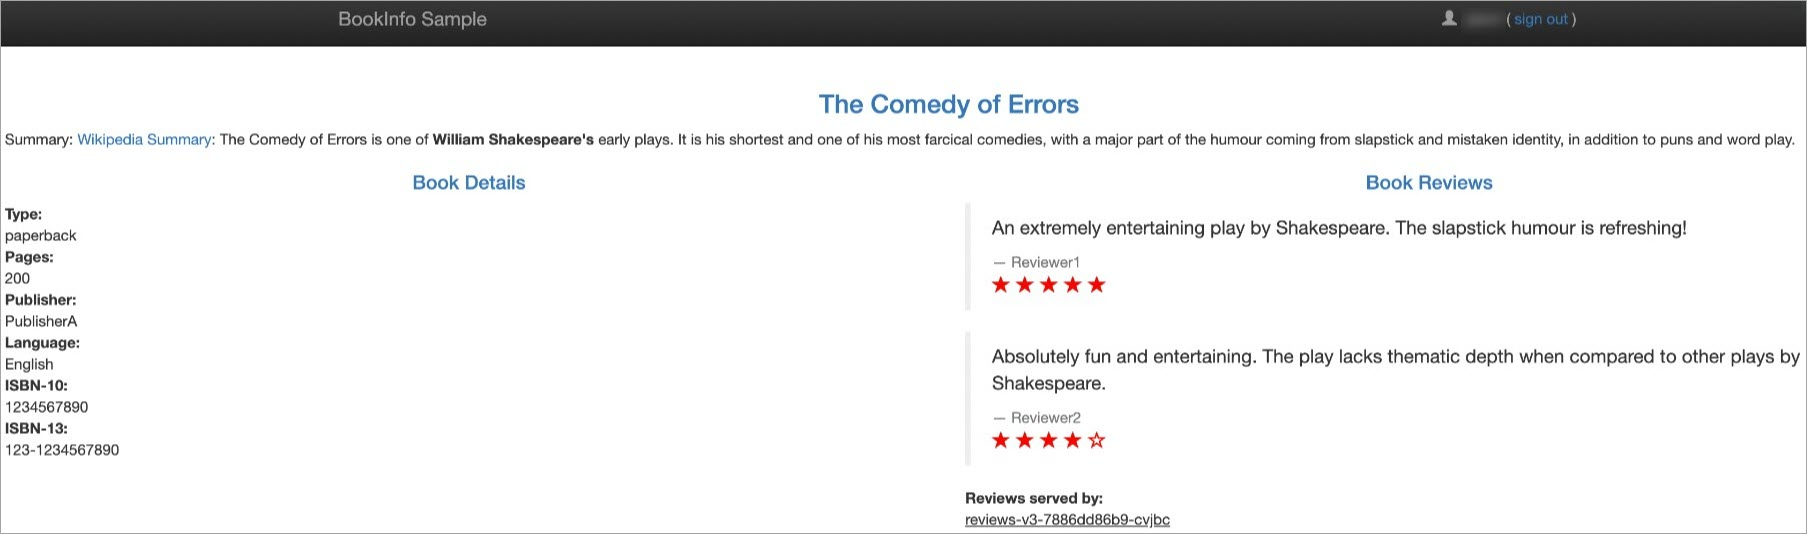
Step 5: Implement GitOps-driven traffic routing
With the Bookinfo application deployed, push a traffic routing change through the GitOps workflow. This example configures a VirtualService rule that routes traffic based on the logged-in user:
Not logged in: The v1 version of reviews is displayed (no stars).
Logged in as
jason: The v2 version of reviews is displayed (black stars).
Update the manifests locally
Modify the VirtualService YAML for the
reviewsservice to add header-based routing:This VirtualService references
subset: v1andsubset: v2, which are defined in the DestinationRule for the reviews service. The DestinationRule maps each subset name to pods with the correspondingversionlabel. The DestinationRule is already included in theargo-cd/bookinfodirectory of the sample repository.apiVersion: networking.istio.io/v1alpha3 kind: VirtualService metadata: name: reviews spec: hosts: - reviews http: - match: - headers: end-user: exact: jason route: - destination: host: reviews subset: v2 - route: - destination: host: reviews subset: v1 ---Modify the Deployment YAML for reviews-v1 to scale it to 2 replicas:
   apiVersion: apps/v1
   kind: Deployment
   metadata:
     namespace: argocd
     name: reviews-v1
     labels:
       app: reviews
       version: v1
   spec:
     replicas: 2
Push changes to Git
Commit and push the updated manifests:
git add *
git commit -m "reviews-v1"
git push
Synchronize the changes to the cluster
If automatic synchronization is enabled in Argo CD, changes are applied to the cluster shortly after the push.
If automatic synchronization is not enabled, synchronize manually:
On the Argo CD UI, locate the bookinfo card. The Status shows OutOfSync, indicating that the Git repository and cluster state have diverged.
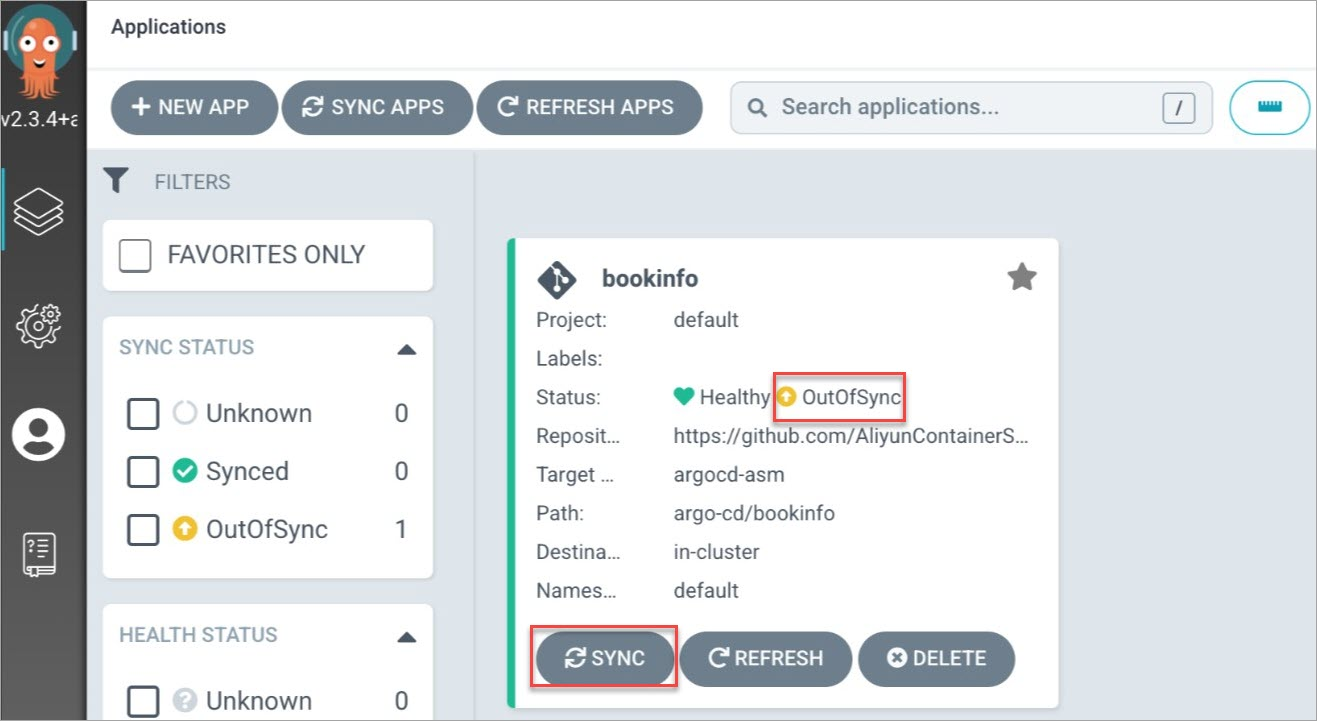
Click SYNC on the bookinfo card.
In the dialog box, click SYNCHRONIZE.
After synchronization completes, verify the updated resources in the ASM console and ACK console using the same steps described in Verify the deployment.
Verify the traffic routing
Open
http://<ingress-gateway-ip>/productpagein a browser without logging in. The v1 version of reviews is displayed (no stars on the right side).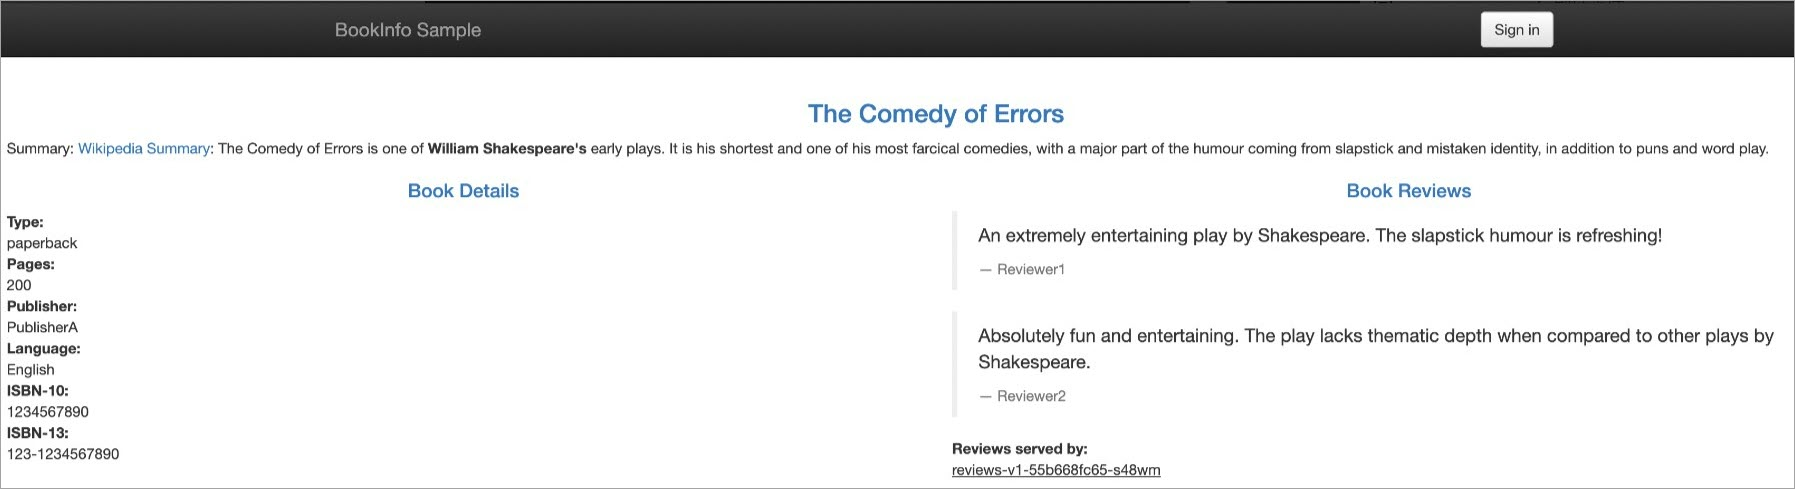
Log in as the
jasonuser. Enter any string as the password. Then access the product page again. The v2 version of reviews is displayed (black stars on the right side).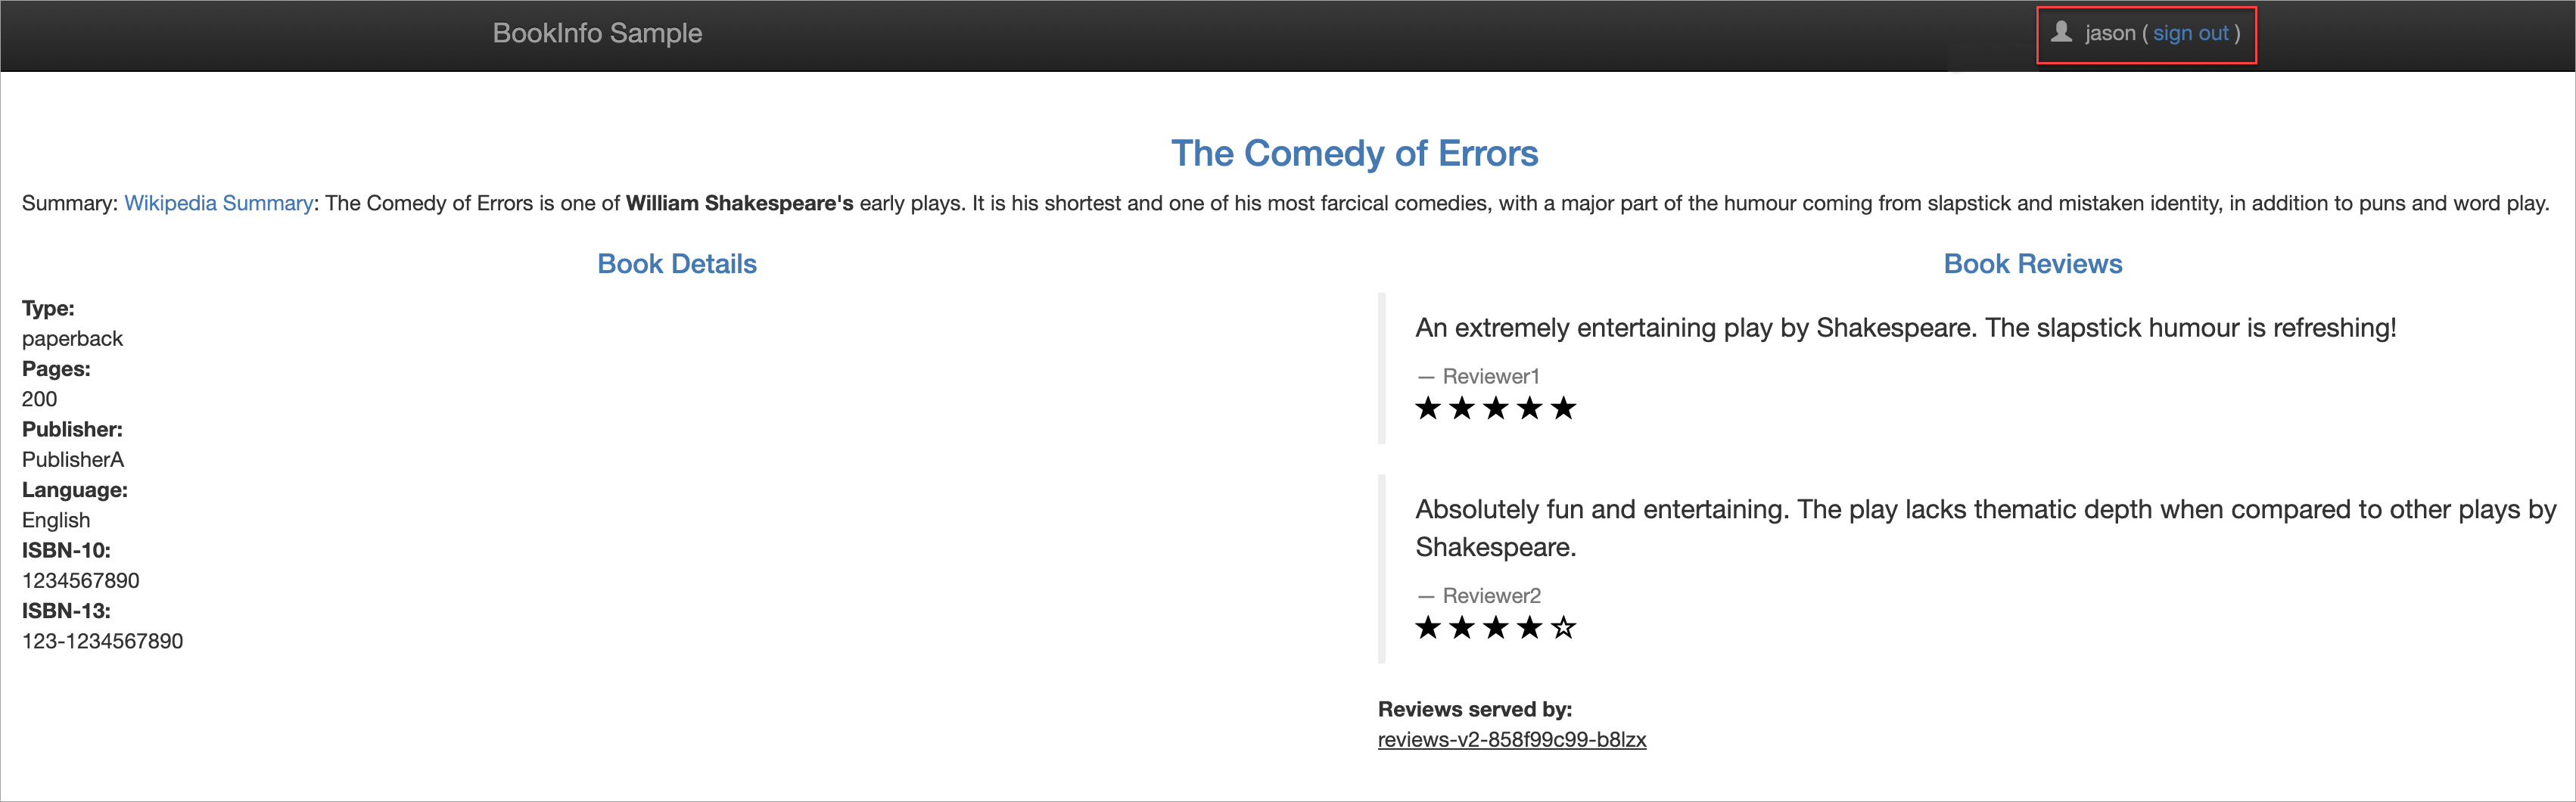
The traffic routing rule is now managed through Git. Future changes to VirtualServices or other Istio resources follow the same workflow: update the YAML, push to Git, and let Argo CD synchronize the cluster.