Service meshes route HTTP traffic between microservices, but without authorization policies, any service can call any other service. Authorization policies let you control which services can send HTTP requests to which other services, based on identity (service account) and operation (HTTP method, path). Start with a deny-all baseline, then incrementally grant access to build a zero-trust security model.
This topic walks through building authorization policies step by step using the Bookinfo sample application. You create four policies that progressively open access to each service in the request chain.
How authorization policies work
An authorization policy consists of three parts:
| Part | Purpose | Example |
|---|---|---|
| Selector | Targets specific workloads by label | app: productpage |
| Action | Specifies whether to allow or deny matched requests | ALLOW |
| Rules | Defines matching criteria for request source (from) and operation (to) | Source principal, HTTP method |
Key behaviors:
An empty spec (
spec: {}) with no selector applies to all workloads in the namespace and denies all requests. This serves as a deny-all baseline.Omitting
fromin a rule means requests from all sources match, as long as thetoconditions are met. This has security implications: the policy effectively allows all users and workloads to reach the target operation.
Prerequisites
Before you begin, make sure that you have:
The Bookinfo application deployed in the ASM instance. For details, see Deploy an application in an ASM instance
Istio resources configured for traffic routing. For details, see Use Istio resources to route traffic to different versions of a service
Step 1: Create a deny-all baseline policy
Create a blank authorization policy that denies all requests to workloads in the default namespace. This establishes the zero-trust baseline.
Log on to the ASM console. In the left-side navigation pane, choose Service Mesh > Mesh Management.
On the Mesh Management page, click the name of the ASM instance. In the left-side navigation pane, choose Mesh Security Center > AuthorizationPolicy. Click Create from YAML.
Select default from the Namespace drop-down list, select a template, paste the following YAML into the code editor, and click Create. The allow-nothing policy appears on the AuthorizationPolicy page.
   apiVersion: security.istio.io/v1beta1
   kind: AuthorizationPolicy
   metadata:
     name: allow-nothing
     namespace: default
   spec:
     {}
Verify the policy. Open
http://<ASM-gateway-IP>/productpagein your browser. The page returnsRBAC: access denied, confirming that all requests are now blocked.NoteFor instructions on obtaining the ASM gateway IP address, see Use Istio resources to route traffic to different versions of a service.
Step 2: Allow access to the productpage service
Create a policy that allows HTTP GET requests to the productpage workload. This policy omits the from field, so it permits GET requests from any source, including the ASM gateway that serves external traffic.
Log on to the ASM console. In the left-side navigation pane, choose Service Mesh > Mesh Management.
On the Mesh Management page, click the name of the ASM instance. In the left-side navigation pane, choose Mesh Security Center > AuthorizationPolicy.
Create the policy using one of the following methods.
Method 1: YAML
On the AuthorizationPolicy page, click Create from YAML.
Select default from the Namespace drop-down list, select a template, paste the following YAML into the code editor, and click Create.
   apiVersion: security.istio.io/v1beta1
   kind: AuthorizationPolicy
   metadata:
     name: "productpage-viewer"
     namespace: default
   spec:
     selector:
       matchLabels:
         app: productpage
     action: ALLOW
     rules:
     - to:
       - operation:
           methods: ["GET"]
Method 2: Console UI
On the AuthorizationPolicy page, click Create.
Configure the following parameters and click Create.
Parameter Value Name productpage-viewerPolicy Type ALLOW Namespace (on the Workload Scope tab) default Effective Scope Service Workload productpage Request Matching Rules Turn on Methods in Add Request Target and set the value to GET
The productpage-viewer policy appears on the AuthorizationPolicy page.
Verify the policy. Open
http://<ASM-gateway-IP>/productpagein your browser. The productpage loads, but the details and reviews sections show errors. This is expected -- you have only authorized access to the productpage service itself. The downstream services (details and reviews) are still blocked by the deny-all policy.
Step 3: Allow access to the details service
Allow the productpage service to call the details service by restricting access to requests from the bookinfo-productpage service account.
Find the productpage service account
Log on to the ACK console. In the left-side navigation pane, click Clusters.
Click the cluster name. In the left-side navigation pane, choose Workloads > Deployments.
Find the productpage-v1 deployment. Choose More > View in YAML in the Actions column. Locate the
serviceAccountfield. The value isbookinfo-productpage.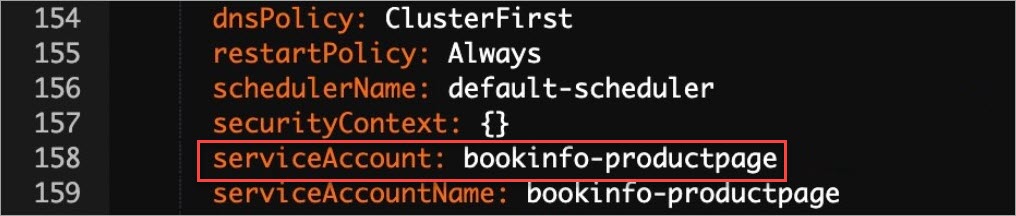
Create the authorization policy
Log on to the ASM console. In the left-side navigation pane, choose Service Mesh > Mesh Management.
On the Mesh Management page, click the name of the ASM instance. In the left-side navigation pane, choose Mesh Security Center > AuthorizationPolicy.
Create the policy using one of the following methods.
Method 1: YAML
On the AuthorizationPolicy page, click Create from YAML.
Select default from the Namespace drop-down list, select a template, paste the following YAML into the code editor, and click Create.
   kind: AuthorizationPolicy
   apiVersion: security.istio.io/v1beta1
   metadata:
     name: details-viewer
     namespace: default
   spec:
     action: ALLOW
     rules:
       - to:
           - operation:
               methods:
                 - GET
       - from:
           - source:
               principals:
                 - cluster.local/ns/default/sa/bookinfo-productpage # Service account from the previous step
     selector:
       matchLabels:
         app: details
Method 2: Console UI
On the AuthorizationPolicy page, click Create.
Configure the following parameters and click Create.
Notebookinfo-productpageis theserviceAccountvalue obtained in the previous step.Parameter Value Name details-viewerPolicy Type ALLOW Namespace (on the Workload Scope tab) default Effective Scope Service Workload details Request Matching Rules In Add Request Source, turn on Principals and set the value to cluster.local/ns/default/sa/bookinfo-productpage. In Add Request Target, turn on Methods and set the value toGET.
The details-viewer policy appears on the AuthorizationPolicy page.
Verify the policy. Open
http://<ASM-gateway-IP>/productpagein your browser. The details section on the left now loads correctly. The reviews section on the right still shows an error because no policy has been created for the reviews service yet.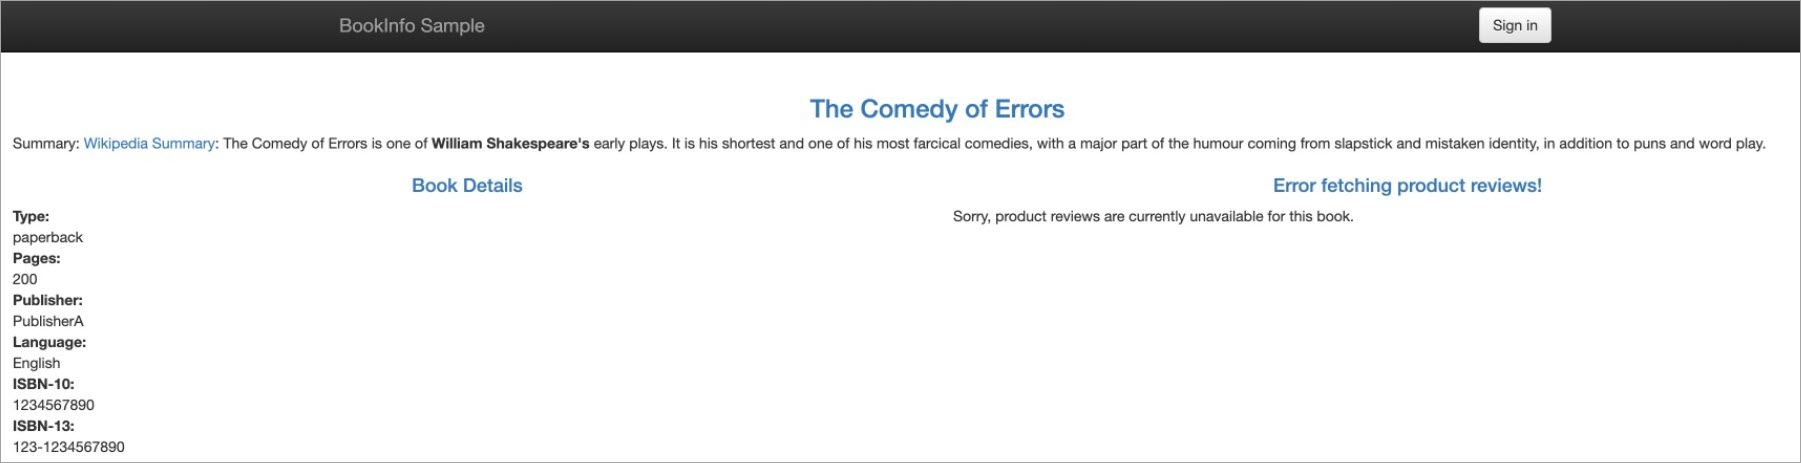
Step 4: Allow access to the reviews service
Create an authorization policy for the reviews service using the same bookinfo-productpage service account as the authorized source.
Log on to the ASM console. In the left-side navigation pane, choose Service Mesh > Mesh Management.
On the Mesh Management page, click the name of the ASM instance. In the left-side navigation pane, choose Mesh Security Center > AuthorizationPolicy.
Create the policy using one of the following methods.
Method 1: YAML
On the AuthorizationPolicy page, click Create from YAML.
Select default from the Namespace drop-down list, select a template, paste the following YAML into the code editor, and click Create.
   kind: AuthorizationPolicy
   apiVersion: security.istio.io/v1beta1
   metadata:
     name: reviews-viewer
     namespace: default
   spec:
     action: ALLOW
     rules:
       - to:
           - operation:
               methods:
                 - GET
       - from:
           - source:
               principals:
                 - cluster.local/ns/default/sa/bookinfo-productpage
     selector:
       matchLabels:
         app: reviews
Method 2: Console UI
On the AuthorizationPolicy page, click Create.
Configure the following parameters and click Create.
Notebookinfo-productpageis theserviceAccountvalue obtained in Step 3.Parameter Value Name reviews-viewerPolicy Type ALLOW Namespace (on the Workload Scope tab) default Effective Scope Service Workload reviews Request Matching Rules In Add Request Source, turn on Principals and set the value to cluster.local/ns/default/sa/bookinfo-productpage. In Add Request Target, turn on Methods and set the value toGET.
The reviews-viewer policy appears on the AuthorizationPolicy page.
Verify the policy. Open
http://<ASM-gateway-IP>/productpagein your browser. Both the details section (left) and reviews section (right) now load correctly. All services in the Bookinfo request chain are authorized.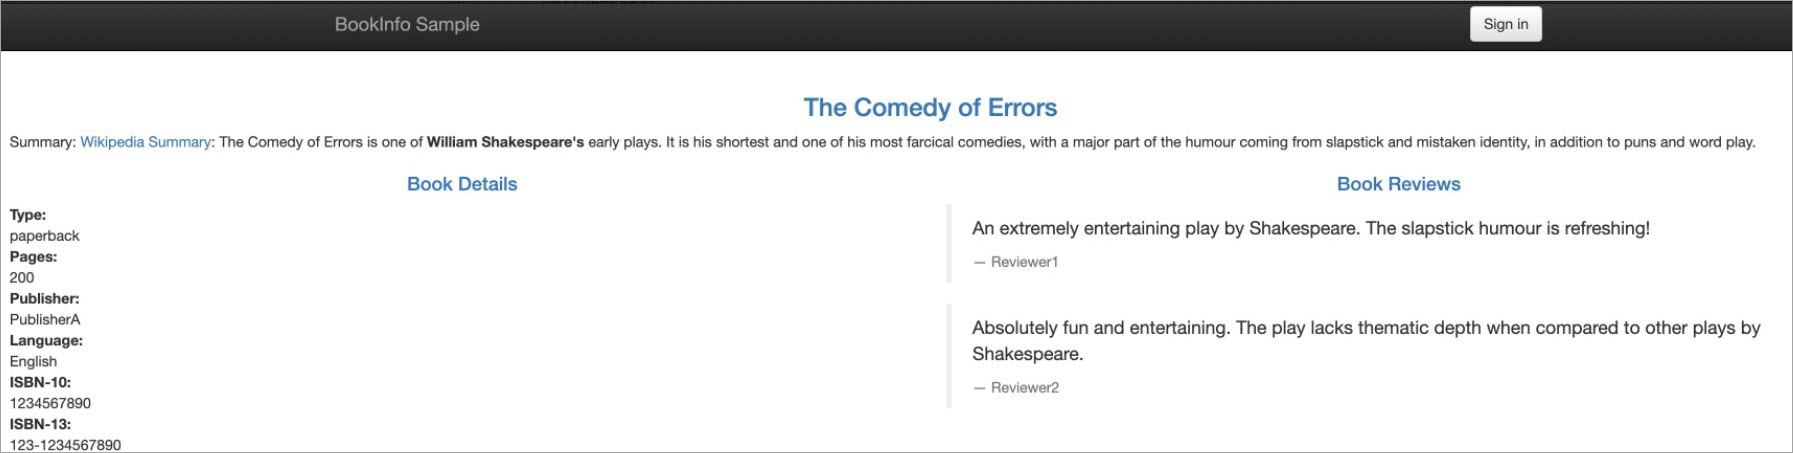
Clean up
To remove the authorization policies created in this topic, delete them from the AuthorizationPolicy page in the ASM console. Select each policy and delete it:
allow-nothingproductpage-viewerdetails-viewerreviews-viewer
Leaving the allow-nothing deny-all policy in place blocks all traffic to services in the default namespace. Always remove it when you no longer need it.
Related topics
Test policies safely: Run authorization policies in trial mode to verify behavior before enforcement. See Run an ASM authorization policy in trial mode.
Secure TCP traffic: Configure authorization policies for TCP requests to control L4 traffic. See Configure authorization policies for TCP requests.
Control external access: Restrict outbound traffic from mesh services to external endpoints. See Control access to an external website and Control access to an external database.
Monitor access logs: Customize ASM gateway access logs to detect security risks. See Configure access log collection for an ASM gateway.
Enable audit trails: Track operations on ASM resources and configure alerts. See Use the KubeAPI operation audit feature in ASM and Configure audit alerts for operations on ASM resources.