When applications within your mesh need to communicate with external services, you can use an egress gateway as a centralized exit point to manage all outbound traffic. Configuring an egress gateway lets you enforce security controls and routing policies, enhancing the security and observability of your applications.
Before you read this article, make sure that you are familiar with the content in Use ASMEgressTrafficPolicy to manage egress traffic. This article uses service mesh resources to transparently intercept requests to services outside the cluster and redirect them to an egress gateway. The egress gateway then enforces security policies and sends the requests to the services outside the cluster. The configuration is relatively complex. If the content in Use ASMEgressTrafficPolicy to manage egress traffic cannot meet your requirements, refer to this article.
Prerequisites
Configuration process
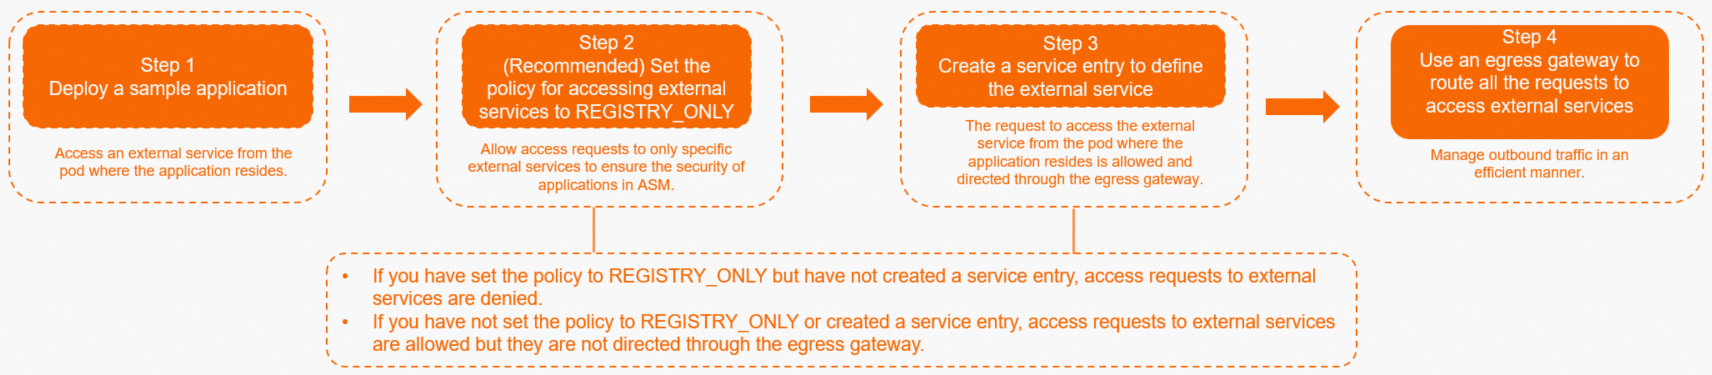
Step 1: Deploy a sample application
-
Deploy the sleep application.
-
Create a file named sleep.yaml with the following content.
-
Using the KubeConfig for your ACK cluster, run the following command to deploy the sleep application.
For more information about how to use kubectl to manage a cluster, see Obtain the KubeConfig of a cluster and use kubectl to connect to the cluster.
kubectl apply -f sleep.yaml
-
-
Run the following commands to open a shell in the sleep pod and access an external service.
You can run the
kubectl get pod -n defaultcommand to view the name of the sleep pod.kubectl exec -it ${sleep-pod-name} -- /bin/sh curl aliyun.com -ISample output:
HTTP/1.1 301 Moved Permanently server: envoy date: Thu, 14 Dec 2023 03:05:41 GMT content-type: text/html content-length: 239 location: https://aliyun.com/ eagleeye-traceid: 0b57ff8717025231418255220e**** timing-allow-origin: * x-envoy-upstream-service-time: 69A
301response indicates that the application in the mesh can access the external service. By default, the pod uses HTTP for access and the website returns a redirect.NoteThis approach offers no security control and prevents you from using the mesh's observability features. We recommend that you enable
REGISTRY_ONLYto restrict access to registered services and use an egress gateway as a unified exit point for traffic, as described in the following steps.
(Optional) Step 2: Enable REGISTRY_ONLY
The default outbound traffic policy for ASM is ALLOW_ANY. We recommend changing it to REGISTRY_ONLY. In this mode, the sidecar proxy blocks access to any external host without a corresponding ServiceEntry in the mesh. This configuration enhances application security.
-
If you enable
REGISTRY_ONLYbut have not created a ServiceEntry for an external service, access to that service is denied. -
If you do not enable
REGISTRY_ONLYand have not created a ServiceEntry, you can still access external services, but your egress gateway configuration will not take effect.
-
Log on to the ASM console. In the left-side navigation pane, choose .
-
On the Mesh Management page, click the name of the ASM instance. In the left-side navigation pane, choose .
-
On the Configure the agent parameters of the injected Sidecar page, click the global tab, click Outbound Traffic Policy, set the Outbound Traffic Policy to REGISTRY_ONLY, and then click Update Settings.
-
Run the following commands to open a shell in the sleep pod and access the external service.
kubectl exec -it ${sleep-pod-name} -- /bin/sh
curl aliyun.com -I
Sample output:
HTTP/1.1 502 Bad Gateway date: Thu, 14 Dec 2023 03:08:46 GMT server: envoy transfer-encoding: chunkedA
502response indicates that applications in the mesh cannot access unregistered external services.
Step 3: Create a ServiceEntry for the external service
To access services outside the cluster through the egress gateway, you must create a ServiceEntry for the external service.
-
Log on to the ASM console. In the left-side navigation pane, choose .
-
On the Mesh Management page, click the name of the ASM instance. In the left-side navigation pane, choose . On the page that appears, click Create from YAML.
-
On the Create page, select the Namespaces where the sleep application resides, select Access mesh external services for the Scenario Template, configure the YAML as shown in the following example, and then click Create.
apiVersion: networking.istio.io/v1beta1 kind: ServiceEntry metadata: name: external-svc-http spec: hosts: - aliyun.com location: MESH_EXTERNAL ports: - number: 80 name: http protocol: HTTP resolution: DNS -
Run the following commands to open a shell in the sleep pod and access the external service.
kubectl exec -it ${sleep-pod-name} -- /bin/sh curl aliyun.com -IA
301response indicates that the application can now access the external service. Because you registered aliyun.com with a ServiceEntry in the mesh, access is permitted. At this point, outbound traffic still flows directly from the pod, not through the egress gateway.
Step 4: Route traffic through the egress gateway
Now that you have created a ServiceEntry for aliyun.com, you can use resources like a VirtualService and a Gateway to manage traffic to aliyun.com.
-
Create an egress gateway that listens for HTTP traffic on port 80. For more information, see Create an egress gateway.
-
Create a Gateway resource as follows. For more information, see Manage Istio gateways.
On the Gateway creation page, set the Namespace to
defaultand the Name toegress-gw. In the Gateway instance area, set the Label key toistioand the Label value toegressgateway. In the Exposed services area, set the service Name tohttp, Port to80, Protocol to HTTP, and Service Domain toaliyun.com. Then, click Create. -
Use the following YAML to create a VirtualService. For more information, see Manage VirtualServices.
-
Test access to the external service.
-
Run the following commands to open a shell in the sleep pod and access the external service.
kubectl exec -it ${sleep-pod-name} -- /bin/sh
curl aliyun.com -I
A
301response indicates that the application can still access the external service. The application now routes traffic through the egress gateway instead of accessing the service directly from the pod. -
Run the following command to check the access logs in the gateway pod.
Note-
If your egress gateway has multiple replicas, the access log may appear on any of them. You might need to check each gateway pod to find the entry.
-
If you have enabled access logging for the egress gateway, you can also view the access records on the Simple Log Service console.
kubectl -n istio-system logs ${egress-gateway-pod-name} -c istio-proxy | grep aliyun.com | tail -n 1Sample output:
{"trace_id":null,"upstream_host":"106.11.XXX.XX:80","downstream_remote_address":"10.34.0.140:47942","requested_server_name":null,"response_code":301,"upstream_service_time":"24","user_agent":"curl/7.86.0-DEV","path":"/","route_name":null,"bytes_sent":0,"response_flags":"-","upstream_local_address":"10.34.0.141:60388","duration":24,"upstream_cluster":"outbound|80||aliyun.com","upstream_transport_failure_reason":null,"authority":"aliyun.com","request_id":"55789d59-9b81-4e39-b64a-66baf44e****","protocol":"HTTP/1.1","bytes_received":0,"method":"HEAD","downstream_local_address":"10.34.0.141:80","start_time":"2022-11-30T08:03:01.315Z","istio_policy_status":null,"x_forwarded_for":"10.34.0.140"}The
downstream_remote_addressfield shows the IP address of the sleep pod.After completing these steps, all outbound traffic to the external service is routed through the egress gateway.
-
-
Related documents
-
You can use the observability and security capabilities of ASM on an egress gateway to manage egress traffic more efficiently. For more information, see Observability capabilities and Security support and dynamic certificate loading.
-
You can use the ASMEgressTrafficPolicy CRD to customize how to manage and access external traffic through an egress gateway. For more information, see Use ASMEgressTrafficPolicy to manage egress traffic.
-
For more information about gateway features, see Overview of ASM gateways.