Service Mesh (ASM) lets you delegate access control to an external authorization service by using an ASM security policy based on the Envoy ext_authz filter. Instead of embedding authorization logic in each application, you deploy a centralized authorization service that evaluates every incoming request against your rules. ASM forwards each request to this service and enforces the allow-or-deny decision before the request reaches your workload. This approach helps you implement complex authentication logic, reduce development and maintenance costs, and improve development efficiency.
Prerequisites
Before you begin, make sure you have:
Step 1: Create a custom authorization policy
Log on to the ASM console. In the left-side navigation pane, choose Service Mesh > Mesh Management.
On the Mesh Management page, click the name of the ASM instance. In the left-side navigation pane, choose Mesh Security Center > ASMSecurityPolicy.
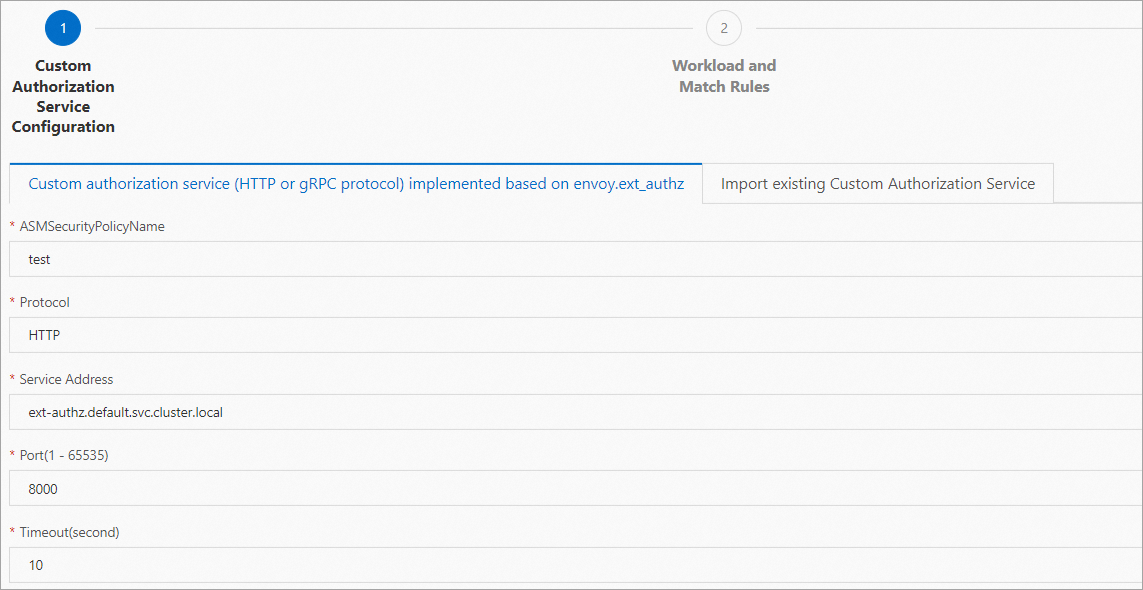
On the ASMSecurityPolicy page, click Create. In the Create ASMSecurityPolicy dialog box, click Custom Authorization Service and then click OK.
Step 2: Configure the authorization service
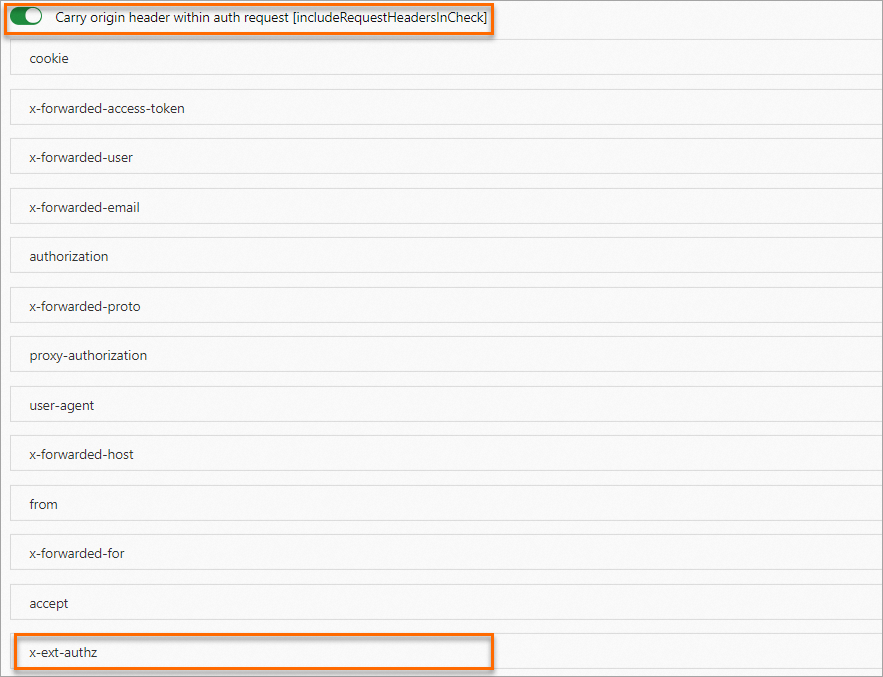
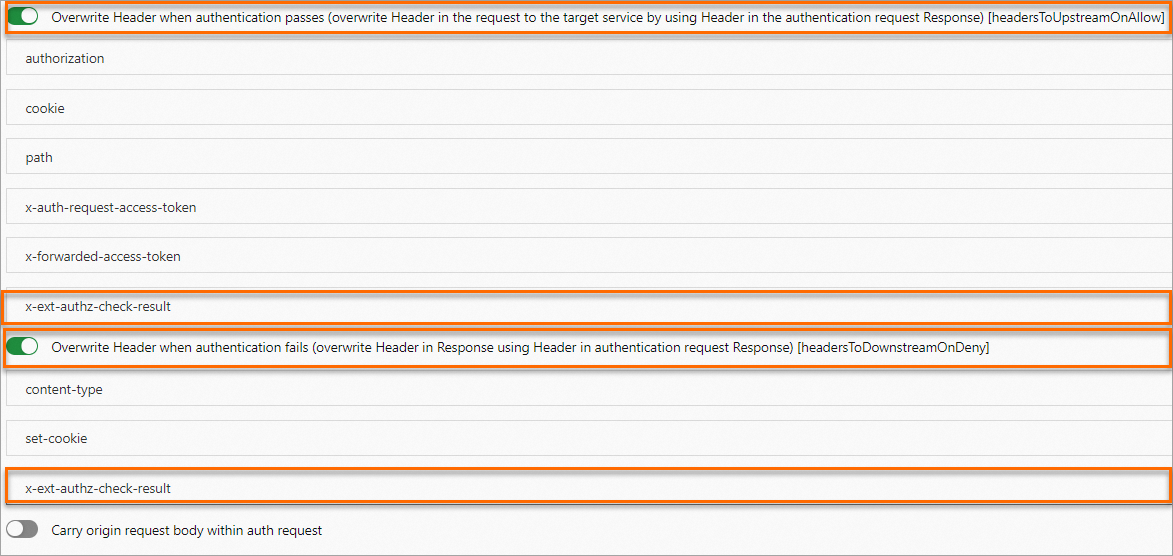
In the Custom Authorization Service Configuration step of the CreateCustom Authorization Service configuration wizard, click the Custom authorization service (HTTP or gRPC protocol) implemented based on envoy.ext_authz tab, configure the parameters, and then click Next.
The following figures show a sample configuration. For parameter descriptions, see Implement custom authorization by using the HTTP protocol.
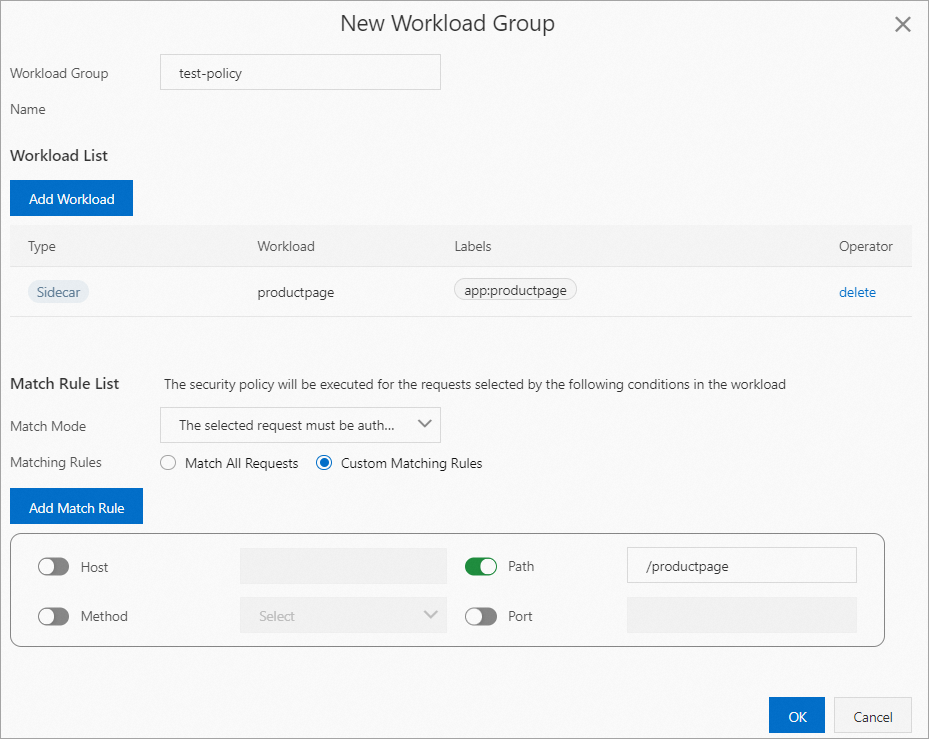
Step 3: Add a workload group and match rules
In the Workload and Match Rules step, click Add Workload Group. In the New Workload Group dialog box, configure the following parameters and click OK.
This example uses the following settings:
| Parameter | Value |
|---|---|
| Workload Group Name | test-policy |
| Workload List | Add a workload scoped to the default namespace with Workload Type set to Service. Select productpage and move it to the selected box. |
| Match Rule List | Set Match Mode to The selected request must be authenticated. Set Matching Rules to Custom Matching Rules. Turn on the Path switch and set the value to /productpage. |
To configure the workload list:
Click Add Workload.
In the Add Workload dialog box, select Workload Scope. Set Namespace to default and Workload Type to Service.
In the Select workloads box, select productpage, click the add icon to move it to the selected box, and then click OK.
In the Complete step, the message "ASMSecurityPolicy Creation successfully" confirms that the policy was created. Click YAML to review the generated resources, or click Complete to return to the ASMSecurityPolicy page.
Step 4: Verify the configuration
Send test requests through the ingress gateway to confirm that the custom authorization service correctly allows and denies access.
Replace <ingress-gateway-ip> with the actual IP address of your ingress gateway. To get this address, see Create an ingress gateway.Test an allowed request
Send a request with the x-ext-authz: allow header:
curl -I -H "x-ext-authz: allow" http://<ingress-gateway-ip>/productpageExpected output:
HTTP/1.1 200 OK
content-type: text/html; charset=utf-8
content-length: 5288
server: istio-envoy
date: Tue, 17 Jan 2023 07:53:14 GMT
x-envoy-upstream-service-time: 20
A 200 OK response confirms that the authorization service allowed the request.
Test a denied request
Send a request with the x-ext-authz: deny header:
curl -I -H "x-ext-authz: deny" http://<ingress-gateway-ip>/productpageExpected output:
HTTP/1.1 403 Forbidden
x-ext-authz-check-result: denied
date: Tue, 17 Jan 2023 07:55:27 GMT
server: istio-envoy
x-envoy-upstream-service-time: 2
transfer-encoding: chunked
A 403 Forbidden response with the x-ext-authz-check-result: denied header confirms that the authorization service denied the request.
Both results together confirm that the custom authorization policy is working correctly.
Related topics
Use the KubeAPI operation audit feature in ASM: Enable the mesh audit feature to record or trace the daily operations of different users.
Configure audit alerts for operations on ASM resources: Configure audit alerts and send alert notifications to alert contacts when important resources change.