When JavaScript is minified for production, error stack traces become unreadable. Source maps restore the original file names, line numbers, and column positions so you can trace errors back to the exact line of source code.
Application Real-Time Monitoring Service (ARMS) Real User Monitoring (RUM) collects JavaScript error stacks from your web or HTML5 application and parses them with uploaded source maps. A build tool plugin assigns a universally unique identifier (UUID) to each JavaScript file and its corresponding source map. After you upload the source maps, RUM automatically resolves minified stack traces to readable source code without manual source map selection.
Before you begin
Your web or HTML5 application is connected to RUM. For details, see Integrate a web application or an HTML5 application.
Webpack or Vite is available as your build tool, with the RUM plugin at version 0.0.5 or later.
Step 1: Generate source maps with the build tool plugin
Install the RUM plugin for your build tool and enable source map generation.
Webpack
Install the plugin:
npm install @arms/rum-webpack-plugin --saveAdd the plugin to your Webpack configuration and set
devtoolto'source-map':import { RumWebpackPlugin } from '@arms/rum-webpack-plugin' const config = { plugins: [new RumWebpackPlugin()], devtool: 'source-map', }; export default configThe devtool option controls how Webpack generates source maps.
Vite
Install the plugin:
npm install @arms/rum-vite-plugin --saveAdd the plugin to your Vite configuration and enable source maps:
import { rumVitePlugin } from '@arms/rum-vite-plugin'

export default defineConfig({
  plugins: [rumVitePlugin()],
  build: {
    sourcemap: true,
  },
});
The build.sourcemap option controls how Vite generates source maps.
Step 2: Upload source maps
Upload source maps to RUM by using one of the following methods.
Method 1: Automatic upload
Configure the build tool plugin to upload source maps to the RUM Object Storage Service (OSS) bucket automatically after UUIDs are assigned.
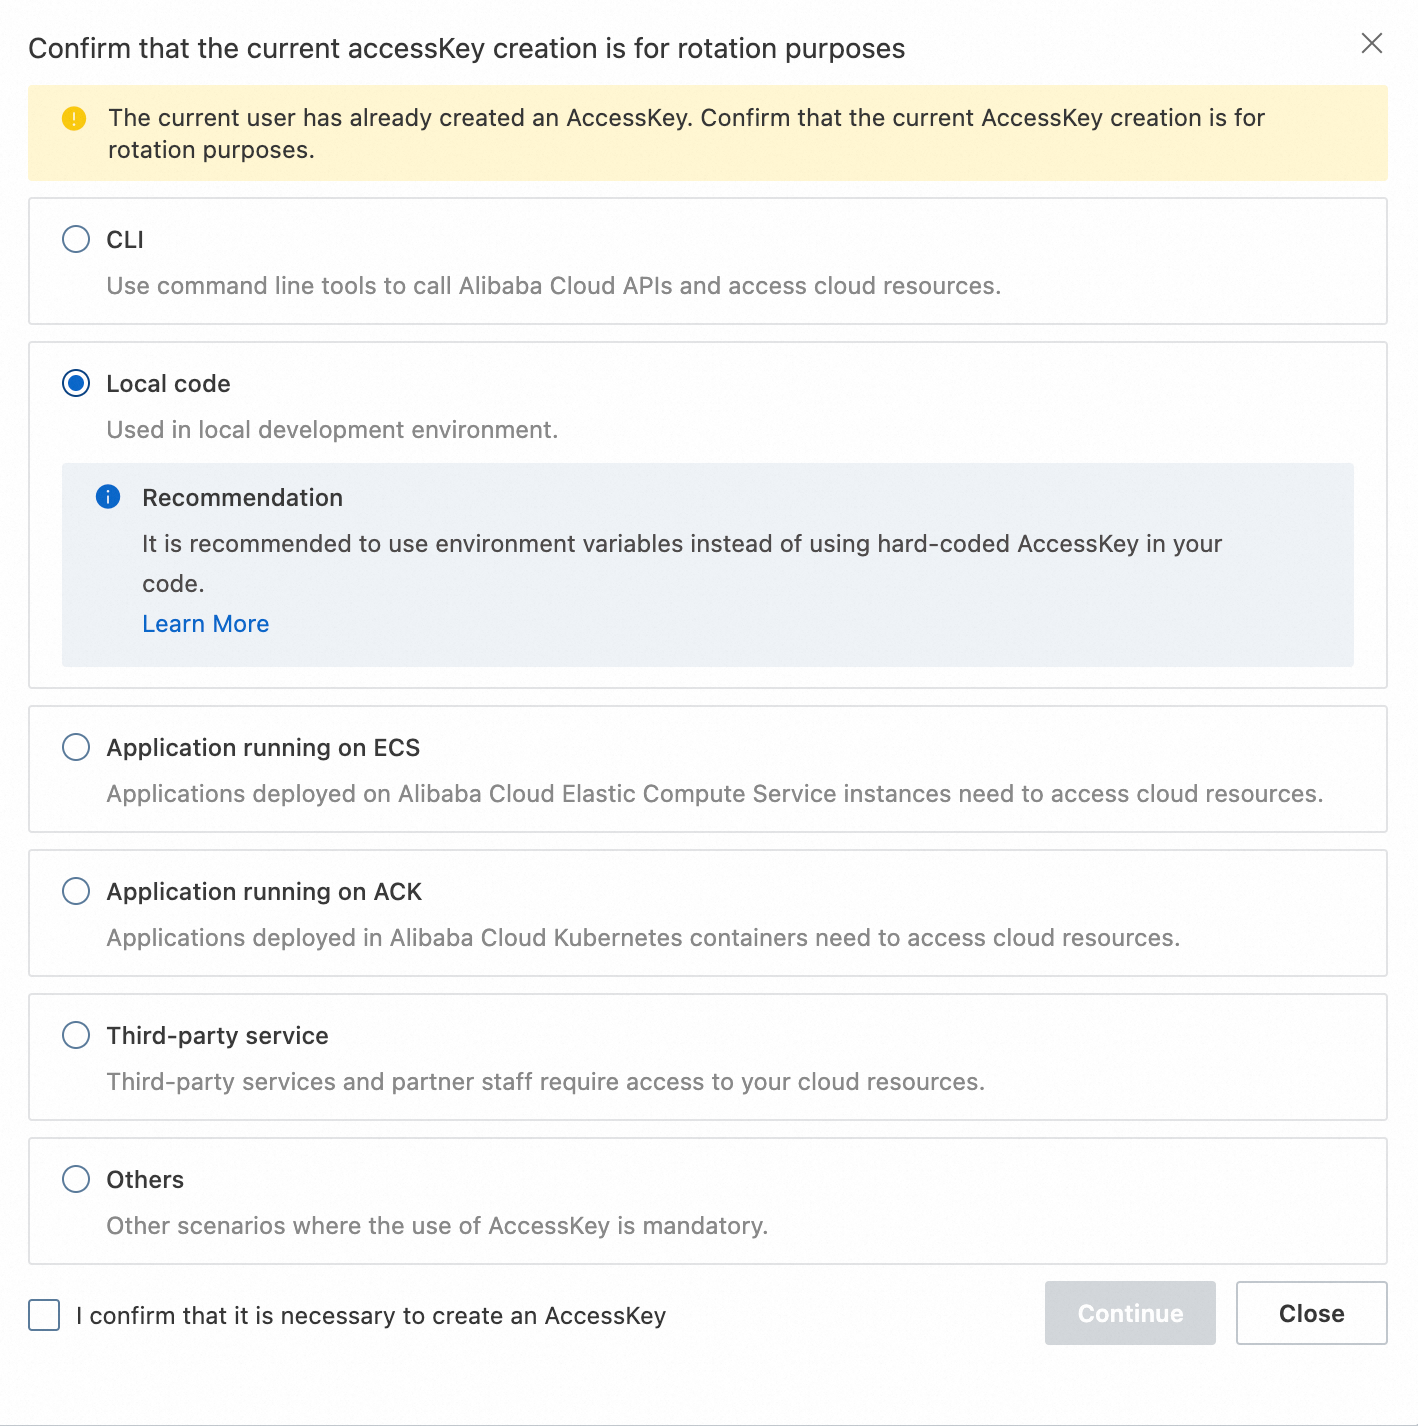
Automatic upload requires the AccessKey ID and AccessKey secret of your Alibaba Cloud account. For security, log on as a Resource Access Management (RAM) user and keep your AccessKey credentials confidential.
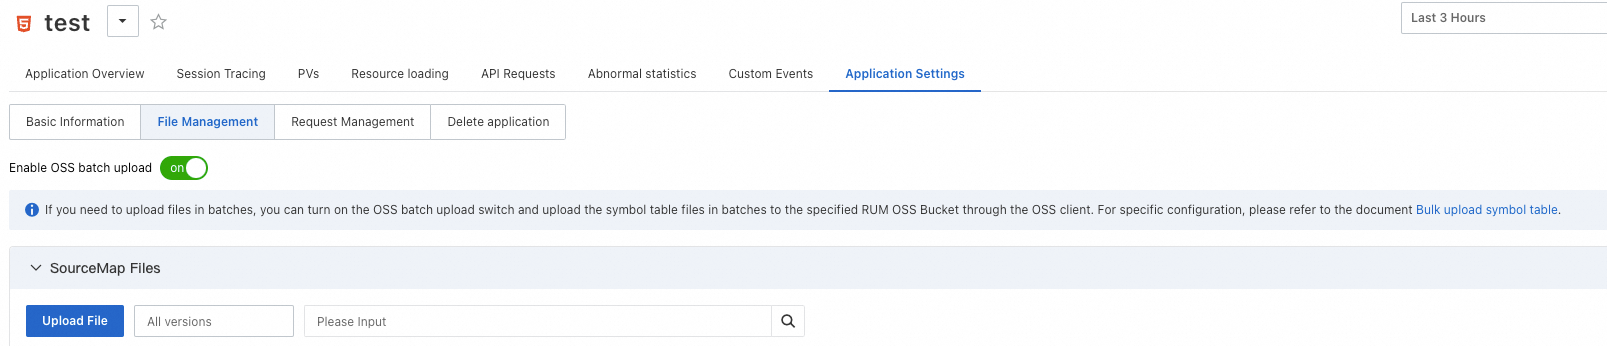
Enable OSS batch upload
Log on to the ARMS console as a RAM user.
In the left-side navigation pane, choose .
Click the target web or HTML5 application.
Click the Application Settings tab, then click the File Management tab.
Turn on Enable OSS batch upload.
Create an AccessKey pair for the RAM user
Create an AccessKey ID and AccessKey secret for the RAM user you logged on as. For instructions, see Create an AccessKey pair.
Select Local code to use the AccessKey in a local development environment.
Configure the plugin with upload credentials
Add your RUM application ID, AccessKey credentials, version number, and region to the plugin configuration.
| Parameter | Description | Default |
|---|---|---|
pid | RUM application ID | -- |
accessKeyId | AccessKey ID of the RAM user | -- |
accessKeySecret | AccessKey secret of the RAM user | -- |
version | Version label for grouping uploaded source maps | 1.0.0 |
region | Region where the RUM application resides | cn-hangzhou |
Webpack
With Webpack, source maps are uploaded only in production mode to avoid duplicate uploads during development.
import { RumWebpackPlugin } from '@arms/rum-webpack-plugin'

const config = {
  plugins: [new RumWebpackPlugin({
    pid: '<your-rum-app-id>',
    accessKeyId: '<your-access-key-id>',
    accessKeySecret: '<your-access-key-secret>',
    version: '<version>',
    region: '<region-id>'
  })],
  devtool: 'source-map',
};

export default config
Vite
import { rumVitePlugin } from '@arms/rum-vite-plugin'

export default defineConfig({
  plugins: [rumVitePlugin({
    pid: '<your-rum-app-id>',
    accessKeyId: '<your-access-key-id>',
    accessKeySecret: '<your-access-key-secret>',
    version: '<version>',
    region: '<region-id>'
  })],
  build: {
    sourcemap: true,
  },
});
Replace the placeholders with your actual values:
| Placeholder | Description | Example |
|---|---|---|
<your-rum-app-id> | RUM application ID (PID) | aem4g9v*** |
<your-access-key-id> | AccessKey ID of the RAM user | LTAI5tXxx |
<your-access-key-secret> | AccessKey secret of the RAM user | xXxXxXx |
<version> | Version label | 1.0.0 |
<region-id> | Region ID | cn-hangzhou |
Method 2: Manual upload
Build the project
Run the build command provided by your build tool. The RUM plugin assigns UUIDs that link each JavaScript file to its corresponding source map:
Source map files: A
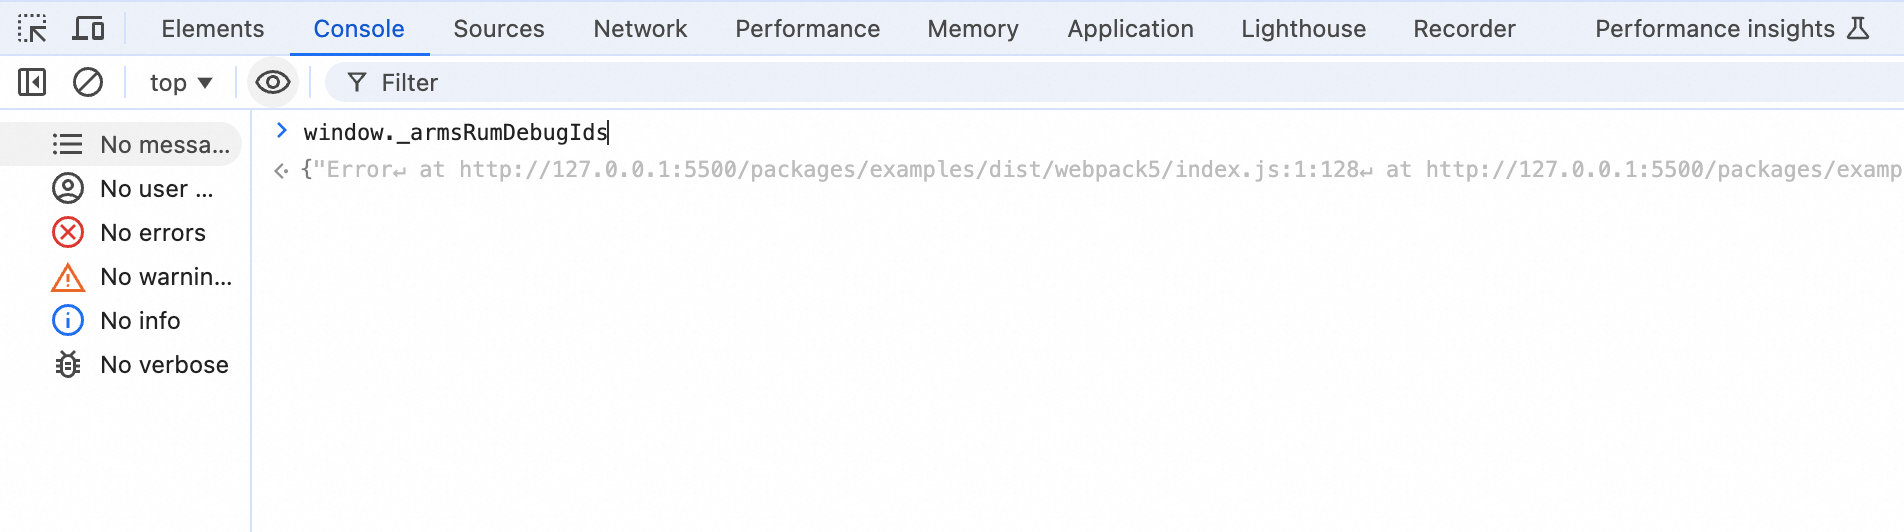
debugIdfield is added to confirm UUID injection.{ "version": 3, "file": "index.js", "mappings": "AAAAA,QAAQC,IAAI", "sources": [ "webpack://examples/./src/index.js" ], "sourcesContent": [ "console.log('Hello World!');\n" ], "names": [ "console", "log" ], "sourceRoot": "", "debugId": "e4f083d6-b8d8-4cae-a0ea-16f2e83a6be1" }JavaScript files: The
_armsRumDebugIdsproperty in the browserwindowobject confirms UUID injection.
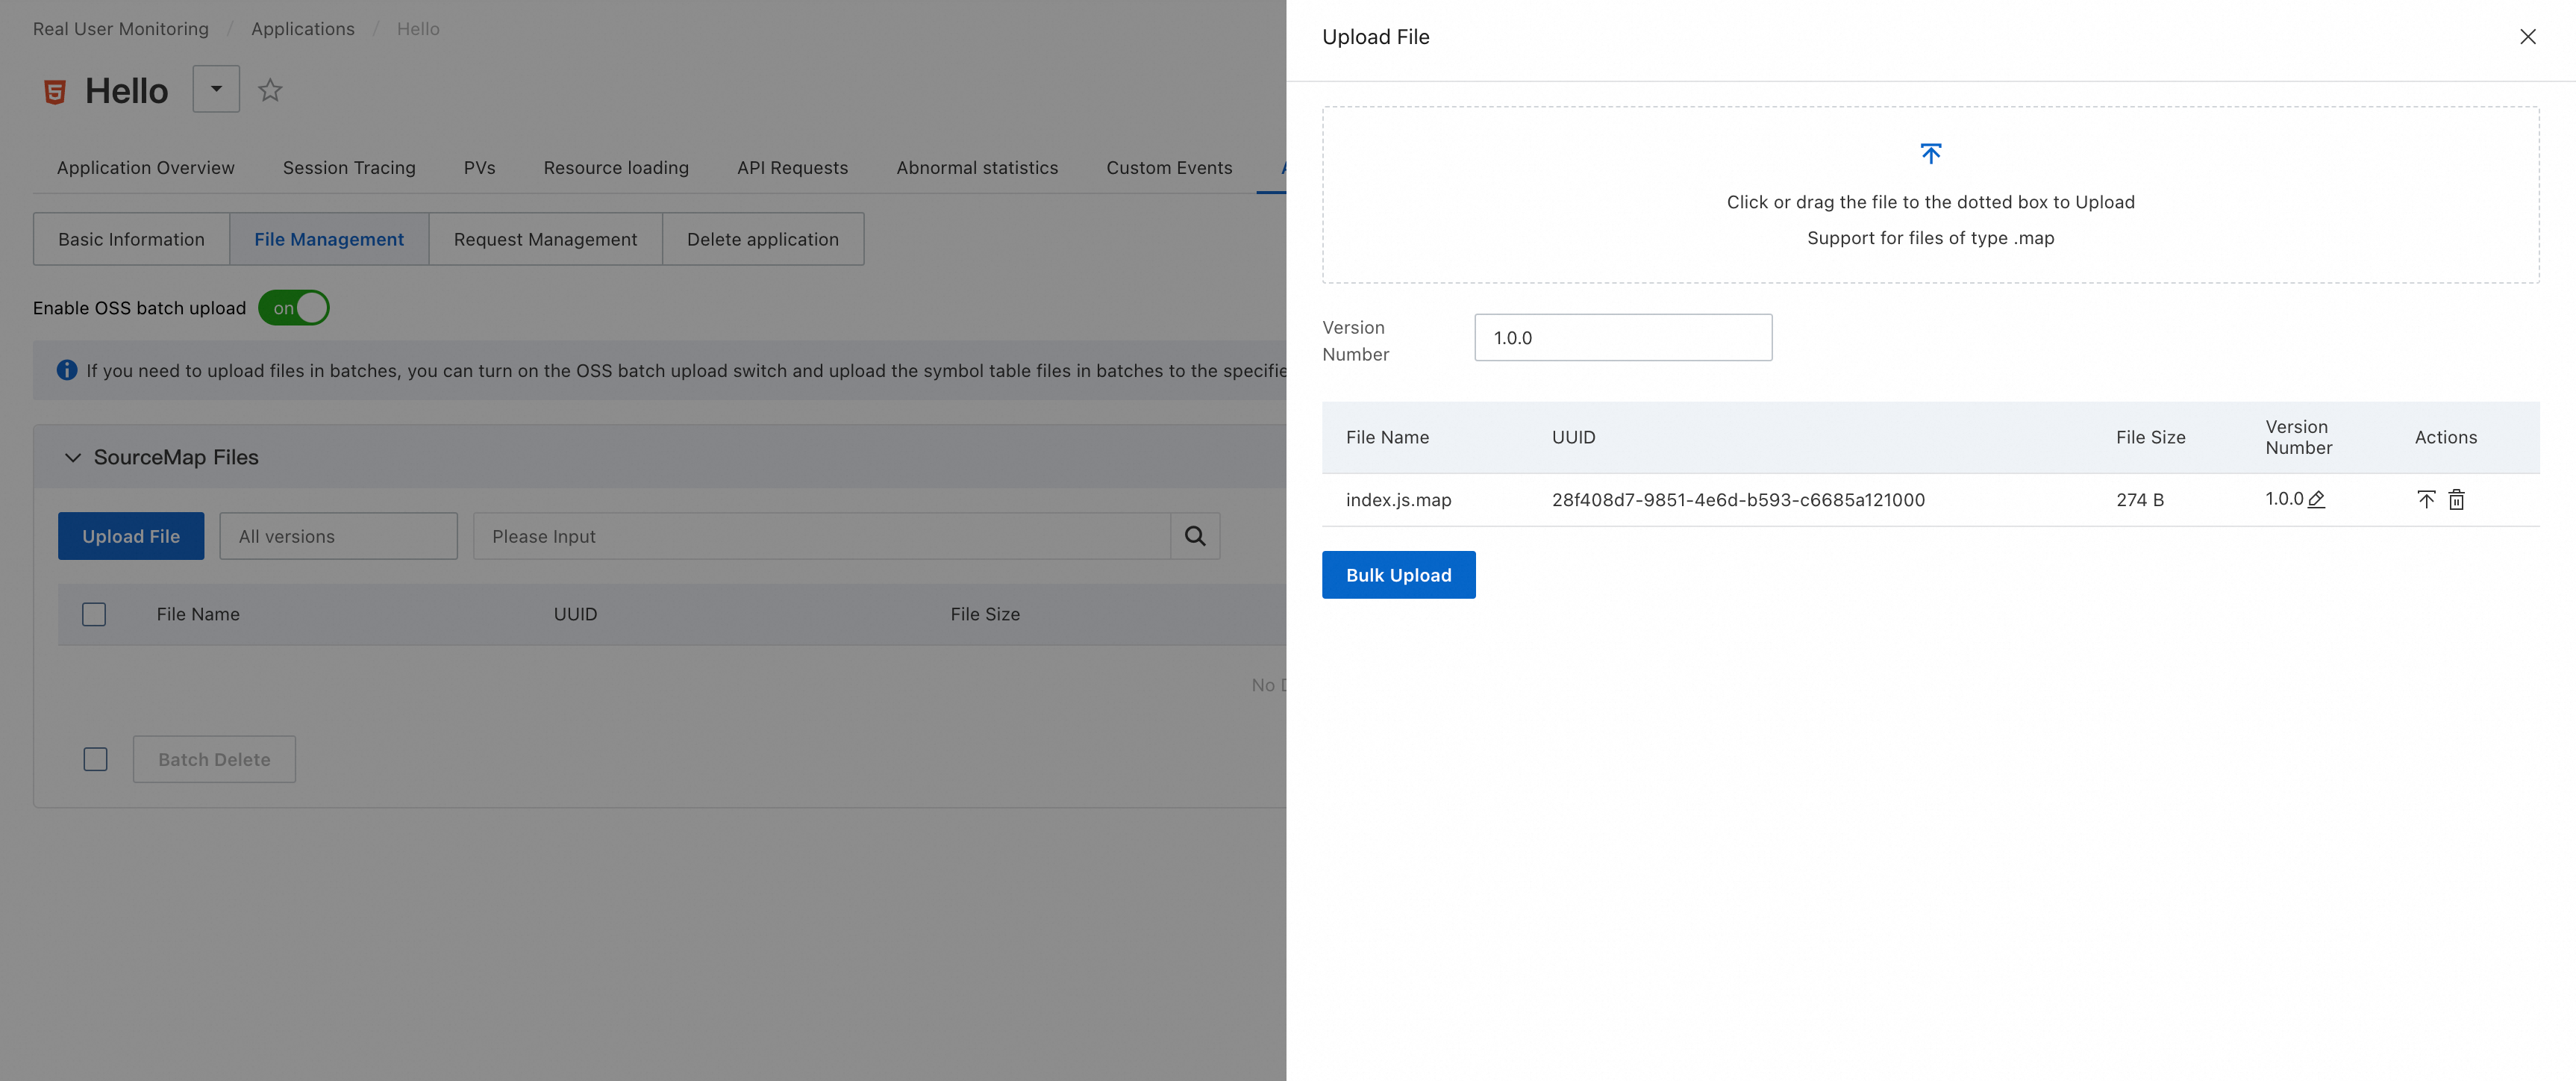
Upload source maps through the console
Log on to the ARMS console as a RAM user.
In the left-side navigation pane, choose .
Click the target web or HTML5 application.
Click the Application Settings tab, then click the File Management tab.
Click Upload File and select the source map files that have UUIDs assigned.
After the upload completes, the UUID column displays the parsed identifiers.
Step 3: Verify automatic parsing
After source maps are uploaded, verify that error stacks resolve correctly.
On the application details page, click the Abnormal statistics tab.
Click an exception to open the exception details page.
On the Stack Information page, verify the following:
Each line of the stack trace includes a UUID assigned by the RUM build tool plugin. If UUIDs are missing, reporting failed.
The first line displays the original source code location where the error occurred.
Expand any other line to see the full parsing result.
