After you instrument an application with OpenTelemetry and report trace data to Managed Service for OpenTelemetry, Managed Service for OpenTelemetry starts to monitor the application. You can view various monitoring data, such as application topology, traces, abnormal transactions, slow transactions, and SQL analysis. This topic describes how to instrument an Android application with OpenTelemetry and report data.
Prerequisites
-
Log on to the Application Real-Time Monitoring Service (ARMS) console. In the left-side navigation pane, click Integration Center.
-
On the Integration Center page, click the OpenTelemetry card in the Server-side Applications section.
-
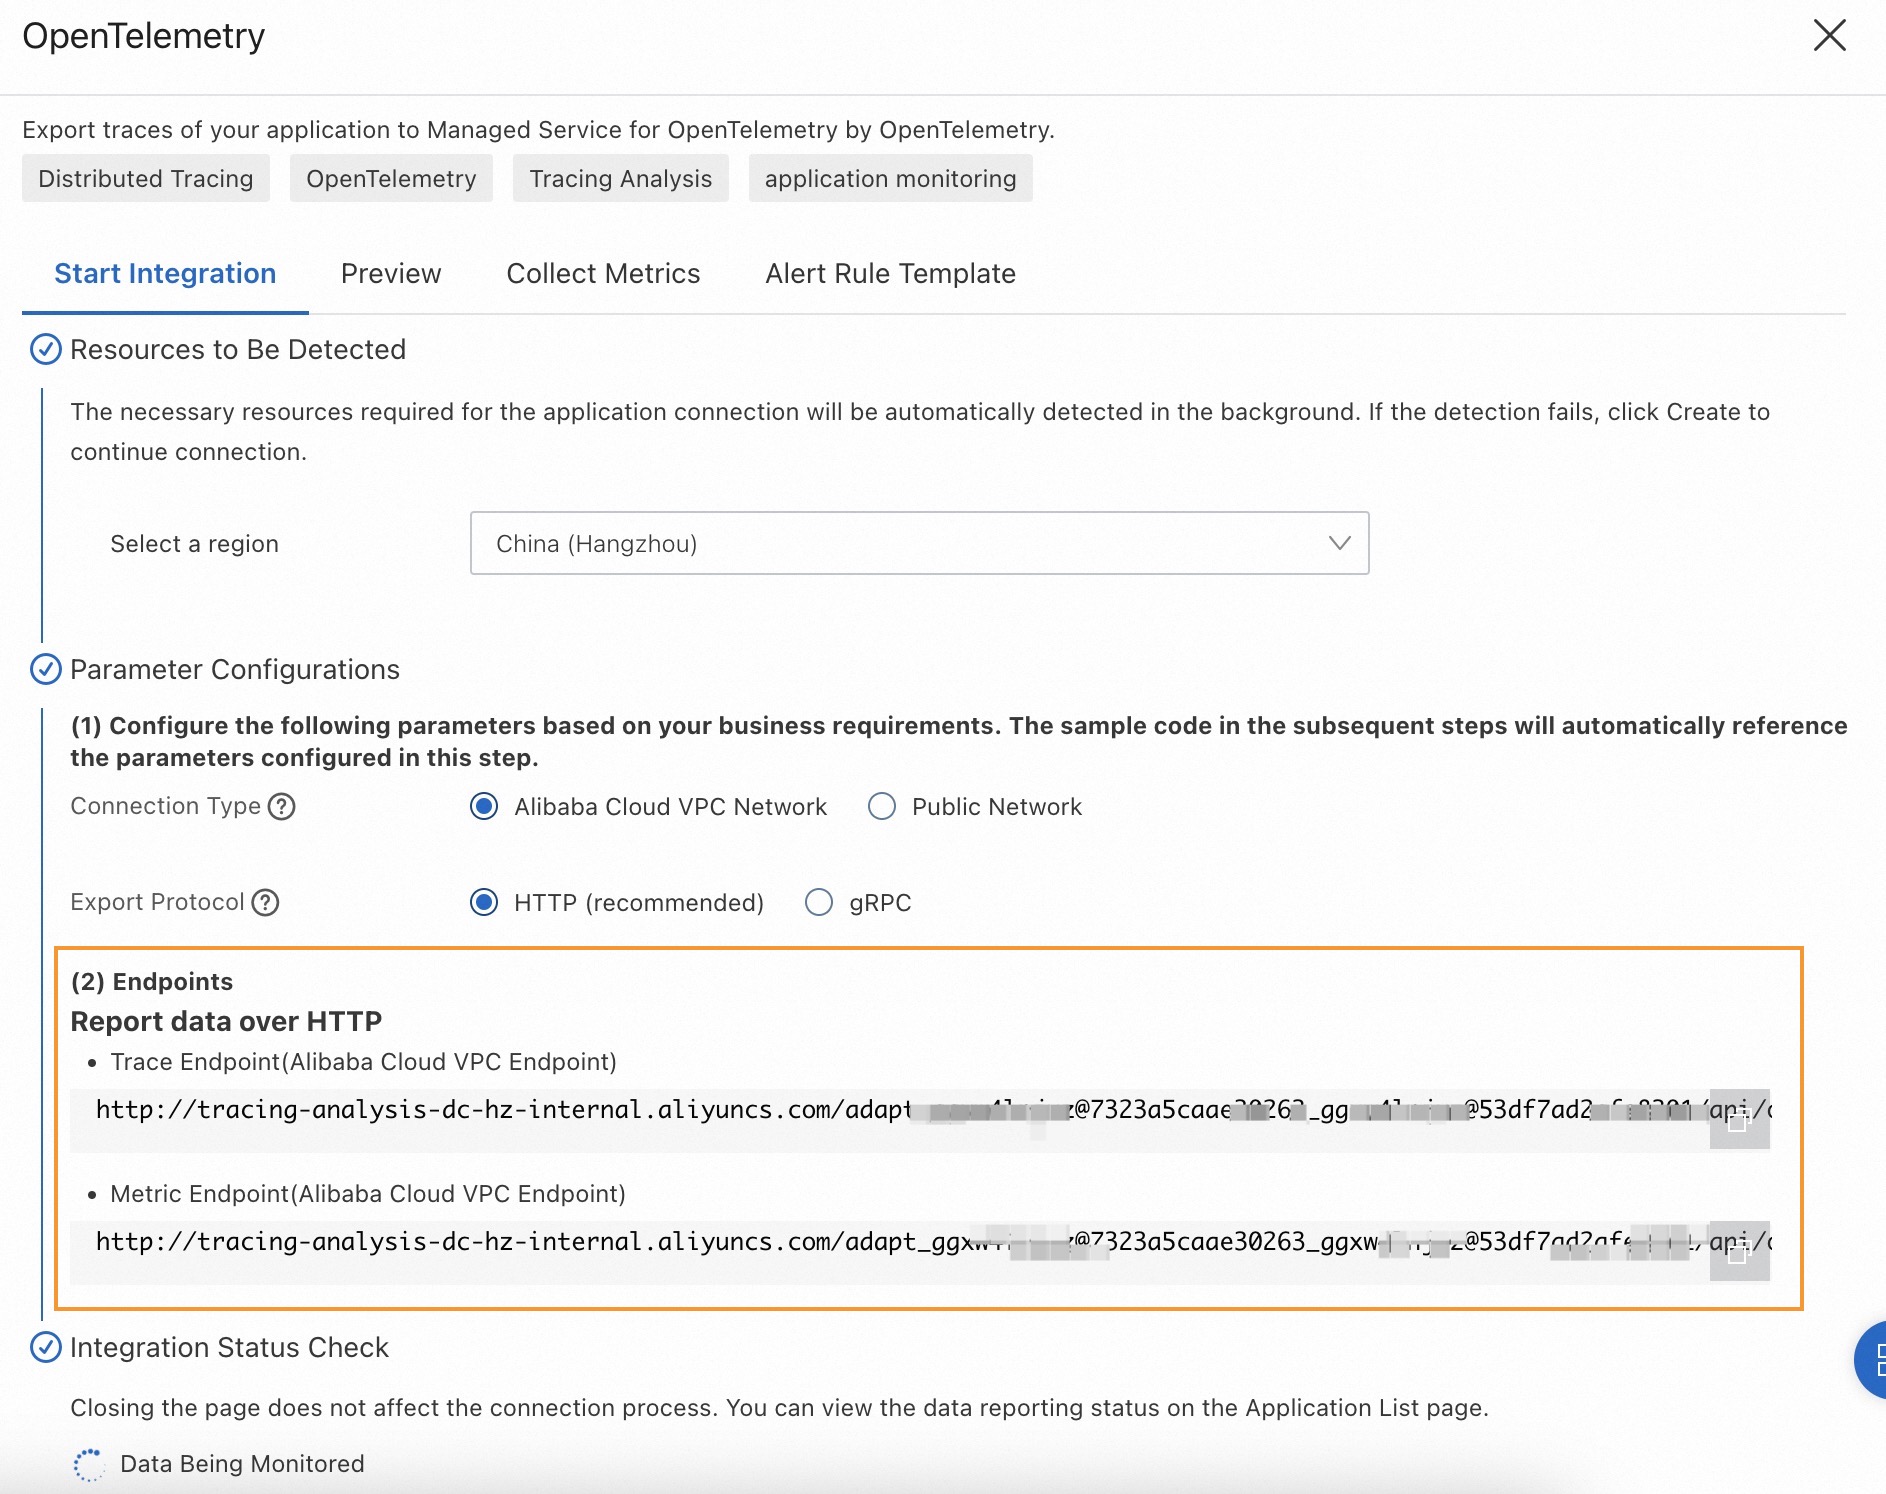
In the OpenTelemetry panel, click the Start Integration tab, and then select a region in which you want to report data.
NoteWhen you access a region for the first time, resources are automatically initialized there.
-
Configure the Connection Type and Export Protocol parameters and copy an endpoint.
-
Connection Type: If your service is deployed on Alibaba Cloud and resides in the region that you selected, we recommend that you set this parameter to Alibaba Cloud VPC Network. Otherwise, set this parameter to Public Network.
-
Export Protocol: Set this parameter to HTTP (recommended) or gRPC based on the protocol that is supported by the client.
-
Sample application
This topic uses a sample application to show how to report trace data from an Android application with OpenTelemetry. The procedure applies to applications written in both Java and Kotlin.
Sample code repository: opentelemetry-android-demo
Step 1: Create and configure the application
-
Create an application.
-
In Android Studio, create a new application. Select the Basic Views Activity template and click Next.
-
Select Java or Kotlin as the language, select API 24: Android 7.0 (Nougat) as the minimum SDK version, and then click Finish.
-
-
Add dependencies.
In the module-level or project-level build.gradle file, add the following dependencies.
This example uses version 1.25.0 of the OpenTelemetry SDK for Java. For other versions, see Opentelemetry Java Releases. For the complete build.gradle file, see build.gradle.
implementation platform('io.opentelemetry:opentelemetry-bom:1.25.0') implementation "io.opentelemetry:opentelemetry-api" implementation "io.opentelemetry:opentelemetry-context" implementation 'io.opentelemetry:opentelemetry-exporter-otlp' implementation 'io.opentelemetry:opentelemetry-exporter-logging' implementation 'io.opentelemetry:opentelemetry-extension-kotlin' implementation 'io.opentelemetry:opentelemetry-sdk' implementation 'io.opentelemetry:opentelemetry-semconv' -
Add network configuration.
-
In the
app/res/xmldirectory, create a file named network_security_config.xml and add the following content.<!-- For the complete file content, see https://github.com/alibabacloud-observability/android-demo/blob/master/AndroidJavaDemo/app/src/main/res/xml/network_security_config.xml --> <?xml version="1.0" encoding="utf-8"?> <network-security-config> <domain-config cleartextTrafficPermitted="true"> <!-- Replace the following domain name with the endpoint you obtained in the Prerequisites section. Do not include "http://", the port number, or the URL path. --> <domain includeSubdomains="true">tracing-analysis-dc-hz.aliyuncs.com</domain> </domain-config> </network-security-config> -
Modify the
app/src/main/AndroidManifest.xmlfile. Add the following two lines to grant the application network permission.<!-- For the complete file content, see https://github.com/alibabacloud-observability/android-demo/blob/master/AndroidJavaDemo/app/src/main/AndroidManifest.xml --> <?xml version="1.0" encoding="utf-8"?> <manifest ...> <!-- Add the following line to grant network permission. --> <uses-permission android:name="android.permission.INTERNET" /> <application ... <!-- Add the following line to configure network settings for the domain to which you want to report data. --> android:networkSecurityConfig="@xml/network_security_config" ...> ... </application> </manifest>
-
Step 2: Initialize OpenTelemetry
-
Create an OpenTelemetry utility class.
In the same directory as MainActivity, create a file named
OpenTelemetryUtiland add the following content.-
Option 1: Report trace data using gRPC
/** For the complete code, visit the following link: https://github.com/alibabacloud-observability/android-demo/blob/master/AndroidJavaDemo/app/src/main/java/com/example/androidjavademo/OpenTelemetryUtil.java */ Resource otelResource = Resource.getDefault().merge( Resource.create( Attributes.of( // Replace <your-service-name> with your application name. ResourceAttributes.SERVICE_NAME, "<your-service-name>", // Replace <your-host-name> with your host name. ResourceAttributes.HOST_NAME, "<your-host-name>" ) ) ); SdkTracerProvider sdkTracerProvider = SdkTracerProvider.builder() .addSpanProcessor(SimpleSpanProcessor.create(LoggingSpanExporter.create())) // Optional: Prints trace data to the console. Comment out this line to disable this feature. // Replace <gRPC-endpoint> with the endpoint you obtained in the Prerequisites section and replace <gRPC-token> with your authentication token. .addSpanProcessor(BatchSpanProcessor.builder( OtlpGrpcSpanExporter.builder() .setEndpoint("<gRPC-endpoint>") // Example: http://tracing-analysis-dc-hz.aliyuncs.com:8090 .addHeader("Authentication", "<gRPC-token>") // Example: xxxx@xxxx_xxxx@xxxx .build()).build() ) .setResource(otelResource) .build(); OpenTelemetry openTelemetry = OpenTelemetrySdk.builder() .setTracerProvider(sdkTracerProvider) .setPropagators(ContextPropagators.create(W3CTraceContextPropagator.getInstance())) .buildAndRegisterGlobal(); // Obtain a tracer to create spans. tracer = openTelemetry.getTracer("android-tracer", "1.0.0");/** For the complete code, visit the following link: https://github.com/alibabacloud-observability/android-demo/blob/master/AndroidKotlinDemo/app/src/main/java/com/example/androidkotlindemo/OpenTelemetryUtil.kt */ val otelResource = Resource.getDefault().merge( Resource.create( Attributes.of( ResourceAttributes.SERVICE_NAME, "<your-service-name>", // Replace <your-service-name> with your application name. ResourceAttributes.HOST_NAME, "<your-host-name>" // Replace <your-host-name> with your host name. ) ) ) /* Report trace data over gRPC. */ val sdkTracerProvider = SdkTracerProvider.builder() .addSpanProcessor(SimpleSpanProcessor.create(LoggingSpanExporter.create())) // Optional: Prints trace data to the console. Comment out this line to disable this feature. // Replace <gRPC-endpoint> with the endpoint you obtained in the Prerequisites section and replace <gRPC-token> with your authentication token. .addSpanProcessor( BatchSpanProcessor.builder( OtlpGrpcSpanExporter.builder() .setEndpoint("<gRPC-endpoint>") // Example: http://tracing-analysis-dc-hz.aliyuncs.com:8090 .addHeader("Authentication", "<gRPC-token>") // Example: xxxx@xxxx_xxxx@xxxx .build() ).build() ) .setResource(otelResource) .build() val openTelemetry: OpenTelemetry = OpenTelemetrySdk.builder() .setTracerProvider(sdkTracerProvider) .setPropagators(ContextPropagators.create(W3CTraceContextPropagator.getInstance())) .buildAndRegisterGlobal() // Obtain a tracer to create spans. tracer = openTelemetry.getTracer("android-tracer", "1.0.0") -
Option 2: Report trace data using HTTP
/** For the complete code, visit the following link: https://github.com/alibabacloud-observability/android-demo/blob/master/AndroidJavaDemo/app/src/main/java/com/example/androidjavademo/OpenTelemetryUtil.java */ Resource otelResource = Resource.getDefault().merge( Resource.create( Attributes.of( // Replace <your-service-name> with your application name. ResourceAttributes.SERVICE_NAME, "<your-service-name>", // Replace <your-host-name> with your host name. ResourceAttributes.HOST_NAME, "<your-host-name>" ) ) ); SdkTracerProvider sdkTracerProvider = SdkTracerProvider.builder() .addSpanProcessor(SimpleSpanProcessor.create(LoggingSpanExporter.create())) // Optional: Prints trace data to the console. Comment out this line to disable this feature. // Replace <HTTP-endpoint> with the endpoint you obtained in the Prerequisites section. .addSpanProcessor(BatchSpanProcessor.builder( OtlpHttpSpanExporter.builder() .setEndpoint("<HTTP-endpoint>") // Example: http://tracing-analysis-dc-hz.aliyuncs.com/adapt_xxxx@xxxx_xxxx@xxxx/api/otlp/traces .build()).build() ) .setResource(otelResource) .build(); OpenTelemetry openTelemetry = OpenTelemetrySdk.builder() .setTracerProvider(sdkTracerProvider) .setPropagators(ContextPropagators.create(W3CTraceContextPropagator.getInstance())) .buildAndRegisterGlobal(); // Obtain a tracer to create spans. tracer = openTelemetry.getTracer("android-tracer", "1.0.0");/** For the complete code, visit the following link: https://github.com/alibabacloud-observability/android-demo/blob/master/AndroidKotlinDemo/app/src/main/java/com/example/androidkotlindemo/OpenTelemetryUtil.kt */ val otelResource = Resource.getDefault().merge( Resource.create( Attributes.of( ResourceAttributes.SERVICE_NAME, "<your-service-name>", // Replace <your-service-name> with your application name. ResourceAttributes.HOST_NAME, "<your-host-name>" // Replace <your-host-name> with your host name. ) ) ) /* Report trace data over HTTP. */ val sdkTracerProvider = SdkTracerProvider.builder() .addSpanProcessor(SimpleSpanProcessor.create(LoggingSpanExporter.create())) // Optional: Prints trace data to the console. Comment out this line to disable this feature. // Replace <HTTP-endpoint> with the endpoint you obtained in the Prerequisites section. .addSpanProcessor(BatchSpanProcessor.builder( OtlpHttpSpanExporter.builder() .setEndpoint("<HTTP-endpoint>") // Example: http://tracing-analysis-dc-hz.aliyuncs.com/adapt_xxxx@xxxx_xxxx@xxxx/api/otlp/traces .build()).build() ) .setResource(otelResource) .build(); val openTelemetry: OpenTelemetry = OpenTelemetrySdk.builder() .setTracerProvider(sdkTracerProvider) .setPropagators(ContextPropagators.create(W3CTraceContextPropagator.getInstance())) .buildAndRegisterGlobal() // Obtain a tracer to create spans. tracer = openTelemetry.getTracer("android-tracer", "1.0.0")
-
-
Initialize OpenTelemetry when the application starts.
In the
onCreatemethod ofMainActivity, call the OpenTelemetryUtil.init() method./** For the complete code, visit the following link: https://github.com/alibabacloud-observability/android-demo/blob/master/AndroidJavaDemo/app/src/main/java/com/example/androidjavademo/MainActivity.java */ ... public class MainActivity extends AppCompatActivity { ... @Override protected void onCreate(Bundle savedInstanceState) { super.onCreate(savedInstanceState); // Add this line to initialize OpenTelemetry. OpenTelemetryUtil.init(); ... } ... }/** For the complete code, visit the following link: https://github.com/alibabacloud-observability/android-demo/blob/master/AndroidKotlinDemo/app/src/main/java/com/example/androidkotlindemo/MainActivity.kt */ ... class MainActivity : AppCompatActivity() { ... override fun onCreate(savedInstanceState: Bundle?) { WindowCompat.setDecorFitsSystemWindows(window, false) super.onCreate(savedInstanceState) // Add this line to initialize OpenTelemetry. OpenTelemetryUtil.init() ... } }
Step 3: Create spans to trace data
-
Create a span.
In the FirstFragment file, create a span named First Fragment Button onClick in the button click handler.
/** For the complete code, visit the following link: https://github.com/alibabacloud-observability/android-demo/blob/master/AndroidJavaDemo/app/src/main/java/com/example/androidjavademo/FirstFragment.java */ public void onClick(View view) { // Get the tracer. Tracer tracer = OpenTelemetryUtil.getTracer(); // Create a span. Span span = tracer.spanBuilder("First Fragment Button onClick").startSpan(); try (Scope scope = span.makeCurrent()) { // Get the trace ID. System.out.println(span.getSpanContext().getTraceId()); ... } finally { span.end(); } }/** For the complete code, visit the following link: https://github.com/alibabacloud-observability/android-demo/blob/master/AndroidKotlinDemo/app/src/main/java/com/example/androidkotlindemo/FirstFragment.kt */ binding.buttonFirst.setOnClickListener { // Get the tracer. val tracer: Tracer = OpenTelemetryUtil.getTracer()!! // Create a span. val span = tracer.spanBuilder("First Fragment Button onClick").startSpan() try { span.makeCurrent().use { scope -> // Get the trace ID. println(span.spanContext.traceId) // Get the span ID. println(span.spanContext.spanId) findNavController().navigate(R.id.action_FirstFragment_to_SecondFragment) } } catch (t: Throwable) { span.setStatus(StatusCode.ERROR, "Something wrong in onClick") throw t } finally { span.end() } } -
Set attributes and events for the span.
/** For the complete code, visit the following link: https://github.com/alibabacloud-observability/android-demo/blob/master/AndroidJavaDemo/app/src/main/java/com/example/androidjavademo/FirstFragment.java */ // Set an attribute. span.setAttribute("key", "value"); Attributes eventAttributes = Attributes.of( AttributeKey.stringKey("key"), "value", AttributeKey.longKey("result"), 0L); // Add an event. span.addEvent("onClick", eventAttributes);/** For the complete code, visit the following link: https://github.com/alibabacloud-observability/android-demo/blob/master/AndroidKotlinDemo/app/src/main/java/com/example/androidkotlindemo/FirstFragment.kt */ // Set an attribute. span.setAttribute("key", "value") val eventAttributes = Attributes.of( AttributeKey.stringKey("key"), "value", AttributeKey.longKey("result"), 0L ) // Add an event. span.addEvent("onClick", eventAttributes) -
Set the status for the span.
/** For the complete code, visit the following link: https://github.com/alibabacloud-observability/android-demo/blob/master/AndroidJavaDemo/app/src/main/java/com/example/androidjavademo/FirstFragment.java */ ... try (Scope scope = span.makeCurrent()) { ... } catch (Throwable t) { // Set the span status. span.setStatus(StatusCode.ERROR, "Something wrong in onClick"); throw t; } finally { span.end(); }/** For the complete code, visit the following link: https://github.com/alibabacloud-observability/android-demo/blob/master/AndroidKotlinDemo/app/src/main/java/com/example/androidkotlindemo/FirstFragment.kt */ ... try { ... } catch (t: Throwable) { // Set the span status. span.setStatus(StatusCode.ERROR, "Something wrong in onClick") throw t } finally { span.end() } -
Create a nested span.
/** For the complete code, visit the following link: https://github.com/alibabacloud-observability/android-demo/blob/master/AndroidJavaDemo/app/src/main/java/com/example/androidjavademo/FirstFragment.java */ public void parentSpan() { // Get the tracer. Tracer tracer = OpenTelemetryUtil.getTracer(); // Create a span. Span span = tracer.spanBuilder("Parent Span").startSpan(); try (Scope scope = span.makeCurrent()) { // Get the trace ID. System.out.println(span.getSpanContext().getTraceId()); // Get the span ID. System.out.println(span.getSpanContext().getSpanId()); childSpan(); } finally { span.end(); } } public void childSpan() { // Get the tracer. Tracer tracer = OpenTelemetryUtil.getTracer(); // Create a span. Span span = tracer.spanBuilder("Child Span").startSpan(); try (Scope scope = span.makeCurrent()) { // Get the trace ID. System.out.println(span.getSpanContext().getTraceId()); // Get the span ID. System.out.println(span.getSpanContext().getSpanId()); } finally { span.end(); } }/** For the complete code, visit the following link: https://github.com/alibabacloud-observability/android-demo/blob/master/AndroidKotlinDemo/app/src/main/java/com/example/androidkotlindemo/FirstFragment.kt */ // Nested span fun parentSpan() { // Get the tracer. val tracer: Tracer = OpenTelemetryUtil.getTracer()!! // Create a span. val span = tracer.spanBuilder("Parent Span").startSpan() try { span.makeCurrent().use { scope -> // Get the trace ID. println(span.spanContext.traceId) // Get the span ID. println(span.spanContext.spanId) childSpan() } } finally { span.end() } } // Nested span fun childSpan() { // Get the tracer. val tracer: Tracer = OpenTelemetryUtil.getTracer()!! // Create a span. val span = tracer.spanBuilder("Child Span").startSpan() try { span.makeCurrent().use { scope -> // Get the trace ID. println(span.spanContext.traceId) // Get the span ID. println(span.spanContext.spanId) } } finally { span.end() } }
Step 4: Run the project and view trace data
-
Run the project and tap the button on the demo application page. In the Running Devices panel of Android Studio, the emulator (for example, Pixel 3a API 33) successfully runs the AndroidJavaDemo application and displays the default First Fragment page.
Check Logcat to view the span information exported by
LoggingSpanExporter.System.out I 0c8b92db3d8b038ea3eedd0ec25a4abb System.out I 9ecd666297f5d8f6 System.out I 0c8b92db3d8b038ea3eedd0ec25a4abb System.out I 7e7eaffe7bd23cb8 System.out I 0c8b92db3d8b038ea3eedd0ec25a4abb System.out I 98ef17d962ecf4d1 LoggingSpanExporter I 'Child Span' : 0c8b92db3d8b038ea3eedd0ec25a4abb 98ef17d962ecf4d1 INTERNAL [tracer: android-tracer:1.0.0] LoggingSpanExporter I 'Parent Span' : 0c8b92db3d8b038ea3eedd0ec25a4abb 7e7eaffe7bd23cb8 INTERNAL [tracer: android-tracer:1.0.0] LoggingSpanExporter I 'First Fragment Button onClick' : 0c8b92db3d8b038ea3eedd0ec25a4abb 9ecd666297f5d8f6 INTERNAL [tracer: android-tracer:1.0.0] EGL_emulation D app_time_stats: avg=460.19ms min=2.23ms max=3653.05ms count=8 -
Log on to the ARMS console. In the left-side navigation pane, choose . On the Applications page, click the name of the application. On the page that appears, view the trace data.
NoteIf the
 icon is displayed in the Language column, the application is connected to Application Monitoring. If a hyphen (-) is displayed, the application is connected to Managed Service for OpenTelemetry.
 The trace details page displays summary metrics (such as duration, number of applications, trace depth, and total number of spans) and a list of spans. The example includes a three-level span hierarchy: the root span First Fragment Button onClick (duration: 6.835 ms), the child span Parent Span (duration: 2.998 ms), and the grandchild span Child Span (duration: 0.14 ms). The application name for all spans is
otel-android-demo. This shows the time breakdown and parent-child relationships.
Step 5: Connect client and server traces
-
Modify the trace context propagation format in the headers.
-
Different protocols use different HTTP headers to pass the trace context to downstream services. For example, OpenTelemetry uses the W3C Trace Context format by default but also supports other formats. Zipkin uses the B3 or B3 Multi format. For more information about context propagation formats, see Specify the context propagation format for OpenTelemetry.
-
To connect client and server traces, configure the
textPropagatorson the client to match the protocol that the server uses:-
If the server uses the default W3C Trace Context format of OpenTelemetry, you do not need to configure
textPropagatorson the client. -
If the server uses the B3 or B3 Multi format of Zipkin, you must set
textPropagatorson the client toB3Propagator.// Set the B3 context propagation format. OpenTelemetry openTelemetry = OpenTelemetrySdk.builder() .setTracerProvider(sdkTracerProvider) .setPropagators(ContextPropagators.create(TextMapPropagator.composite( B3Propagator.injectingMultiHeaders(), B3Propagator.injectingSingleHeader()))) .buildAndRegisterGlobal(); -
If the server uses the Jaeger protocol, you must set
textPropagatorson the client toJaegerPropagator.// Set the Jaeger context propagation format. OpenTelemetry openTelemetry = OpenTelemetrySdk.builder() .setTracerProvider(sdkTracerProvider) .setPropagators(ContextPropagators.create(TextMapPropagator.composite( JaegerPropagator.getInstance()))) .buildAndRegisterGlobal(); -
You can also set multiple trace context propagation formats.
// Use W3C Trace Context, B3, and Jaeger as the trace context propagation formats.
OpenTelemetry openTelemetry = OpenTelemetrySdk.builder()
        .setTracerProvider(sdkTracerProvider)
        .setPropagators(ContextPropagators.create(TextMapPropagator.composite(
                W3CTraceContextPropagator.getInstance(),
                B3Propagator.injectingMultiHeaders(),
                B3Propagator.injectingSingleHeader(),
                JaegerPropagator.getInstance())))
        .buildAndRegisterGlobal();
-
-
-
Import okhttp3 and opentelemetry-okhttp.
The
opentelemetry-okhttp-3.0plugin for OkHttp automatically instruments your application by intercepting all network requests sent through OkHttp3 and creating traces.-
Add the following two dependencies to the
build.gradlefile.dependencies { ... implementation 'io.opentelemetry.instrumentation:opentelemetry-okhttp-3.0:2.3.0-alpha' implementation 'com.squareup.okhttp3:okhttp:4.12.0' } -
Create
OkHttpConfiguration.import io.opentelemetry.api.OpenTelemetry; import io.opentelemetry.instrumentation.okhttp.v3_0.OkHttpTelemetry; import okhttp3.Call; import okhttp3.OkHttpClient; public class OkHttpConfiguration { //Use this Call.Factory implementation for making standard http client calls. public Call.Factory createTracedClient(OpenTelemetry openTelemetry) { return OkHttpTelemetry.builder(openTelemetry).build().newCallFactory(createClient()); } //your configuration of the OkHttpClient goes here: private OkHttpClient createClient() { return new OkHttpClient.Builder().build(); } }
-
-
Use OkHttp3 to send a network request to the server.
private void callHttpService() throws IOException { Tracer tracer = OpenTelemetryUtil.getTracer(); // Create a span. Span span = tracer.spanBuilder("AsyncRequestZipkinServer").startSpan(); System.out.println("AsyncRequestZipkinServer TraceID: " + span.getSpanContext().getTraceId()); System.out.println("AsyncRequestZipkinServer SpanID: " + span.getSpanContext().getSpanId()); try (Scope scope = span.makeCurrent()) { // Send a network request, for example, by using OkHttp. OkHttpConfiguration configuration = new OkHttpConfiguration(); Call.Factory tracedClient = configuration.createTracedClient(GlobalOpenTelemetry.get()); Request request = new Request.Builder().url("${ServerAddress}").get().build(); Call call = tracedClient.newCall(request); try (Response response = call.execute()) { // Process the response. String responseBody = response.body().string(); System.out.println(responseBody); } catch (IOException e) { // Handle the error. e.printStackTrace(); } } finally { span.end(); } } -
On the Trace Explorer page, view the end-to-end trace between the client and the server.
AsyncRequestZipkinServeris the Android application andzipkin-demo-serveris the server-side application.