To send and receive messages with ApsaraMQ for RocketMQ HTTP SDKs, you need four resources: an instance, a topic, a group ID, and an HTTP endpoint. This guide walks you through creating each resource in the ApsaraMQ for RocketMQ console.
Prerequisites
Before you begin, make sure that you have:
Network access constraints
Review these constraints before you create resources:
| Constraint | Details |
|---|---|
| Region and instance scope | A topic is accessible only by producers and consumers whose group is created in the same region and instance. For example, a topic on Instance A in the China (Hangzhou) region is accessible only to groups on Instance A in China (Hangzhou). |
| Protocol matching | TCP endpoints work only with TCP client SDKs. HTTP endpoints work only with HTTP client SDKs. Do not mix protocols. |
| Endpoint types | Both public and private endpoints are available for TCP and HTTP in all regions. |
Endpoint selection:
Production environments: Use a VPC-based private endpoint.
Cross-region access, on-premises data centers, or Internet access (when CEN is unavailable): Use a public endpoint. Outbound traffic fees apply. For details, see Internet traffic fee.
Step 1: Create an instance
An instance is a virtual machine that hosts the ApsaraMQ for RocketMQ service. It stores your topics and group IDs.
Log on to the ApsaraMQ for RocketMQ console.
In the left-side navigation pane, click Instances.
In the top navigation bar, select a region. Example: China (Hangzhou).
On the Instances page, click Create Instance.
In the Create Message Queue for Apache RocketMQ Instance panel, configure the following parameters, and then click OK.
Parameter Description Instance Type Select Standard Edition or Enterprise Platinum Edition. For billing details, see Billing overview. Name A descriptive name for the instance. Example: rocketmq-order-prodDescription A brief description of the instance purpose. Example: Order processing messages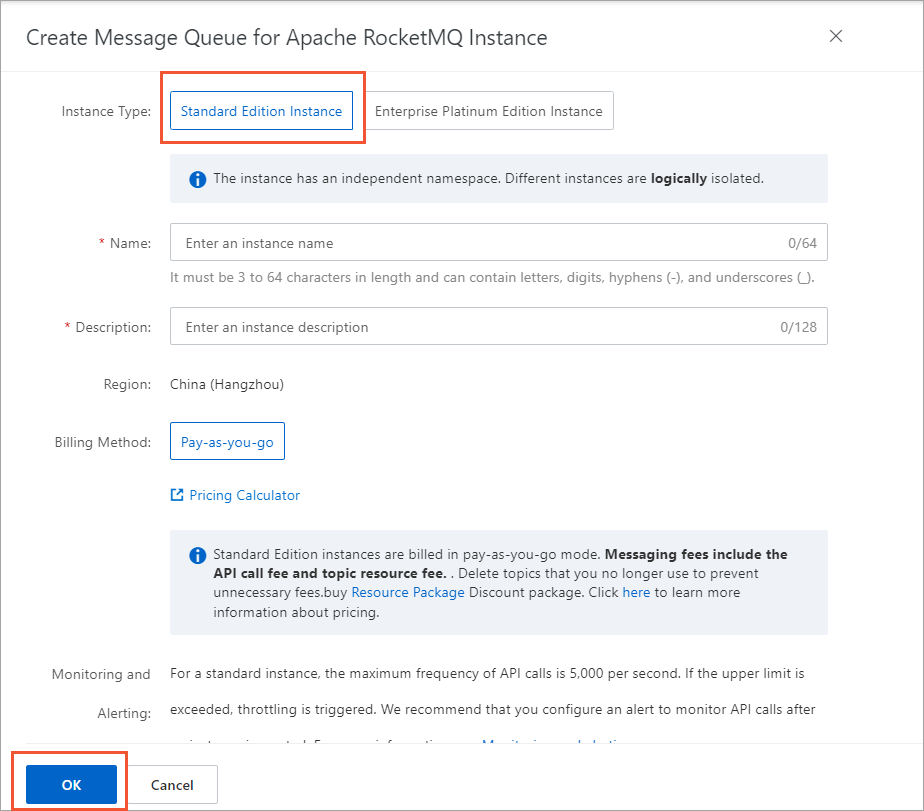
Result: The new instance appears on the Instances page.
Step 2: Create a topic
A topic is a first-level message category. Producers send messages to a topic, and consumers subscribe to that topic to receive them. For example, you can create a topic named Topic_Trade for transactional messages.
Topic rules:
| Rule | Details |
|---|---|
| Instance-scoped | A topic belongs to a single instance. A topic created on Instance A is not available on Instance B. |
| Unique names | Topic names must be unique within an instance. |
| Single message type | Each topic supports only one message type. Create separate topics for different message types. |
Message type examples:
| Topic name | Message type |
|---|---|
| Topic A | Normal messages |
| Topic B | Transactional messages |
| Topic C | Scheduled and delayed messages |
For details on message types, see Message types.
Create the topic:
On the instance details page, click Topics in the left-side navigation pane.
On the Topics page, click Create Topic.
In the Create Topic panel, configure the following parameters, and then click OK.
Parameter Description Name A unique topic name within this instance. Example: Topic_OrderMessage Type Select Normal Message. This example uses normal messages. Description A brief description of the topic purpose. Example: Order-related messages
This example uses normal messages only. To send or receive transactional, scheduled, or delayed messages, create a separate topic with the corresponding message type.
Result: The new topic appears in the topic list with Status set to Enabled.
If Status shows Creating, refresh the page until it changes to Enabled.
Step 3: Create a group ID
A group ID identifies a set of related producers or consumers.
Group rules:
| Rule | Details |
|---|---|
| Instance limit | Each instance supports up to 1,000 groups. Reuse existing groups or delete unused ones when possible. To increase this limit, contact ApsaraMQ for RocketMQ technical support. |
| Instance-scoped | A group belongs to a single instance. A group created on Instance A is not available on Instance B. |
| Consumer requirement | A group ID is required for each consumer. It is optional for producers. |
| Protocol separation | Consumer groups can consume messages over HTTP or TCP, and different consumer groups can use different protocols. Create separate groups for TCP and HTTP protocols. Using different protocols within the same consumer group can cause message consumption failures, duplication, or loss. For details, see Manage groups. |
Changing the protocol used by consumers in a group takes approximately 1 to 2 hours. If consumers use a protocol that differs from the one displayed in the console, console data may be inaccurate, but messaging is not affected. Contact technical support to update the displayed protocol.
Create the group:
On the instance details page, click Groups in the left-side navigation pane.
On the Groups page, choose HTTP > Create Group.
In the Create Group for HTTP Protocol panel, configure the following parameters, and then click OK.
Parameter Description Group ID A unique group identifier. Example: GID_Order_HTTPDescription A brief description of the group purpose. Example: HTTP consumers for order messages
Result: The new group ID appears in the group list.
Step 4: Get the HTTP endpoint
After you create all resources, get the HTTP endpoint to connect your application to the ApsaraMQ for RocketMQ broker.
On the instance details page, click Instance Details in the left-side navigation pane.
On the Instance Details page, click the Endpoints tab.
In the HTTP Endpoint section, hover over the endpoint and click to copy it.
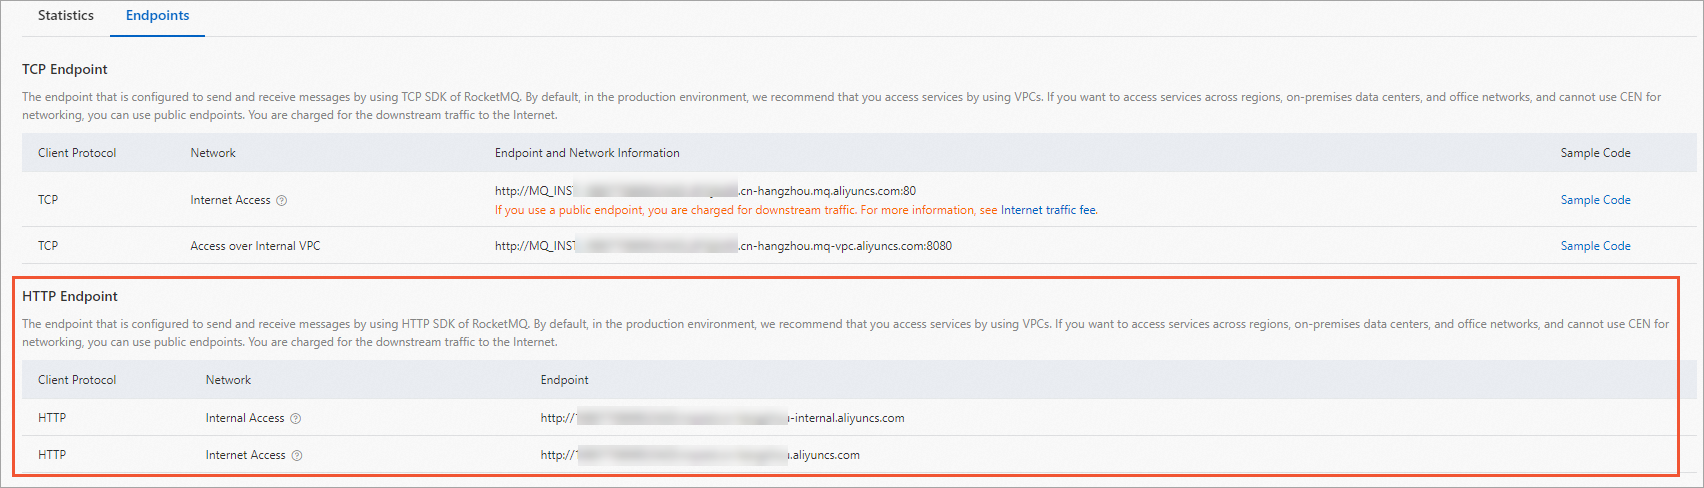
The HTTP endpoint and TCP endpoint of the same instance cannot be used interchangeably. If you use an HTTP client SDK, you must use the HTTP endpoint. The HTTP endpoint is region-specific. Specify both the endpoint and the instance ID in your code before sending or receiving messages.
Result: The HTTP endpoint is copied to your clipboard. Save it for use in your SDK configuration.
What to do next
With all resources created, start sending and receiving messages: