This topic describes how to use a source connector of Kafka Connect to synchronize data from a MySQL database to an ApsaraMQ for Kafka instance.
Background information
Kafka Connect is used to import data streams to and export data streams from ApsaraMQ for Kafka. Kafka Connect uses various source connectors to import data from third-party systems to ApsaraMQ for Kafka brokers and various sink connectors to export data from ApsaraMQ for Kafka brokers to third-party systems.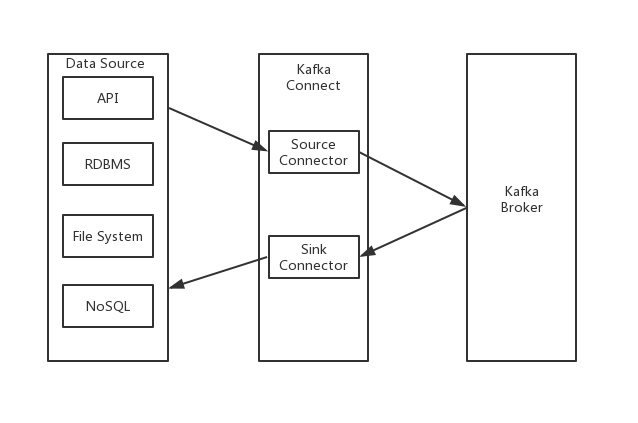
Prerequisites
Before you use a source connector of Kafka Connect to synchronize data, make sure that the following operations are performed:
Step 1: Configure Kafka Connect
Decompress the downloaded MySQL source connector package to the specified directory.
In the connect-distributed.properties configuration file of Kafka Connect, specify the installation path of the MySQL source connector.
plugin.path=/kafka/connect/pluginsImportantIn earlier versions of Kafka Connect, the plugin.path parameter is not supported. You must specify the path by using the CLASSPATH parameter.
export CLASSPATH=/kafka/connect/plugins/mysql-connector/*
Step 2: Start Kafka Connect
After the connect-distributed.properties configuration file is configured, select one of the following methods to start Kafka Connect:
Access from the Internet
Run the
export KAFKA_OPTS="-Djava.security.auth.login.config=kafka_client_jaas.conf"command to configure java.security.auth.login.config.Run the
bin/connect-distributed.sh config/connect-distributed.propertiescommand to start Kafka Connect.
Access from a virtual private cloud (VPC)
Run the
bin/connect-distributed.sh config/connect-distributed.propertiescommand to start Kafka Connect.
Step 3: Install MySQL
Download the docker-compose-mysql.yaml file.
Run the following commands to install MySQL:
export DEBEZIUM_VERSION=0.5
docker-compose -f docker-compose-mysql.yaml up
Step 4: Configure MySQL
Add the following content to the configuration file to enable binary logging for MySQL and specify row as the binary logging mode:
[mysqld]
log-bin=mysql-bin
binlog-format=ROW
server_id=1
Run the following command to grant permissions to the MySQL user:
GRANT SELECT, RELOAD, SHOW DATABASES, REPLICATION SLAVE, REPLICATION CLIENT ON *.* TO 'debezium' IDENTIFIED BY 'dbz';NoteIn this example, the name of the MySQL user is debezium and the password is dbz.
Step 5: Start the MySQL source connector
Download the register-mysql.json file.
Configure the register-mysql.json file.
Access from a VPC
## The endpoint of the ApsaraMQ for Kafka instance. You can obtain the endpoint in the ApsaraMQ for Kafka console.
## The default endpoint that you obtained in the ApsaraMQ for Kafka console.
"database.history.kafka.bootstrap.servers" : "kafka:9092",
## You must create a topic that has the same name as the specified topic in the MySQL database in the ApsaraMQ for Kafka console in advance. In this example, a topic named server1 is created.
## All table changes are recorded in topics named in the format of server1.$DATABASE.$TABLE, such as server1.inventory.products.
## Therefore, you must create all related topics in the ApsaraMQ for Kafka console in advance.
"database.server.name": "server1",
## Schema changes are recorded in this topic.
## You must create this topic in the ApsaraMQ for Kafka console in advance.
"database.history.kafka.topic": "schema-changes-inventory"
Access from the Internet
## The endpoint of the ApsaraMQ for Kafka instance. You can obtain the endpoint in the ApsaraMQ for Kafka console. Schema changes of the database are stored on the ApsaraMQ for Kafka broker.
## The SSL endpoint that you obtained in the ApsaraMQ for Kafka console.
"database.history.kafka.bootstrap.servers" : "kafka:9092",
## You must create a topic that has the same name as the specified topic in the MySQL database in the ApsaraMQ for Kafka console in advance. In this example, a topic named server1 is created.
## All table changes are recorded in topics named in the format of server1.$DATABASE.$TABLE, such as server1.testDB.products.
## Therefore, you must create all related topics in the ApsaraMQ for Kafka console in advance.
"database.server.name": "server1",
## Schema changes are recorded in this topic.
## You must create this topic in the ApsaraMQ for Kafka console in advance.
"database.history.kafka.topic": "schema-changes-inventory",
## Specify the following configurations to enable SSL-based Internet access:
"database.history.producer.ssl.truststore.location": "kafka.client.truststore.jks",
"database.history.producer.ssl.truststore.password": "KafkaOnsClient",
"database.history.producer.security.protocol": "SASL_SSL",
"database.history.producer.sasl.mechanism": "PLAIN",
"database.history.consumer.ssl.truststore.location": "kafka.client.truststore.jks",
"database.history.consumer.ssl.truststore.password": "KafkaOnsClient",
"database.history.consumer.security.protocol": "SASL_SSL",
"database.history.consumer.sasl.mechanism": "PLAIN",
After you configure the register-mysql.json file, you must create the related topics in the ApsaraMQ for Kafka console based on the configurations. For more information, see Step 1: Create a topic.
In the example of this topic, the database:inventory database is created in advance in MySQL. The database contains the following tables:
customers
orders
products
products_on_hand
You must create the following topics by calling the CreateTopic operation based on the preceding configurations:
server1
server1.inventory.customers
server1.inventory.orders
server1.inventory.products
server1.inventory.products_on_hand
Based on the configurations in the register-mysql.json file, schema changes need to be stored in schema-changes-testDB. Therefore, you must create the schema-changes-inventory topic by calling the CreateTopic operation. For information about how to create a topic by calling the CreateTopic operation, see CreateTopic.
Run the following command to start the MySQL source connector:
curl -i -X POST -H "Accept:application/json" -H "Content-Type:application/json" http://localhost:8083/connectors/ -d @register-mysql.json
Verify the result
Perform the following steps to check whether ApsaraMQ for Kafka can receive data from MySQL:
Modify the data of a table in MySQL.
Log on to the ApsaraMQ for Kafka console. On the Message Query page, query the changed data.