This topic describes how to create a metadata import task in the ApsaraMQ for Kafka console to migrate the metadata of a self-managed Apache Kafka cluster to an existing ApsaraMQ for Kafka instance.
Prerequisites
Java Development Kit (JDK) 8 is downloaded and installed. For more information, see Java Downloads.
An ApsaraMQ for Kafka instance is purchased and deployed.
NoteFor information about the specifications to purchase, see Step 1: Evaluate specifications.
Limits
You cannot create metadata import tasks for serverless ApsaraMQ for Kafka instances.
Background information
The metadata of a self-managed Apache Kafka cluster consists of the configurations of topics and groups in the cluster. The metadata of a self-managed Apache Kafka cluster is stored in ZooKeeper. Each node of the self-managed Apache Kafka cluster obtains the most recent metadata of the cluster from ZooKeeper. This way, the metadata that is exported from each node of the cluster is consistent and up-to-date. You can export the metadata of a self-managed Apache Kafka cluster to a JSON file and then import the JSON file to another self-managed Apache Kafka cluster to back up the metadata of the self-managed Apache Kafka cluster.
Metadata migration refers to the process of migrating metadata from a self-managed Apache Kafka cluster to an ApsaraMQ for Kafka instance. You can export the metadata of a self-managed Apache Kafka cluster and then import the metadata to an ApsaraMQ for Kafka instance. When you create the metadata migration task, ApsaraMQ for Kafka parses the imported metadata and allows you to configure topics and groups in a visualized manner. After the metadata migration task is created, you can create topics and groups on the destination ApsaraMQ for Kafka instance to migrate the metadata of the self-managed Apache Kafka cluster to the cloud.
Step 1: Evaluate specifications
If you use the specification evaluation feature provided by ApsaraMQ for Kafka, the ApsaraMQ for Kafka console recommends specifications based on the information of the self-managed Apache Kafka cluster.
Log on to the ApsaraMQ for Kafka console. In the Resource Distribution section of the Overview page, select the region where the ApsaraMQ for Kafka instance that you want to manage resides.
In the left-side navigation pane, click Migration. On the page that appears, click the Metadata Import tab.
On the Metadata Import tab, click Evaluation.
In the Evaluation panel, enter the information about the self-managed Apache Kafka cluster and obtain the recommended specifications for the destination ApsaraMQ for Kafka instance. The following table describes the parameters in the Evaluate Specifications panel.
Parameter
Description
Example
Major Version
The Kafka version that is used in your self-managed Apache Kafka cluster.
0.10.x
Migration from IDC
Specifies whether to migrate data from an Internet data center (IDC).
Yes
Maximum Cluster Traffic
The maximum traffic for message production or consumption. Unit: MB/s.
20
Public Network Traffic
The Internet traffic. If you do not need to access the Internet, enter 0. Unit: MB/s.
0
SSD
Specifies whether the disk is a solid state drive (SSD).
Yes
Disk Capacity
The disk capacity. Unit: GB.
500
Partitions
The total number of partitions in the topics that you want to migrate.
800
Replicas
The number of replicas for a topic.
3 Replicas
Scenario
The scenario in which the ApsaraMQ for Kafka instance is used for message production and consumption.
Business Message
Response Latency
The requirements on the response latency (RT) of message production and consumption.
No Special Requirements
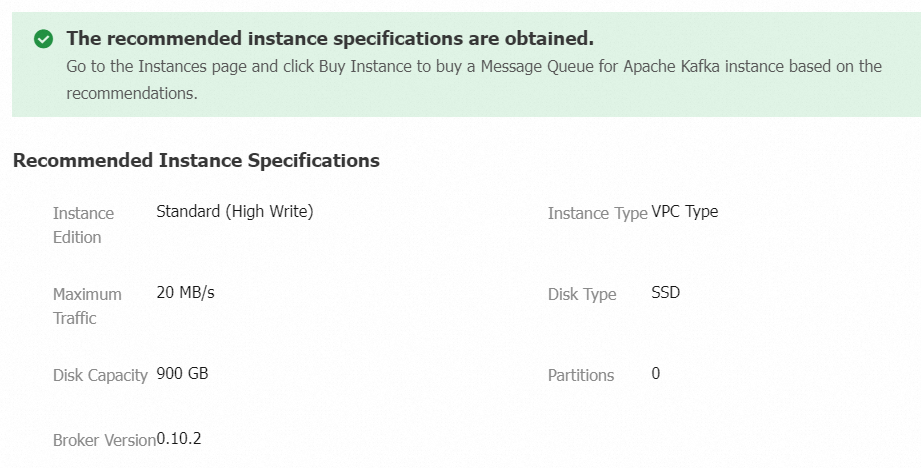
After you configure the preceding parameters, click OK. The recommended specifications for the ApsaraMQ for Kafka instance are displayed in the Recommended Instance Specifications section of the Evaluation panel.
Step 2: Export the metadata
Use the metadata export tool to export the metadata of the self-managed Apache Kafka cluster.
Download the metadata export tool from the following link: kafka-migration-assessment.jar.
Upload the file that contains the metadata export tool to your self-managed Apache Kafka cluster.
Run the following command to grant the executable permission on the JAR file:
chmod 777 kafka-migration-assessment.jarRun the following command to export the metadata of the self-managed Apache Kafka cluster:
java -jar kafka-migration-assessment.jar MigrationFromZk --sourceZkConnect <yourHost:yourPort> --sourceBootstrapServers <yourHost:yourPort> --targetDirectory <yourDirectoryName> --fileName <yourFileName> --commitParameter
Description
Example
sourceZkConnect
The IP address and port of the ZooKeeper node on which the self-managed Apache Kafka cluster is deployed. If you do not configure this parameter, the metadata export tool automatically obtains the IP address and the port number.
192.168.XX.XX:2181
sourceBootstrapServers
The IP address and port of the self-managed Apache Kafka cluster. If you do not configure this parameter, the metadata export tool automatically obtains the IP address and the port number.
192.168.XX.XX:9092
targetDirectory
The directory in which you want to store the metadata file. If you do not configure this parameter, the metadata file is exported to the current directory by default.
../home/
fileName
The name of the metadata file. If you do not configure this parameter, the default name kafka-metadata-export.json is used.
metadata.json
commit
Commits the task.
commit
installTsar
Specifies whether to install Taobao System Activity Reporter (Tsar). By default, Tsar is not automatically installed.
Tsar can be used to obtain accurate information about the specifications of the machine that is used to run the self-managed Apache Kafka cluster and the recent memory usage, traffic usage, and configurations of the cluster. The automatic installation of Tsar requires a long period of time to complete and may fail if the environment is incompatible.
None
evaluate
Specifies whether to obtain the information about the specifications of the machine that is used to run the self-managed Apache Kafka cluster and the recent memory usage, traffic, and configurations of the cluster for specification evaluation. Valid values: true and false. Default value: true. If you set this parameter to true, the ApsaraMQ for Kafka console evaluates and recommends the specifications of the ApsaraMQ for Kafka instance to which the metadata is migrated.
If you do not want to use the specification evaluation feature, set this parameter to false.
None
After you export the metadata, the system generates a JSON file in the specified directory.
View the metadata file in the specified directory. You also can download and save the file to your on-premises machine.
Step 3: Create a metadata import task
Log on to the ApsaraMQ for Kafka console. In the Resource Distribution section of the Overview page, select the region where the ApsaraMQ for Kafka instance that you want to manage resides.
In the left-side navigation pane, click Migration. On the page that appears, click the Metadata Import tab.
On the Metadata Import tab, click Create Task.
In the Create Metadata Import Task panel, configure the parameters and click Create.
In the Create Task step, configure the Task Name and Destination Instance parameters and upload the metadata file that is obtained in Step 2: Export the metadata.
In the Edit Topic step, perform the following operations:
Add a topic: Click Add Topic. In the panel that appears, configure the Name, Description, Partitions, and Message Type parameters.
Modify a topic: Find the topic that you want to modify and click Modify in the Actions column. In the panel that appears, configure the Description, Partitions, Message Type, and Log Cleanup Policy parameters.
Delete a topic: Find the topic that you want to delete and click Delete in the Actions column. In the Note message, click OK.
In the Edit Group step, perform the following operations:
Add a group: Click Add Group. In the panel that appears, configure the Group ID and Description parameters.
Modify a group: Find the group that you want to modify and click Modify in the Actions column. In the panel that appears, configure the Description parameter.
Delete a group: Find the group that you want to delete and click Delete in the Actions column. In the Note message, click OK.
After the metadata import task is created, you can view the migration progress of the topics and groups in the Topic Migration Progress and Group Migration Progress columns on the Migration page. You can also click Details in the Actions column to view the details of the metadata import task.
Step 4: View the migration result
Log on to the ApsaraMQ for Kafka console. In the Resource Distribution section of the Overview page, select the region where the ApsaraMQ for Kafka instance that you want to manage resides.
In the left-side navigation pane, click Instances.
On the Instances page, click the name of the instance that you want to manage.
View the topics and groups on the instance.
In the left-side navigation pane, click Topics. On the page that appears, view the created topics on the instance.
In the left-side navigation pane, click Groups. On the page that appears, view the created groups on the instance.